Store
Contents
Setup Your Store
Set-up Shipping Options
The Shipping functions allow you to set the shipping fees associated to a sale. First step is to setup pricing tiers, second is to associate those tiers to a shipping option. Access the Shipping Options via Setup > Finance > Shipping.
Set Price Tiers
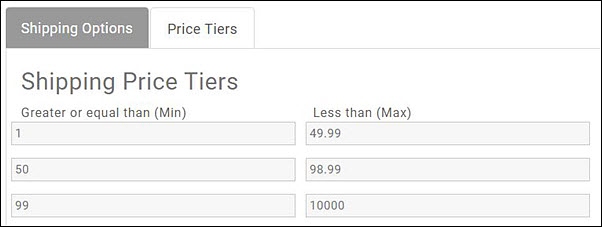
The Price Tiers screen is where you can set up your shipping price thresholds. Each item in the Price Tier is a price range with a minimum and a maximum value.
- Click Setup in the Navigation Panel.
- Click Shipping in the Finance section.
- Click the Price Tiers tab.
- To add a price tier, click the + button.
- Greater or equal than (Min) - Enter the minimum purchase dollar amount that will qualify for a designated shipping price.
- Less than (Max) - Enter the maximum purchase dollar amount that will qualify for a designated shipping price.
- Repeat the steps above to add all price tiers.
- Click Save.
Set Shipping Options
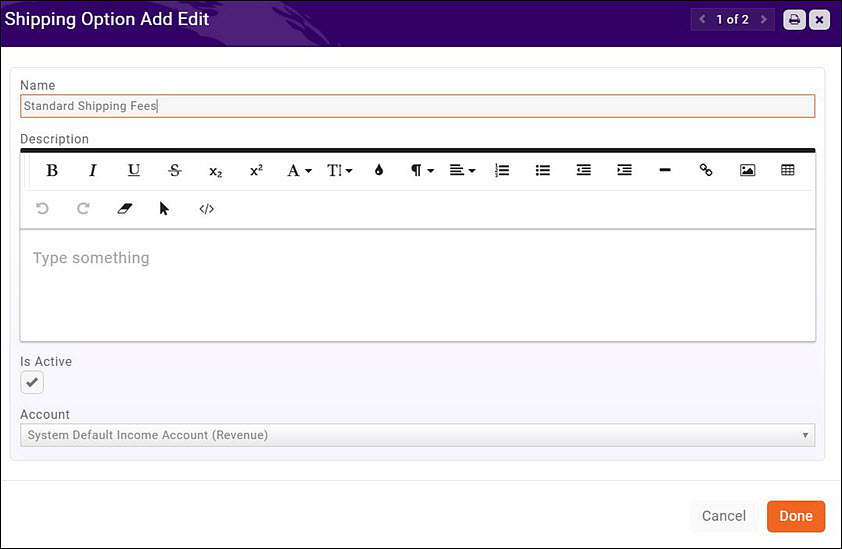
On the Shipping Options tab you will create a set of shipping options, associate the price tiers, and assign the shipping cost for each tier. You may have multiple shipping option sets, for example you may have options for ground shipping, air shipping, pick up in store and so on. All of the shipping option sets that you create will automatically be available in your store at checkout.
- Click the Shipping Options tab.
- Click the Add button.
- Enter a Name for the Shipping Option set.
- Enter a Description of the set.
- Select the Is Active check-box to be able to select this set.
- Account - Select the account to which the shipping revenue should assigned.
- Click Done.
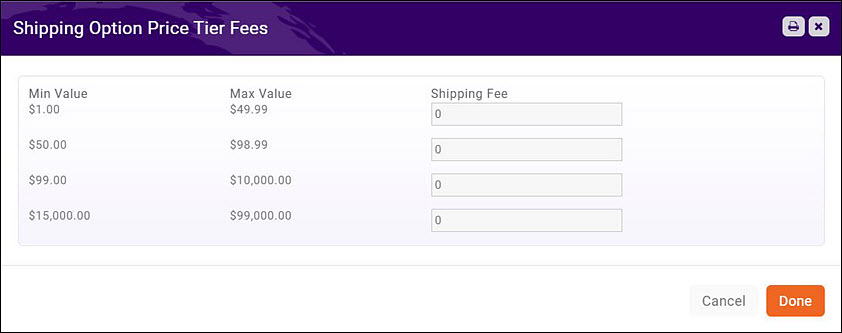
- Click the Setup Shipping Options Tiers icon

- Enter the Shipping Fee you wish to associate to each tier.
- Click Done.
Set Store General Settings
- Click Store in the Navigation Panel.
- Click the Settings tab.
- The Entire Url will be initially blank. Once you have created the page to be added to your website, the URL will be populated.
- Store Description - The Store Description will be displayed at the top of your store page.
- Payment Gateway: If using an alternate payment gateway for your store, select it from the list. If no payment gateway is selected, your default gateway will be used.
- Click Done.
Adding the Store to your Web-site
To add the store to your web-site, you will first configure the web-site page through the back office. Once the page has been configured you will add it to your web-site.
Back-office Setup Store page setup
- Click Setup.
- Click Sites in the Website/Content Management System section.
- Click the Actions button for your website
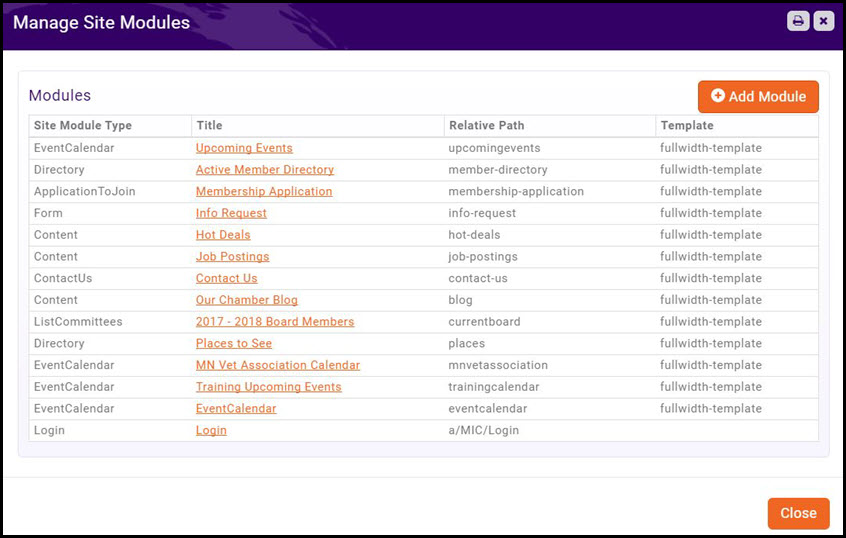
- Click Modules/Pages.
- Click the Add Module button.
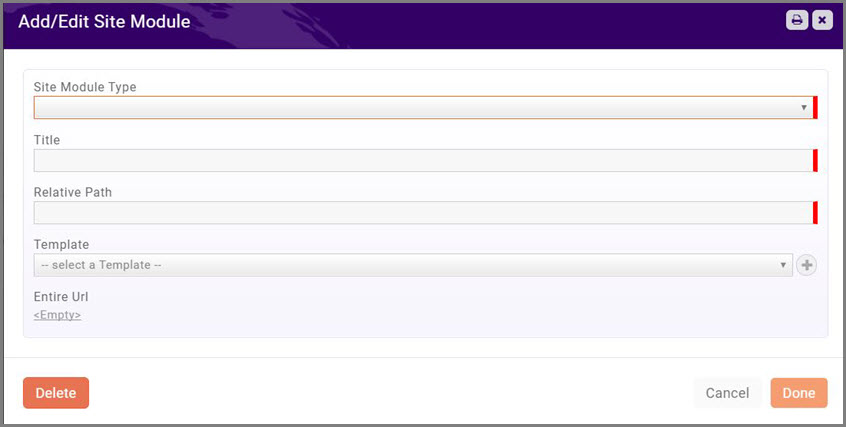
- Configure the following:
- Site Module Type: Select Store from the drop-down list.
- Enter the Title for the Module - this title will be displayed on your web-site
- Enter the Relative Path to your store. The relative path is the final portion of the URL. The system will automatically build the full path and display in the Entire URL setting once you have save the page.
- Select the Template you wish to use for your store from the drop-down list.
- Click Done.
- In the list of modules displayed, click the hyper-link for the store page you just created. Copy the URL for the store.
Add Page to Web-site
- Launch your web-site.
- In Edit mode, click the Dashboard icon
 in the upper left corner.
 - Click Menus.
- Click the drop-down arrow next to Custom Links.
- Paste the URL to your store in the URL text box.
- Enter the name for this menu item in the Link Text text-box.
- Click Add to Menu. You new page menu item will be added to the menu structure shown to the right. You can re-position where it will be in the menu structure by dragging and moving it to the desired location.
- Click Save Menu.
Setup Goods/Services Items for Store Products
Goods and Services allow you to define the fee items associated to the products you will sell in your store.
- Click Setup in the Navigation panel.
- Click Goods/Services in the Services, Products and Commerce section. A list of Goods/Services currently configured in your system will be displayed.
- Click the New button.
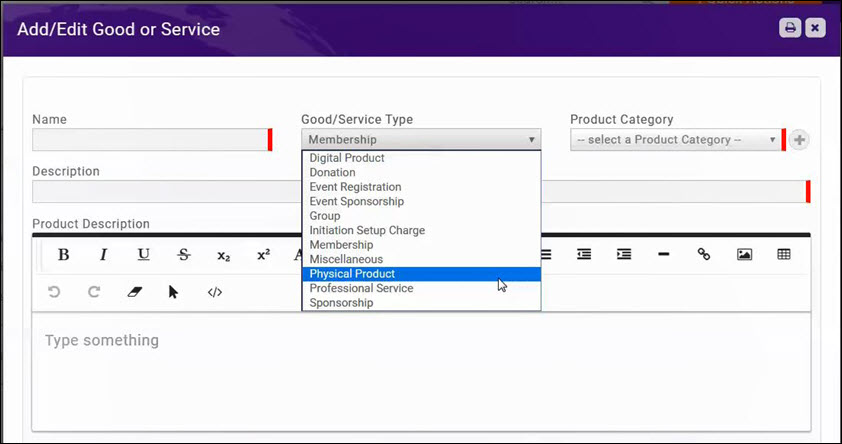
- On the Add/Edit Good or Service screen, configure the following:
- Name - Provide a name for the good/service. This will be displayed when you are selecting goods or services.
- Good/Service Type - Select a type from the drop-down list. Type will drive the goods/service items that may be selected when setting up the products in your store. Physical Product and Digital Product are store items.
- Product Category - Select a product category from the drop-down list. Product Category is used for filtering and reporting. To add a new product category, click the + sign.
- Description - Enter a description of the good/service. This description is displayed in the Goods/Services list.
- Product Description - The Product Description is displayed on the web when this good/service is used. The standard word processing for formatting your text (i.e. bolding, italiczing, etc.) are available. You may also add links and images to the description.
- Price Period - Select one-time for store products.
- Default Price - Enter a default price for this good/service. This price may be over-ridden when you are assigning the good/service.
- Default Quantity - Enter the default quantity for this good/service. This would be used if a minimum purchase for this good/service is required, and may be overridden when you are assigning the good/service.
- Accounting Type - Select either Cash or Accrual.
- Revenue Recognition Type - Select how you will recognize the revenue for this good/service.
- Income Account - Select the income account for this good/service. The drop-down list will be populated with the income accounts currently configured in your Chart of Accounts. You may add a new account by clicking the + sign. If you are unsure as to which account should be selected you will want to check with your accountant, as this will affect your financial statements.
- Receivables Account - Select the accounts receivable account for this good/service.The drop-down list will be populated with the receivables account configured in your Chart of Accounts.
- Deferred Income Account - Select the deferred income account for this good/service. The drop-down list will be populated with the deferred income accounts configured in you Chart of Accounts.
- Deposit Account - Select the deposit account for this good/service. The drop-down list will be populated with the deposit accounts configured in your Chart of Accounts.
- Default Revenue Recognition Months - If the revenue for this good/service will be recognized over a period of time, enter the default number of months over which the revenue will be recognized.
- Product Tax Category - If this good/service is taxable, select the appropriate product tax category. The drop-down list will be populated with tax categories currently configured in your system. If you wish to add a new product tax category, click the + button.
- Tax Set - If this good/service is taxable, select the appropriate tax set.
- Is Recurring Fee (vs. one-time) - Does not apply to store purchases.
- Invoice Template - Select the invoice template to be used for this good/service.
- Is Active - Select this check-box to activate this good/service. Only Active items may be billed.
- Click Done to save the new good/service.
Add Products to Your Store
- In the Store module, click the Products tab. A list of all products currently setup in your system will be displayed.
- Click the Add button.
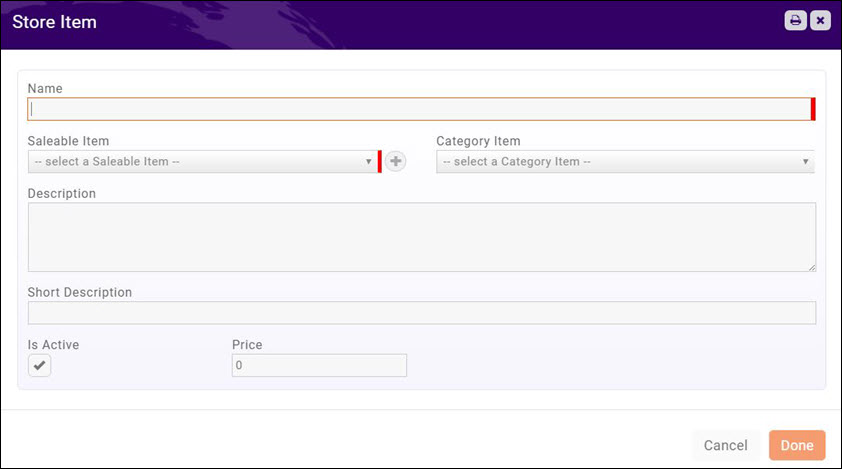
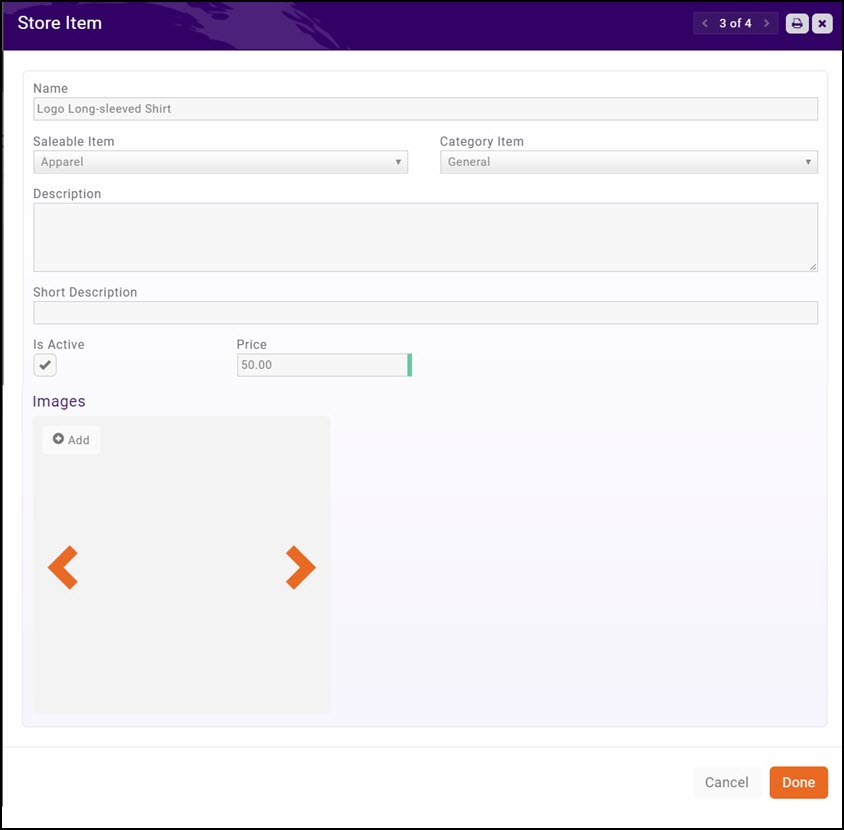
- Configure the following for your new product:
- Name - This is the name of the product that will be displayed on the public web-site.
- Saleable Item - Select the good/service fee associated to this product. Good/Services that you have created as Physical Product or Digital Product will be displayed in the drop-down. You can add a new Good/Service by clicking the + button.
- Category Item - Select a category item from the drop-down. Category will allow for reporting and filtering.
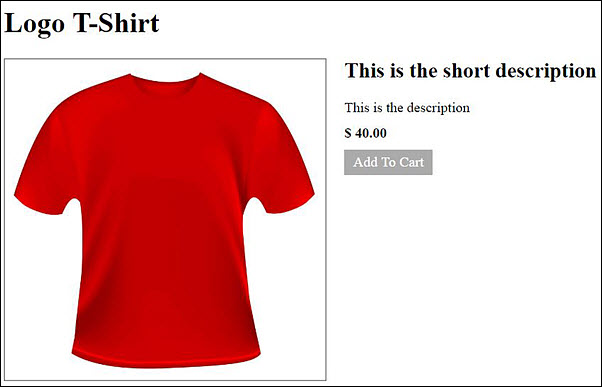
- Description - Enter a description of this product. The description will be displayed on your public web-site, when someone clicks on the item.
- Short Description - Enter a short description. The short description will be displayed above the Description when someone clicks on the item on your public web-page.
-
- Is Active - Select this check-box to display this item in your store. If the item is no longer available, you can deselect this option.
- Price - Enter the price of the item.
- Click Done.
Store Products - Digital Downloads (COMING SOON)
Via the GrowthZone Store module, you can offer digital downloads available for purchase. Perhaps you are an HBA, and sell your members access to a set of .pdf/.docx format contracts for a certain time-frame. This can easily be managed using the Store module.
Pre-requisites
- Add a digital collection or single digital file to the GrowthZone Cloud from the back office. See Working with Documents in the Cloud for instructions.
- Create a Goods/Services item, of type Digital Product. See Setup Goods/Services for instructions.
- Add the digital product to your store.
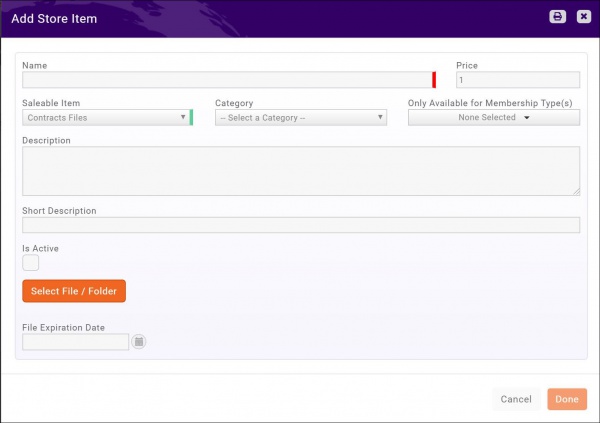
- Select the product you created of type Digital Product from the Saleable Item list.
- Click the Select File/Folder button to choose your file/folder.
- (Optional) Select a specific Membership Type that is allowed to purchase this download. If none selected, this will be available to all purchasers. NOTE: All visitors to the store will be able to view the item, but the store item can only be added to the cart after they have logged in.
- (Optional) Enter an Expiration Date for the files. When the expiration date is reached, the files will no longer be available for purchase in the store.
How Digital Downloads Works
- Customers purchase the digital product from your Store.
| NOTE: As of July 2019, to purchase digital downloads, purchasers must have or create a login account with your association. This means the contact MUST exist in your database in order for a login account to be created. If the purchaser exists in your database, he/she will be given the access level assigned to their membership type (if applicable) or the default access level you have setup for your organization. See Setup User Info Hub Login Settings for further information. In a future software update, a contact record will not need to exist in order to create a login. This will allow the general public to purchase digital downloads. |
- Upon checkout the customer will see an online message about their digital purchase with a link to the Info Hub to access the file(s) and instructions.
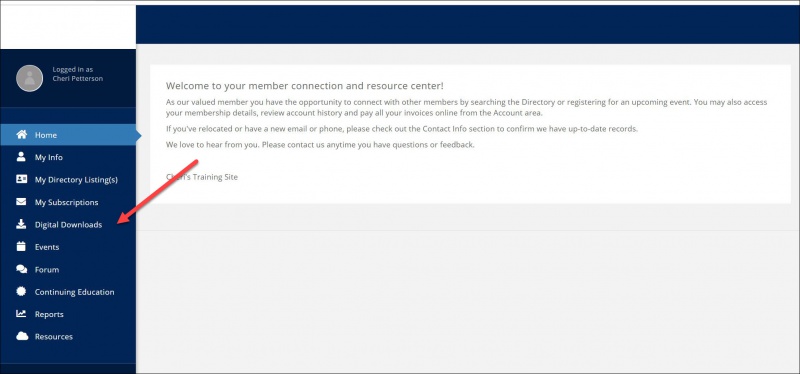
- Within the Info Hub, a left-hand navigation called Digital Downloads will be displayed.
- By clicking Digital Downloads, the purchaser will see a list of the the downloadable products they have purchased, and can click the
 in the Actions column to download the file.
Revoking Access to Digital Downloads
In the case of refunds or mistakes, you have the ability to revoke access to the digital downloads.
- In the Store module, click the Digital Downloads Access tab. A list of all digital downloads that have been purchased will be displayed.
- To revoke access, click the
 in the Actions column.
 - Click OK to delete the purchase and revoke the purchaser's access.
Adding Image(s) to your Product
Once you have added a product to the store, you may add an image:
- On the Products tab, click the hyper-link for the product to which you wish to add an image.
- In the Images section, click the Add button.
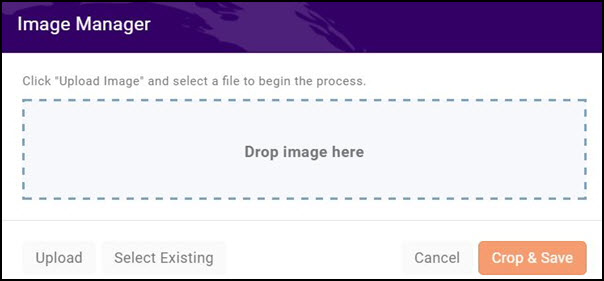
- Drag and drop the image, or click Upload to browse to the file and upload it.
- If necessary, crop the image.
- Click Crop & Save.
You may add additional images by clicking the Add button again, and completing the steps above.
Managing Store Orders
Store Order Notifications
When an order is placed, an automated message will be sent to those staff members who have subscribed to the New Store Order Created notification. Click here for details on setting up notifications.
Reviewing and Fulfilling Orders
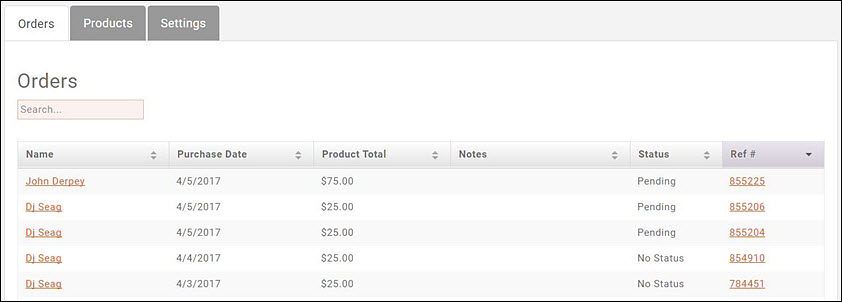
All orders placed through your store will be displayed on the Orders tab of the Store module.
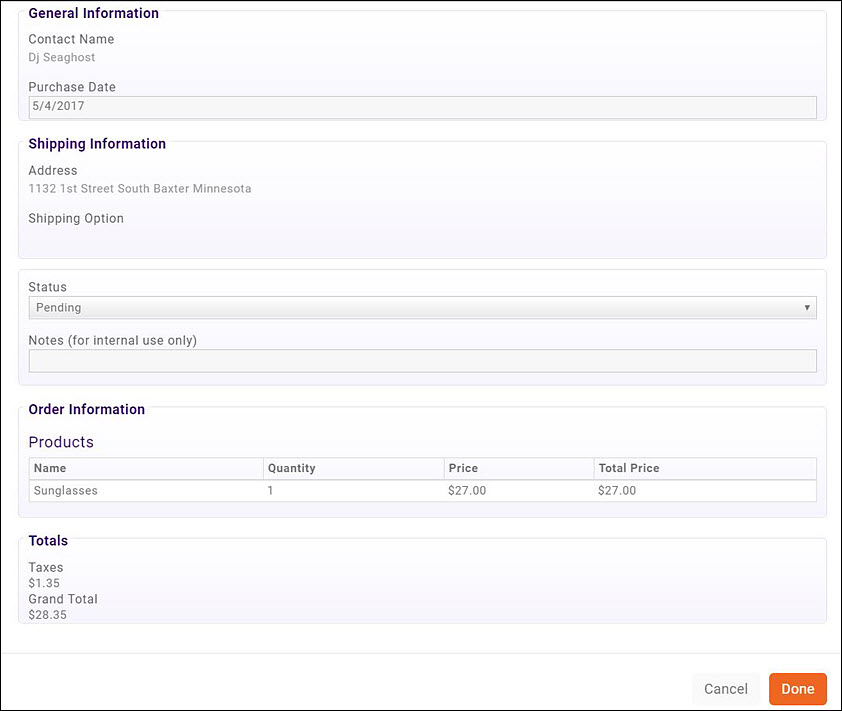
To update the status of an order once it has been fulfilled:
- Click into the Purchaser's Name on the Orders tab.
- Select Fulfilled from the Status list. If no selection is made, the order will remain in Pending.
- (Optional) Enter Notes. Notes are for internal use and may be a way to track when an order was completed, or other details.
- Click Done.
| NOTE: Orders for Digital Downloads are automatically marked as Fulfilled in your database. |
Store Reports
Several reports are available for managing and analyzing your store. See Store Reports.
