Communications Basics
Contents
Create your Signature
Creating your signature will save time when sending email correspondence. You can design your signature with both text & graphics, and easily select it when sending email correspondence.
- Click Setup in the navigation panel
- In the Communications section, click Signatures
- Click the Add Button.
- Provide a Name for the signature. You can create multiple signatures, so you will wish to provide a name that allows you to differentiate between signatures.
- In the Signature HTML text box you can customize your signature by adding your organization name, an image, a link, etc. Common word processing icons make it easy to format your signature as you desire.
- When completed, click Done.
Configure Communication Categories
Communication Categories provide a way for you to organize and filter email communications. Reports such as the Communication Report can be filtered by category to allow you to get a better understanding of the communications that are being sent.
- Click Setup in the navigation panel
- In the Communications section, click Communications Categories. A list of the current categories in the database will be displayed.
- Click the Add button to add a new category. The Add/Edit Communications Category dialog box will be displayed.
- Enter a Name for the category. This name will be displayed when you are selecting communication categories within the software so it should be descriptive and reflect the purpose of this category.
- N/A at this time
- Click Done to save the new category.
Create and Manage Email Templates
Email templates provide an easy way to respond to standard email tasks. For example, you may wish to send a thank you email to all those who have attended an event. You can create (or customize a default) template that can be used consistently for all of your events. This will allow you to efficiently send emails, and increase productivity. Email templates may also include database fields. For example, when sending an email for an event, the Event Name database field may be included in the email to customize the email to a specific event.
View Default Email Templates
There are a variety of default email templates populated in the database that you may us to meet your business needs. You may view the existing templates, and edit them as needed. NOTE: When editing a default email template, you may not change the name of the template. If you wish a template with a different name,
- Click Setup in the navigation panel
- In the Communications section, click Email Templates. A list of the default email templates will be displayed.
- Click the name of the email template you wish to view or modify. The Add/Edit Email Template dialog box will open. The following fields are displayed and may be edited:
- Name - The name of the template is displayed for selection when you are sending emails. Additionally, the name of an email may be used for filtering and reporting.
- Description - This field allows you to provide more details about this template.
- Category-The category field allows you to associate this template to specific email categories, and may also be used for filtering.
- Subject-The subject is the subject line of the email.
- Template Text-The template text is the body of the email. When editing a default template, this section is editable. You may add, delete or modify the existing content. Standard word processing functions, such as bolding, italicizing, adding attachment, etc. may be used to format the content.
- From Email Address - This field will display the from email address that will be used when you use this template. You are not able to edit this field on a default template.
- Make available to all users- this checkbox allows you to determine which users will have access to this template. You are not able to edit this field on a default template.
- Click the Close button.
Add a New Email Template
- Click Setup in the navigation panel
- In the Communications section, click Email Templates. A list of the default email templates will be displayed.
- Click the Add button.
- Configure the following:
- Name - Enter a name for the new template. This name will be displayed in the template drop-down when you are sending emails.
- Description - Enter a description of the template. This is useful if you have several templates that are similar.
- Category - Optional. Select a category from the drop-down list. Category is used for easily filtering and reporting.
- Subject - Enter the text you want to show in the subject line when you use this template.
- Template Text - Enter the email message you wish when using this template. You can customize the the message in many ways:
- Customize font and paragraphs using the standard word-processing icons such as bolding, italicizing, underlining, etc.
- Insert hyper-links and images.
- Select the Insert Merge Fields to select field from the database to be included in your message. For example, you may select Contact name from the merge fields list to enter the name of the contact (based on the email address entered in the "To" line of your email). This is especially beneficial when you are sending emails to multiple recipients.
- Select a Signature
- From Email Address - Select a from email address to be automatically assigned when this template is used. If this template will be used by multiple users, you may wish to select a generic address for your organization. The address may be changed by the user, if they wish, when they use the template.
- Make Available to Other Users - Select this check-box if all users will be given access to this template.
- Click Done.
Configure Automated Messaging
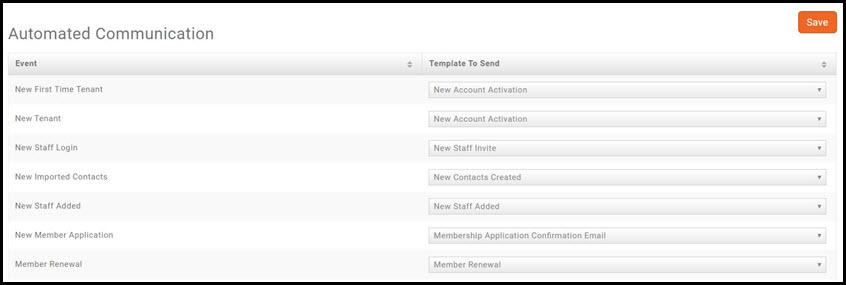
Automatic messages may be configured to be sent in response to certain actions. For Example, an automated message may be sent to a new member when they have completed the Member Application Form, or, an automatic thank you message may be sent when someone registers for the event. Your database is pre-configured with automatic messages, which you may use "as-is" or customize to meet your needs.
- Click Setup in the navigation panel
- In the Communications section, click Automated Messaging. A list of the available options for automated messages is displayed.
- You may change the default message sent for each of the available options.
- If changes are made, click the Save button to save your changes.
NOTE: Refer to Create and Manage Email Templates for details on working with email templates.
Email Settings
The Email Settings allow you to configure the unsubscribe message included in your emails. Additionally, you will find the Archive Email Address here. In order for your database to track emails that you have sent from Outlook, you will want to include this email address in the BCC line of the email. A copy of the email will then be sent to the archive address for evaluation. If the system can associate the contact to whom you sent the email to a contact in the database, your outlook email will be displayed on the communications tabs.
Lists/Committees
Sending communication via email and letters may be simplified by creating lists/committees. Additionally, you can allow your members to automatically join the lists/committees that they wish to participate in.
Add a New Email List
- Click Lists/Committees in the Navigation Panel. A listing of all lists/committees configured in your database will display. On installation of the software, common lists have been populated, such as Current Staff, Ambassadors, etc. You may use these lists as configured, or customize them to meet your needs.
- Click the Add Email List button.
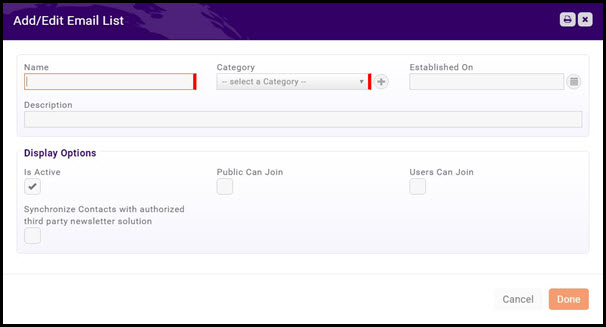
- Configure the following on the Add/Edit Email List screen:
- Name - Enter a name for the new list. Use a name that well describes this list, as it will be displayed in the To line of your emails.
- Category - Select the category to which you want to associate this list. Categorizing will make it easier to filter and report on this list.
- Established On - If you wish to track when this group list was started, enter an established on date.
- Description - Provide a description of the list (Optional).
- Display Options:
- Is Active - Select this check-box to activate this list. If the list is not activated, it will not be displayed.
- Public Can Join - Select this check-box to allow the public to join this list. If selected, the list may be displayed on your web-site.
- Users Can Join - Select this option to allow your member users to join this list. If selected, the list may be displayed on your web-site.
- Synchronize Contacts with authorized third party newsletter solution - If you are using a third party solution, such as Constant Contact, select this option to synchronize this group to your solution.
- Click Done.
Add a New Committee
- Click Lists/Committees in the Navigation Panel. A listing of all lists/committees configured in your database will display. On installation of the software, common lists have been populated, such as Current Staff, Ambassadors, etc. You may use these lists as configured, or customize them to meet your needs.
- Click the drop-down arrow on the Add Email List button, and select Add Committee.
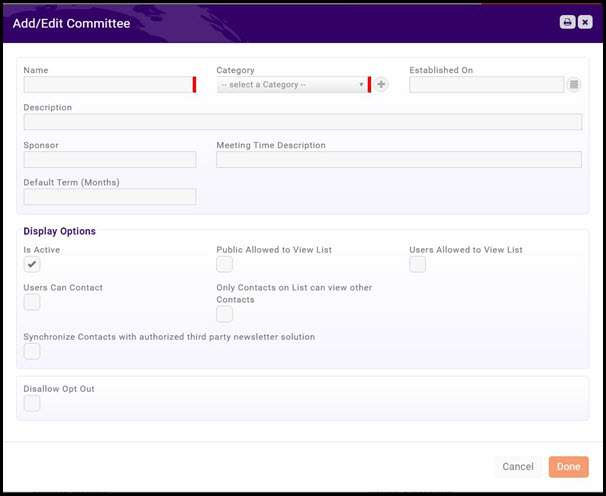
- Configure the following on the Add/Edit Committee screen:
- Name - Enter a name for the new list. Use a name that well describes this list, as it will be displayed in the To line of your emails.
- Category - Select the category to which you want to associate this list. Categorizing will make it easier to filter and report on this list.
- Established On - If you wish to track when this group list was started, enter an established on date.
- Description - Provide a description of the list (Optional).
- Sponsor - Enter the name of the committee sponsor (Optional).
- Meeting Time Description - Enter information about the meeting times for this committee.
- Default Term (Months) - Enter the default term length that members may sit on this committee (Optional).
- Display Options:
- Is Active - Select this check-box to activate this list. If the list is not activated, it will not be displayed.
- Public Can Join - Select this check-box to allow the public to join this list. If selected, the list may be displayed on your web-site.
- Users Can Join - Select this option to allow your member users to join this list. If selected, the list may be displayed on your web-site.
- Users Can Contact - Select this option if you wish to allow all users to contact members of this committee.
- Only Contacts on List can view other Contacts - Select this option if you wish to limit who can view contacts on the list to only other contacts on the list.
- Synchronize Contacts with authorized third party newsletter solution - If you are using a third party solution, such as Constant Contact, select this option to synchronize this group to your solution.
- Disallow Opt Out - Select this option if you do not wish members on the list to be able to opt out from the list.
- Display Options:
- Click Done.
Managing Lists/Committees
- Click Lists/Committees in the Navigation Panel. A listing of all lists/committees configured in your database will display.
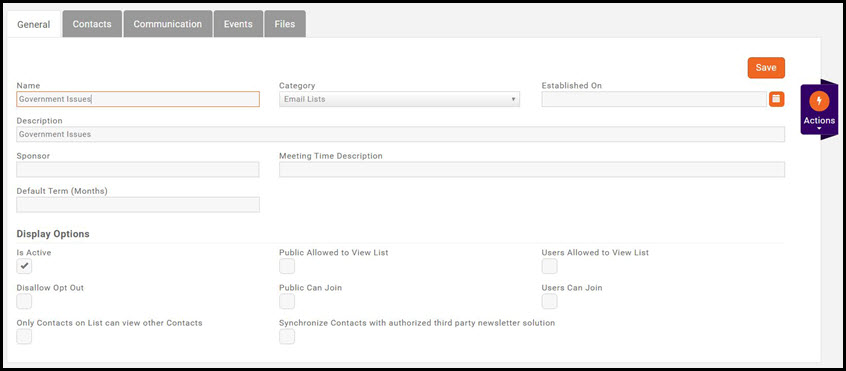
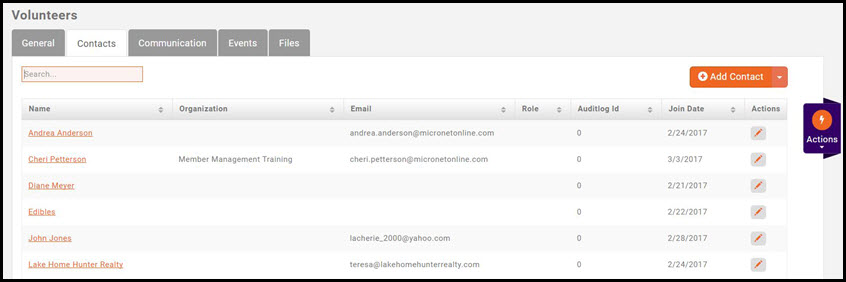
- Click the hyper-link for the list/committee you wish to work with. The List/Committee screen provides four tabs to manage the list/committee: General, Contacts, Communications, Events, and Files.
Update List/Committee General Settings
The General tab allows you to update the settings you configured when the list/committee was first created.
You can view and/or change the following settings on the General tab:
- Name - Enter a name for the new list. Use a name that well describes this list, as it will be displayed in the To line of your emails.
- Category - Select the category to which you want to associate this list. Categorizing will make it easier to filter and report on this list.
- Established On - If you wish to track when this group list was started, enter an established on date.
- Description - Provide a description of the list (Optional).
- Sponsor - Enter the name of the committee sponsor (Optional).
- Meeting Time Description - Enter information about the meeting times for this committee.
- Default Term (Months) - Enter the default term length that members may sit on this committee (Optional).
- Display Options:
- Is Active - Select this check-box to activate this list. If the list is not activated, it will not be displayed.
- Public Can Join - Select this check-box to allow the public to join this list. If selected, the list may be displayed on your web-site.
- Users Can Join - Select this option to allow your member users to join this list. If selected, the list may be displayed on your web-site.
- Users Can Contact - Select this option if you wish to allow all users to contact members of this committee.
- Only Contacts on List can view other Contacts - Select this option if you wish to limit who can view contacts on the list to only other contacts on the list.
- Synchronize Contacts with authorized third party newsletter solution - If you are using a third party solution, such as Constant Contact, select this option to synchronize this group to your solution.
- Disallow Opt Out - Select this option if you do not wish members on the list to be able to opt out from the list.
- Display Options:
Click the Save button if you have made changes.
View and/or Edit Contacts on a List/Committee
You may view and/or add contacts to a List/Committee on the Contacts tab. NOTE: You can also add individual members to list/committees from their contact page.
- Click Lists/Committee in the Navigation Panel. A list of the lists/committees currently configured in your system will be displayed.
- Click the hyper-link for the list you want to view.
- Click the Contacts tab. A list of all of the contacts in the list/committee will be displayed.
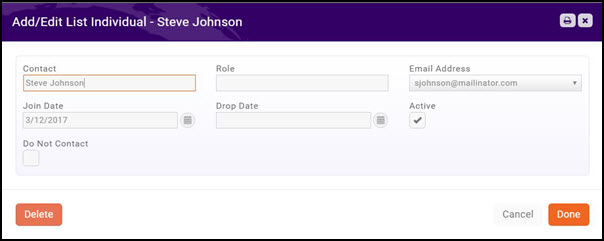
- Click the pencil icon in the actions column to edit details of a contact.
- Update the desired fields:
- You may drop a contact from this list by entering a Drop Date.
- You may deactivate this contact from the list by deselecting the Active button. This will remove the contact from the list.
- You may keep the contact in the list, but prevent emails from being sent to the contact by clicking the Do Not Contact check-box.
- Click Done.
Add Contacts to a List/Committee
- Click Lists/Committee in the Navigation Panel. A list of the lists/committees currently configured in your system will be displayed.
- Click the hyper-link for the list you want to view.
- Click the Contacts tab. A list of all of the contacts in the list/committee will be displayed.
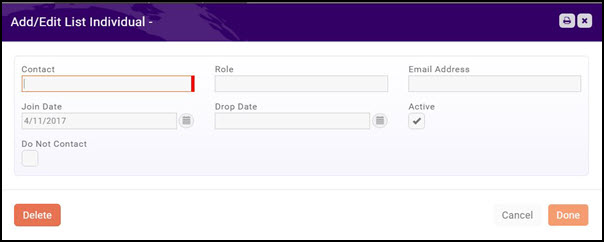
- Click the Add Contact button.
- Configure the following fields:
- Name - Enter the name of the contact. If the contact exists in your database, as you type ahead contacts that match will be displayed.
- Role - This is an optional field where you can assign a role to this contact.
- Email Address - Select the contacts email address. If an address has not been configured you will need to go to the individual contact page to enter it.
- Join Date - The join date will default to the current date. You may change this if necessary.
- Active - Select this check-box.
- Do Not Contact - if the members wishes to be on the list/committee but does not want to be contacted, click this check-box.
- Click Done.
NOTE: Contacts may be added to or removed from list/committees on their individual contact page.
FAQ
How do I add a signature to an email?
On any Send Email page select your signature from the Signature drop down list.
