Chapters
Revision as of 19:56, 18 October 2017 by Cpetterson (talk | contribs) (Created page with "=Overview= For organizations with chapters, it is valuable to manage this chapter structure, allow membership applications to be tied to a chapter, provide chapter-based publ...")
Overview
For organizations with chapters, it is valuable to manage this chapter structure, allow membership applications to be tied to a chapter, provide chapter-based public website content and manage member communication at the chapter level – all providing increased relevance to your members. The Chapters Module makes all of this happen.
Create/Manage Chapters
Setup each chapter, including the chapter name, description, the calendar you’d like assigned to the chapter (allows ability to display relevant events) and a directory the chapter is aligned. Create a list/committee that is aligned to this chapter, which will allow individuals to receive communication related to the chapter.
Create Chapters
- Select Chapters in the left hand navigation panel. A list of all the chapters currently configured in your system will be displayed.
- Click the Add button.
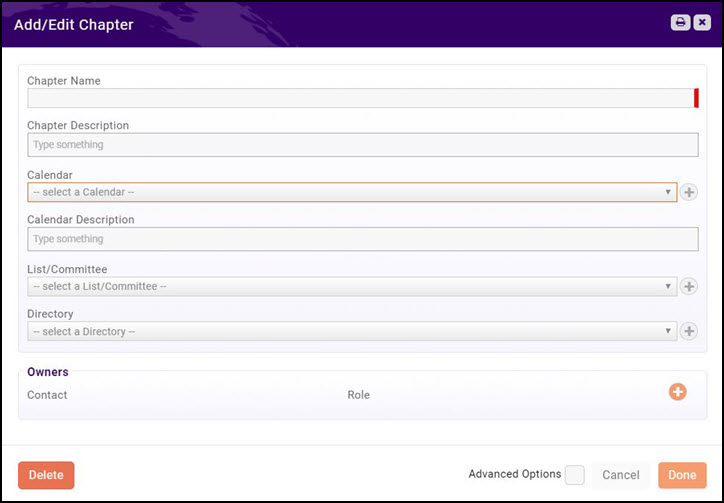
- Configure the following:
- Chapter Name - Enter the name of the chapter.
- Chapter Description - Enter a description of the chapter.
- Calendar - Select the calendar that you wish to associate to this chapter. You may select from previously created calendars in the drop-down list, or click the
 to add a new calendar. Click Here for information on creating calendars.
 - Calendar Description - (Optional) Enter a description of the calendar.
- List/Committees - Select the Lists/Committees to which contacts in this chapter will belong. Creating a list/committee that is aligned to this chapter, to easily allow individuals to receive communication related to the chapter. Click the
 to add a new list/committee. Click Here for information on creating lists/committees.
 - Directory - Select the directory in which you wish to display the contacts of this chapter, or click the
 to create a new directory. Click Here for information on creating directories.
 - Owners - Owners may be added to the chapter once the chapter has been saved.
- Click Done.
Add Owners to Chapters
- Select Chapters in the left hand navigation panel. A list of all the chapters currently configured in your system will be displayed.
- Click the hyper-link for the chapter to which you wish to add owners.
- Click the
 in the Owners section.
 - Configure the following:
- Contact - Type the name of the contact. The contact must exist in your database.
- Role - Select the access level the owner will have to the Info Hub from the drop-down list.
- Click Done.

