Chapters
Contents
Overview
For organizations with chapters, it is valuable to manage this chapter structure, allow membership applications to be tied to a chapter, provide chapter-based public website content and manage member communication at the chapter level – all providing increased relevance to your members. The Chapters Module makes all of this happen.
| Chapter Setup (Click the links below for further setup instruction) | |||||
|---|---|---|---|---|---|
| Setup separate calendars for Chapters (optional) | |||||
| Setup payment gateways for Chapters (optional) | |||||
| Setup directories for Chapters (optional) | |||||
| Set up Chapter membership good/services | |||||
| Setup Chapter selection on your on-line membership application form (optional) | |||||
| Create Chapters | |||||
Create/Manage Chapters
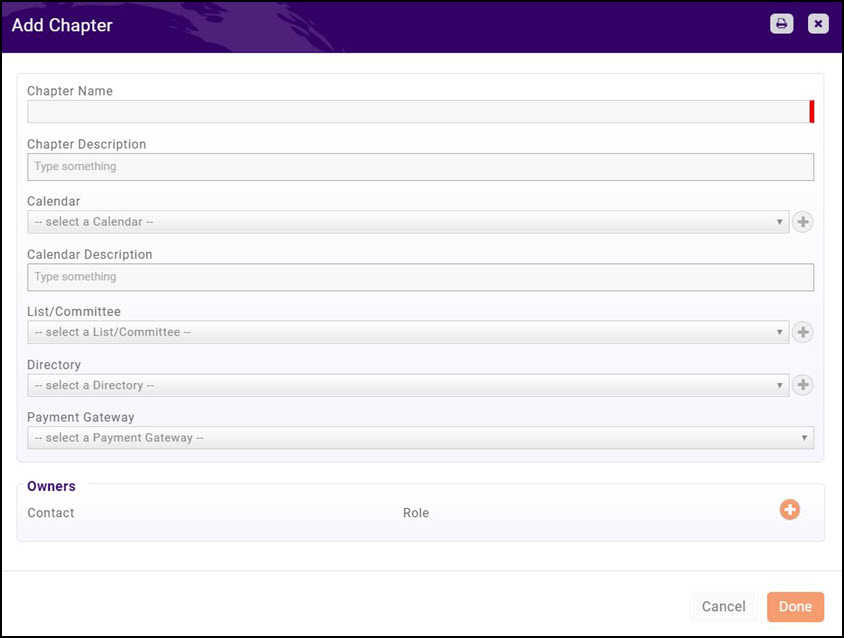
Setup each chapter, including the chapter name, description, the calendar you’d like assigned to the chapter (allows ability to display relevant events) and a directory the chapter is aligned. Create a list/committee that is aligned to this chapter, which will allow individuals to receive communication related to the chapter.
Create Chapters
- Select Chapters in the left hand navigation panel. A list of all the chapters currently configured in your system will be displayed.
- Click the Add button.
- Configure the following:
- Chapter Name - Enter the name of the chapter.
- Chapter Description - Enter a description of the chapter.
- Calendar - Select the calendar that you wish to associate to this chapter. You may select from previously created calendars in the drop-down list, or click the
 to add a new calendar. Click Here for information on creating calendars.
 - Calendar Description - (Optional) Enter a description of the calendar.
- List/Committees - Select the Lists/Committees to which contacts in this chapter will belong. Creating a list/committee that is aligned to this chapter, to easily allow individuals to receive communication related to the chapter. This group will automatically contain all the contacts that are part of that chapter.Click the
 to add a new list/committee. Click Here for information on creating lists/committees.
 - Directory - Select the directory in which you wish to display the contacts of this chapter, or click the
 to create a new directory. Click Here for information on creating directories.
 - Payment Gateway - Select the payment gateway used by this chapter. You can to assign a different gateway to each chapter, if needed. When running scheduled billing the system will look at the assigned chapter on the membership and then put the associated gateway on that invoice.
- Owners - Owners may be added to the chapter once the chapter has been saved.
- Click Done.
Add Owners to Chapters
- Select Chapters in the left hand navigation panel. A list of all the chapters currently configured in your system will be displayed.
- Click the hyper-link for the chapter to which you wish to add owners.
- Click the
 in the Owners section.
 - Configure the following:
- Contact - Type the name of the contact. The contact must exist in your database.
- Role - Select the access level the owner will have to the Info Hub from the drop-down list.
- Click Done.
Setting up Membership Types for Chapters
Setting Up Membership Types for Single Chapter Selection on Membership Application Form
If you will allow selection of a single chapter on your membership application form, you membership type is simply setup for the fee items associated to a single chapter. Click Here for instructions on how to create a membership type.
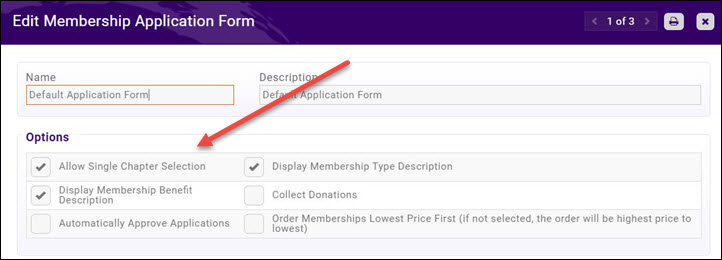
Once you have created your membership types for single chapter selection, you will enable the Allow Single Chapter Selection on the Membership Application form. Click Here for instructions on how to include chapter selection on the Membership Application Form.
Setting up Membership Types to Allow Single Chapter Selection on the Membership Application Form
If applicants may select one chapter from multiple chapters when applying for membership, you must configure your Membership Type by enabling Allow single chapter selection. When Allow single chapter selection is enabled, you will be presented with two additional choices:
- Include Selection of a Top Level Membership (i.e. State, National Level) - Select this option if you want an applicant to be able to select a top-level organization in addition to a chapter. For example, if you are a national organization that manages multiple chapters, enabling this selection allows the applicant to choose a membership to your organization OR a single chapter membership. The result on a membership application will be as shown below. The applicant may select either a chapter or the national (top-level) membership.
- Require Top Level Membership - Select this option if the applicant must be a member of the top-level organization in order to be a member of a chapter organization. For Example: If you are a national organization, and the applicant must belong to your organization in order to belong to a chapter. The result on your membership application will be as shown below. Your top-level organization selection is automatically selected, and may not be disabled by the applicant.
Setting up Membership Types to Allow Multiple Chapter Selection on the Membership Application Form
If applicants may select multiple chapters when applying for membership, you must configure your Membership Type by enabling Allow Multiple Chapter Selections.
When Allow Multiple Chapter Selections is enabled, you will be presented with two additional choices:
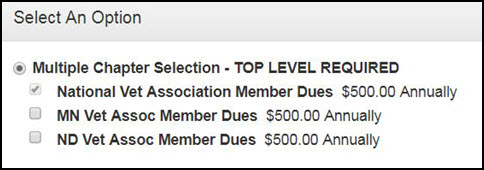
- Include Selection of a Top Level Membership (i.e. State, National Level) - Select this option if you want an applicant to be able to select a top-level organization in addition to a chapter. For example, if you are a national organization that manages multiple chapters, enabling this selection allows the applicant to choose a membership to your organization along with chapter(s). The result on a membership application will be as shown below.
- Require Top Level Membership - Select this option if the applicant must be a member of the top-level organization in order to be a member of a chapter organization. For Example: If you are a national organization, and the applicant must belong to your organization in order to belong to a chapter. The result on your membership application will be as shown below. Your top-level organization selection is automatically selected, and may not be disabled by the applicant.
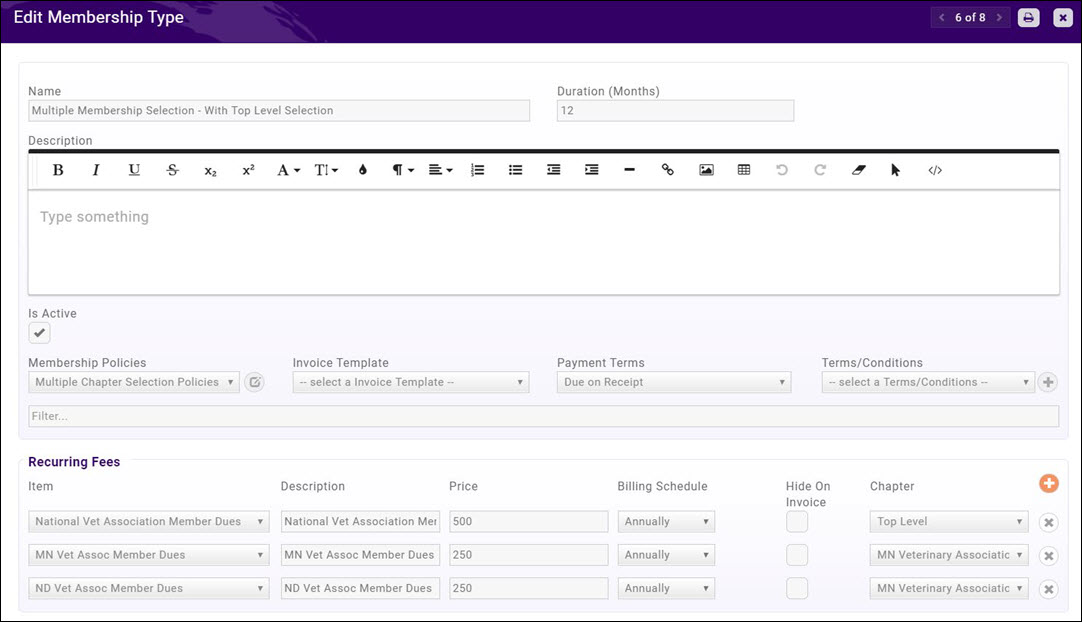
When Allow Multiple Chapter Selections is enabled, for the membership type, you will need to configure the fees for each of the chapters you are offering.
- In the Recurring Fees section of your Membership Type, click the
 to add a new fee item.
- Select the desired fee item from the Item drop-down list.
- Enter an alternate Description if needed.
- Enter alternate Price' if needed.
- Select an alternate Billing Schedule if needed.
- Select a Chapter. NOTE: If you have selected to include a Top Level Membership, Top Level will be displayed as one of your choices.
To add the fee items for all of your chapters, click the ![]() to add the additional fee items.
to add the additional fee items.
Managing Member Chapter Affiliation
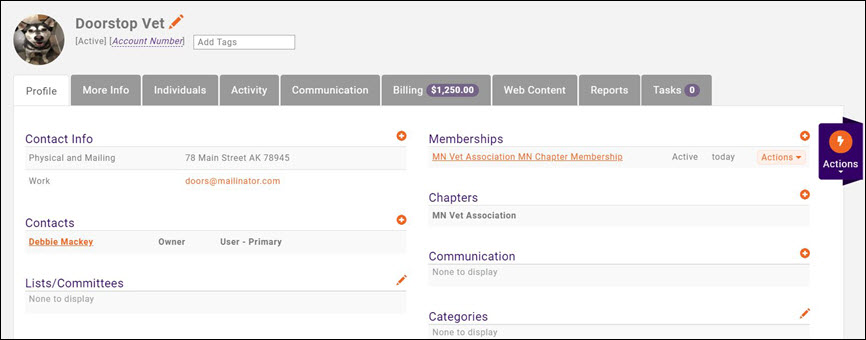
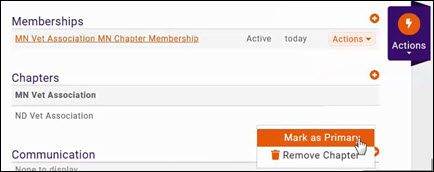
Chapter affiliation may be viewed and updated on the contact's Profile tab. The Chapters section displays all the chapters that a contact is connected to. You can manually add a chapter to a contact, mark a chapter as primary, or remove a chapter. When a membership is created that is connected to a chapter it automatically adds the chapter to this section if one does not already exist.
NOTE: The first chapter added to a contact is marked as the primary chapter.
Add a Member to a Chapter
A member may be added directly to a chapter by adding them to the membership type which includes a Chapter. Click Here for information on adding a membership. In addition, when someone applies on-line and selects a membership type that includes a chapter affiliation, the chapter will be assigned directly in the database.
In addition to the above, members may be affiliated to chapters manually on the contact's profile tab:
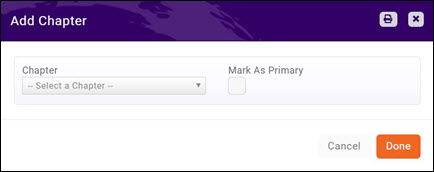
- On the member's Profile tab, click the
 in the Chapters section.
- Select the Chapter from the list (only those chapters to which the member is not affiliated with will be displayed in the list).
- If this chapter is to be the primary chapter for this member, click the Mark As Primary check-box.
- Click Done.
The new Chapter affiliation is displayed in the Chapters section. The chapter selected as primary is displayed in bold. NOTE: A member may have only one primary chapter. See Change a Members Primary Chapter for information on changing the primary chapter.
Remove a Member from a Chapter
A member may be removed from a chapter on the contact's profile tab.
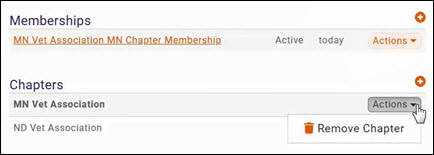
- On the member's Profile tab, click the Actions arrow next to the chapter to be removed.
- Click Remove Chapter.
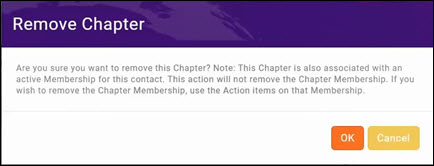
- Click OK to confirm that you wish to remove this chapter affiliation. If the chapter removed is the primary chapter, primary chapter assignment will automatically be updated for the next chapter displayed on the profile tab.
NOTE: If this chapter is tied to a membership - the Chapter Membership should be dropped/removed using the membership selections. Click Here for information on dropping a membership.
Change a Members Primary Chapter
- On the member's Profile tab, click the Actions arrow next to the chapter to be removed.
- Click Mark as Primary.
- Click OK to confirm that you wish to mark this chapter as primary.
Chapter Reports
Member Roster
The Member Roster report provides the ability to generate a roster for a specific chapter. By default, the report will display the contact name, email and phone.
Click Reports in the left-hand navigation panel.
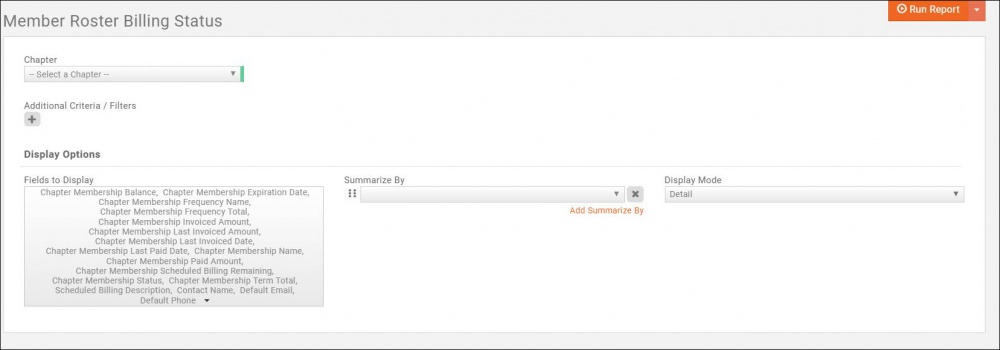
- Click Member Roster Billing Status. NOTE to easily locate reports, click Chapter in the Show Only drop-down list.
- Select the desired Chapter from the drop-down list.
- (Optional) Add Additional Criteria / Filters if necessary.
- Display Options:
- Add or remove the Fields to Display in your report.
- (Optional) Select a Summarize By option.
- Select the desired Display Mode.
- Click Run Report.
See Common Report Functions for performing the following:
- Export as PDF
- Export as Excel.
- Export Summary as PDF
- Export Summary as Excel
- Email Report
- Add to List
- Save as New Report
- Add as Favorite Report
Member Roster Billing Status
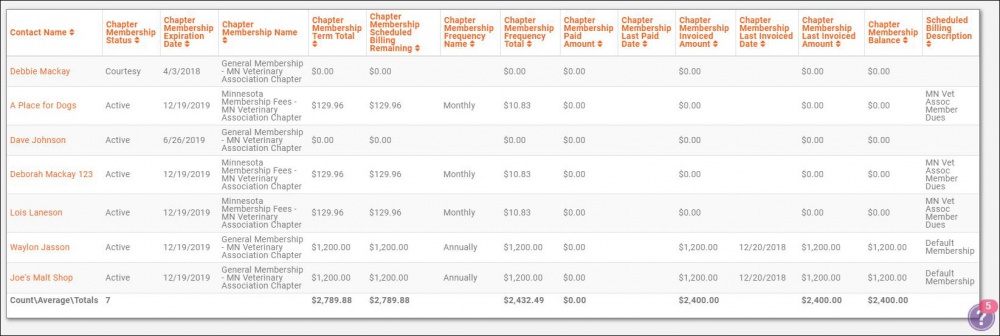
The Member Roster Billing Status report provides the ability to review the current financials for members in an individual chapter. This report will allow you to track billing for each chapter, including amounts that haven't been billed and those that are awaiting payment.
- Click Reports in the left-hand navigation panel.
- Click Member Roster Billing Status. NOTE to easily locate reports, click Chapter in the Show Only drop-down list.
- Select the desired Chapter from the drop-down list.
- Display Options:
- Add or remove the Fields to Display in your report.
- (Optional) Select a Summarize By option.
- Select the desired Display Mode.
- Click Run Report.
See Common Report Functions for performing the following:
- Export as PDF
- Export as Excel.
- Export Summary as PDF
- Export Summary as Excel
- Email Report
- Add to List
- Save as New Report
- Add as Favorite Report

