Reports
Your GrowthZone software provides a variety of reports which will help you to analyze all aspects of your business.
Contents
Common Report Functions
Export Reports
All Reports may be exported to Excel or PDF. The reports may be exported in detail or summary format (Detail vs. Summary results will vary dependent on the report you are working with)
- Define the desired filters for your report.
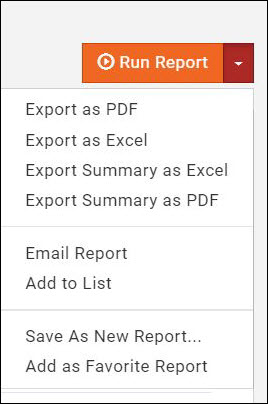
- Click the down arrow on the Run Report button.
- Click the desired export format:
- Export as Excel
- Export Summary as Excel
- Export as PDF
- Export Summary as PDF
Email Reports
You can easily send report results via email. Perhaps the board would like a report of all Dropped Members, generate the report and email the results.
- Define the desired filters for your report.
- Click the down arrow on the Run Report button.
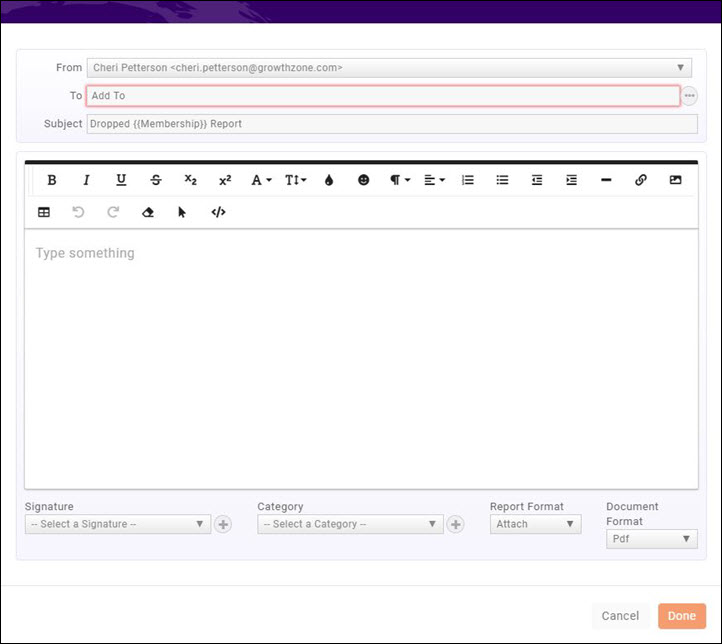
- Click Email Report.
- Enter the To email address.
- The Subject' will default to the name of the report. You may change this as needed.
- Enter your message.
- (Optional) Select a signature from the drop-down list.
- (Optional) Select a communication Category.
- Select how you would like to attach the file from the Report Format, Attach or In-line. Best Practice is to attach Inline as email messages with attachment are more prone to going to SPAM.
- Select whether you wish PDF, Excel or CSV as the Document Format.
- Click Send.
Add Report Contacts to a List/Committee
You can easily create a list from a report. For Example: If you wish to communicate with your dropped members, you can generated the Dropped Membership Report, and create a list. You can then easily communicate with these contacts.
- Define the desired filters for your report.
- Click the down arrow on the Run Report button.
- Click Add to List.
- From the Group drop-down, select the name of the list to which you wish to add members (this option will allow you to add the members to an existing list) OR click the
 to create a new list. See Working with Lists/Committees for further instruction on creating the list.
 - Click Done.
Save a Report as a New Report
With all of the reports, you have the ability to apply custom filters. After customizing the report to suit your needs, you may save the report as a New Report. This will make it easy for you to run the report again in the future as your custom settings and filters will be saved.
To Save a Report as a New Report:
- Define the desired filters for your report.
- Click the down arrow on the Run Report button.
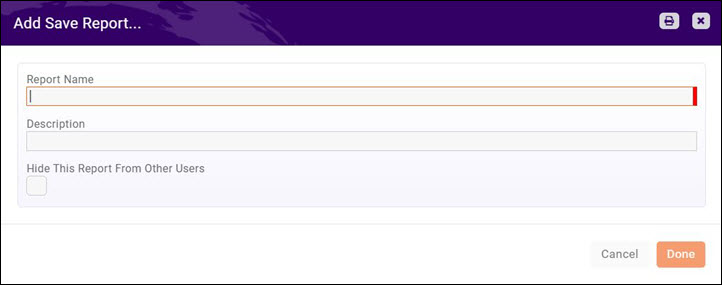
- Select Save As New Report.
- Enter a Report Name.
- Enter a Description.
- Hide This Report From Other Users: Select this option if the report is only to be used by you. It will not be available for other users.
- Click Done.
Save a report as a Favorite Report
If you frequently use the same report, you can save it as a favorite.
- For the desired report, click the down arrow on the Run Report button.
- Click Add as Favorite Report.
When you access the Reports module, in the Show Only drop-down list, select Favorites.
Report Filtering Options
Reports are built to include recommended fields, however, you may customize the report to get more granular in the information that you are looking to analyze. For Example: When working with the Dropped Membership Report, if you wish to view a list of the members that have dropped for a certain reason, you can generate the report by setting the Criteria / Filters.
Use the following procedure on all reports, to set filtering criteria.
- In the Criteria / Filters section, click the
 icon.
icon. - Select the field on which you wish to filter from the drop-down list. The fields available will vary based on the report you are working with.
- Select the desired Operator. Operators will vary dependent on the field you have chosen. The operators is used to specify the condition that must be met to be included in your report. Available operators are described below.
Operator Description Is Equal Use this operator to look for results that are exactly equal what you input into the text box. For example, if running the drop report searching for members who have dropped because membership was too expensive, you would select Is Equal and type Too Expensive in the text box. Is Not Equal Use this operator to exclude from your report results what you have input into the text box. For example, if running the drop report, and you would like to see all of the members who dropped, except those who dropped because membership was too expensive, you would select Is Not Equal and type Too Expensive in the text box. Starts With Use this operator to look for results where the beginning of the field begins with the letters that you have input into the text box. For Example, if running the Event Discount Activity Report, and you are Contains Example Not Contains Example Ends With Example Is Empty Example Is Not Empty Example Before Example After Example Between Example Greater Than Example Greater Than or Equal Example Less Than Example Greater Than or Equal Example
Types of Reports
Membership Reports
Membership Change Report - This report lets you create a report for all new memberships, upgrades, downgrades, re-activations, and adjustments to membership.


