Difference between revisions of "Reports"
| Line 378: | Line 378: | ||
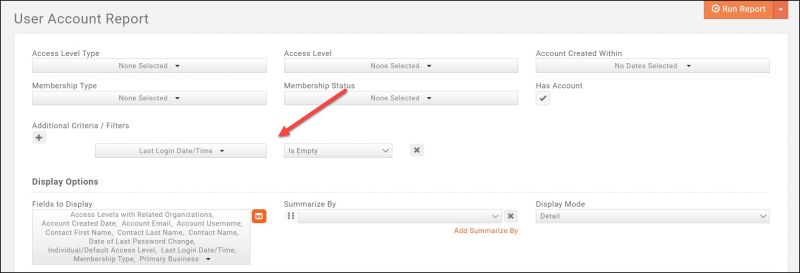
Generate the '''User Account Report''', with the '''Additional Filter/Criteria''' set to '''Last Login Date/Time Is Empty''' | Generate the '''User Account Report''', with the '''Additional Filter/Criteria''' set to '''Last Login Date/Time Is Empty''' | ||
[[File:Last login empty 2020.jpg|800px|center]] | [[File:Last login empty 2020.jpg|800px|center]] | ||
| + | |||
| + | ==='''<span style="color:#800080">Contact Information Report'''</span>=== | ||
| + | ---- | ||
| + | This report lists phone, email, or website information. Only pick types for one of the three communication methods (phone, email, or website). The report will not work if more than one method has types selected. This report will list all contact information, so a best practice may be to Summarize By '''Display Name''' for better visibility. | ||
| + | |||
| + | #Select '''Reports''' in the left-hand navigation panel. | ||
| + | #Select '''Contact Information Report'''. | ||
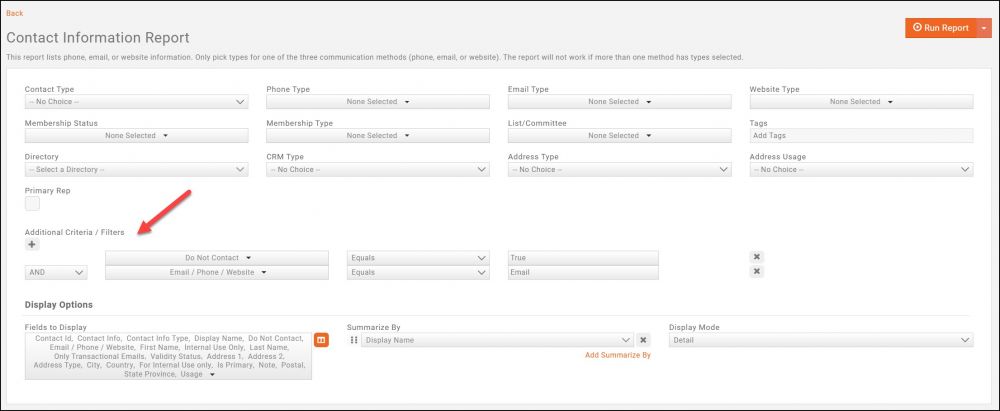
| + | #:[[File:Contact information report transactional only.jpg|1000px|center]] | ||
| + | #Select desired filtering criteria. '''IMPORTANT''': If you are selecting Phone Type, Email Type or Website Type select only one of these options. They report will not generate as expected if you select more than one. If needed, generate the report multiple times with your individual type selections. | ||
| + | #Add '''Additional Filter/Criteria'''. See Use Cases. | ||
| + | #Choose '''Fields to Display'''. | ||
| + | #Click '''Run Report'''. | ||
| + | |||
| + | See '''[[Reports#Common_Report_Functions|Common Report Functions]]''' for performing the following: | ||
| + | |||
| + | *'''Export as PDF''' | ||
| + | *'''Export as Excel'''. | ||
| + | *'''Export Summary as PDF''' | ||
| + | *'''Export Summary as Excel''' | ||
| + | *'''Email Report''' | ||
| + | *'''Add to List''' | ||
| + | *'''Save as New Report''' | ||
| + | *'''Add as Favorite Report''' | ||
| + | |||
| + | ===='''<span style="color:#800080">Contact Information Report Use Cases'''</span>==== | ||
| + | ---- | ||
| + | '''I need a report to...''' | ||
| + | *Identify contacts whose emails are marked as Transactional Only Emails. Use the following Additional Filter/Criteria: | ||
| + | :*Only Transactional Emails Equals True '''AND''' | ||
| + | :*Email/Phone/Website Equals Email'''. | ||
| + | [[File:Transaction only 2021.jpg|1000px|center]] | ||
| + | *Identify contacts whose emails are marked as '''Do Not Contact'''. Use the following Additional Filter/Criteria: | ||
| + | :*Do Not Contact Equals True '''AND''' | ||
| + | :*Email/Phone/Website Equals Email'''. | ||
| + | [[File:Do not contact true 2.jpg|1000px|center]] | ||
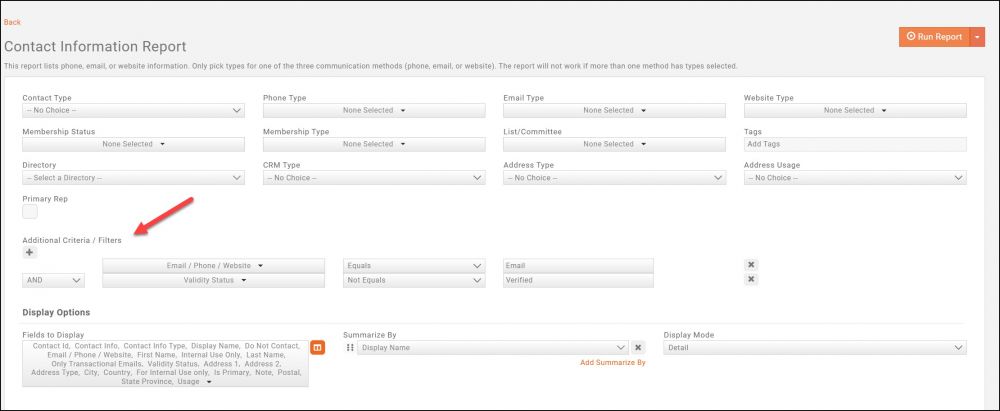
| + | *Identify contacts whose emails are marked invalid and the reason the email is marked invalid. Use the following Additional Filter/Criteria: | ||
| + | :*Validity Status Not Equals Verified '''AND''' | ||
| + | :*Email/Phone/Website Equals Email'''. | ||
| + | [[File:Verified status 2021.jpg|1000px|center]] | ||
| + | |||
| + | ==='''<span style="color:#800080">New Organization Contacts Report'''</span>=== | ||
| + | ---- | ||
==='''<span style="color:#800080">Membership Engagement Report'''</span>=== | ==='''<span style="color:#800080">Membership Engagement Report'''</span>=== | ||
Revision as of 18:17, 26 February 2021
Your GrowthZone software provides a variety of reports which will help you to analyze all aspects of your business.
Contents
- 1 Common Report Functions
- 2 Contact Management Reports
- 3 Membership Reports
- 4 Communications Reports
- 5 Billing Reports
- 5.1 Accounting General Ledger Reports
- 5.2 Banking Reports
- 5.3 Credit Card Processing Reports (GZ Pay)
- 5.4 Collections Reports
- 5.5 Billing - Historical & Planning Reports
- 5.5.1 Credit Memo Report
- 5.5.2 Last Bill Date
- 5.5.3 Membership Invoices by Month (Beta)
- 5.5.4 Recurring Billing Report
- 5.5.5 Refund Report
- 5.5.6 Sales by Contact Report
- 5.5.7 Taxes Billed Report
- 5.5.8 Total Spending by Contact Report
- 5.5.9 Transactions by Contact
- 5.5.10 Voluntary Payment Report
- 5.5.11 Write Off Report
- 6 Chapter Reports
- 7 Continuing Education/Certification Reports
- 8 Event Reports
- 9 Fundraiser Reports
- 10 Lists/Committees Reports
- 11 Project/Tasks Reports
- 12 Sales Funnel Reports
- 13 Store Reports
- 14 Web Content Reports
Common Report Functions
Export Reports
All Reports may be exported to Excel or PDF. The reports may be exported in detail or summary format (Detail vs. Summary results will vary dependent on the report you are working with)
- Define the desired filters for your report.
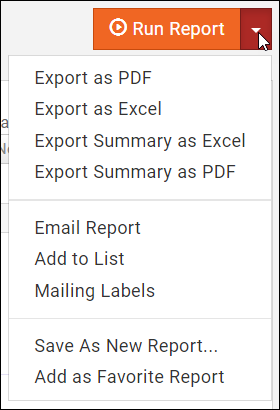
- Click the down arrow on the Run Report button.
- Click the desired export format:
- Export as Excel
- Export Summary as Excel
- Export as PDF
- Export Summary as PDF
Email Reports
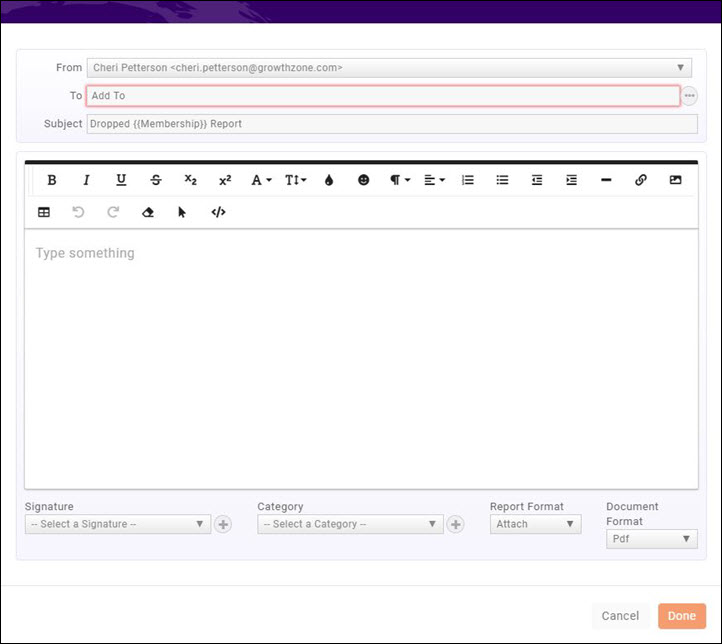
You can easily send report results via email. Perhaps the board would like a report of all Dropped Members, generate the report and email the results.
- Define the desired filters for your report.
- Click the down arrow on the Run Report button.
- Click Email Report.
- Enter the To email address.
- The Subject' will default to the name of the report. You may change this as needed.
- Enter your message.
- (Optional) Select a signature from the drop-down list.
- (Optional) Select a communication Category.
- Select how you would like to attach the file from the Report Format, Attach or In-line. Best Practice is to attach Inline as email messages with attachment are more prone to going to SPAM.
- Select whether you wish PDF, Excel or CSV as the Document Format.
- Click Send.
Add Report Contacts to a List/Committee
You can easily create a list from a report. For Example: If you wish to communicate with your dropped members, you can generated the Dropped Membership Report, and create a list. You can then easily communicate with these contacts.
- Define the desired filters for your report.
- Click the down arrow on the Run Report button.
- Click Add to List.
- From the List/Committees drop-down, select the name of the list to which you wish to add members (this option will allow you to add the members to an existing list) OR click the
 to create a new list. See Working with Lists/Committees for further instruction on creating the list.
 - Select the Replace existing contacts if you wish to replace all of the contacts in an existing list with the results of your report.
- Click Done.
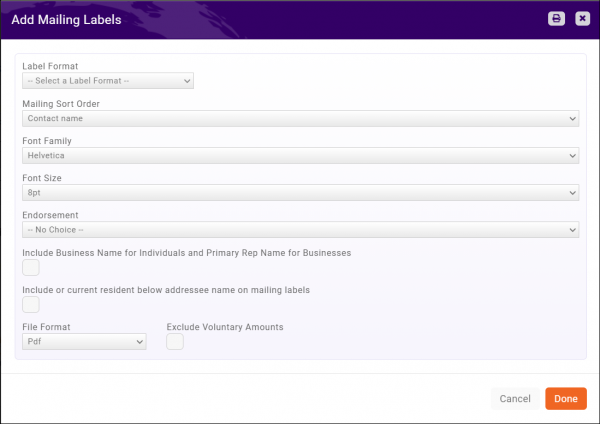
Mailing Labels
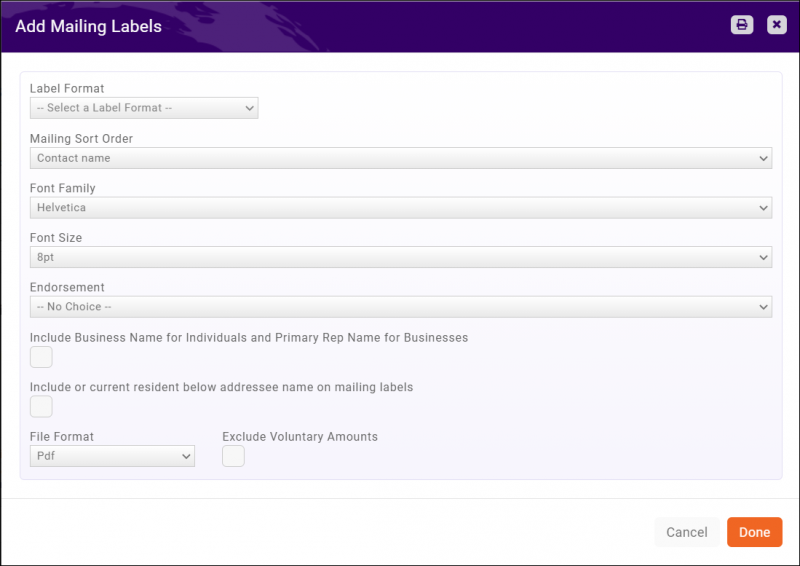
You can create mailing labels directly from the results of your report. The contact’s address marked as Mailing or Physical and Mailing is used as a priority if available. If more than one is listed as Mailing type, it will use the one marked as Default. The address of the contact is used; if no fall back address is available.
- Define the desired filters and fields to display for your report.
- Click the down arrow on the Run Report button.
- Click Mailing Labels.
- Select a Label Format (see Setup Your Document Templates for more details).
- Select a Mailing Sort Order, Font Family and Font Size for your labels.
- (Optional) Select the Endorsement.
- (Optional) Enable "Include Business Name for Individuals and Primary Rep Name for Businesses".
- (Optional) Enable "Include 'or current resident' below addressee name on mailing labels".
- Select the file format for the labels.
- Click Done.
Save a Report as a New Report
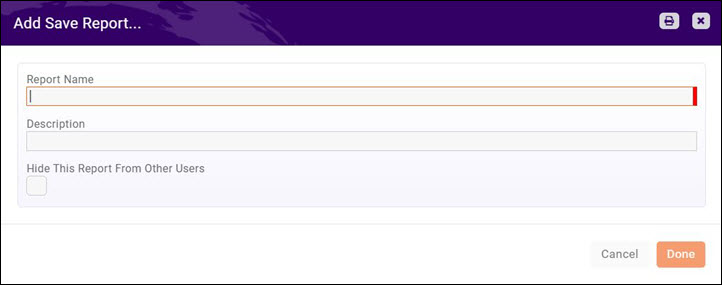
With all of the reports, you have the ability to apply custom filters. After customizing the report to suit your needs, you may save the report as a New Report. This will make it easy for you to run the report again in the future as your custom settings and filters will be saved.
To Save a Report as a New Report:
- Define the desired filters for your report.
- Click the down arrow on the Run Report button.
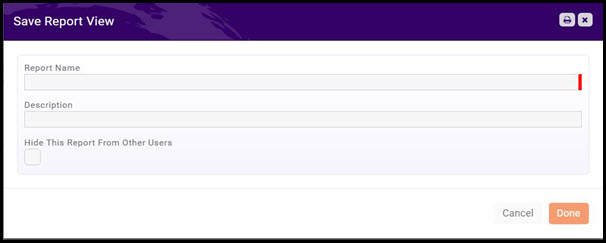
- Select Save As New Report.
- Enter a Report Name.
- Enter a Description.
- Hide This Report From Other Users: Select this option if the report is only to be used by you. It will not be available for other users.
- Click Done.
Save a report as a Favorite Report
If you frequently use the same report, you can save it as a favorite.
- For the desired report, click the down arrow on the Run Report button.
- Click Add as Favorite Report.
When you access the Reports module, in the Show Only drop-down list, select Favorites.
Report Filtering Options
Reports are built to include recommended fields, however, you may customize the report to get more granular in the information that you are looking to analyze. For Example: When working with the Dropped Membership Report, if you wish to view a list of the members that have dropped for a certain reason, you can generate the report by setting the Criteria / Filters.
Use the following procedure on all reports, to set filtering criteria.
- In the Criteria / Filters section, click the
 icon.
icon. - Select the field on which you wish to filter from the drop-down list. The fields available will vary based on the report you are working with.
- Select the desired Operator. Operators will vary dependent on the field you have chosen. The operators is used to specify the condition that must be met to be included in your report. See the Report Filtering Operators below.
Report Filtering Operators
Operator Description Is Equal Use this operator to look for results that are exactly equal what you input into the text box. For example, if running the drop report searching for members who have dropped because membership was too expensive, you would select Is Equal and type Too Expensive in the text box. Is Not Equal Use this operator to exclude from your report results what you have input into the text box. For example, if running the drop report, and you would like to see all of the members who dropped, except those who dropped because membership was too expensive, you would select Is Not Equal and type Too Expensive in the text box. Starts With Use this operator to look for results where the beginning of the field begins with the letters that you have input into the text box. Contains Use this operator to include in your results, fields that match a letter, word or phrase that you enter. Not Contains Use this operator to exclude from your results, fields that match a letter, word or phrase that you enter. Ends With Use this operator to include in your results fields that end with the characters that you enter. Is Empty Use this operator to include in your results, fields that are NOT populated. For Example: When if you wish to run a report to identify primary contacts that do not have an email address, you can generate the Contact's Report, and set filtering, as shown below. Is Not Empty Use this operator to include in your results, fields that are populated. Before Generally used for dates, this option would be used when looking for dates that are "before" a certain date. For example, you could use this when looking for Membership Start Dates that are earlier than a certain date. If I wish to find all memberships started prior to 1/1/2018, using the Membership Report, my filter option would display as shown below. After Generally used for dates, this option would be used when looking for dates that are "after" a certain date. For example, you could use this when looking for Membership Start Dates that are later than a certain date. If I wish to find all memberships started after 12/31/2017, using the Membership Report, the filter would be as shown below: Between Generally used for dates, this option would be used when looking for dates that are "between" two dates. For Example:If I wish to find all memberships started after 12/31/2017 and before 1/1/2019, using the Membership Report, the filter would be as shown below: Greater Than Generally used for numeric or monetary values, this option would be used when you wish to find results that are more than (but not equal to) the value you specify. For Example: If you wish to find all contacts who owe you more than $500.00, using the Accounts Receivable Detail Report, the filter would be as shown below. Greater Than or Equal Generally used for numeric or monetary values, this option would be used when you wish to find results that are more than or equal to the value you specify. Less Than Generally used for numeric or monetary values, this option would be used when you wish to find results that are less than (but not equal to) the value you specify. For Example: If you wish to find all contacts where accounts receivable aging is less than 30 days, using the Accounts Receivable Detail Report, the filter would be as shown below. Less Than or Equal Generally used for numeric or monetary values, this option would be used when you wish to find results that are less than or equal to the value you specify.
You can include multiple search/filter criteria using the And or Or function.
- The AND operator displays a record if All of your filter criteria are met.
- The OR operator displays a record if any of the conditions are met.
For Example: Using the Contacts Report, I wish to find primary contacts where both the default email address AND the default phone are not populated in the database. My filtering criteria would be as shown below.
For Example: Using the New Membership Report, I wish to find those members who joined either for Educational Purposes OR for Networking Purposes. My filtering criteria would be as shown below.
Select Report Fields to Display
Reports have been setup with default fields to be displayed. You can choose the fields that you wish to include in the report by clicking into the Fields to Display list.
Reorder Report Fields to Display
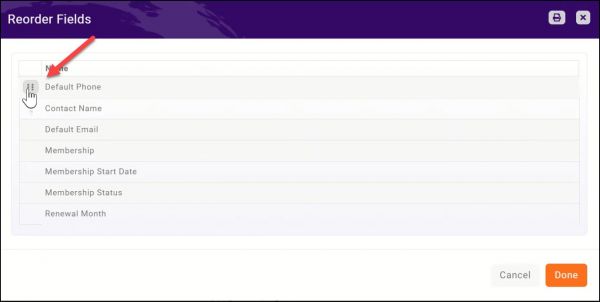
To change the order in which fields are displayed in your report select the ![]() icon in the Display Options section. You will then be able to drag the fields into the order you wish them displayed.
icon in the Display Options section. You will then be able to drag the fields into the order you wish them displayed.
Contact Management Reports
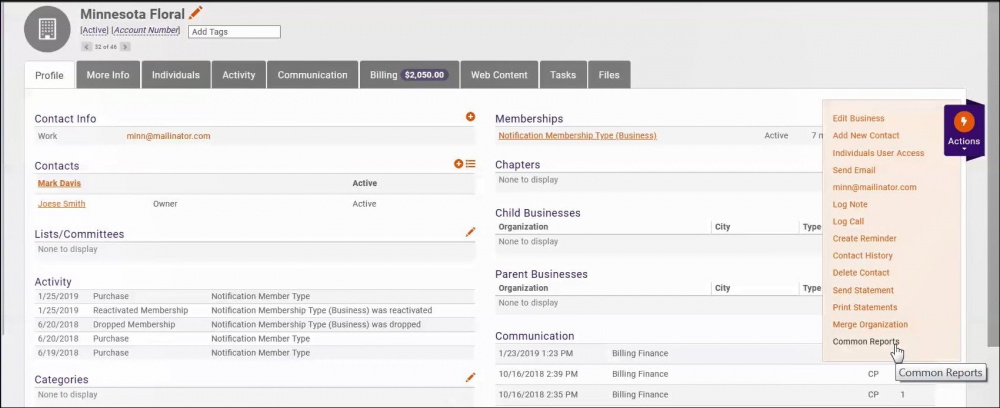
A variety of reports are available to you to manage your contacts. These may be accessed via the Reports module, or by selecting the Common Tasks Actions button within the Contacts module.
Contacts List/Committee Report
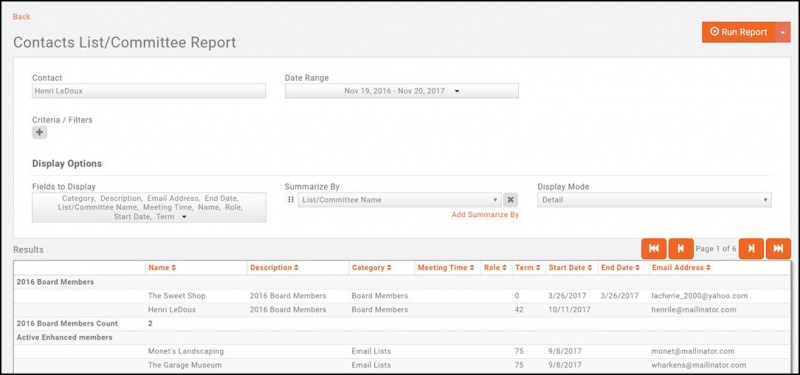
The Contact List/Committee Report may be used to generate a report of all of your lists/committees and the individuals associated to those lists/committees. The report may be filtered by an individual contact if you wish to see all group membership for an individual and/or by a specified date range.
- Click Reports in the Navigation Panel
- Select Contact List/Committee Report.
- Select your search filtering criteria.
- Click Run Report.
You can perform the following actions with the report by clicking the down arrow on the Run Report button:
- Export as PDF
- Export as Excel.
- Export Summary as PDF
- Export Summary as Excel
- Email Report
- Add to List - This option will allow you to add the members to an existing list, or create a new list (by clicking the + button on the Add Contacts to List screen). This can help you in sending emails to this group as necessary.
- Mailing Labels - This option will allow you to create mailing labels directly from the results of the report.
- Save as New Report - If you want to use this report with the same filtering options in the future, you can save the report.
- Add as a Favorite Report - you may save the report as a favorite, then easily identify it when filtering reports in the Reports module.
Contacts Report
The Contacts Report provides you the flexibility to generate a list of your contacts based on a variety of different criteria, as well as custom filters. For example, if you wish to generate a list of all of you prospective members, you can filter the report based on Membership Status.
The following standard filtering criteria are available:
- Membership Status
- Membership Type
- Membership Category
- Contact Type
- Assigned To
- List/Committee
- Tags
- Last Communication Date
- Directory
You may choose to display only Primary Reps or Active Reps in your results.
- Click Reports in the Navigation Panel
- Select Contacts Report.
- Select your search filtering criteria. If you want all records from the directory, do not choose the Contact Type. You can specify Individual or Business if that filter is needed. For best results on a filter, use the "Contains" option rather than "Equals" and "Not Equals".
- Click Run Report.
| IMPORTANT:
When using the Business Categories or All Business Categories options, there are distinct differences in the report results:
When using the Membership options:
|
See Common Report Functions for performing the following:
- Export as PDF
- Export as Excel.
- Export Summary as PDF
- Export Summary as Excel
- Email Report
- Add to List
- Save as New Report
- Add as Favorite Report
| Did You Know... You can make the Contacts Report available to your members in the Info Hub. Fields that would not be displayed in the Info Hub report are: Balance, Credit Balance, Last Communicated with, Last Communication Date. Click Here for instruction on displaying the Contacts Report in the Info Hub.. |
Contacts Reports Use Cases
View All Organizations to which an Individual belongs
Use the Contacts Report described above to view all organizations/businesses to which an individual belongs by including All Organizations in your fields to display. Results will be displayed in one column, comma separated, as shown below.
View report of all contacts that do not have a directory listing
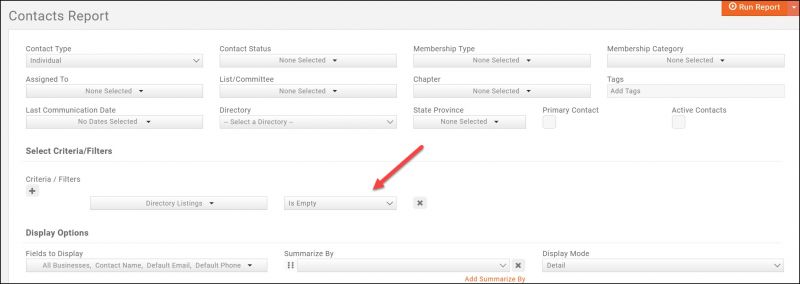
Use the Contacts Report described above to generate a list of all contacts that do not have a directory listing. Add Additional Criteria/Filter where Directory Listing is Empty as shown in the screenshot below.
- Using the Contacts Report, click on the Fields to Display. The information related to child businesses will be listed in the Child Contacts section of the available fields.
- To include the name of the child, scroll to the Child section of available fields and select Child Name. All of the fields listed in the Child will return information related to the child, for example, Role: Child Email Address will return the email address of the child business.
- For best results, summarize your report by Contact Name.
- Click Run Report.
Directory Contact Report
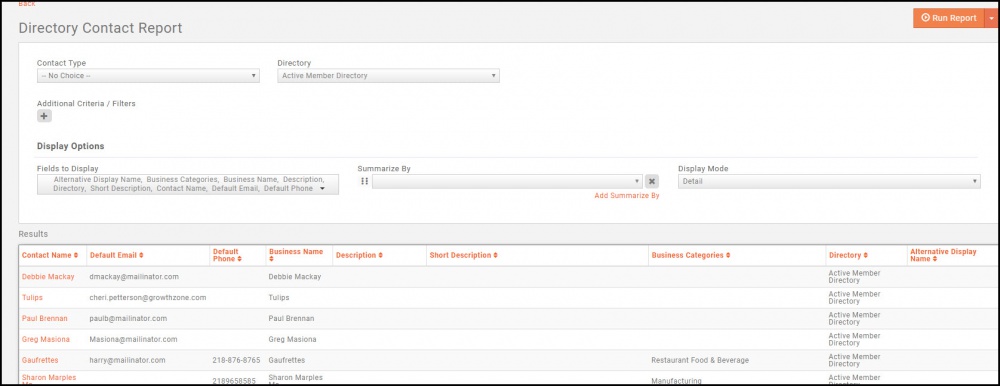
The Directory Contact Report provides you the ability to generate a list of your contacts listed in the directories set up in your GrowthZone software. For example, if you provide a list of the directory for a print version, you can easily export the details into Excel.
- Click Reports in the Navigation Panel
- Select Directory Contact Report.
- Select your search filtering criteria.
- Click Run Report.
See Common Report Functions for performing the following:
- Export as PDF
- Export as Excel.
- Export Summary as PDF
- Export Summary as Excel
- Email Report
- Add to List
- Save as New Report
- Add as Favorite Report
Duplicate Account Number Report
The Duplicate Account Number Report gives you the ability to verify the existence of duplicate account numbers on contact records set up in your GrowthZone software.
- Click Reports in the Navigation Panel
- Select Duplicate Account Number Report.
- Select your search filtering criteria.
- Click Run Report.
See Common Report Functions for performing the following:
- Export as PDF
- Export as Excel.
- Export Summary as PDF
- Export Summary as Excel
- Email Report
- Add to List
- Save as New Report
- Add as Favorite Report
User Account Report
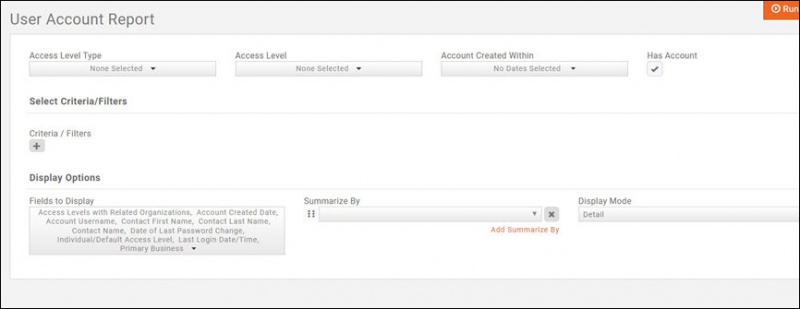
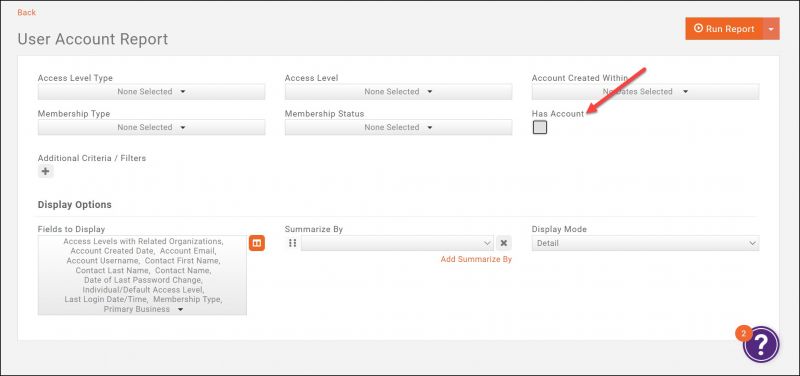
The User Account Report gives you the ability to view all of your contacts, and their associate log-in name, access level, etc. Importantly, by deselecting Has Account you will be able to see those members that do not have login credentials.
- Click Reports in the left-hand navigation panel.
- Click User Account Report.
- Enter desired filtering criteria:
- Access Level Type: If you wish to view results for one or multiple types (Staff, User, Other), select the desired type(s).
- Access Level Type: If you wish to view results for one or multiple access levels, select the desired access level(s).
- Account Created Within: If you wish to view results for accounts created in a a specific date range, select the desired date range.
- Membership Type: If you wish to view results for certain membership types, select the desired type(s).
- Membership Status: If you wish to view results for certain membership statuses, select the desired status(es).
- Has Account: This check-box is enabled by default. If you wish to view only those who do not have an account, de-select this check-box.
- Add Additional Criteria / Filters as needed.
- Select or remove desired Fields to Display.
- Choose a field by which you wish to summarize.
- Click Run Report
| Did You Know? If you have generated a list of members who do not have login credentials, you can create a list and then use the New Member Access email template to send a mass email to all inviting them to create their login credentials. |
See Common Report Functions for performing the following:
- Export as PDF
- Export as Excel.
- Export Summary as PDF
- Export Summary as Excel
- Email Report
- Add to List
- Mailing Labels
- Save as New Report
- Add as Favorite Report
User Account Report Use Cases
View Contacts who do no have Login Credentials
Generate the User Account Report and clear the Has Account check-box.
View Contacts Have Login Credentials by Have Not Logged In
Generate the User Account Report, with the Additional Filter/Criteria set to Last Login Date/Time Is Empty
Contact Information Report
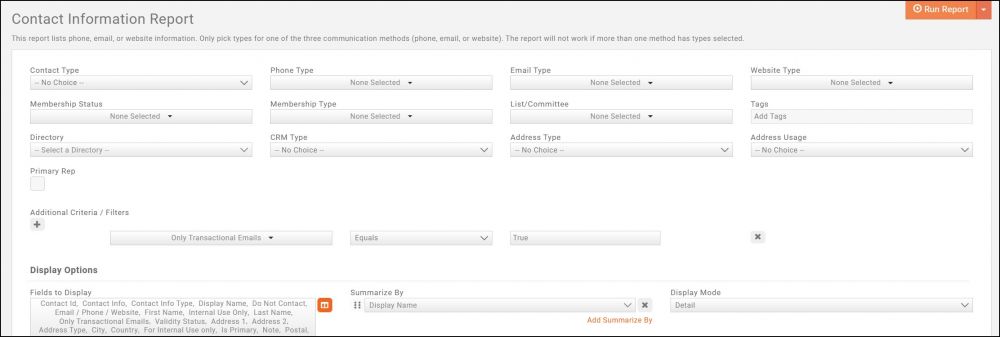
This report lists phone, email, or website information. Only pick types for one of the three communication methods (phone, email, or website). The report will not work if more than one method has types selected. This report will list all contact information, so a best practice may be to Summarize By Display Name for better visibility.
- Select Reports in the left-hand navigation panel.
- Select Contact Information Report.
- Select desired filtering criteria. IMPORTANT: If you are selecting Phone Type, Email Type or Website Type select only one of these options. They report will not generate as expected if you select more than one. If needed, generate the report multiple times with your individual type selections.
- Add Additional Filter/Criteria. See Use Cases.
- Choose Fields to Display.
- Click Run Report.
See Common Report Functions for performing the following:
- Export as PDF
- Export as Excel.
- Export Summary as PDF
- Export Summary as Excel
- Email Report
- Add to List
- Save as New Report
- Add as Favorite Report
Contact Information Report Use Cases
I need a report to...
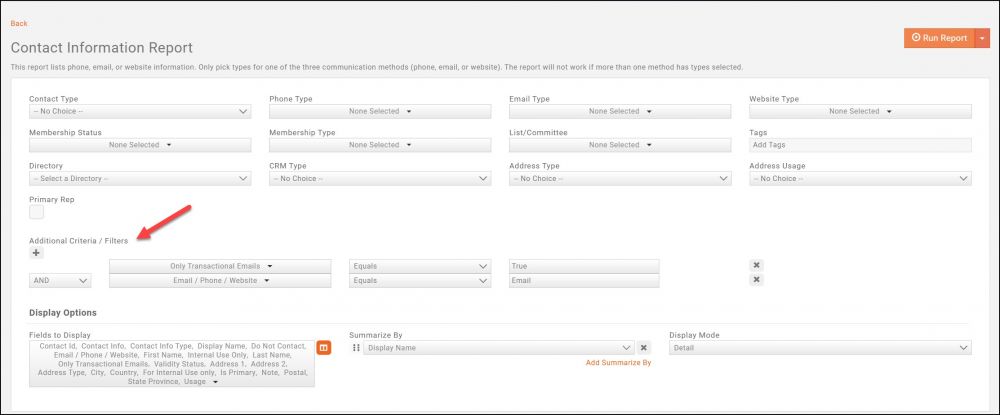
- Identify contacts whose emails are marked as Transactional Only Emails. Use the following Additional Filter/Criteria:
- Only Transactional Emails Equals True AND
- Email/Phone/Website Equals Email.
- Identify contacts whose emails are marked as Do Not Contact. Use the following Additional Filter/Criteria:
- Do Not Contact Equals True AND
- Email/Phone/Website Equals Email.
- Identify contacts whose emails are marked invalid and the reason the email is marked invalid. Use the following Additional Filter/Criteria:
- Validity Status Not Equals Verified AND
- Email/Phone/Website Equals Email.
New Organization Contacts Report
Membership Engagement Report
**COMING SOON** Your association works hard to keep members coming back year after year, offering value through opportunities and events. The more you engage your members, the more likely they will renew their memberships. The Member Engagement Report provides a way for you to analyze how engaged your members are by looking at how many events they have attended, the number of list/committees to which they belong, and spending activity. Not only can this report highlight those most engaged, but will assist you in identifying those that you need to reach out to and re-engage.
- Select Reports in the left-hand navigation panel.
- Select Member Engagement Report.
- If you wish to run the report for specific membership types, select from the Membership Types list. If no selection is made, the report will be generated for all membership types.
- If you wish to run the report for a specific date range, select a Date Between. If no selection is made, the report will be generated "for all time".
- Add Additional Criteria / Filters as you wish. For Example: If you wish to report on all members who have never attended an event, you could add the filter Count of Event Registrations isEmpty.
- Select the Fields to Display.
- Click Run Report.
I want to...
- View a report of all members who have never registered for an event: Run the Membership Engagement Report with the additional filter Count of Event Registrations isEmpty.
- View a report of all members who have never attended an event: Run the Membership Engagement Report with the additional filter Count of Event Attendees isEmpty.
- View a report of all members who do not belong to any Lists/Committees: Run the Membership Engagement Report with the additional filter Count of Existing List/Committee Members isEmpty.
See Common Report Functions for performing the following:
- Export as PDF
- Export as Excel.
- Export Summary as PDF
- Export Summary as Excel
- Email Report
- Add to List
- Save as New Report
- Add as Favorite Report
Membership Reports
Common Membership Calculations
Does the thought of having to calculate retention, churn, or the cost of acquiring a new member make your head hurt? For many association pros, crunching numbers is (unfortunately) a part of their daily grind. You don’t have to be a math person to use these seven common calculations to determine everything from renewal rates to average length of membership.
Retention Rate
Retention Rate is the percentage of members retained over a given period of time. This metric can be calculated if you know how many members you had at the beginning of a period, and many you had at the end of a period.
| CALCULATION: (End Count - New Members) ÷ Start Count = Retention Rate |
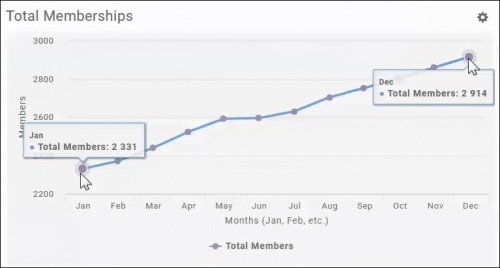
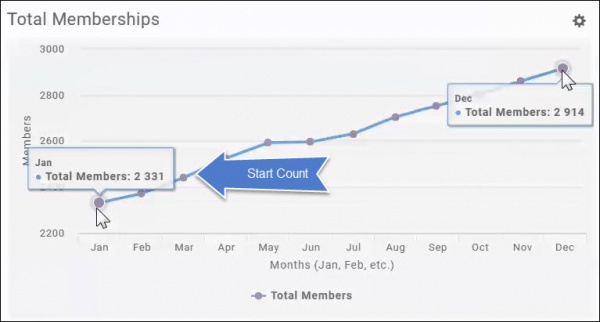
The Dashboard will provide the Start Count and the End Count needed for this calculation.
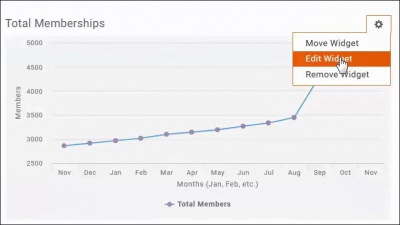
- Click Dashboard in the left-hand navigation.
- Click the Metrics tab.
- Click the
 icon next to Total Memberships. NOTE: if you have removed this widget from your dashboard, click the Add Widget button to place it on your dashboard.
- Click Edit Widget.
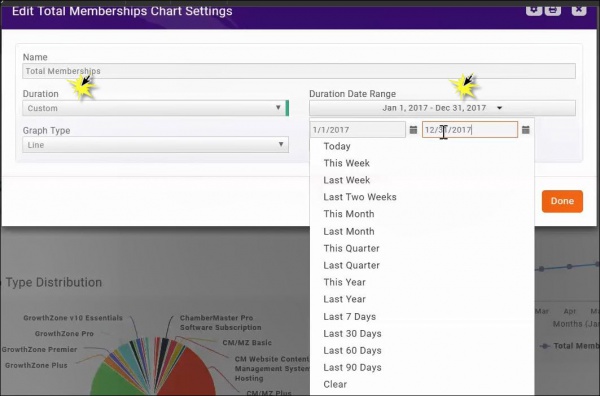
- Select Custom from the Duration drop-down list.
- Enter the desired dates in the Duration Date Range.
- Click Done. The Total Memberships widget will refresh displaying metrics for the desired date range.
Start Count = 2331 End Count = 2914
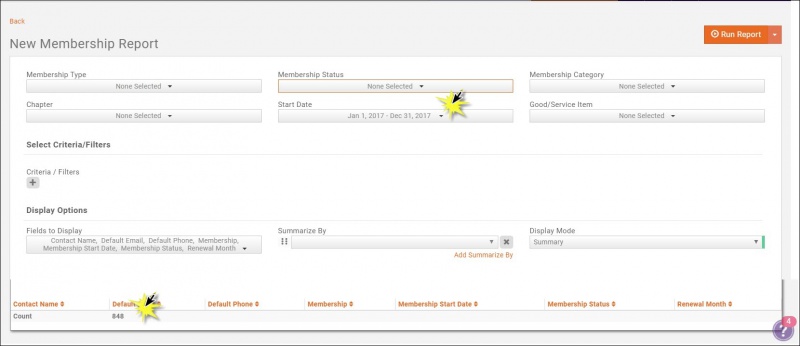
Generate the New Membership report to find New Members. Generate the report for the same date range used above.
See New Membership Report for further instructions on generating the New Membership Report.
New Members = 848
CALCULATION: (End Count - New Members) ÷ Start Count = Retention Rate
(2914 - 848) ÷ 2331 = .88 88% Retention Rate
Lapse Rate (Churn)
The Lapse Rate (Churn) is the percentage of members that discontinue their membership over a given period of time.
| CALCULATION: Dropped Members ÷ Start Count = Lapse Rate |
The Start Count is calculated as described in Retention Rate above.
Start Count = 2331
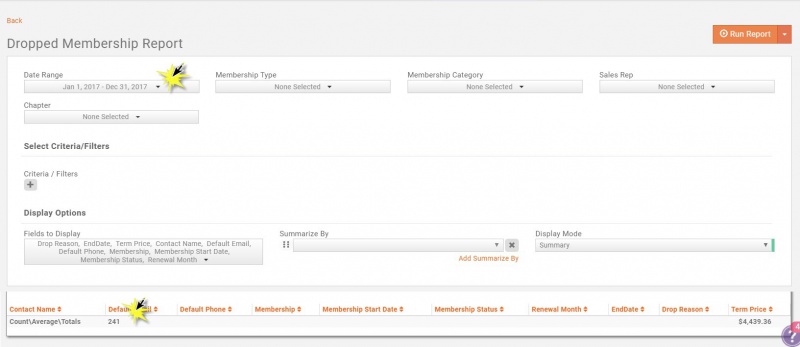
The Dropped Membership Report may be used to calculate Dropped Members. Generate the report using the same date range used to find the Start Count. See Dropped Membership Report for instructions on generating the report.
Dropped Count = 241
CALCULATION: Dropped Members ÷ Start Count = Lapse Rate
241 ÷ 2331 = .10 Lapse Rate = 10%
Renewal Rate
Renewal Rate is the percentage of members that renew their membership over a given time period.
| CALCULATION: # of Renewals ÷ Eligible Members = Renewal Rate |
| NOTE: Using the criteria described below will get an overall Renewal Rate, not specific to a certain year - but for all time. You could use this to judge if you are moving the right direction each time to run this stat. |
The Membership Report will provide you with the information to calculate the Renewal Rate. You will generate the report twice, each with different filtering options.
First: Generate the Membership Report with the following filtering criteria to find the # of Renewals:
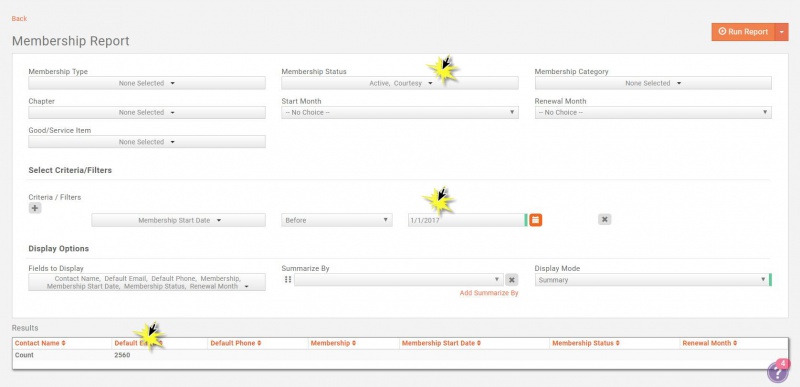
- Set Membership Status set to Active and Courtesy.
- Add a Criteria / Filters for Membership Start Date Before and set the date to the first date of your search criteria. For example if you are looking for your renewal rate for up until 1-1-2017, you would set the before date to 1/1/2017.
In the example above, # of Renewals = 2560.
Second: Generate the Membership Report with the following filtering criteria to find Eligible Members"
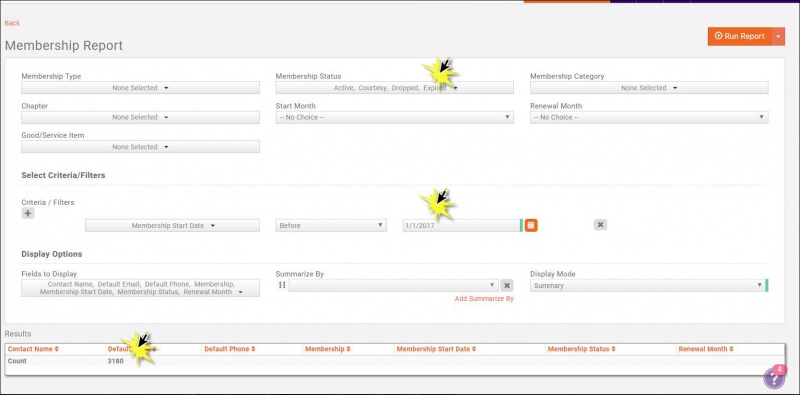
- Set Membership Status set to Active, Courtesy, Dropped, Expired. Do not include Non-Member or other statuses since these were never up for renewal and thus not part of your eligible members.
- Add a Criteria / Filters for Membership Start Date Before and set the date to the first date of your search criteria. For example if you are looking for your renewal rate for 2017, you would set the before date to 1/1/2017.
In the example above, Eligible Members = 3180.
CALCULATION: # of Renewals ÷ Eligible Members = Renewal Rate
2560 ÷ 3180 = .80 80% Renewal Rate
See Membership Report for further instructions on generating the report.
Average Membership Tenure (AMT)
Average Membership Tenure is the average length of time a member stays with the organization. This can be useful in projecting expected membership tenure for new members
| CALCULATION: 1 ÷ Lapse Rate = AMT |
Lapse Rate is calculated as described above in Lapse Rate (Churn).
- 1 ÷ .10 = 10
- Average Membership Tenure in Years is 10 years
Member Lifetime Value (MLV)
Member Lifetime Value (MLV) is the measure of monetary value of member based on projected length of membership.
| Calculation: Net member-paid revenue ÷ # of members x AMT = MLV |
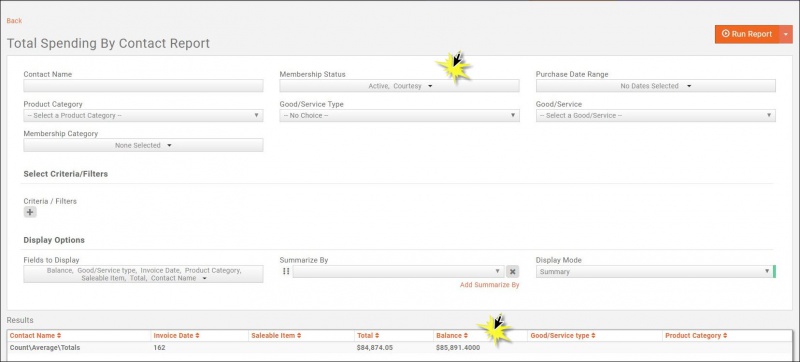
The Total Spending by Contact Report can be used to calculate the MLV. Set the Membership Status criteria to Active and Courtesy to see all dues and non-dues generated by your members.
To get the Net value, you need to subtract your operating costs from that total. You can get your operating costs from your accountant. This will give you your Net Member-paid revenue.
The End Count can be obtained from the Retention Rate calculation, described above.
AMT can be obtained from the Average Membership Tenure (AMT) calculation, described above.
Example:
- In 2017, there were 3,000 total members who collectively invested $550,000 in dues and contributed $325,000 in non-dues revenue. The operating costs were $650,000 and the organization’s AMT (average membership tenure) was 17 years.
- $550,000 + $325,000 = $875,000 (dues revenue plus member-generated nondues revenue)
- $875,000 – $650,000 = $225,000 (total member-generated revenue minus total operating costs)
- $225,000 ÷ 3,000 = $75 (net member-generated revenue divided by number of members)
- $75 x 17 = $1,275 (average member contributed revenue x AMT)
- MEMBER LIFETIME VALUE = $1,275
Member Acquisition Cost (MAC)
Member Acquisition Cost (MAC) is the total monetary cost associated with recruiting a new member. To effectively maintain and/or grow an organization, it is necessary to assign an average monetary value to potential membership sales.
| Total recruitment cost ÷ # of new members = MAC |
- Calculate the # of new members as described in Retention Rate above.
- The Total Recruitment cost would be available from your accountant.
Example:
- At the end of 2017, 75 new members had joined and $28,875 was spent on new member recruitment.
- $28875 ÷ 75 = $385
- MEMBER ACQUISITION COST = $385
MLV to MAC ratio
The MLV to MAC ratio is the measurement of the relationship between the lifetime value of a member and the cost of acquiring that member. Best Practice: Aim for 3:1 as the target ratio.
| CALCULATION: MLV : MAC |
Calculate your Member Lifetime Value (MLV) and Member Acquisition Cost (MAC) as described above.
- Example: In 2017, the average lifetime value per member was $1,275. $32,000 was budgeted for member recruitment and $28,875 was spent. Breaking down those numbers further means the budgeted recruitment cost was $425/ new member and the actual recruitment spend was $385/ new member.
- Goal ratio = 3 : 1 ($1,275 : $425)
- Actual ratio = 3.3 : 1 ($1,275 : $385)
Membership Change Report
The Membership Change Report provides you with a way to view and analyze membership type changes, as well as fee changes. For example, if you have had a major marketing campaign to upgrade members to a higher membership level, you can generate this report based on the Membership Purchase Type and a specified change date range. You could also include Sales contact in your report, if you want to see which sales person was responsible for the upgrade.
The report may be filtered on the following standard criteria:
- Sales Contact
- Membership Purchase Type (New, Upgrade, Downgrade, Renewal, Adjustment, Re-activated)
- Membership Type
- Change Date Range
- Click Reports in the Navigation Panel
- Select Membership Change Report.
- Select your search filtering criteria.
- Click Run Report.
See Common Report Functions for performing the following:
- Export as PDF
- Export as Excel.
- Export Summary as PDF
- Export Summary as Excel
- Email Report
- Add to List
- Mailing Labels
- Save as New Report
- Add as Favorite Report
Membership Referral Report
The Membership Referral Report allows you to generate a list of members, and the contact who referred them to your organization. The Referred by Contact Name field pulls from the Referred By Contact information entered when you add a membership from the back office.
- Click Reports in the Navigation Panel
- Select Membership Referral Report.
- Select your search filtering criteria.
- Select desired display options. The system is setup with default display options. Click the drop down arrow on Fields to Display to add or removed display options.
- Select Summarize By. This is an optional setting that will allow you to group the results of your report. For example, if you wish to group the report by the contact who referred a member, you would select Contact Name.
- Click Run Report.
In the example above, the report is filtered on contacts who referred members, i.e. Edibles referred Antiques on Main.
See Common Report Functions for performing the following:
- Export as PDF
- Export as Excel.
- Export Summary as PDF
- Export Summary as Excel
- Email Report
- Add to List
- Mailing Labels
- Save as New Report
- Add as Favorite Report
Membership Report
The Membership Report provides detail information regarding memberships. It can be filtered by membership type(s), membership status(es), membership category(ies), chapter(s), membership start month, renewal month and/or good/service item(s). You can filter this report to a specific membership type and membership status, or by custom filter criteria. For example, if you want to generate a list of members renewing in a specific month, you can select Renewal Month as Criteria/Filters.
- Click Reports in the Navigation Panel
- Select Membership Report.
- Select your search filtering criteria.
- Add additional Criteria/Filters - optional.
- Select desired display options. The system is setup with default display options. Click the drop down arrow on Fields to Display to add or removed display options.
- Select Summarize By. This is an optional setting that will allow you to group the results of your report. For example, if you wish to group the report by membership, you would select Membership.
- Click Run Report.
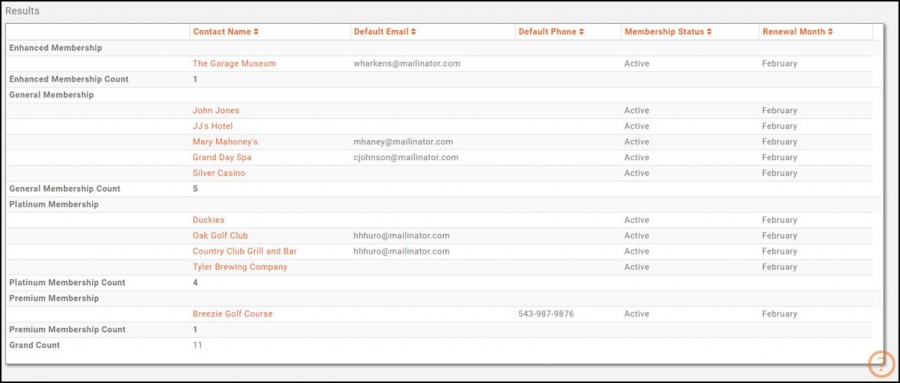
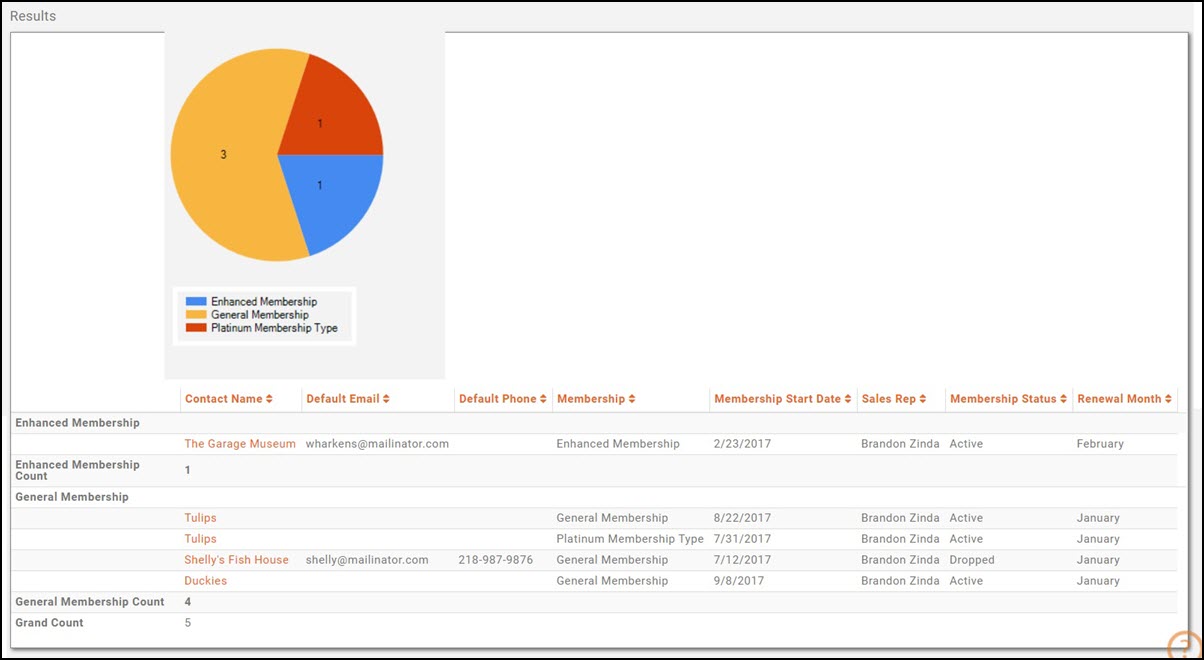
The report shown above is filtered on all memberships, renewing in February. The report is summarized by membership type.
See Common Report Functions for performing the following:
- Export as PDF
- Export as Excel.
- Export Summary as PDF
- Export Summary as Excel
- Email Report
- Add to List
- Mailing Labels
- Save as New Report
- Add as Favorite Report
Create Membership Card via Membership Report Mail Merge
The Mail Merge feature allows you to take the results from your Member report and perform a mail merge via MS Word. Several templates are setup by default, including a Member Card template.
- Define the desired filters for your report. NOTE: The report Display Options must include the field you wish to include in your MailMerge.
- Click the down arrow on the Run Report button.
- Click Mail Merge.
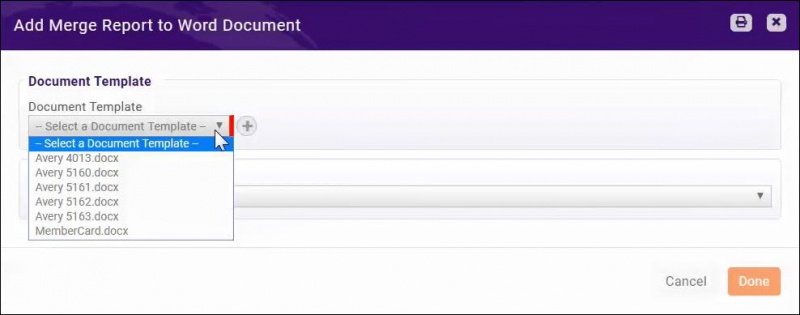
- Select the desired template from the list. NOTE: Only templates designed as Member type will be available for selection. If needed, click the
 to upload a new template. See Setting Up Document Templates for further information on configuring and uploading templates.
 - Select the desired output format: PDF or Word Document.
- Click Done.
The file will download, and you can make any necessary changes prior to printing out your badges.
New Membership Report
The New Membership Report allows you to view new members by type, status, membership category, chapter, start date, or by goods/services item. This report can be useful to provide annual statistics on new memberships.
- Click Reports in the Navigation Panel
- Select New Membership Report.
- Select your search filtering criteria. For example, if you want to see year to date statistics, select This Year from the Start Date' drop-down list.
- Optional - Enter a Search/Filter query. For example, if you would like to view new membership sales by a specific sales person select Sales Rep.
- Select Display Options. They system is setup with default fields to display in your report. You may add or remove fields by clicking on the Fields to Display drop-down arrow.
- Select Summarize by criteria. This optional field allows you to select how you wish report results grouped. For example, you may choose to group results by membership type.
- Click Run Report.
See Common Report Functions for performing the following:
- Export as PDF
- Export as Excel.
- Export Summary as PDF
- Export Summary as Excel
- Email Report
- Add to List
- Mailing Labels
- Save as New Report
- Add as Favorite Report
Renewal Membership Report
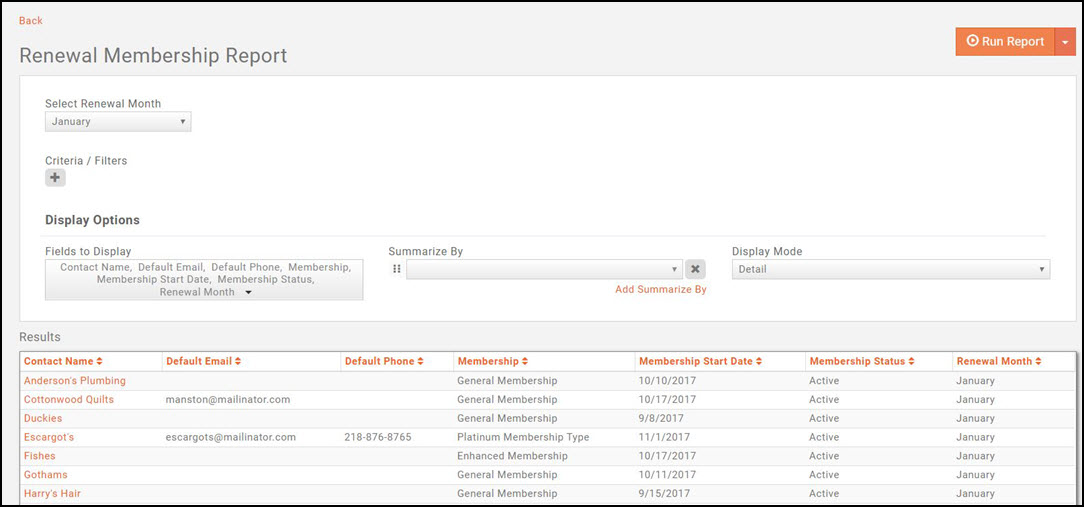
The Renewal Membership Report allows you to generate a list of all members, with the associated renewal month. You may choose specific renewal months to narrow report results.
- Click Reports in the Navigation Panel
- Select Renewal Membership Report.
- Select your search filtering criteria.
- Click Run Report.
See Common Report Functions for performing the following:
- Export as PDF
- Export as Excel.
- Export Summary as PDF
- Export Summary as Excel
- Email Report
- Add to List
- Mailing Labels
- Save as New Report
- Add as Favorite Report
Dropped Membership Report
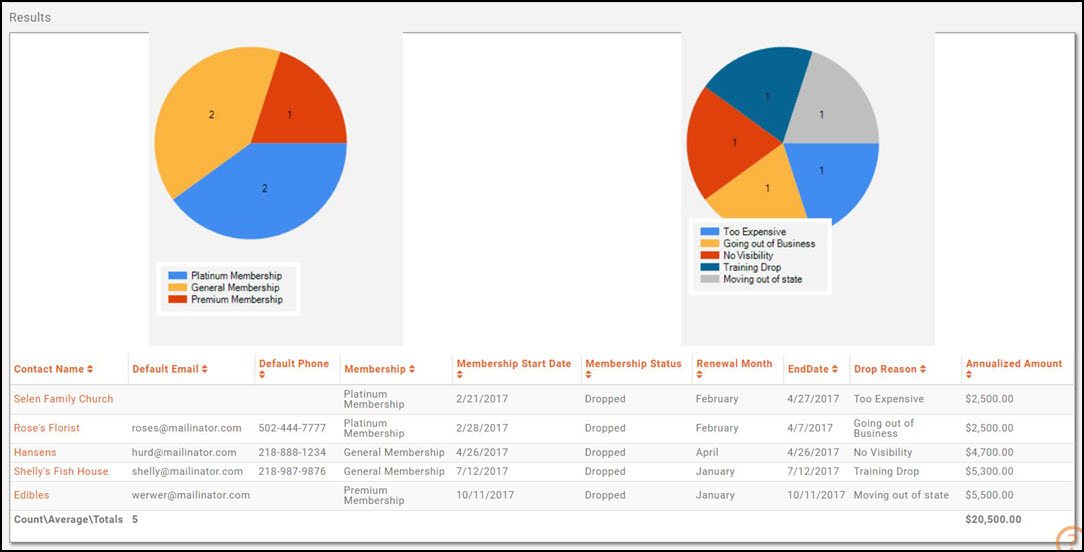
The Dropped Membership Report ill show you which memberships have dropped along with the dropped details. It can be filtered by dropped date range, by specific membership type(s), chapter and sales rep. The report can help you in identifying the reason members drop, as well as view the annualized revenue loss due to the drop.
- Click Reports in the Navigation Panel
- Select Dropped Membership Report.
- Select your search filtering criteria.
- Optional - enter additional Criteria/Filters. For example, if you have a drop reason called Too Expensive, you could filter on that specific Drop Reason to analyze the number of members who have dropped due to cost.
- Select Display Options. They system is setup with default fields to display in your report. You may add or remove fields by clicking on the Fields to Display drop-down arrow.
- Select Summarize By criteria. This optional field allows you to select how you wish report results grouped. For example, you may choose to group results by drop reason.
- Click the Run Report button.
See Common Report Functions for performing the following:
- Export as PDF
- Export as Excel.
- Export Summary as PDF
- Export Summary as Excel
- Email Report
- Add to List
- Mailing Labels
- Save as New Report
- Add as Favorite Report
Retention Report
Result displayed:
- Starting Count: This is the number of active members at the start of the month.
- Ending Count: This is the number of active members on the last day of the month.
- New Members Added this Month: Count of Membership Owners that have a Membership Start Date that falls within this month (include all Membership Status')
- Dropped Members this Month: Count of Membership Owners that have a Membership End Date that falls within this month (include all Membership status)
- New Investment: Total of all scheduled billing items tied to the memberships for New Members Added this Month. (scheduled billing items tied to this membership where the scheduled billing is not ended)
- Lost Investment: Total of all scheduled billing items tied to the memberships for Dropped Members This Month. This includes all scheduled billing items not ended plus those that are ended with an end date during this 12 month period (most of them will be)
- Retention Rate = (End Count - New Members) / Start Count
- Churn Rate = Dropped Member / Start Count
Communications Reports
Communication Report
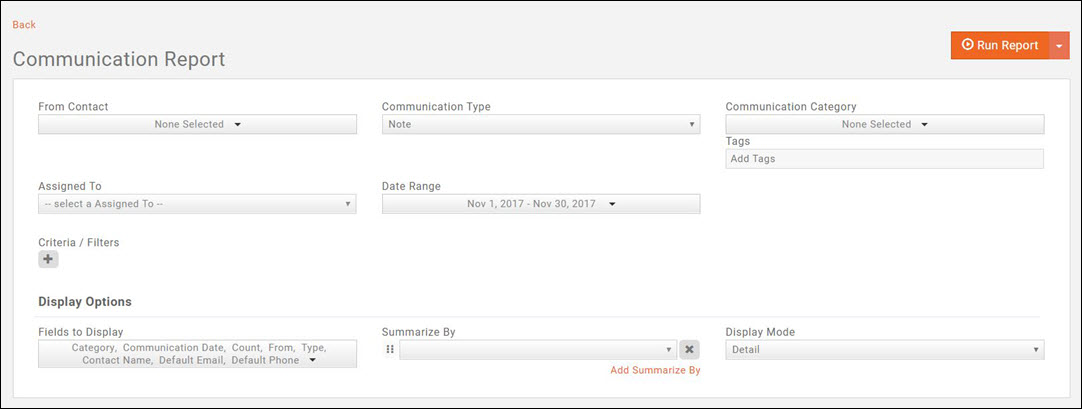
The Communication Report allows you to generate a list of all communications (regardless of type). The report may be filtered to a specific From Contact, specific type of communication, communication category, assigned to, date range, category, or your own custom filters.
- Click Reports in the Navigation Panel
- Select Communication Report.
- Select your search filtering criteria.
- Optional - Enter a Search/Filter query. For example, if you want to filter the report results to just a specific business category you would select Business Category as filtering criteria.
- Select Display Options. They system is setup with default fields to display in your report. You may add or remove fields by clicking on the Fields to Display drop-down arrow.
- Select Summarize by criteria. This optional field allows you to select how you wish report results grouped. For example, you may choose to group results by type of communication.
- Click Run Report.
See Common Report Functions for performing the following:
- Export as PDF
- Export as Excel.
- Export Summary as PDF
- Export Summary as Excel
- Email Report
- Add to List
- Save as New Report
- Add as Favorite Report
Failed/Invalid Email Communications Report
The Failed/Invalid Email Communications Report generates a list of all emails that have failed in a specific date range. This report may be useful in identifying emails that have not successfully reached the recipient (and the reason), as well as provide information for cleaning up your emails within the database.
- Click Reports in the Navigation Panel
- Select Failed/Invalid Email Report.
- Select your search filtering criteria.
- Optional - Enter a Search/Filter query. For example, if you wish to view failed emails that contained the word invoice in the subject line, you would select Communication Subject Contains Invoice.
- Select Display Options.
- The system is setup with default fields to display in your report. You may add or remove fields by clicking on the Fields to Display drop-down arrow.
- Select Summarize by criteria. This optional field allows you to select how you wish report results grouped. For example, you may choose to group results by communication subject.
- Select the desired Display Mode: In Detail mode, the report will list all email addresses that meet your filtering criteria. In Summary mode, the report will simply provide a total of the invalid email failures that meet your filtering criteria.
- Click Run Report.
From the report, you will be able to click into the email to access the contact's General Tab. From this tab, you will be able to manage the invalid email. See Managing Invalid Emails for further information.
See Common Report Functions for performing the following:
- Export as PDF
- Export as Excel.
- Export Summary as PDF
- Export Summary as Excel
- Email Report
- Add to List
- Save as New Report
- Add as Favorite Report
Invalid Email Addresses Report
When an email is bounced or gets a spam report, it is flagged in your system. The system will prevent you from sending emails to flagged/invalid emails. The Invalid Email Addresses Report provides a list of all emails in your database that have been marked invalid.
- Click Reports in the Navigation Panel
- Select Invalid Email Addresses Report.
- Enter desired filtering options:
- Email Validity Change Date: If you wish to view results for email addresses based on when they were flagged in your system, select a change date.
- Contact: If you wish to view results for an individual contact, type the name of the contact.
- Additional Filtering Criteria: Add additional criteria, as needed. For example: if you wish to view only emails that have been flagged for a specific reason, choose Validity Status, then enter the bounce reason.
- Select Display Options.
- The system is setup with default fields to display in your report. You may add or remove fields by clicking on the Fields to Display drop-down arrow.
- Select Summarize by criteria. This optional field allows you to select how you wish report results grouped. For example, you may choose to group results by Validity Status.
- Display Mode: Select the desired display mode. When Detail is selected, a list of all email addresses will be displayed. When Summary is selected, a list of each validity status and the number of bad emails will be displayed.
- Click Run Report.
From the report, you will be able to click into the name of a contact to access the contact's General Tab. From this tab, you will be able to manage the invalid email. See Managing Invalid Emails for further information.
See Common Report Functions for performing the following:
- Export as PDF
- Export as Excel.
- Export Summary as PDF
- Export Summary as Excel
- Email Report
- Add to List
- Save as New Report
- Add as Favorite Report
Email Delivery Failure Report
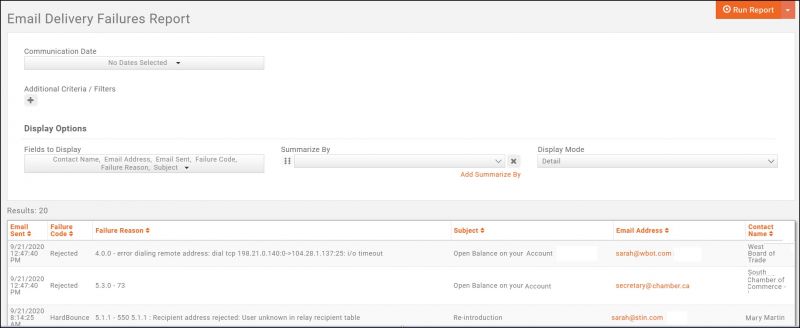
The Email Delivery Failures Report shows email failures direct from the email server error logs. These errors include hard bounces, blocked emails, dropped emails, rejections, and spam complaints.
- Click Reports in the Navigation Pane.
- Select Email Delivery Failures Report.
- Select desired filtering.
- Click Run Report.
See Common Report Functions for performing the following:
- Export as PDF
- Export as Excel.
- Export Summary as PDF
- Export Summary as Excel
- Email Report
- Add to List
- Save as New Report
- Add as Favorite Report
Unsubscribed Contacts Report
The Unsubscribed Contacts Report provides a list of those contacts who have unsubscribed from list/committee email communications. It can be filtered by individual contact email, a specific list/committee and/or the opt-out date or date range.
- Click Reports in the Navigation Panel
- Select Unsubscribed Contacts Report.
- Select your search filtering criteria. For example, you may wish to search for unsubscribed contact that are members of a specific list/committee.
- Optional - Enter a Search/Filter query.
- Select Display Options. They system is setup with default fields to display in your report. You may add or remove fields by clicking on the Fields to Display drop-down arrow.
- Select Summarize by criteria. This optional field allows you to select how you wish report results grouped. For example, you may choose to group results by committees.
- Click Run Report.
See Common Report Functions for performing the following:
- Export as PDF
- Export as Excel.
- Export Summary as PDF
- Export Summary as Excel
- Email Report
- Add to List
- Save as New Report
- Add as Favorite Report
Billing Reports
Your software provides a wide range of reports that can be used to monitor your billing and update your general accounting software.
Looking for specific billing reports? The billing reports are organized into five categories:
You will see these categories in the filter drop down on the top of the reports page. Any customized/saved reports that you have created will be in the respective categories, based on the base report you saved from. |
Accounting General Ledger Reports
Accounting Summary
The Accounting Summary tab in the Billing module provides you with a summary of the credits and debits to your accounts. This summary may be filtered in the way that you need to update your general accounting software. See Accounting Summary for further details.
Accounts Receivable Aging Summary
The Accounts Receivable Aging Summary report allows you to keep on top of outstanding invoices. It will give you a solid understanding of your existing and future cash flow position. It provides a list of all invoices in specific aging ranges (Current, 1 - 30 days, 31 - 60 days, 61 - 90 days, 91 - 120 day, and 121+ days). by specific product category (ie. Membership Dues) or Accounts. Reviewing your accounts receivable aging report at least monthly—and ideally more often—can help to ensure that your members are paying you. It at least tells you where they stand so you can take steps to collect if necessary.
- On the Billing module overview tab, click Accounts Receivable in the Reports section.
- Select any desired filtering criteria: Report Date, Good/Service Type, Income Account, or additional Criteria / Filters.
- Select any desired fields to display on the report from the Display Options. This option will allow you to limit the results to a specific date range, for example 120 days +.
- Click Run Report.
You can perform the following actions with the report by clicking the down arrow on the Run Report button:
See Common Report Functions for performing the following:
- Export as PDF
- Export as Excel
- Export Summary as PDF
- Export Summary as Excel
- Email Report
- Add to List
- Save as New Report
- Add as Favorite Report
Accounts Receivable Aging Detail
The Accounts Receivable Aging Detail report displays detailed information on aging customer accounts. The report displays “detail” information; instead of balances and summary information, the detail report includes individual transactions. The aging report can be used as a primary tool used by collections personnel to determine which invoices are overdue for payment.
- Click Reports in the Navigation Panel
- Select Accounts Receivable Aging Detail.
- Select your search filtering criteria.
- Optional - Enter a Search/Filter query. For example, if you want to filter the report results to just receivable that are more than 90 days old, you would select Aging as filtering criteria.
- Select Display Options. They system is setup with default fields to display in your report. You may add or remove fields by clicking on the Fields to Display drop-down arrow.
- Select Summarize by criteria. This optional field allows you to select how you wish report results grouped. For example, you may choose to group results by contact or account type.
- Click Run Report.
See Common Report Functions for performing the following:
- Export as PDF
- Export as Excel
- Export Summary as PDF
- Export Summary as Excel
- Email Report
- Add to List
- Save as New Report
- Add as Favorite Report
Accounting Transaction Report
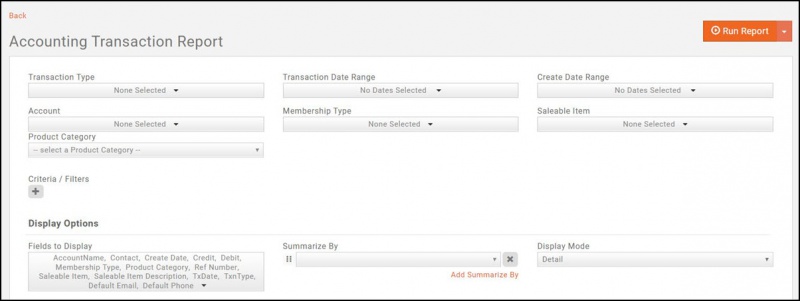
The Accounting Transaction Report will generate a report of all of your debit and credit transactions in a specified date range. It may be filtered to specific transaction types, accounts, date range, membership type, goods/services or product category. This report will display the "double-entry" transactions, which means that there are always two sides to the record, the debit and the credit sides.
- Click Reports in the Navigation Panel
- Select Accounting Transaction Report.
- Select your search filtering criteria.
- Optional - Enter a Search/Filter query. For example, if you want to filter the report results to just an individual member, you would select Contact as filtering criteria.
- Select Display Options. They system is setup with default fields to display in your report. You may add or remove fields by clicking on the Fields to Display drop-down arrow.
- Select Summarize by criteria. This optional field allows you to select how you wish report results grouped. For example, you may choose to group results by contact or even account type.
- Click Run Report.
The above report is generated on specific accounts (Dinner Income and Training Income), specific contact (Nelson's Accounting) and summarized by Account type.
See Common Report Functions for performing the following:
- Export as PDF
- Export as Excel.
- Export Summary as PDF
- Export Summary as Excel
- Email Report
- Add to List
- Save as New Report
- Add as Favorite Report
Recognized Income Report
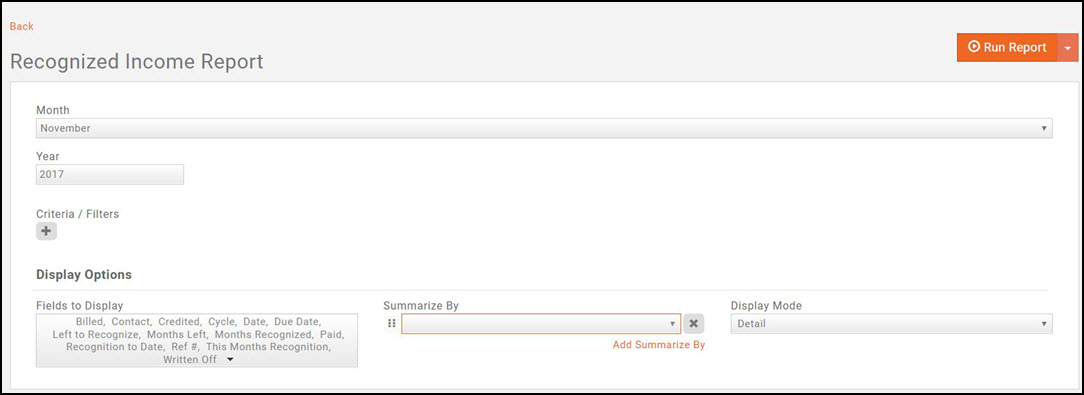
The Recognized Income Report allows you to generate a report displaying income that has been recognized and income remaining to be recognized for a selected month. This report should be used if you are just getting started with GrowthZone and you wish to balance with your old system.
- Click Reports in the Navigation Panel
- Select Recognized Income Report.
- Select your search filtering criteria.
- Optional - Enter a Search/Filter query. For example, if you wish to view only those with an annual cycle (cycle is the number of recognition months).
- Select Display Options. They system is setup with default fields to display in your report. You may add and/or remove fields by clicking on the Fields to Display drop-down arrow.
- Select Summarize by criteria. This optional field allows you to select how you wish report results grouped, for example, you may wish to group by contact name.
- Click Run Report.
See Common Report Functions for performing the following:
- Export as PDF
- Export as Excel.
- Export Summary as PDF
- Export Summary as Excel
- Email Report
- Add to List
- Save as New Report
- Add as Favorite Report
Revenue Recognition Report
The Revenue Recognition Report shows transactions by cycle to allow you to identify the amounts recognized and the amounts remaining to be recognized when deferring revenue The report displays the journal entries for each good/service in that period. Write-offs, credits, invoices, payments, and so on are included in the report. This report should only be used if the transactions have been created within the GrowthZone software.
- Click Reports in the Navigation Panel
- Select Revenue Recognition Report.
- Select your search filtering criteria. For example, you may wish to view just a selected date range.
- Optional - Enter a Search/Filter query. For example, if you wish to view all write-offs, select Tx Type.
- Select Display Options. They system is setup with default fields to display in your report. You may add and/or remove fields by clicking on the Fields to Display drop-down arrow.
- Select Summarize by criteria. This optional field allows you to select how you wish report results grouped, for example, you may wish to group by customer or account name.
- Click Run Report.
See Common Report Functions for performing the following:
- Export as PDF
- Export as Excel.
- Export Summary as PDF
- Export Summary as Excel
- Email Report
- Add to List
- Save as New Report
- Add as Favorite Report
Sales by Account Report
The Sales by Account Report provides a record of all sales for each account in your chart of accounts. It can be used for future budgeting purposes, to view sales generated based on member join dates, to be able to analyze sales generated by new memberships. This report may be useful when reconciling to your accounting software if there are any discrepancies.
- Click Reports in the Navigation Panel
- Select Sales by Account Report.
- Select your search filtering criteria. For example, you may wish to view just a selected date range.
- Optional - Enter a Search/Filter query. For example, if you wish to view a specific account, select Account Name.
- Select Display Options. They system is setup with default fields to display in your report. You may add and/or remove fields by clicking on the Fields to Display drop-down arrow.
- Select Summarize by criteria. This optional field allows you to select how you wish report results grouped, for example, you may wish to group by account name.
- Click Run Report.
See Common Report Functions for performing the following:
- Export as PDF
- Export as Excel.
- Export Summary as PDF
- Export Summary as Excel
- Email Report
- Add to List
- Save as New Report
- Add as Favorite Report
Banking Reports
Deposit Summary Report
The Deposit Summary Report provides a list of all deposits you have created in the GrowthZone software, and the total of the deposit. If deposits are being created for your credit card processing, this report may be used to reconcile deposits made in GrowthZone to the deposits made directly to your back accounts. To view the individual payments that make up your deposits, use the Deposit Report.
- Click Reports in the Navigation Panel
- Select Deposit Summary Report.
- Select your search filtering criteria.
- Optional - Enter a Search/Filter query.
- Select Display Options. They system is setup with default fields to display in your report. You may add or remove fields by clicking on the Fields to Display drop-down arrow. By default, the report will include account name, deposit amount, deposit date, notes, and total payments.
- Select Summarize by criteria. This optional field allows you to select how you wish report results grouped. For example, you may choose to group results by account name.
- Click Run Report.
See Common Report Functions for performing the following:
- Export as PDF
- Export as Excel
- Export Summary as PDF
- Export Summary as Excel
- Email Report
- Add to List (N/A for Deposit Summary Report)
- Save as New Report
- Add as Favorite Report
Deposit Report
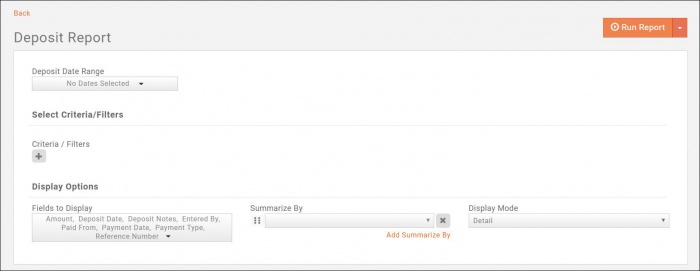
The Deposit Report provides a list of all payments that make up an individual deposit. It can be useful in reconciling to your bank account, and reviewing the results you received in the Deposit Summary Report. Summarize By Deposit Date to get a view of the total payments that made up a deposit. Can be filtered by payment type, so you can see checks/cash vs. credit card deposits..
- Click Reports in the Navigation Panel
- Select Deposit Report.
- Selected desired Deposit Date Range. If you do not select a date range, all deposits will be displayed in the report.
- (Optional) Enter additional Criteria / Filters.
- (Optional) Configure Display Options:
- Select or deselect Fields to Display. By default the report will display: Amount, Deposit Date, Deposit Notes, Entered By, Paid From, Payment Date, Payment Type, Reference Number.
- Summarize By: Select the option you wish to summarize by. For example, you may wish to summarize by the Deposit Date.
- Display Mode: Select Detail or Summary. NOTE: If Summary is selected, you will only see a count of the number of deposits.
- Click Run Report.
See Common Report Functions for performing the following:
- Export as PDF
- Export as Excel
- Export Summary as PDF
- Export Summary as Excel
- Email Report
- Add to List (N/A for Deposit Report)
- Save as New Report
- Add as Favorite Report
Credit Card Processing Reports (GZ Pay)
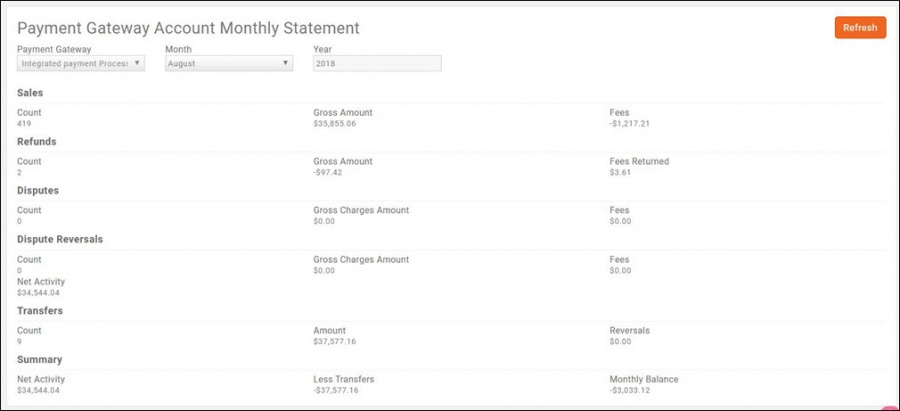
GrowthZone Pay Monthly Statement
The GrowthZone Pay Monthly Statement summarizes all of your income from all of your payment gateways per month. The results can be filtered by payment gateway or date range.
- On the Billing module Overview tab, click GrowthZone Pay Monthly Statement in the Reports section. The report is automatically generated and will default to the current month.
- To change the filtering criteria, select desired filtering criteria: Payment Gateway, Month, Year.
- Click Refresh Report.
GrowthZone Pay Monthly Transfers
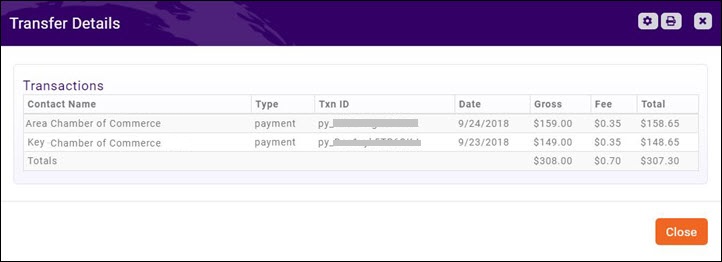
The GrowthZone Pay Monthly Transfers report provides a list of all transfers from a selected gateway, month and year. This report will give you all of the payments that match up with a specific transfers to your bank account and the initial transaction date. This report should be used to find the fees associated with credit card transactions so that you can make the appropriate journal entries into your accounting software.
| NOTE: Your very first deposit (transfer) may take up to 7 days to be deposited. After that, deposits (transfers) are made daily and are typically composed of the payments that were processed two days prior for most US and Australia customers; seven days for other countries. For example, August 1st charges are deposited by August 3rd for most US and Australia customers; August 8th for other countries. August 2nd charges are deposited by August 4th for most US and Australia customers; August 9th for other countries. On occasion, banks may take 2-3 additional days to post funds. Also keep in mind that transfers that are scheduled on weekends or holidays won’t be accepted by your bank until the next business day. Also some US and Australia customers may initially be set for a seven day transfer while business activity is evaluated. |
- On the Billing module overview tab, click GrowthZone Pay Monthly Transfers in the Reports section. The report is automatically generated and will default to the current month.
- To change the filtering criteria, select desired filtering criteria: Payment Gateway, Month, Year.
- Click Refresh Report.
By clicking into the id link for a given date, you will be able to see the specific transfers along with the contact name, transaction ID, payment amount and fees.
| NOTE: An automated process will create a deposit, within the GrowthZone software, for each GrowthZone pay transfer. A separate deposit will be created for payments processed through bank accounts and payments processed to credit cards. The automated deposit will be for the Gross amount. See Deposits for further details. |
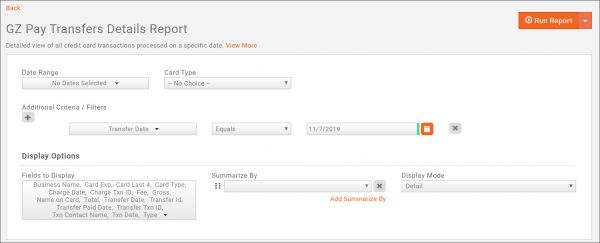
GZ Pay Transfers Details Report
This report provides a detailed view of all credit card transactions processed on a specific date. The goods/services or events associated with a transaction inside a transfer can also be viewed, making this a great report for reconciling deposits.
- Select Billing in the left-hand navigation panel.
- On the Overview tab, click GZ Pay Transfer Details Report in the Reports section.
- Configure the filters you wish for the report results:
- Date Range: Enter the desired date range. Transfers paid that occurred in this range will be included in the report.
- Card Type: If you wish to limit the results to one or more card types, select the desired type(s).
- Additional Criteria / Filters: You can add additional filters as needed.
- Click Run Report.
GrowthZone Pay Disputes
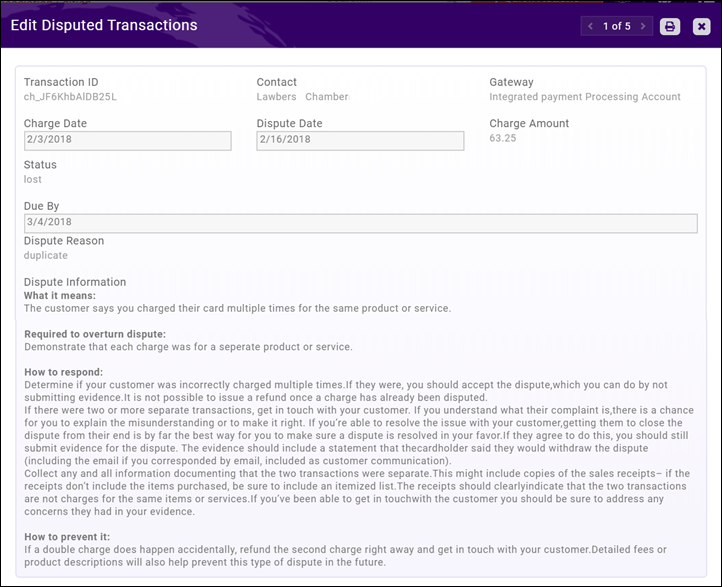
Disputes are an unfortunate part of accepting payments online, but they are not typically common. Disputes and the reasons for them (e.g., fraud) are ultimately your responsibility so you must take the appropriate actions to prevent and respond to disputes.
When a dispute is filed for a credit card charge, a notification is sent to the email listed in Credit Card Account/Dispute Notifications Email under the Payment Gateway settings. Within the email is a link that allows for answering the dispute. There is a dispute resolution process through which you can respond and submit evidence to make the case that the payment was valid. If the dispute is found in your favor, the disputed amount and fee is returned back to you. If a dispute is upheld, the card issuer’s decision is final and the cardholder’s payment remains refunded. NOTE: There is a specific Respond by Date, if a response is not received by this date the dispute is automatically lost.
The GrowthZone Pay Disputes report will provide further information of disputes, and also provide the opportunity to submit further documentation.
- Select Billing in the left-hand navigation panel.
- On the Overview tab, click GrowthZone Pay Disputes in the Reports section. A list of disputed transactions will be displayed.
By clicking on a Transaction ID you can view further details of the dispute, and submit evidence supporting the validity of the charge.
| NOTE: A dispute may be filed simply because the purchaser does not recognize your name on their statement. You can edit how your name appears on the statement under Setup > Finance > Payment Gateways. |
Payment Processing Report
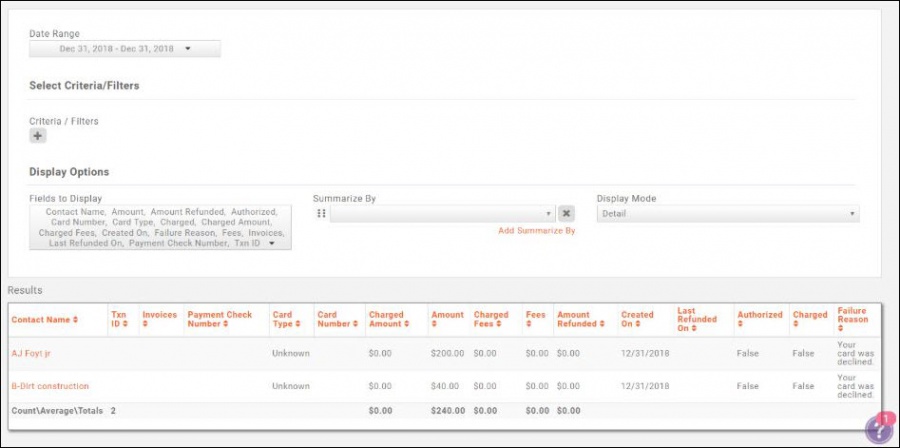
The Payment Processing Report will allow you to view the date of transactions and the success/failure of those transactions.
- Click Reports in the left-hand navigation panel.
- Select Payment Processing Report.
- Select your search filtering criteria.
- Click Run Report.
See Common Report Functions for performing the following:
- Export as PDF
- Export as Excel
- Export Summary as PDF
- Export Summary as Excel
- Email Report
- Add to List
- Save as New Report
- Add as Favorite Report
Stored Payment Profiles Report
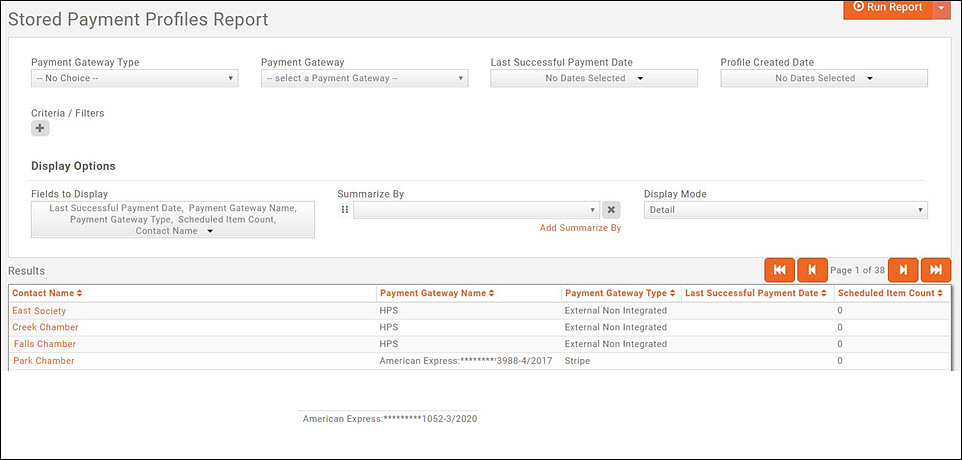
The Stored Payment Profiles Report provides a list of your contacts and their stored payment profiles (credit card or bank account). You can filter by when a transaction was last processed using the profile or when the profile was added. This can be useful if you want to track and reward members for setting up a payment profile. Built-in filters allow you to generate the report based on Payment Gateway Type, Payment Gateway, Last Successful Payment Date, and Profile Created Date.
- Click Reports in the Navigation Panel
- Select Stored Payment Profiles Report.
- Select your search filtering criteria.
- Click Run Report.
See Common Report Functions for performing the following:
- Export as PDF
- Export as Excel
- Export Summary as PDF
- Export Summary as Excel
- Email Report
- Add to List
- Save as New Report
- Add as Favorite Report
Collections Reports
Collections Detail Report
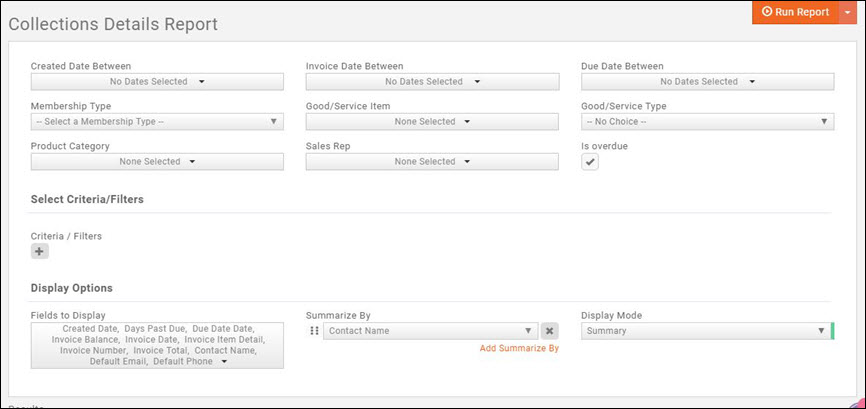
The Collections Detail Report will allow you to search for over-due invoices based on invoice date, invoice due date, membership type, product category, goods/service type, sales person, etc. This report can help manage who has a membership that has been invoiced that has not been paid in full (then perhaps determining whether the membership is dropped, or whether you would reach out to the member). You can add additional filters, such as Days Past Due, to search for invoices that have aged beyond a certain number of days. Once the report is generated, you may use the list to generate a group that could be used for sending collections notices.
- Click Reports in the left-hand navigation panel.
- Select Collections Detail Report.
- Select your search filtering criteria.
- Display Options
- Fields to Display: Default fields are automatically included in your report. You may add or remove fields as needed. For Example, if you wish further details about a membership, you may wish to add Membership Join Date/Start Date and the Membership Type to the report.
- Select a Summarize By option. For example, you can summarize the report by Contact Name to group together all of the invoices by contact.
- Select desired Display Mode. Select Detail show individual invoices for a contact; or Summary to display the total of all contacts invoices.
- Click Run Report.
The report will show detailed information about the contact, the invoices items, number of days past due, etc. In the above example, the report was Summarize By contact name, and the Display Mode is set to Detail.
See Common Report Functions for performing the following:
- Export as PDF
- Export as Excel
- Export Summary as PDF
- Export Summary as Excel
- Email Report
- Add to List
- Save as New Report
- Add as Favorite Report
Collections by Member Report
The Collections by Member Report shows the total amount owed by a contact. It can be filtered by particular goods/services, salesperson, or due date ranges. It may be particularly useful for sending collections letters or for assigning salesperson follow-ups.
The report may be filtered in the following ways:
- Created Date Between (created date = the date the invoice was created)
- Invoice Date Between
- Due Date Between
- Membership Type
- Good/Service Item
- Good/Service Type
- Product Category
- Sales Rep
- Only Show Past Due
- Click Reports in the left-hand navigation panel.
- Select Collections by Member Report.
- Enter desired filtering options.
- Click Run Report.
See Common Report Functions for performing the following:
- Export as PDF
- Export as Excel
- Export Summary as PDF
- Export Summary as Excel
- Email Report
- Add to List
- Save as New Report
- Add as Favorite Report
Open Invoices Report
The Open Invoices Report gives you a comprehensive list of all open invoices, as of the report date, so you can quickly see the names of individuals or businesses you've invoiced and the amount they need to pay. This can help you to manage your past dues, as well as analyze your expected cash flow.
| NOTE: Invoices with an Invoice Date after the Report Date will not be included on this report. |
- Click Reports in the Navigation Panel
- Select Open Invoices Report.
- Select your search filtering criteria.
- Optional - Enter a Search/Filter query. For example, if you wish to view only open invoices where the balance is over a certain amount, select Invoice Balance.
- Select Display Options. They system is setup with default fields to display in your report. You may add and/or remove fields by clicking on the Fields to Display drop-down arrow.
- Select Summarize by criteria. This optional field allows you to select how you wish report results grouped, for example, you may wish to group by contact name.
- Click Run Report.
See Common Report Functions for performing the following:
- Export as PDF
- Export as Excel.
- Export Summary as PDF
- Export Summary as Excel
- Email Report
- Add to List
- Save as New Report
- Add as Favorite Report
Billing - Historical & Planning Reports
Credit Memo Report
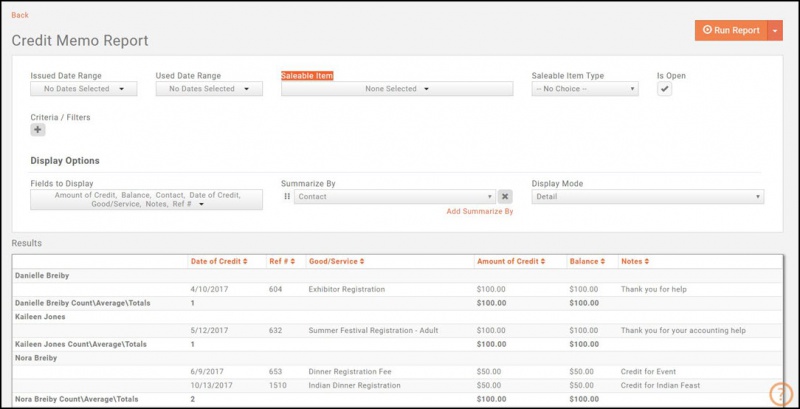
The Credit Memo Report will list all credit memos you have issued. It will provide an understanding of the offsetting transactions made to your chart of accounts. It can be filtered to just open credit memos, so that you can apply these to a member’s open invoices as needed.
- Click Reports in the Navigation Panel
- Select Credit Memo Report.
- Select your search filtering criteria.
- Click Run Report.
See Common Report Functions for performing the following:
- Export as PDF
- Export as Excel
- Export Summary as PDF
- Export Summary as Excel
- Email Report
- Add to List
- Save as New Report
- Add as Favorite Report
Last Bill Date
The Last Bill Date report will allow you to generate a list of the last time a member was billed. It can be filtered by product type, for example, if you wish to view a list of the last time members were billed for Membership Dues.
Filtering options for the report include:
- Date Range
- Good/Service Type
- Membership Type
- Membership Status
- Bill Frequency
- Renewal Month
- Click Reports in the left-hand navigation panel
- Click Last Bill Date
- Enter desired filtering options.
- Click Run Report.
See Common Report Functions for performing the following:
- Export as PDF
- Export as Excel.
- Export Summary as PDF
- Export Summary as Excel
- Email Report
- Add to List
- Save as New Report
- Add as Favorite Report
Membership Invoices by Month (Beta)
The Membership Invoices by Month report provides a monthly look at paid and unpaid memberships – grouped into months by membership activation date. It provides a calculation of the percentage of paid vs unpaid membership counts and monetary amounts for each month. The companion report is the Membership Invoices report which provides the details that make up the summary data.
- Click Reports in the left-hand navigation panel
- Click Membership Invoices by Month (Beta).
Recurring Billing Report
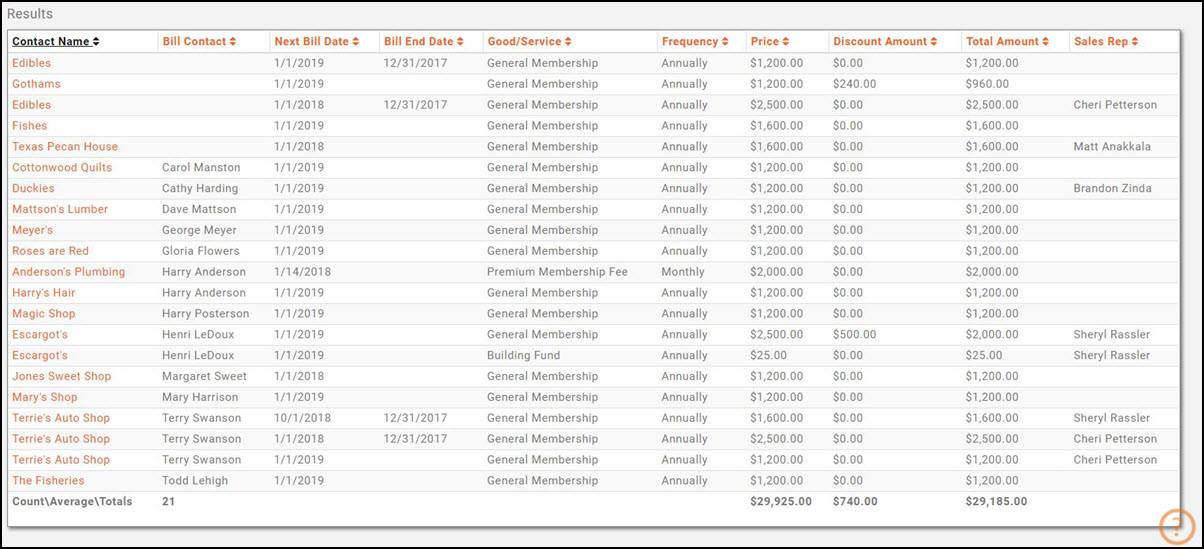
The Recurring Billing Report will provide you with a list of Scheduled Billing configured for your contacts. This will include all schedules, not just membership. Tip: This report can be used to view expected revenue based on the schedules, and, can be generated for a specified date range, or a specific Renewal Month.
| Summarize this report by renewal month, and you will have the total expected revenue on a monthly basis for budgeting purposes! |
- Click Reports in the Navigation Panel
- Select Recurring Billing Report.
- Select your search filtering criteria. For example, you may wish to view just a selected renewal month.
- Optional - Enter a Search/Filter query. For example, if you wish to view recurring billing based on a particular sales person, select Sales Rep.
- Select Display Options. They system is setup with default fields to display in your report. You may add and/or remove fields by clicking on the Fields to Display drop-down arrow.
- Select Summarize by criteria. This optional field allows you to select how you wish report results grouped, for example, you may wish to group by sales rep.
- Click Run Report.
See Common Report Functions for performing the following:
- Export as PDF
- Export as Excel.
- Export Summary as PDF
- Export Summary as Excel
- Email Report
- Add to List
- Save as New Report
- Add as Favorite Report
Refund Report
The Refund Report will generate a report of all refunds you have performed over a given date range. You can generate the report to display specific Saleable Items (Goods/Services), Saleable Item Type, and/or apply additional filter criteria. By default the report will display: Amount of Refund, Contact, Date of Refund, Goods/Service and Reference #.
- Click Reports in the Navigation Panel
- Select Refund Report.
- Select your search filtering criteria.
- Click Run Report.
See Common Report Functions for performing the following:
- Export as PDF
- Export as Excel
- Export Summary as PDF
- Export Summary as Excel
- Email Report
- Add to List
- Save as New Report
- Add as Favorite Report
Sales by Contact Report
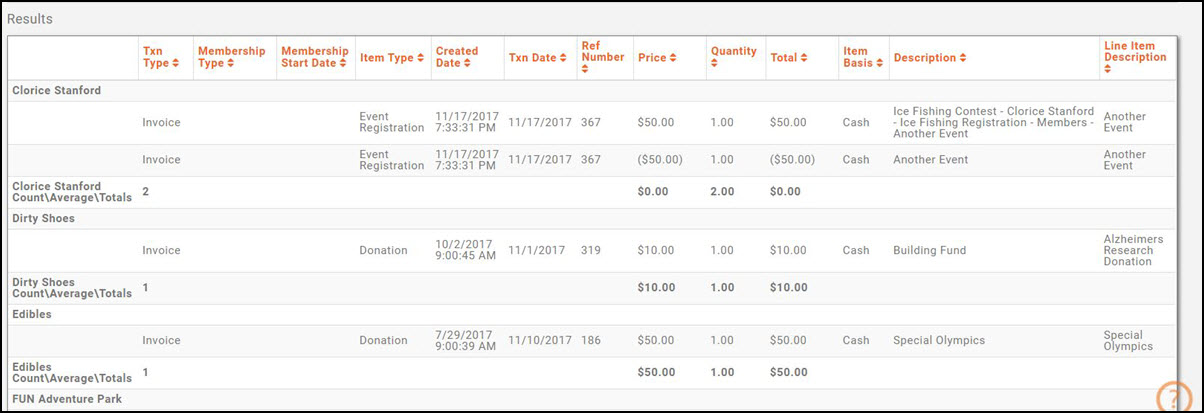
The Sales by Contact Report provides a way to analyze sales generated by all or specific members. The report may be filtered by member, specific date range, and custom search criteria. NOTE: This will display sales totals, whether the sale has been paid for or not.
- Click Reports in the Navigation Panel
- Select Sales by Contact Report.
- Select your search filtering criteria. For example, you may wish to generate the report for a specific date range.
- Optional - enter additional Criteria/Filters. For example, if you wish to generate the report based on membership type, select Membership Type.
- Select Display Options. They system is setup with default fields to display in your report. You may add or remove fields by clicking on the Fields to Display drop-down arrow.
- Select Summarize By criteria. This optional field allows you to select how you wish report results grouped. For example, you may choose to group results by contact name.
- Click the Run Report button.
See Common Report Functions for performing the following:
- Export as PDF
- Export as Excel.
- Export Summary as PDF
- Export Summary as Excel
- Email Report
- Add to List
- Save as New Report
- Add as Favorite Report
Taxes Billed Report
The Taxes Billed Report shows the taxes that you have billed and owe to tax agencies. The report can be filtered by state and/or tax-set so you can better identify taxes owed to different entities.
- Click Reports in the Navigation Panel
- Select Taxes Billed Report.
- Select your search filtering criteria. For example, you may wish to view a selected date range.
- Optional - Enter a Search/Filter query. This report will display all sales in your date range, if you wish to view only those that were taxed, you could enter tax amount greater than 0 as a filtering option.
- Select Display Options. They system is setup with default fields to display in your report. You may add and/or remove fields by clicking on the Fields to Display drop-down arrow.
- Select Summarize by criteria. This optional field allows you to select how you wish report results grouped, for example, you may wish to group by contact.
- Click Run Report.
See Common Report Functions for performing the following:
- Export as PDF
- Export as Excel.
- Export Summary as PDF
- Export Summary as Excel
- Email Report
- Add to List
- Save as New Report
- Add as Favorite Report
Total Spending by Contact Report
The Total Spending by Contact Report will provide you with the total amount contacts have spent over a given time period. It can be filtered by product category (for example events vs. membership) to view contact spending patterns. This can help you in budgeting for future years.
- Click Reports in the Navigation Panel
- Select Total Spending by Contact Report.
- Select your search filtering criteria. For example, you may wish to generate the report for a specific Good/Service Type to view spending for just that type.
- Optional - enter additional Criteria/Filters.
- Select Display Options. They system is setup with default fields to display in your report. You may add or remove fields by clicking on the Fields to Display drop-down arrow.
- Select Summarize By criteria. This optional field allows you to select how you wish report results grouped. For example, you may choose to group results by contact name.
- Click the Run Report button.
See Common Report Functions for performing the following:
- Export as PDF
- Export as Excel.
- Export Summary as PDF
- Export Summary as Excel
- Email Report
- Add to List
- Save as New Report
- Add as Favorite Report
Transactions by Contact
The Transactions by Contact report allows you to view accounting transactions for an individual contact or multiple contacts. The report, by default, will include all accounting transactions (Invoice, Payment, Over-payments, Refunds, Write-offs, and Credits). This report can be used to review and ensure that you have recorded all transactions for an individual contact or multiple contacts.
- Click Reports in the Navigation Panel
- Select Transactions by Contact.
- Select your search filtering criteria. For example, you may wish to generate the report for a specific Good/Service Type to view transactions for just that type.
- (Optional): Enter additional Criteria/Filters. For example, if you wish to view transactions for an individual contact, choose Name and enter the desired contact name, as shown below.
- Select Display Options:
- They system is setup with default fields to display in your report. You may add or remove fields by clicking on the Fields to Display drop-down arrow.
- Select Summarize By criteria. This optional field allows you to select how you wish report results grouped. For example, you may choose to group results by contact name.
- Display Mode: Select Detail to view all the individual transactions, or select Summary to view the total number of transactions per contact.
- Click Run Report.
See Common Report Functions for performing the following:
- Export as PDF
- Export as Excel.
- Export Summary as PDF
- Export Summary as Excel
- Email Report
- Add to List
- Save as New Report
- Add as Favorite Report
View Report of Voided Transactions
You can use the Transactions by Contact report to view voided invoices in a given date range. Set your Additional Filters/Criteria to TXN Type = Invoice (Voided). See Transactions by Contact report for further information on generating this report.
Voluntary Payment Report
The Voluntary Payment Report will provide you with information on voluntary fees that were either paid or not paid. This can help you in planning for the future of the programs for which you are asking for voluntary fees.
- Click Reports in the Navigation Panel.
- Click Voluntary Payment Report.
- Select your search filtering criteria.
- Click Run Report.
See Common Report Functions for performing the following:
- Export as PDF
- Export as Excel.
- Export Summary as PDF
- Export Summary as Excel
- Email Report
- Add to List
- Save as New Report
- Add as Favorite Report
Write Off Report
The Write Off Report provides an itemized list of all write-offs issued during a selected date range. There are times when an invoice becomes non-collectible and you need to write it off and declare it as bad debt so you can clear the invoice out of your accounts receivable and reduce your net profit by its amount. The write off report will provide you with a visual of the write-offs and could be used for future planning if looked at from the perspective of expected sales/write-off.
- Click Reports in the Navigation Panel
- Select Write Off Report.
- Select your search filtering criteria.
- Click Run Report.
See Common Report Functions for performing the following:
- Export as PDF
- Export as Excel
- Export Summary as PDF
- Export Summary as Excel
- Email Report
- Add to List
- Save as New Report
- Add as Favorite Report
Chapter Reports
Member Roster
The Member Roster report provides the ability to generate a roster for a specific chapter. By default, the report will display the contact name, email and phone.
Click Reports in the left-hand navigation panel.
- Click Member Roster Billing Status. NOTE to easily locate reports, click Chapter in the Show Only drop-down list.
- Select the desired Chapter from the drop-down list.
- (Optional) Add Additional Criteria / Filters if necessary.
- Display Options:
- Add or remove the Fields to Display in your report.
- (Optional) Select a Summarize By option.
- Select the desired Display Mode.
- Click Run Report.
See Common Report Functions for performing the following:
- Export as PDF
- Export as Excel.
- Export Summary as PDF
- Export Summary as Excel
- Email Report
- Add to List
- Save as New Report
- Add as Favorite Report
Member Roster Billing Status
The Member Roster Billing Status report provides the ability to review the current financials for members in an individual chapter. This report will allow you to track billing for each chapter, including amounts that haven't been billed and those that are awaiting payment.
- Click Reports in the left-hand navigation panel.
- Click Member Roster Billing Status. NOTE to easily locate reports, click Chapter in the Show Only drop-down list.
- Select the desired Chapter from the drop-down list.
- Display Options:
- Add or remove the Fields to Display in your report.
- (Optional) Select a Summarize By option.
- Select the desired Display Mode.
- Click Run Report.
See Common Report Functions for performing the following:
- Export as PDF
- Export as Excel.
- Export Summary as PDF
- Export Summary as Excel
- Email Report
- Add to List
- Save as New Report
- Add as Favorite Report
Continuing Education/Certification Reports
Reports to help you view and analyze status of your certifications are available on the Certifications Overview tab.
Continuing Education Progress Report
The Continuing Education Progress Report will provide an understanding of how an individual contact, or multiple contacts are progressing towards certification or participation in continuing education programs. The report may be filtered to a specific certification program, certification component, status, etc.
- In the Continuing Education Module, select the Overview tab.
- In the Reports section, click Continuing Education Progress Report.
- Select the desired filtering criteria:
- Certification Type Name
- Status
- Certification Category
- Certification Component Name
- Enrollment Date
- Additional Criteria / Filters
- Select desired Display Options
- Fields to Display: Add or remove the fields you wish to include in your report.
- Summarize By: Select a field by which you wish to summarize the report.
- Display Mode
- Click Run Report.
See Common Report Functions for performing the following:
- Export as PDF
- Export as Excel.
- Export Summary as PDF
- Export Summary as Excel
- Email Report
- Add to List
- Save as New Report
- Add as Favorite Report
Certification Summary Report
Using the Certification Summary Report, you can generate a list of all of your certifications and their associated settings (i.e. fees associated to the certification, whether the certification requires approval, number of contacts with active certificates, and so on). This report may be a quick way to verify settings for all of your certification programs.
This report may be filtered to specific certification types, categories, components, objectives, or your custom filter criteria.
- Click the certifications Overview tab.
- Click Certification Summary Report in the Reports section.
- Certification Type Name: This is a type ahead box. If you wish to filter the report to a specific certification, begin typing the name of the certification, and select it from the list. If left blank the report will be generated for all certifications.
- Certification Category: If you wish to filter the report to a specific certification category, select if from the list. If left blank, the report will include all categories.
- Certification Component Name: This is a type ahead box. If you wish to filter the report to a specific component, begin typing the name of the component, and select it from the list. If left blank the report will include all components.
- Additional Criteria / Filters: Add any additional filtering criteria as needed.
- Display Options:
- Fields to Display: Add or remove fields to be included in the report as needed.
- Summarize By: If you wish to group the report results in a certain way (for example, if running the report for a specific certification for the purpose of verifying the component settings, you may wish to summarize by Component Name).
- Display Mode: Select Details to see the full details of all settings or select Summary to view totalized results.
- Click the Run Report button.
See Common Report Functions for performing the following:
- Export as PDF
- Export as Excel.
- Export Summary as PDF
- Export Summary as Excel
- Email Report
- Add to List
- Save as New Report
- Add as Favorite Report
Certification Individual Report
The Certification Individual Report provides a way for you to filter to an individual contact or organization, and display all certifications, components and/or objectives the individual has met, as well as completion date. As with all reports, this report can be printed or emailed, if you need to send it to the participant or other interested parties.
Certification Roster Report
The Certification Roster Report may be used by by staff person,holding a certification training event, to create a roster OR sign in sheet. The roster may be generated for all components or a single certification component, as well as for a specific date range. A default Certification Roster documentation template is provided in your database so that you can easily create a sign in sheet. You may view and/or edit this template via the Documentation Generation functions. See Setting Up Document Templates for further information on configuring and uploading templates.
- Click the Certifications Overview tab.
- Click Roster in the Reports section.
- Select from the following filtering criteria:
- Certification Item: Begin typing the name of the component. Type ahead functionality will allow you to select the desired component. This selection is required.
- Start Date Between: Select a date range, if you wish to generate the report for specific dates.
- Additional Criteria / Filters: Select additional filters as needed.
- Display Options: Add or remove display options as needed. NOTE: If you wish to use the Mail Merge functionality, you must include all of the fields you wish to merge. Additionally, if you wish to use the roster as a sign in sheet, add the Sign In and Sign Out fields to include blank columns for this purpose in your output.
- Select any desired Summarize by options.
- Click Run Report.
- To create the mail merged roster, click the down arrow on the Run Report button.
- Click Mail Merge.
- Select the desired template from the list. NOTE: Only templates designed as Certification Roster type will be available for selection. If needed, click the
 to upload a new template. See Setting Up Document Templates for further information on configuring and uploading templates.
 - Select the desired output format: PDF or Word Document.
- Click Done.
The file will download, and you can make any necessary changes prior to printing out your roster.
See Common Report Functions for performing the following:
- Export as PDF
- Export as Excel.
- Export Summary as PDF
- Export Summary as Excel
- Email Report
- Add to List
- Save as New Report
- Add as Favorite Report
Event Reports
Various reports are available for you to analyze your events.
Event Attendees Report
The Event Attendees Report would provide the information on what events a contact has attended. Allows you to generate a list of event attendees, filtered by a specific date range, event category, calendar, list, event, attendee registration status, and/or customized search criteria. Example usage of this report includes analyzing attendance in specific event categories, or to view a list of all contacts who have been invited to events in a specified date range, but have not attended. This report could also be used to identify all event registrations for individuals associated with a specific organization.
- Click Reports in the Navigation Panel
- Select Event Attendees Report.
- Select your search filtering criteria.
- Optional - Enter a Search/Filter query.
- Select Display Options. The system is setup with default fields to display in your report. You may add or remove fields by clicking on the Fields to Display drop-down arrow.
- Select Summarize by criteria. This optional field allows you to select how you wish report results grouped. For example, you may choose to group results by Event Name.
- Click Run Report.
Event Activity Report
Allows you to generate a list of a contact's event-related activity The report may be filtered to view the event activity for an individual contact or all contacts, within or for a specified date range, a specific event, registration status, and/or customized filtering criteria.
- Click Reports in the Navigation Panel (Or go to the orange Actions button in the Attendees or Attendees Purchases tab)
- Select Event Activity Report.
- Select your search filtering criteria. NOTE: To exclude event attendees that are not contacts, click the Display Only Contacts check-box.
- Optional - Enter Search/Filter query.
- Select Display Options. They system is setup with default fields to display in your report. You may add or remove fields by clicking on the Fields to Display drop-down arrow.
- Select Summarize by criteria. This optional field allows you to select how you wish report results grouped. For example, you may choose to group results by Event Name.
- Click Run Report.
Event Discount Use Report
Provides you with statistics on how discounts are being used. You can generate the report for a specific registration date range, one or more events, and/or by adding additional filtering criteria (including a particular discount.
- Click Reports in the Navigation Panel
- Select Event Discount Use Report.
- Select your search filtering criteria. For example, if you wish to view discount use for a specific event, select an option from the Event drop down-list.
- Optional - Enter a Search/Filter query. For example, if you wish to view the report based on a specific discount select Discount Name.
- Select Display Options. They system is setup with default fields to display in your report. You may add or remove fields by clicking on the Fields to Display drop-down arrow.
- Select Summarize by criteria. This optional field allows you to select how you wish report results grouped. For example, you may choose to group results by event name.
- Click Run Report.
Event Sessions Report
The Event Sessions Report can be used to generate a report of all session registrants. You can run the report for an individual session and use the report as a check-in roster, or run the report for all the sessions offered at your event.
- Click Reports in the left-hand navigation panel.
- Click Event Sessions Report.
- Select desired filtering criteria:
- Event Name: Select the desired event. If no selection is made all events will be included in report results.
- Event Session: Select the desired session. If no selection is made, all sessions will be included in report results.
- Event Timeslot: Select the desired timeslot. If no selection is made, all timeslots will be included in report results.
- Display Only Contacts: Select this option if you wish to see only registrants that exist as contacts in your database.
- Contact: If you wish to see only an individual contact, enter the name of the contact.
- Additional Criteria / Filters: You may add additional filters by clicking the grey plus button.
- Display Options:
- Fields to Display: Default fields are included in the report. You can add or remove fields as needed.
- Summarize By: If needed, select a summarize by option. This will group the report results by the field selected. For example, if you are running a report for all of an event's sessions, you may wish to summarize by the Session Name.
- Summarize By: Select Detail to view details of sessions or select Summary to view a total of sessions (without attendee names).
- Click Run Report.
See Common Report Functions for performing the following:
- Export as PDF
- Export as Excel.
- Export Summary as PDF
- Export Summary as Excel
- Email Report
- Add to List
- Save as New Report
- Add as Favorite Report
Event Sponsorships By Contact Report
The Event Sponsorships By Contact Report provides the ability to view sponsors with various filters. The report allows you to filter by event date range, event category, calendar, event name, membership category, and to filter by displaying contacts.
- Click Reports in the left-hand navigation panel.
- Click Event Sponsorships By Contact Report.
- Select desired filtering criteria:
- Event Date Range: Select the date(s). If no selection is made all events will be included in report results.
- Event Category: Select the desired category. If no selection is made, all categories will be included in report results.
- Event Calendar: Select the desired calendar. If no selection is made, all calendars will be included in report results.
- Event: Select the event that you would like to report on. If no selection is made, all events will be included in report results.
- Membership Category: Select the desired category. If no selection is made, all categories will be included in report results.
- Display Only Contacts: If your events included sponsors that were not contacts in the database, you may filter them out by selecting to include only those that are contacts in the software.
- Display Options:
- Fields to Display: Default fields are included in the report. You can add or remove fields as needed.
- Summarize By: If needed, select a summarize by option. This will group the report results by the field selected. For example, if you are running a report for all of an event's sessions, you may wish to summarize by the Session Name.
- Summarize By: Select Detail to view details of sponsors or select Summary to view a total of sponsors (without sponsor names).
- Click Run Report.
See Common Report Functions for performing the following:
- Export as PDF
- Export as Excel.
- Export Summary as PDF
- Export Summary as Excel
- Email Report
- Add to List
- Save as New Report
- Add as Favorite Report
Events Overview Report
The Events Overview Report provides the ability to view summary information about one or multiple events. This report can be useful in summarizing attendance, and registration fees generated by your events.
- Click Reports in the left-hand navigation panel.
- Click Events Overview Report.
- Select desired filtering criteria:
- Event: Select one or multiple events to include in the report.
- Event Category: Select one or multiple event categories to include in your report.
- Event Start Date Range: Select the desired date range for your events.
- Event Status: Select the desired event status(es), or leave blank to include all statuses.
- Additional Criteria / Filters: Select additional filtering criteria as needed.
- Display Options:
- Fields to Display: Default fields are included in the report. You can add or remove fields as needed.
- Summarize By: If needed, select a summarize by option. This will group the report results by the field selected.
- Summarize By: Select Detail to view details of exhibitors or select Summary to view a total of exhibitors (without exhibitor names).
- Click Run Report.
See Common Report Functions for performing the following:
- Export as PDF
- Export as Excel.
- Export Summary as PDF
- Export Summary as Excel
- Email Report
- Add to List
- Save as New Report
- Add as Favorite Report
Exhibitor Activity Report
The Exhibitor Activity Report provides the ability to view event exhibitors. The report filters by exhibitor name, event date range and exhibitor type.
- Click Reports in the left-hand navigation panel.
- Click Exhibitor Activity Report.
- Select desired filtering criteria:
- Exhibitor Name: Select the exhibitor you would like to report on. If no selection is made all exhibitors will be included in report results.
- Event Date Range: Select the desired date range. If no selection is made, all dates will be included in report results.
- Exhibitor Type: Select the desired Exhibitor Type. If no selection is made, all types will be included in report results.
- Display Options:
- Fields to Display: Default fields are included in the report. You can add or remove fields as needed.
- Summarize By: If needed, select a summarize by option. This will group the report results by the field selected.
- Summarize By: Select Detail to view details of exhibitors or select Summary to view a total of exhibitors (without exhibitor names).
- Click Run Report.
Fundraiser Reports
Donation Summary
The Donation Summary tab in the Fundraising module will display a list of all donors to all campaigns. The summary may be filtered to a specific date range and/or a specific donor.
Fundraiser History by Donor
The Fundraising History By Donor Report allows you to easily view the sum of donations for individual donors or all donors. It may be filtered to specific campaigns, or all of your current campaigns. If you have had a major push in fundraising over a period in time, you can filter the report to a selected date range. This report can be used to quickly generate a report of all Messages, Tribute Names and In Recognition of information gathered from donors.
- Click Reports in the Navigation Panel
- Select Fundraising History By Donor Report.
- Select your search filtering criteria. For example, if you would like to see donation history by a specific contact, type the name of the contact in the Contact text box.
- Optional - Enter a Search/Filter query. For example, if you would like to see the history for a specific fundraising campaign, select Campaign Name.
- Select Display Options:
- The report is setup with default fields to display in your report. You may add or remove fields by clicking on the Fields to Display drop-down arrow.
- Select Summarize by criteria. This optional field allows you to select how you wish report results grouped. For example, you may choose to group results by campaign name.
- 'Display Mode: Select Detail to view each individual donor and the donations to each campaign. Select Summary to see a total number of donations and the donation amount.
- Click Run Report.
See Common Report Functions for performing the following:
- Export as PDF
- Export as Excel.
- Export Summary as PDF
- Export Summary as Excel
- Email Report
- Add to List
- Add as a Favorite Report
Recurring Donation Report
The Recurring Donations Report allows you to generate a list of all contacts who have setup recurring donations for a fundraiser. This report can be generated for all fundraisers or a specific fundraiser.
- Click Reports in the Navigation Panel
- Select Recurring Donations Report.
- Select your search filtering criteria. For example, if you would like to see recurring donations for a specific fundraiser, or a specific contact.
- Optional - Enter a Search/Filter query.
- Select Display Options:
- The system is setup with default fields to display in your report. You may add or remove fields by clicking on the Fields to Display drop-down arrow.
- Select Summarize by criteria. This optional field allows you to select how you wish report results grouped. For example, you may choose to group results by campaign name.
- Display Mode: Select Detail to display each individual donor and their recurring donation. Select Summary to see the total number of donors, and the total of their donations.
- Click Run Report.
See Common Report Functions for performing the following:
- Export as PDF
- Export as Excel.
- Export Summary as PDF
- Export Summary as Excel
- Email Report
- Add to List
- Add as a Favorite Report
Lists/Committees Reports
Contacts List/Committee Report
The Contact List/Committee Report may be used to generate a report of all of your lists/committees and the individuals associated to those lists/committees. The report may be filtered by an individual contact if you wish to see all group membership for an individual and/or by a specified date range.
- Click Reports in the Navigation Panel
- Select Contact List/Committee Report.
- Select your search filtering criteria.
- Click Run Report.
See Common Report Functions for performing the following:
- Export as PDF
- Export as Excel.
- Export Summary as PDF
- Export Summary as Excel
- Email Report
- Add to List
- Mailing Labels
- Save as New Report
- Add as Favorite Report
Unsubscribed Lists/Committees Report
The Unsubscribed Lists/Committees Report will provide you with a comprehensive list of contacts who have unsubscribed from list/committee(s). This report can be used to identify contacts who should be deactivated from lists/committee(s). Add a summary filter of Contact name to view each contact and the list/committees that they belong to.
- Click Reports in the Navigation Panel.
- Click Unsubscribed Lists/Committee Report.
- Select the desired filters for your report. For Example: If you wish to view results for select lists/committees choose from the Lists/Committees drop-down list.
- Add Additional Filter/Criteria you wish. For Example: If you wish to view contacts whose membership status is active, add Contact Membership Status = Active.
- Select the fields to display you wish to include in the report. For example: You may wish to include the Contact Membership Status, to help in identifying contacts that no longer have active memberships.
- (Optional) Select a Summarize By option. If you are running the report for all lists/committees you may wish to summarize by the lists/committees.
- Click Run Report.
See Common Report Functions for performing the following:
- Export as PDF
- Export as Excel.
- Export Summary as PDF
- Export Summary as Excel
- Email Report
- Add to List
- Mailing Labels
- Save as New Report
- Add as Favorite Report
Project/Tasks Reports
Project Started by Quarter
The Project Started by Quarter report allows you to generate a list of all projects started in each quarter of a selected year. The report may be filtered on project status, project categories, and custom filtering options.
- Click Reports in the Navigation Panel
- Select Project Started by Quarter.
- Select your search filtering criteria. For example, if you wish to view only a specific project category, select from the Project Categories drop down list.
- Optional - Enter a Search/Filter query.
- Select Display Options:
- They system is setup with default fields to display in your report. You may remove fields by clicking on the Fields to Display drop-down arrow. By default, the report will include Q1, Q2, Q3, Q4, Type and total.
- Select Summarize by criteria. This optional field allows you to select how you wish report results grouped. For example, you may choose to group results by project Type.
- Display Mode: Select Detail to view a list of all project types, and the total of each type started per quarter. Select Summary to simply view the total of all project types started per quarter.
- Click Run Report.
See Common Report Functions for performing the following:
- Export as PDF
- Export as Excel.
- Export Summary as PDF
- Export Summary as Excel
- Email Report
- Add to List
- Mailing Labels
- Save as New Report
- Add as Favorite Report
Project Summary Report
The Project Summary Report allows you to generate a list of some or all projects along with the name of the project owner. The report may be filtered by project status, project type, project start and/or end date, project category, and custom filter criteria. This report can be useful in analyzing the number of open projects, number of projects assigned to an individual, and so on.
- Click Reports in the Navigation Panel
- Select Project Summary Report.
- Select your search filtering criteria. For example, if you are looking for a specific type of project, select a Project Type from the drop-down list.
- Optional - Enter a Search/Filter query. For example, if you are looking for projects assigned to a specific staff member, select Project Owner.
- Select Display Options:
- The system is setup with default fields to display in your report. You may add or remove fields by clicking on the Fields to Display drop-down arrow. By default, the report will include project name, category, project owner, type, and total projects.
- Select Summarize by criteria. This optional field allows you to select how you wish report results grouped. For example, you may choose to group results by project owner.
- Display Mode: Select Detail to view a listing of all projects and associated fields selected for the report. Select Summary to simply see the total number of projects, based on your filtering criteria.
- Click Run Report.
See Common Report Functions for performing the following:
- Export as PDF
- Export as Excel.
- Export Summary as PDF
- Export Summary as Excel
- Email Report
- Add to List
- Mailing Labels
- Save as New Report
- Add as Favorite Report
Projects Report
The Projects Report can be used to analyze the status of your current project, for example, project that are past completion date. The report may be generated based on project type, project status, project category, completed or incompleted tasks, last communication, past estimated completion date, date range, and custom filtering criteria.
- Click Reports in the Navigation Panel
- Select Projects Report.
- Select your search filtering criteria. For example, if you are looking for a specific type of project, select a Project Type from the drop-down list.
- Optional - Enter a Search/Filter query.
- Select Display Options:
- The system is setup with default fields to display in your report. You may add or remove fields by clicking on the Fields to Display drop-down arrow.
- Select Summarize by criteria. This optional field allows you to select how you wish report results grouped. For example, you may choose to group results by project type.
- Display Mode:
- Click Run Report.
See Common Report Functions for performing the following:
- Export as PDF
- Export as Excel.
- Export Summary as PDF
- Export Summary as Excel
- Email Report
- Add to List
- Mailing Labels
- Save as New Report
- Add as Favorite Report
Task Report
The Task Report allows you to generate a list of all tasks. Use this report to identify open tasks, tasks assigned to specific staff members, incomplete tasks, and so on.
- Click Reports in the Navigation Panel
- Select Task Report.
- Select your search filtering criteria. For example, if you are looking for tasks assigned to a specific staff member, select the staff member name from the Assigned to drop-down list.
- Optional - Enter a Search/Filter query. For example, if you wish to view tasks that are estimated to be completed by a certain date, select Estimate End Date.
- Select Display Options:
- The system is setup with default fields to display in your report. You may add or remove fields by clicking on the Fields to Display drop-down arrow.
- Select Summarize by criteria. This optional field allows you to select how you wish report results grouped. For example, you may choose to group results by Assigned To.
- Display Mode: Select Details to see a listing of ALL tasks, and the associated fields you chose to display. Select Summary to simply see a total of tasks that meet your filtering criteria.
- Click Run Report.
See Common Report Functions for performing the following:
- Export as PDF
- Export as Excel.
- Export Summary as PDF
- Export Summary as Excel
- Email Report
- Add to List
- Mailing Labels
- Save as New Report
- Add as Favorite Report
Sales Funnel Reports
The software provides a variety of reports that you can use to analyze your sales opportunities.
Sales Funnel Report
The Sales Funnel Report provides you with many ways to analyze the opportunities in your funnel. For Example, you may analyze based on salesperson, sales source, sales probability and so on.
- Click Reports in the Navigation panel.
- Click Sales Funnel
- Select Desired filters for your report:
- Sales Persons - This filter option will help you identify sales opportunities by sales person.
- Sales Statuses - This filter option will help you to identify the status of your sales opportunities: Won, Lost, Active, On Hold, Pending, Prospect.
- Sales Stages - This filter will help you to identify the current stages of your opportunities. Sales Stages are customized by you.
- Sales Source - This filter will help you to identify where your sales opportunities are coming from.
- Sales Categories - This filter will help you to identify the types of sales opportunities currently in your Member Recruitment "funnel".
- Created Date Range - This filter allows you to view only sales opportunities created in a selected date range.
- Won/Lost Date Range - This filter will help you to identify won/lost sales opportunities in a selected date range.
- Estimated Close Date - This filter will help you to view sales opportunities expected to closed in a selected date range.
- Probability - This filter will help you to identify the probability of winning (or losing) sales based on the probability range that you enter.
- Criteria / Filters - You can select additional filtering options for your report by clicking the + button next to Criteria/Filters.
- Display Options:
- Fields to Display: Select the items that you want to include in your report. Default fields are included, and you may select additional fields (or remove default fields) by clicking the Fields to Display box.
- Summarize By: This option allows you to select how you want to summarize the results of your report. For Example, you may want to summarize the report by sales person or by probability.
- Display Mode: This options allows you to display your report results summarized or detailed.
- Click Run Report to generate the report. In the example below, the report was generated to see the total value of all sales opportunity wins, summarized by sales person, in detail display mode.
See Common Report Functions for performing the following:
- Export as PDF
- Export as Excel.
- Export Summary as PDF
- Export Summary as Excel
- Email Report
- Add to List
- Mailing Labels
- Save as New Report
- Add as Favorite Report
Sales Opportunity Communication Report
The Sales Opportunity Communication Report will show you a list of sales opportunities, and the number of days since the last communication. This report may be generated by sales person, sales status, sales stage, sales category and sales source. You may add additional filters as needed.
- Click Reports in the Navigation panel.
- Click Sales Opportunity Communication Report
- Select Desired filters for your report:
- Sales Persons: This filter option will help you identify sales opportunities communications by sales person.
- Sales Statuses: This filter option will help you to identify the status of your sales opportunities: Won, Lost, Active, On Hold, Pending, Prospect.
- Sales Stages: This filter will help you to identify the current stages of your opportunities. Sales Stages are customized by you.
- Sales Source: This filter will help you to identify where your sales opportunities are coming from.
- Sales Categories: This filter will help you to identify the types of sales opportunities currently in your sales "funnel".
- Criteria / Filters: You can select additional filtering options for your report by clicking the + button next to Criteria/Filters.
- Display Options:
- Fields to Display: Select the items that you want to include in your report. Default fields are included, and you may select additional fields (or remove default fields) by clicking the Fields to Display box.
- Summarize By: This option allows you to select how you want to summarize the results of your report. For Example, you may want to summarize the report by sales person or by probability.
- Display Mode: This options allows you to display your report results summarized or detailed.
- Click Run Report to generate the report.
See Common Report Functions for performing the following:
- Export as PDF
- Export as Excel.
- Export Summary as PDF
- Export Summary as Excel
- Email Report
- Add to List
- Mailing Labels
- Save as New Report
- Add as Favorite Report
Sales Proposal Report
The Sales Proposal Report allows you to generate a list of all the sales proposals you have created. The report may be filtered by sales rep, sales category, sales stage, sales discount, proposal template, valid until date, accepted on date, is accepted, and custom filtering criteria. You may wish to use this report to analyze the number of proposals completed by your sales rep, to view proposals that are nearing the end of their valid date, and so on.
- Click Reports in the Navigation Panel.
- Select Sales Proposal Report.
- Select your search filtering criteria. For example, you may wish to view just a selected date range.
- Optional - Enter a Search/Filter query.
- Select Display Options:
- The system is setup with default fields to display in your report. You may add and/or remove fields by clicking on the Fields to Display drop-down arrow.
- Select Summarize by criteria. This optional field allows you to select how you wish report results grouped, for example, you may wish to group by sales rep.
- Display Mode: Select Detail or Summary.
- Click Run Report.
See Common Report Functions for performing the following:
- Export as PDF
- Export as Excel.
- Export Summary as PDF
- Export Summary as Excel
- Email Report
- Add to List
- Mailing Labels
- Save as New Report
- Add as Favorite Report
Timeline Report
The Timeline Report allows you to generate a listing of the timeline entries found in the Member Recruitment "funnel"M. Grouping the report by Contact Name provides an at a glance view of all contacts in the funnel, and the associated timeline items.
- Click Reports in the Navigation Panel
- Select Timeline Report.
- Select your search filtering criteria. For example, you may wish to view those timeline items that are in Active sales status.
- Optional - Enter a Search/Filter query.
- Select Display Options.
- The system is setup with default fields to display in your report. You may add and/or remove fields by clicking on the Fields to Display drop-down arrow.
- Select Summarize by criteria. This optional field allows you to select how you wish report results grouped, for example, you may wish to group by contact name.
- Display Mode: Select Detail or Summary.
- Click Run Report.
See Common Report Functions for performing the following:
- Export as PDF
- Export as Excel.
- Export Summary as PDF
- Export Summary as Excel
- Email Report
- Add to List
- Mailing Labels
- Save as New Report
- Add as Favorite Report
Timeline Summary Report
The Timeline Summary Report summarizes all timeline items for each sales opportunity in your database.
- Click Reports in the Navigation Panel
- Select Timeline Summary Report.
- Select your search filtering criteria. For example, you may wish to view those timeline items that are in Active sales status.
- (Optional) Enter a Search/Filter query.
- Select Display Options:
- The system is setup with default fields to display in your report. You may add and/or remove fields by clicking on the Fields to Display drop-down arrow.
- Select Summarize by criteria. This optional field allows you to select how you wish report results grouped, for example, you may wish to group by sales person.
- Display Mode: Select Detail or Summary.
- Click Run Report.
See Common Report Functions for performing the following:
- Export as PDF
- Export as Excel.
- Export Summary as PDF
- Export Summary as Excel
- Email Report
- Add to List
- Mailing Labels
- Save as New Report
- Add as Favorite Report
Store Reports
Store Product Purchases
The Store Product Purchases report will generate a list of all product sold through your store. This list can be generated for an individual contact, or all contacts. Additionally you can filter the report on specific products and/or specific date ranges.
- Click Reports in the Navigation Panel.
- Select the Store Product Purchases Report.
- Enter desired filtering criteria:
- To view purchases for an individual contact, begin typing the name in the Contact Name text box. If the contact exists in your database, the type ahead functionality will display a list of contacts for you to choose from. If Contact Name is left blank, the report will be generated for all contacts who have made purchases.
- To view purchases in a particular date range, select a predefined date range (i.e. Last Week, Last Quarter, etc.) or select beginning and end dates from the calendars.
- To view purchases for a selected product, begin typing the name of the product in the Product Name text box. If the product exists in your database, the type ahead functionality will display a list of products for you to choose from. If Product Name is left blank, the report will be generated for all products sold.
- You may select additional Criteria / Filters to customize the results of your report.
- Configure the Display Options as needed:
- By default the Fields to Display in the report include: Order Date, Short Description, Quantity, Total Amount, and Contact Name. You may change or add additional fields to your report by clicking into the Fields to Display box.
- The Summarize By option allows you to group together the results of your report. For Example, you might select Contact Name to group the results by contact.
- The Display Mode may be either Detail or Summary. If you have selected a summarize option, detail will show all the transactions whereas summary will show only the total of all transactions.
- Click Run Report.
See Common Report Functions for performing the following:
- Export as PDF
- Export as Excel.
- Export Summary as PDF
- Export Summary as Excel
- Email Report
- Add to List
- Mailing Labels
- Save as New Report
- Add as Favorite Report
Store Products report
The Store Products report will generate a list of all of your store products, along with the number sold of each item, and the number of orders for each item. The report may be filtered by date range so you can see what you have sold over a period of time, by specific categories, or saleable item.
- Click Reports in the Navigation Panel.
- Select the Store Products report.
- Enter desired filtering criteria:
- To view products in a particular date range, select a predefined date range (i.e. Last Week, Last Quarter, etc.) or select beginning and end dates from the calendars.
- To view a specific product, begin typing the name of the product in the Product Name text box. If the product exists in your database, the type ahead functionality will display a list of products for you to choose from. If Product Name is left blank, the report will be generated for all products.
- To view a specific saleable item, begin typing the name of the item in the Saleable Item text box. If the saleable item exists in your database, the type ahead functionality will display a list of the items for you to choose from. If this field is left blank, the report will be generated for all saleable items.
- You may select additional Criteria / Filters to customize the results of your report.
- Configure the Display Options as needed:
- By default the Fields to Display in the report include: Orders Number, Product Name, Saleable Item, and Total Sold. You may change or add additional fields to your report by clicking into the Fields to Display box.
- The Summarize By option allows you to group together the results of your report. For Example, you might select Product Name to group the results by product.
- The Display Mode may be either Detail or Summary. If you have selected a summarize option, detail will show all the transactions whereas summary will show only the total of all transactions.
- Click Run Report.
See Common Report Functions for performing the following:
- Export as PDF
- Export as Excel.
- Export Summary as PDF
- Export Summary as Excel
- Email Report
- Add to List
- Mailing Labels
- Save as New Report
- Add as Favorite Report
Web Content Reports
Web Content Activity Report
The Web Content Activity Report allows you to generate statistics on web content use. You will be able to view content items that were recently entered, content that is expiring soon, activity for specific web content types (Blogs, Hot Deal, Job Postings, etc.).
- Click Reports in the Navigation Panel
- Select Web Content Activity Report.
- Select your search filtering criteria. For example, you may wish to view a specific Content Type.
- Optional - Enter a Search/Filter query.
- Select Display Options. They system is setup with default fields to display in your report. You may add and/or remove fields by clicking on the Fields to Display drop-down arrow.
- Select Summarize by criteria. This optional field allows you to select how you wish report results grouped, for example, you may wish to group by contact.
- Click Run Report.
See Common Report Functions for performing the following:
- Export as PDF
- Export as Excel.
- Export Summary as PDF
- Export Summary as Excel
- Email Report
- Add to List
- Mailing Labels
- Save as New Report
- Add as Favorite Report
