Difference between revisions of "Forms and Surveys"
Cpetterson (talk | contribs) |
Cpetterson (talk | contribs) |
||
| Line 66: | Line 66: | ||
#*'''Section Name''': Select the section within which you would like this custom field displayed. See '''[[Forms/Surveys#Add_Sections_to_a_Form|Add Sections to a Form]]''' for information on configuring sections. | #*'''Section Name''': Select the section within which you would like this custom field displayed. See '''[[Forms/Surveys#Add_Sections_to_a_Form|Add Sections to a Form]]''' for information on configuring sections. | ||
#*'''Page Number''': Select the page on which you would like this field displayed. | #*'''Page Number''': Select the page on which you would like this field displayed. | ||
| − | #*'''Field Name from 3rd Party Application''' | + | #*'''Field Name from 3rd Party Application''': If you have configured your survey to receive responses from a third party form/survey, enter the field from the third party survey that will be used to populated this field. For example, if you have created a field called '''Title''' in your survey, and the field in the third party software is '''Position''', enter the word '''Position''' in this field. |
| − | #*''' | + | #*'''External Data Source API URL''': This option allows you to point to a list of the needed responses to the question. For example, if an FTC Code is needed, rather than using a drop-down list and manually populating all of the possible responses (which takes time, and introduces room for error), you can enter the needed API URL, which will point to the list of responses. '''NOTE:''' When using an External Data Source API, the '''Key Field Name''' field ties the list to the custom field in your survey. For further information on the use of an external data source, contact GrowthZone support. |
| + | #*'''Copy Response to an Existing Database Field for Known Contacts''': N/A | ||
#Click '''Done'''. | #Click '''Done'''. | ||
| − | |||
| − | |||
===="Specialized Field Types" for Forms Questions==== | ===="Specialized Field Types" for Forms Questions==== | ||
Revision as of 14:46, 5 September 2018
Contents
Overview
The Forms/Surveys module enables you to quickly create and publish custom web forms and surveys. Features include an intuitive interface which allows you to select from a variety of form fields. This module allows you to engage your members regularly and get feedback on how you are serving them.
- Send targeted surveys to members and visitors
- Collect important survey data
- Store information gathered within a contact's profile
- Upload documents
- Render the data in easy to understand/useful ways
Create a Form
Creating a form is a two step process. First you will add the form, then you will add the questions to your form.
- Click Forms in the Navigation Panel.
- Click the Add button.
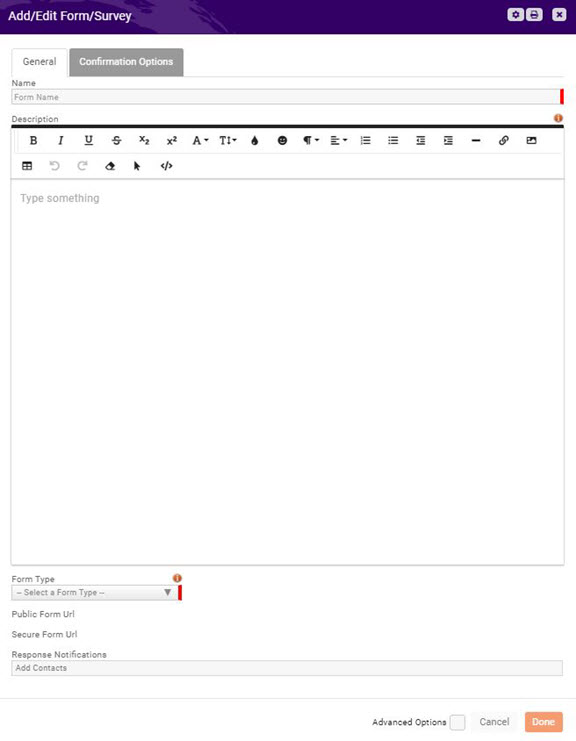
- Configure the following on the Create tab:
- Name - provide a name for your new form.
- Description - This text appears at the top of the form for the user/public to view. You may use the standard word processing functions (bold, italics, etc.), as well as add links, and images.
- Form Type - Select a form type or select User Defined. If you select Contact Us form type, staff who have subscribed to the Contact Us Submission email notification will receive an email when the form is submitted. If you select Inquiry Tracking the form will be used in the Sales Funnel inquiry tracking.
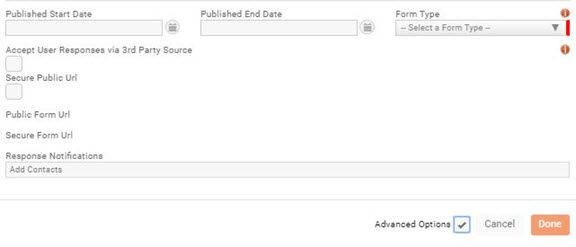
- (Optional) Click the Advanced Options check box to configure the following:
- Publish Start/Publish End.
- Accept User responses via 3rd Party Source: Enable this option if you wish to receive form responses from a third party survey solution (for example, ActOn). This will setup the mapping needed to receive and store the responses in your database. When this is enabled, once the form has been saved, the URL to Send Responses To will be automatically generated. This is the URL that should be shared with the third-party solution.
- Response Notifications: Enter the email(s) of staff members who should receive notification when survey responses are submitted.
- Click the Confirmation Options tab
- Configure the following:
- Post Submit Message - Enter the message you wish displayed after the form is submitted.
- Download File - If you wish to include a file to be downloaded after the form has been submitted, click the Select File button and import the file. Alternately, you can select a previously imported file.
- Click Done.
The Url for the form will automatically be populated once the form has been saved. Two URLs will be available:
Public Form Url: This URL should be used when you wish to link the form to your web-site and format using templates you have designed for your web-site. Secure Form Url: This URL should be used when you wish to send the link via email, or other method. This will generate a basic form, without any formatting.
Add Sections to a Form
To better organize the questions you wish to ask on your form, you can create sections. Once sections are created, you can add custom questions to the specified sections.
- In the Forms module, click the gear icon for the form to which you wish to add questions.
- Click Manage Sections.
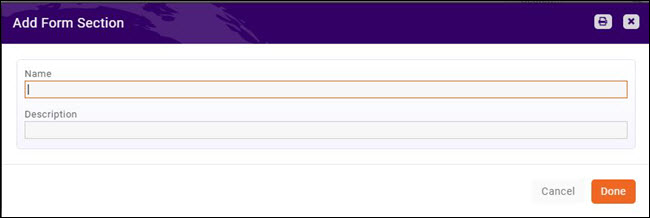
- Click the Add New Section button.
- Enter a Name for the section.
- Enter a Description of the section (optional).
- Click Done.
- Add additional sections as needed, click Done when all sections have been added.
Add Questions to a Form
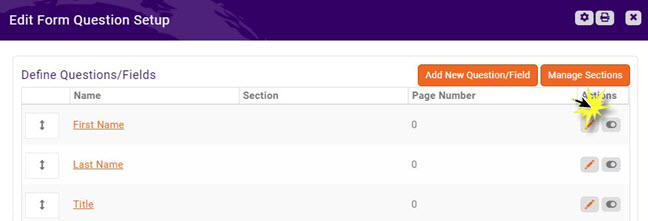
- In the Forms module, click the gear icon for the form to which you wish to add questions.
- Click Add New Question Field.
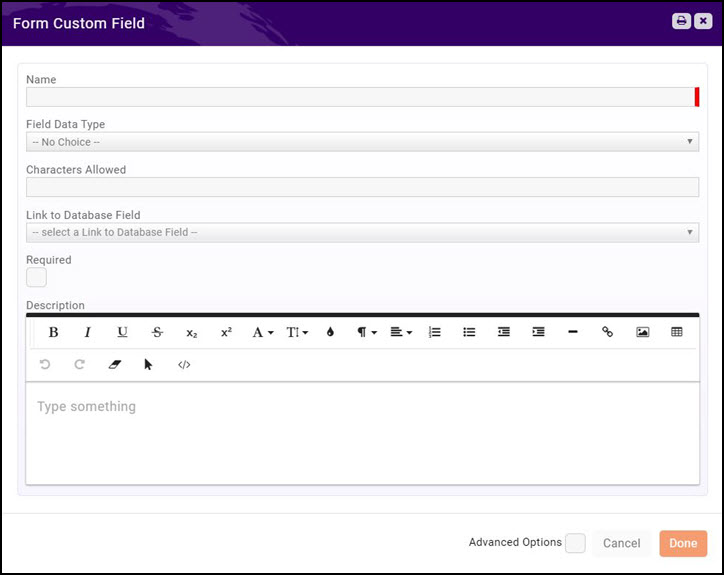
- Configure the following:
- Name - Enter in the name/question. This should be entered as you wish to see it on the form/survey. NOTE - If you have previously created the same field, you may select the field from the Link to Database Field drop-down list and select the desired field.
- Field Data Type -Select the type of data expected as a response to this question. See Specialized Field Types for Forms for field type options.
- Characters Allowed - If you have selected a Text data type, enter the number of characters that will be accepted in the field.
- Required - Select this check-box if the field is required in the form/survey. If there are fields that your staff will answer after the form has been submitted (For Example: You may have a form that determines eligibility of a respondent, a staff only field called Eligible could be configured.)
- (Optional) Description - Enter a description of the field.
- Click Advanced Options
- Section Name: Select the section within which you would like this custom field displayed. See Add Sections to a Form for information on configuring sections.
- Page Number: Select the page on which you would like this field displayed.
- Field Name from 3rd Party Application: If you have configured your survey to receive responses from a third party form/survey, enter the field from the third party survey that will be used to populated this field. For example, if you have created a field called Title in your survey, and the field in the third party software is Position, enter the word Position in this field.
- External Data Source API URL: This option allows you to point to a list of the needed responses to the question. For example, if an FTC Code is needed, rather than using a drop-down list and manually populating all of the possible responses (which takes time, and introduces room for error), you can enter the needed API URL, which will point to the list of responses. NOTE: When using an External Data Source API, the Key Field Name field ties the list to the custom field in your survey. For further information on the use of an external data source, contact GrowthZone support.
- Copy Response to an Existing Database Field for Known Contacts: N/A
- Click Done.
"Specialized Field Types" for Forms Questions
When creating questions for your forms, the following Field Types provide additional functionality.
- Drop Down and Drop Down with Fill In: When using the Drop-down or Drop-down with fill in options, you will enter a list of answers to your questions. You can then define which page, if the Go To Page list, the respondent will be sent to based on the response selected. NOTE: If your purpose in using a drop down is NOT for navigation purposes, you will simply select Continue as the Go to page option. NOTE: The Go to Options will only navigate to pages, not to sections.
- Yes No: When using this field type, two choices are available, Yes and No. Dependent on the respondent selection, they will be navigated to the page you have entered in the Go To Page fields. NOTE: The Go to Options will only navigate to pages, not to sections.
- Upload File: When this option is selected, a field is made available on the form for the respondent to upload a file. When the file is uploaded, it will be stored within the form, and within your Cloud. Additionally, if you have connected the respondent to a contact in your database, the file will be stored on the contact's Files tab. See View Individual Form Responses for information on connecting a respondent to a contact in your database.
Disable a Form Question
In the event that you wish to remove a question from your form, best practice is to disable the question. Disabling will ensure that previous responses are maintained within your database. This approach is recommended if you wish to change the field type for a question. For example, if you have created a question as a drop-down field type, and you wish to change this question to a text field type. De-activate the original question to maintain responses, and re-create the question with the desired field type.
- In the Forms module, click the
 next to the form/survey for which you wish to deactivate a question.
- Click the
 in the Actions column for the question you would like to disable.
- Click OK.
Copy a Form
- In the Forms module, click the
 icon in the Actions column for the form you wish to copy.
 - Click OK to confirm you wish to make a copy.
The form will be displayed at the bottom of your list of forms, name Copy of....
View Individual Form Responses
You may view individual responses in the following manner:
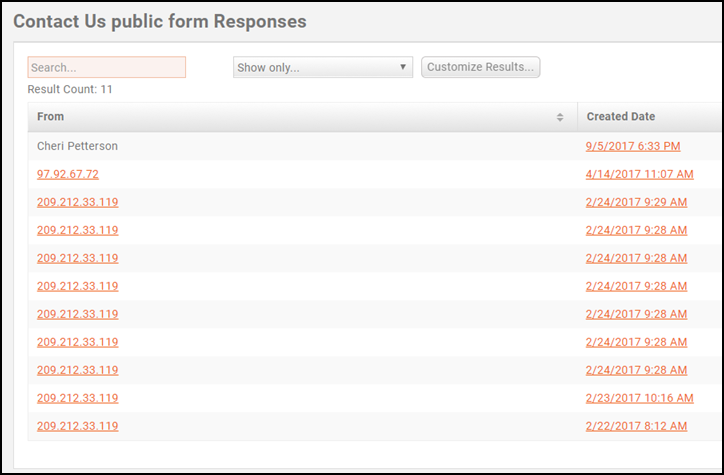
- In the Forms module, click the numbered link for Total Responses. The Responses screen will be displayed.
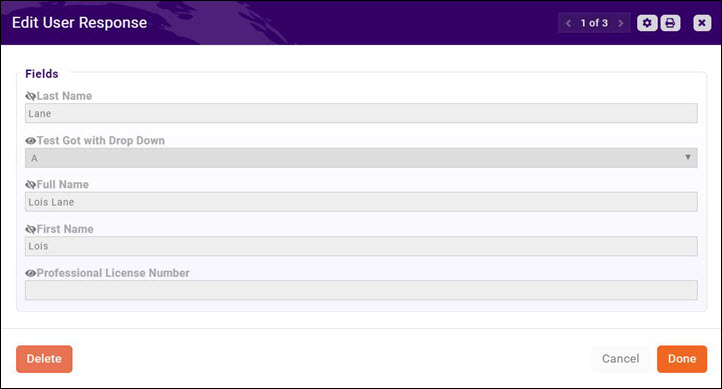
- Click the Response Date hyper-link for the response you wish to view. The User Response screen will be displayed.
Associate Form Responses to Contacts
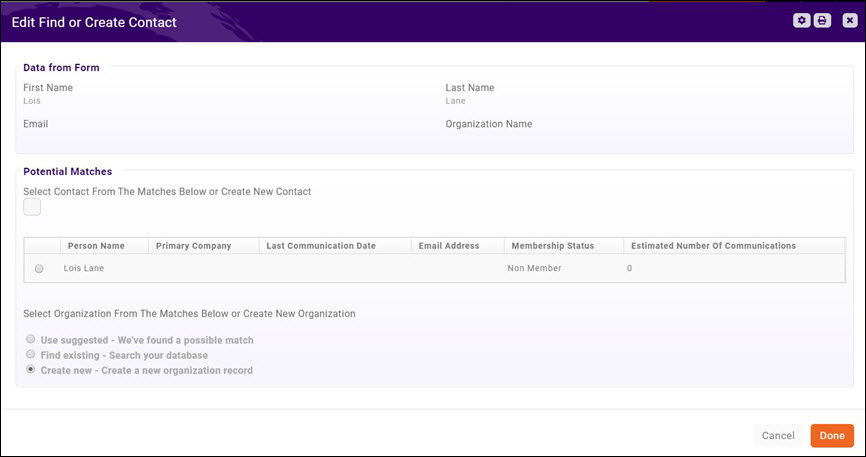
You can associate a form response to a contact in your database, by clicking into the IP Address listed in the From column. NOTE You must have included: Form: First Name, Form: Last Name, Form: Organization or Form: Email Address in your survey to be provided with sufficient information to match the response to a contact in your database.
- In the Forms module, click the numbered link for Total Responses. The Responses screen will be displayed.
- Click the IP Address listed in the From column.
- If the system has found a suggested match, it will be displayed on the screen. If this is the appropriate contact, click the Use Suggested radio button and click Done.
- If no match is found, or the match found is not the appropriate contact BUT you believe there is a contact to match to in your database, click the Find existing - Search your database radio button, and begin typing the name of a contact that exists in your database. The type-ahead functionality will populate a list of contacts in your database that match your entry. If the contact is displayed, select the contact and click Done.
- If this is a new contact, and you wish to add the contact to your database, click the Create new - Create a new organization record. The contact will be added to your database as a new contact.
- Click Done.
Download All Form Responses
All responses to a form may be downloaded in the following manner:
- In the Forms module
- Click the Download Form/Survey Responses icon in the Actions column for the form you to download.
The responses will be downloaded in a xlsx format.
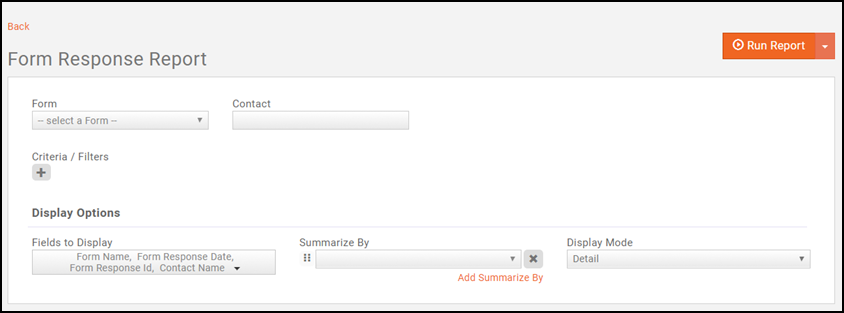
Form Response Report
The Form Response Report allows you to download responses for all forms or an individual form.
- Click Reports in the Navigation Panel.
- Click Forms Response Report.
- Select from the following search criteria:
- Form: Select the desired form from the drop-down list. To generate the report for all forms, do not select a form.
- Contact: To see form results for a specific contact, type the name of the contact.
- Criteria/Filters: If desired, select additional filtering options.
- Display Options: Select desired fields to display, summarizing options, and display mode.
- Click the Run Report button.
