Difference between revisions of "Forms and Surveys"
Jump to navigation
Jump to search
Cpetterson (talk | contribs) (Created page with "The '''Forms''' module enables you to quickly create and publish custom web forms and surveys. Features include an intuitive interface which allows you to select from a variet...") |
Cpetterson (talk | contribs) |
||
| Line 2: | Line 2: | ||
==Create a Form== | ==Create a Form== | ||
| + | |||
| + | Creating a form is a two step process. First you will add the form, then you will add the questions to your form. | ||
#Click '''Forms''' in the Navigation Panel. | #Click '''Forms''' in the Navigation Panel. | ||
#Click the '''Add''' button. | #Click the '''Add''' button. | ||
| − | #:[[File:Add Edit Form.jpg | + | #:[[File:Add Edit Form.jpg|center]] |
#Configure the following on the '''Create''' tab: | #Configure the following on the '''Create''' tab: | ||
#:*'''Name''' - provide a name for your new form. | #:*'''Name''' - provide a name for your new form. | ||
| − | #:'''Description''' - This text appears at the top of the form for the user/public to view. You may use the standard word processing functions (bold, italics, etc.), as well as add links, and images. | + | #:*'''Description''' - This text appears at the top of the form for the user/public to view. You may use the standard word processing functions (bold, italics, etc.), as well as add links, and images. |
| − | #:'''Form Type''' - Select a form type or select '''User Defined'''. | + | #:*'''Form Type''' - Select a form type or select '''User Defined'''. |
| + | #(Optional) Click the '''Advanced Options''' check box and configure the following: | ||
#:*'''Published Start Date''' | #:*'''Published Start Date''' | ||
#:*'''Published End Date''' | #:*'''Published End Date''' | ||
| − | #:'''Accept User responses via HTTP collector''' | + | #:*'''Accept User responses via HTTP collector''' |
| − | #:*''' | + | #Click the '''Confirmation Options''' tab |
| + | #Configure the following: | ||
| + | #:*'''Post Submit Message''' - Enter the message to be displayed after the form is completed. | ||
| + | #:*'''Download File''' - If you wish to include a file to be downloaded after the form has been submitted, click the '''Select File''' button and import the file. Alternately, you can select a previously imported file. | ||
| + | #Click '''Done'''. | ||
| + | |||
| + | The Url for the form will automatically be populated once the form has been saved. | ||
| + | |||
| + | ===Add Questions to a Form=== | ||
| + | |||
| + | #In the '''Forms''' module, click the pencil icon for the form to which you wish to add questions. | ||
| + | #:[[File:Form Question Setup.jpg|center]] | ||
| + | #Click '''Add New Question Field'''. | ||
| + | #:[[File:Form Custom Field.jpg|center]] | ||
| + | #Configure the following: | ||
| + | #:*'''Name''' - Enter in the name/question. This should be entered as you wish to see it on the form/survey. '''NOTE''' - If you have previously created the same field, you may select the field from the '''Link to Database Field''' drop-down list. | ||
| + | #:*'''Field Data Type''' -Select the type of data expected as a response to this question. | ||
| + | #:*'''Characters Allowed''' - If you have selected a '''Text''' data type, enter the number of characters that will be accepted in the field. | ||
| + | #:*'''Required''' - Select this check-box if the field is required in the form/survey. | ||
| + | #:*(Optional) '''Description''' - Enter a description of the field. | ||
Revision as of 23:52, 5 September 2017
The Forms module enables you to quickly create and publish custom web forms and surveys. Features include an intuitive interface which allows you to select from a variety of form fields.
Create a Form
Creating a form is a two step process. First you will add the form, then you will add the questions to your form.
- Click Forms in the Navigation Panel.
- Click the Add button.
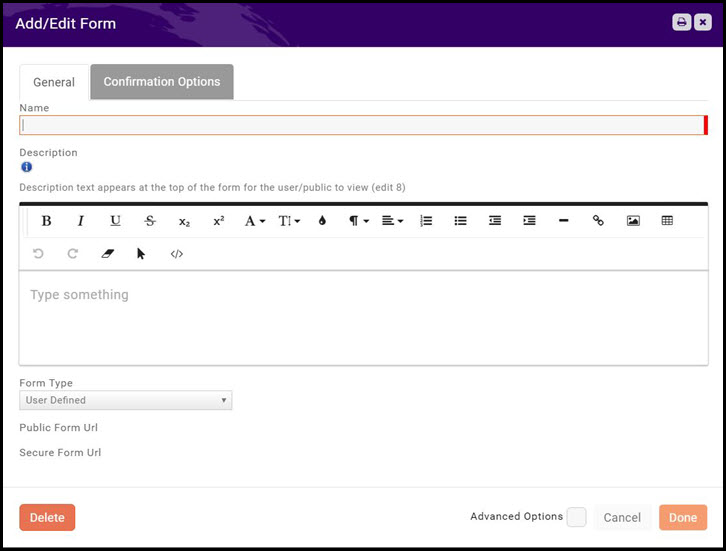
- Configure the following on the Create tab:
- Name - provide a name for your new form.
- Description - This text appears at the top of the form for the user/public to view. You may use the standard word processing functions (bold, italics, etc.), as well as add links, and images.
- Form Type - Select a form type or select User Defined.
- (Optional) Click the Advanced Options check box and configure the following:
- Published Start Date
- Published End Date
- Accept User responses via HTTP collector
- Click the Confirmation Options tab
- Configure the following:
- Post Submit Message - Enter the message to be displayed after the form is completed.
- Download File - If you wish to include a file to be downloaded after the form has been submitted, click the Select File button and import the file. Alternately, you can select a previously imported file.
- Click Done.
The Url for the form will automatically be populated once the form has been saved.
Add Questions to a Form
- In the Forms module, click the pencil icon for the form to which you wish to add questions.
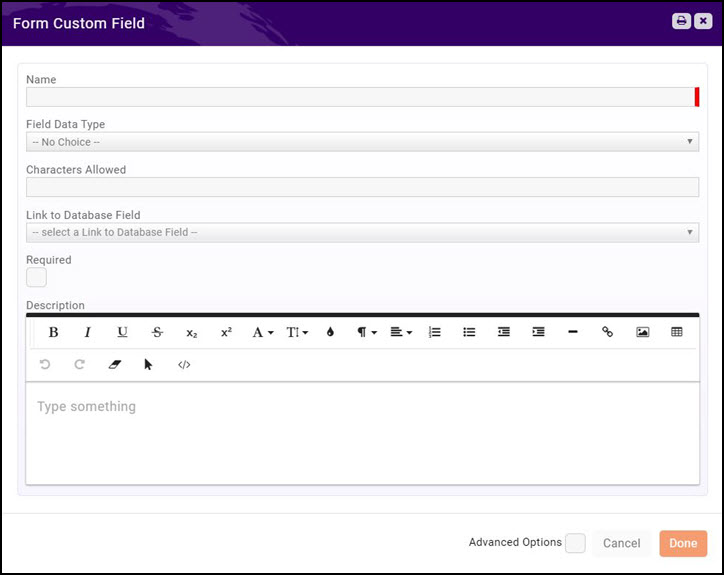
- Click Add New Question Field.
- Configure the following:
- Name - Enter in the name/question. This should be entered as you wish to see it on the form/survey. NOTE - If you have previously created the same field, you may select the field from the Link to Database Field drop-down list.
- Field Data Type -Select the type of data expected as a response to this question.
- Characters Allowed - If you have selected a Text data type, enter the number of characters that will be accepted in the field.
- Required - Select this check-box if the field is required in the form/survey.
- (Optional) Description - Enter a description of the field.


