Difference between revisions of "Billing"
| Line 3: | Line 3: | ||
With your GrowthZone software, we have integrated the entire invoicing process into the software to ensure no double entry and save you time. An Accounting Summary report allows you to post summary from GrowthZone to keep QuickBooks, PeachTree and other accounting systems in sync. | With your GrowthZone software, we have integrated the entire invoicing process into the software to ensure no double entry and save you time. An Accounting Summary report allows you to post summary from GrowthZone to keep QuickBooks, PeachTree and other accounting systems in sync. | ||
| − | <html><class='searchaux'><h1>Initial Billing Setup< | + | <!--POSSIBLE WAY TO ELIMINATE LEAD TEXT--> |
| − | + | <!--html><class='searchaux'><h1>Initial Billing Setup<h1></html--> | |
| + | =Initial Billing Setup= | ||
==Setup Your Chart of Accounts== | ==Setup Your Chart of Accounts== | ||
Revision as of 21:22, 19 July 2017
Contents
- 1 Overview
- 2 Initial Billing Setup
- 3 Billing Functions
- 4 Billing Reporting
- 4.1 Accounting Summary
- 4.2 Accounts Receivable Aging Summary
- 4.3 Integrated Processing Monthly Statement
- 4.4 Integrated Processing Monthly Transfers
- 4.5 Integrated Processing Transactions
- 4.6 Integrated Processing Disputes
- 4.7 Stored Payment Profiles Report
- 4.8 Scheduled Billing Report
- 4.9 Refund Report
- 4.10 Accounting Transaction Report
- 5 FAQ's
Overview
With your GrowthZone software, we have integrated the entire invoicing process into the software to ensure no double entry and save you time. An Accounting Summary report allows you to post summary from GrowthZone to keep QuickBooks, PeachTree and other accounting systems in sync.
Initial Billing Setup
Setup Your Chart of Accounts
The Chart of Accounts ensures that your financial data is aligned to any existing accounting records and processes. On installation of the software, a sample chart of accounts is provided as a starting point. Edit and add to this list to ensure your database chart of accounts matches your current structure.
Edit Your Chart of Accounts
- Click Setup in the Navigation panel.
- Click Chart of Accounts in the Finance section. A list to the accounts currently configured in your system will be displayed.
- Click on the link for the account you wish to edit and make the desired edits.
- Click Done to save the changes.
Add New Account to Your Chart of Accounts
- Click Setup in the Navigation panel.
- Click Chart of Accounts in the Finance section. A list to the accounts currently configured in your system will be displayed.
- Click the Add button.
- Configure the following settings:
- a. Name - This is the name of the account. This name must match exactly the name of the account in your general accounting software.
- b. Number - This is the number associated with this account.
- c. Account Description - Enter a description of this account. This is for informational purposes only.
- d. Is Active - Select the check-box to activate this account. If the account is not activated, it will not be available for use within the software.
- e. Type - Select the type of account from the drop-down list.
- f. Chapter - If applicable, select the chapter associated with this account.
- Click Done to save the new account.
Set Up Your Payment Terms
By default, payment terms are set to Due on Receipt. You may modify and add additional payment terms to meet your business needs.
- Click Setup in the Navigation panel.
- Click Invoice Terms in the Finance section. A list of invoice terms currently configured in your system will be displayed.
- Click the Add button.
- On the Add/Edit Invoice Terms screen, configure the following:
- Name - Enter a name for this invoice term. This name will be displayed in drop-down lists in the software.
- Display Name - Enter the display name. This will be displayed on invoices.
- Default Due Days - Enter the default due days for this invoice term configuration.
- Click Done.
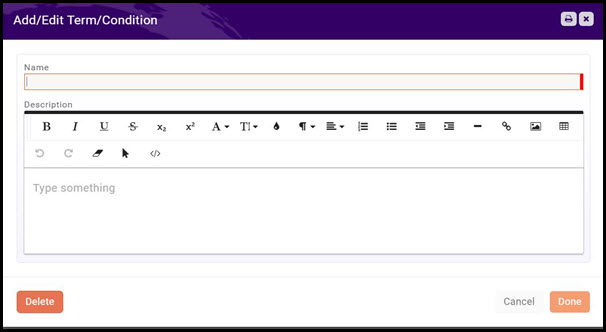
Set Up Your Terms & Conditions
- Click Setup in the Navigation Panel.
- Click Terms/Conditions in the Services, Products and Commerce section.
- Click the Add button.
- Enter a Name that easily identifies this terms & condition set. You may create multiple terms & conditions as needed by your business processes.
- Description - Enter your terms & conditions. You may use the standard word-processing functions (bold, italics, etc.) as well as add links and images. If you choose, the terms & conditions may be displayed on the Membership Application Form.
- Click Done.
Set Up Your Payment Gateways
Integrated Payment Processing (IPP)
Integrated Payment Processing (IPP) allows your contacts to enter their credit card or bank account information into a secured page to pay invoices, event registration, donations, etc… online. By checking to save this account, users can apply this automatically to recurring fees (e.g. membership) or other one-time purchases. Creating your IPP gateway is a two step process
Step One
- Click Setup in the Navigation panel.
- Click Payment Gateways in the Finance section.
- Click the Add button.
- On the Add Payment Gateway screen, configure the following:
- Type - Select Integrated Payment Processor from the drop-down list.
- Default Gateway - Select this check-box if this will be used as your default gateway.
- Internal Name - This name is the name you will see internally for this account. You may have multiple processing accounts, perhaps one for your memberships and one for fundraising. In this event, you would add additional IPP gateways for these. This is a way for you to internally recognize with account is used for which transaction.
- Country - (Optional) Select your country from the drop-down list.
- Click Done to save the new IPP account.
Step Two
In step two, your business contact and account information is entered. This will also include personal information about the owner of the account. This information is necessary to verify the authenticity of the account holder.
- For the newly created gateway, click the pencil icon in the 'Actions column.
- On the Edit Payment Gateway screen, configure the following:
- Name - this field will be populated with the name previously assigned to this gateway. You may modify it if needed.
- Default Gateway - this field if populated with your previous choice. You may modify it if needed.
- *Account Number - this field is automatically generated when the gateway is first created.
- Business Name - this field is automatically populated with the name of your business.
- Statement Descriptor (Maximum 22 characters) - The statement descriptor appear on purchasers statements so best practice is to enter a descriptor that allows the purchaser to easily identify your organization.
- Public Contact Info - Enter the contact information for your organization.
- Decline Charge On:
- CVC Failure - If you select this check-box, charges will be declined if the CVC fails.
- AVC Failure - If you select this check-box, charges will be declined if the AVC fails.
- Bank Accounts - Click the Add button to associate the organization's bank account with this gateway. This is the bank account to which the funds will be transferred. Once created, this bank account may not be deleted unless another one is added.
- Account Holder Information - Enter the required account holder information. Enter information about the holder of this account, i.e. the user/business receiving funds from this account. Select Individual or Business account. If selecting Business, the representative for the business is the individual who has been given authorization by their business to set up an account on behalf of the business. This individual is not responsible or liable for any activity that happens on the businesses' account but is required as part of "Know Your Customer" regulations.
- Additional Owners - In EU countries, we are required to collect and verify information about anybody that owns at least 25% of the company, in addition to the representative. The address of the additional owner(s) does not need to be in the same country as the account. Click the Add button to add additional owners to this account.
- Identity Document
- Click Done to save the account information.
Once the form is completed, an authorization process will take place. This is a very quick process, and you will be notified if any thing is missing or inaccurate on the form.
Setting Up Taxes
If any of your goods/services are taxable, to setup your taxes you will need to configure:
- Product Tax Categories
- Tax Regions
- Tax Rules
- Tax Rates
- Tax Sets
Setup Product Tax Categories
Under Product Tax Categories you will define the categories of products that are taxable. For example, if you are using the store module and are required to collect tax on certain products, you could set up the tax categories based on your store product categories (i.e. apparel, gifts, etc.).
- Click Setup
- Click Taxes in the Finance section.
- On the Product Tax Categories tab, click the Add button.
- Enter a Name for the category.
- Click Done
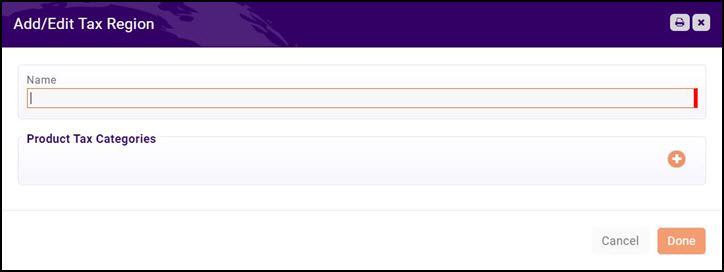
Setup Tax Regions
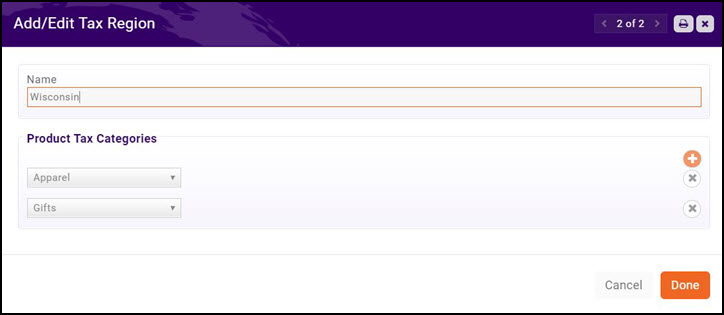
Tax regions are the region for which you must collect taxes. For example, if you must collect state taxes, you could name the region after the state.
- Click Setup
- Click Taxes in the Finance section.
- On the Tax Regions tab, click the Add button.
- Enter a Name for the new regions.
- Click the + button to associate the product categories that are taxable in this region.
- NOTE: When the product categories are added to the regions, these become the Tax Rules displayed on the Tax Rules tab.
- Click Done.
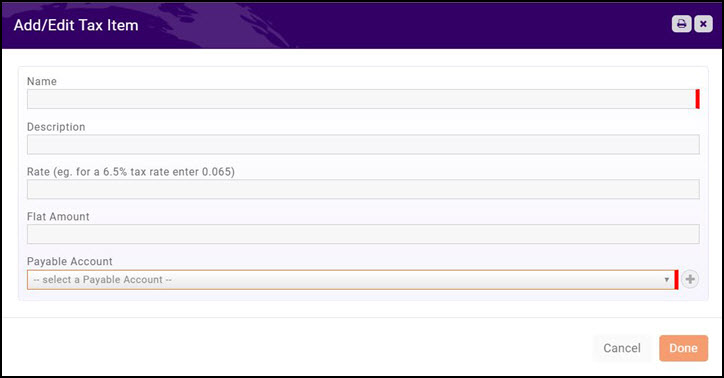
Setup Tax Rates
In most cases, sales tax rates must be configured for the physical location that the chamber/association has a presence (nexus). If you operate in multiple states, you would need to enter the tax rates for each state.
- Click Setup
- Click Taxes in the Finance section.
- On the Tax Rates tab, click the Add button.
- Enter a Name for the tax rate. For Example: Minnesota to identify a Minnesota tax rate.
- Enter an optional Description of the tax rate.
- Enter the rate in decimal format. For Example: 6.5% tax rate enter 0.065.
- If taxing is a Flat Amount enter the flat amount.
- Select the Payable Account that will be used for your taxes payable.
- Click Done.
Set Up Your Invoice Template
A standard invoice template is built into the software. You can use this default template, or modify it to meet your business needs. You may also add a logo to the invoice. Alternately, you may import your existing template into the database.
View/Modify Invoice Template
- Click Setup in the Navigation Panel.
- Click Document Generation Templates in the Document Generation section. A list of existing templates will be displayed.
- Click the Copy icon for the Invoice template.
- Click OK in the confirmation dialog box. A copy of the invoice template will be available at the bottom of the list of templates.
- To view the template, click the pencil icon (Edit Template Document). You will be taken to the document editor login. Enter your MemberZone user name and password to launch the document.
- Enable editing of the document.
- Complete your changes.
- Select save and close the document.
Your changes will be saved. You can now choose this template where applicable.
Configure Finance Defaults & Logo for Invoices & Statements
- Click Setup in the Navigation panel.
- Click General Settings in the Finance section.
- Click the pencil icon below Logo for Invoices and Statements.
- NOTE: the icon is visible when you dwell the mouse below Logo for Invoices and Statements.
- Click Upload to browse to the location of your logo.
- Click Open.
- Crop the image as needed, then click Crop & Save. The logo will now be displayed on all of your invoices and statements.
- For each of the listed accounts, select your default. This default will automatically be applied when you create goods & services, but you will be able to over-ride if needed.
- Select your Default Invoice Template. This is the template that will be used for all of your invoicing, but may be over-ridden. Refer to Setting Up Your Invoice Template for details on setting up a template.
- Select your Default Invoice Terms. Select the terms you wish to use by default.
- Transaction Deletion - This setting determines the number of days in which an invoice or payment may be deleted. Best practice is to limit the transaction window, as once an invoice is deleted, it is completed removed from your view which could cause issues with audits and/or reconciling. Additionally, there is risk that an invoice deleted from the database may already have been posted to your general accounting software. This would cause the two systems to become out of sync. The system provides a Void option that can be used instead of deleting. A void will create a counter entry.
- Automated Scheduled Billing - The Lead Time Days setting allows you to configure the number of days ahead of the due date invoices for recurring fees (i.e. membership dues) are automatically generated. The lead time gives you time to review the invoices prior to them being emailed out.
- NOTE: At this time, you will still need to manually kick-off the actual email process.
- Use Automated Billing - select this check-box if you wish to automatically charge those members who have stored payment profiles.
- Click Save.
Set Up Goods/Services
Goods and Services allow you to define the “products” for the memberships, services and products you provide. Upon initial setup of the system you will add high level categories of the items that you offer. Additional good/services may be added as your business requires.
- Click Setup in the Navigation panel.
- Click Goods/Services in the Services, Products and Commerce section. A list of Goods/Services currently configured in your system will be displayed.
- Click the New button.
- On the Add/Edit Good or Service screen, configure the following:
- Name - Provide a name for the good/service. This will be displayed when you are selecting goods or services.
- Good/Service Type - Select a type from the drop-down list. Type is used for filtering and reporting.
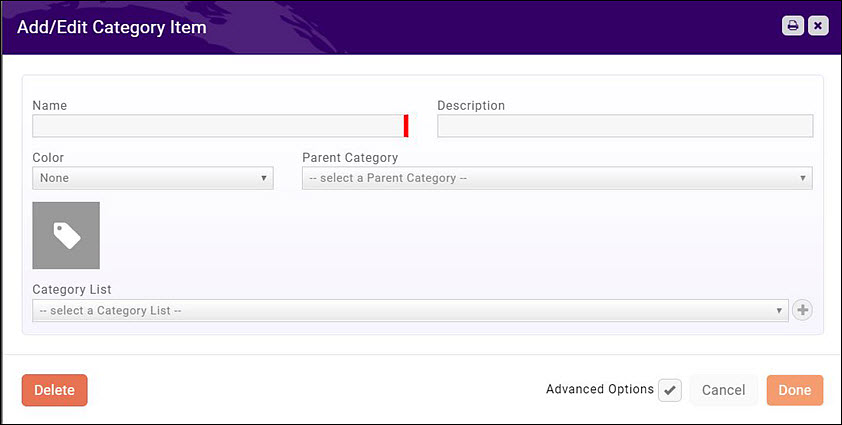
- Product Category - Select a product category from the drop-down list. Product Category is used for filtering and reporting. You can select a previously configured product category from the list, or, to add a new product category, click the + sign.
-
- Enter a Name for the new product category.
- Enter a Description of the new product category.
- Select a Category List from the drop-down, or, to add a new category list, click the + sign.
- Click Done.
- Description - Enter a description of the good/service. This description is displayed in the Goods/Services list.
- Product Description - The Product Description is displayed on the web when this good/service is used. The standard word processing for formatting your text (i.e. bolding, italiczing, etc.) are available. You may also add links and images to the description.
- Price Period - Select how this good/service is billed. You may select: Annually, Monthly, One-time, Semi-annually, or Quarterly. An event good/service would be a one time fee.
- Default Price - Enter a default price for this good/service. This price may be over-ridden when you are assigning the good/service.
- Default Quantity - Enter the default quantity for this good/service. This would be used if a minimum purchase for this good/service is required, and may be overridden when you are assigning the good/service.
- Accounting Type - Select either Cash or Accrual.
- Revenue Recognition Type - Select how you will recognize the revenue for this good/service. For example, if this is an event related fee, and you wish to defer revenue recognition until the start date of the event, you would select Fully on Event Start Date.
- Income Account - Select the income account for this good/service. The drop-down list will be populated with the income accounts currently configured in your Chart of Accounts. You may add a new account by clicking the + sign. If you are unsure as to which account should be selected you will want to check with your accountant, as this will affect your financial statements.
- Receivables Account - Select the accounts receivable account for this good/service.The drop-down list will be populated with the receivables account configured in your Chart of Accounts.
- Deferred Income Account - Select the deferred income account for this good/service. The drop-down list will be populated with the deferred income accounts configured in you Chart of Accounts. If you have chosen to defer the revenue for this event to a specific point in time, the revenue will be held in the deferred income account until that point in time.
- Deposit Account - Select the deposit account for this good/service. The drop-down list will be populated with the deposit accounts configured in your Chart of Accounts.
- Default Revenue Recognition Months - If the revenue for this good/service will be recognized over a period of time, enter the default number of months over which the revenue will be recognized.
- Voluntary - Select this check-box if the fees for this good/service are voluntary. A voluntary fee may be displayed on an invoice, and the member may choose to or to not pay this fee. If they choose not to pay the fee, it will not be counted against them in any past due invoices reports.
- Product Tax Category - If this good/service is taxable, select the appropriate product tax category. The drop-down list will be populated with tax categories currently configured in your system. If you wish to add a new product tax category, click the + button.
- Tax Set - If this good/service is taxable, select the appropriate tax set.
- Is Recurring Fee (vs. one-time) - Select this check-box if this is a recurring fee. Your membership dues, for example, are recurring fees.
- Invoice Template - Select the invoice template to be used for this good/service.
- Is Active - Select this check-box to activate this good/service. Only Active items may be billed and only active items will be displayed when you need to select a good/service.
- Click Done to save the new good/service.
Billing Functions
The Billing module provides the functions to review invoices, view overdue invoices, accept payments, as well as review reports on accounts receivables, and generate the reports needed to reconcile to your general accounting software.
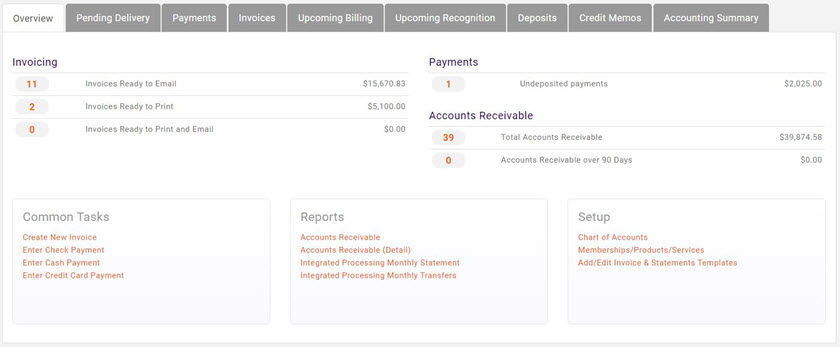
The Billing module displays nine separate tabs to allow you to manage your billing processes:
- Overview - This tab provides a summary view into the present status of your billing.
- Pending Delivery - This tab will display a list of invoices that are currently waiting to be sent.
- Payments - This tab displays a list of all payments you have received.
- Invoices - This tab will display list of all invoices that have not yet been sent out.
- Upcoming Billing - This tab displays a list of all future billing.
- Upcoming Recognition - This tab will display a list of all revenue to be recognized in the future.
- Deposits - This tab will display a list of all previous deposits.
- Credit Memos - This tab will display a list of all previous credit memos.
- Accounting Summary - This tab will display your accounting summary.
Deliver Invoices
The Pending Delivery tab in the Billing Module will provide a list of invoices that have not been sent out. You may process and send out the invoices in the following manner:
- Select Billing in the Navigation Panel.
- Click the Pending Delivery tab. A list of all invoices that have not been sent will be displayed. When an invoice is created, you select whether the invoice is to be emailed, printed or both. This choice is displayed in the Delivery Method column. If the database does not have the information needed (address and/or email address) this will be noted by Yes in the Missing Info column. You may click the Yes hyper-link to add the missing information if available.
Deliver Invoices via E-mail
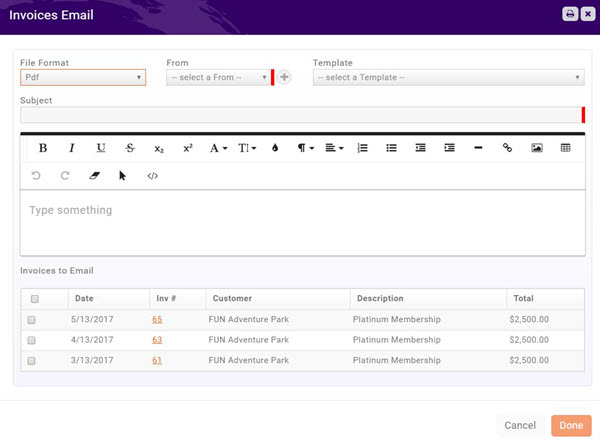
- To deliver the invoices via e-mail, click the Email Invoices button. A list of invoices to be emailed will be displayed.
- NOTE: If an email address is not available, the invoice will NOT be displayed in the list. Correct this as described previously.
- Configure the following email settings:
- File Format - Select either PDF or Word Format.
- From - Select the from email address.
- Template - If you have created an email template to be used when sending invoices you may select it. If you are not using a template, you will simply be able to type your message.
- Subject - Enter a subject for the email, and type your message into the text box, if you are not using a template.
- Select the Invoices to Email.
- NOTE: You may select invoices individually, or click the top check-box to select all invoices in the list.
- Click Done. You selected invoices have now been emailed.
Print Invoices for Delivery
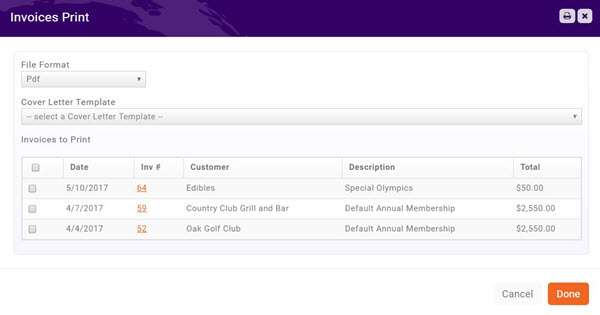
- To print invoices for delivery, click the drop-down arrow on the E-mail Invoices button, and select Print Invoices. The Invoices Print screen will display.
- NOTE: Only invoices for which you have address information will be displayed. Correct missing address information as previously described.
- Select the File Format you wish to use.
- Select your Cover Letter Template (optional)
- Select the invoices you wish to print. You may select invoices individually, or click the top check-box to select all the invoices in the list.
- Click Done. The invoices will download and you may proceed with printing.
Re-deliver Past Due Invoices
You can view all invoices on the Sales/Invoices tab. To view only over-due invoices select Past Due Invoices from the Show Only drop-down list. The list of invoices will refresh displaying on your past due invoices.
Re-deliver Past Due Invoices via Email
- On the Sales/Invoices tab, filter the list to Past Due Invoices as described previously.
- Click the drop-down arrow on the New Invoice button.
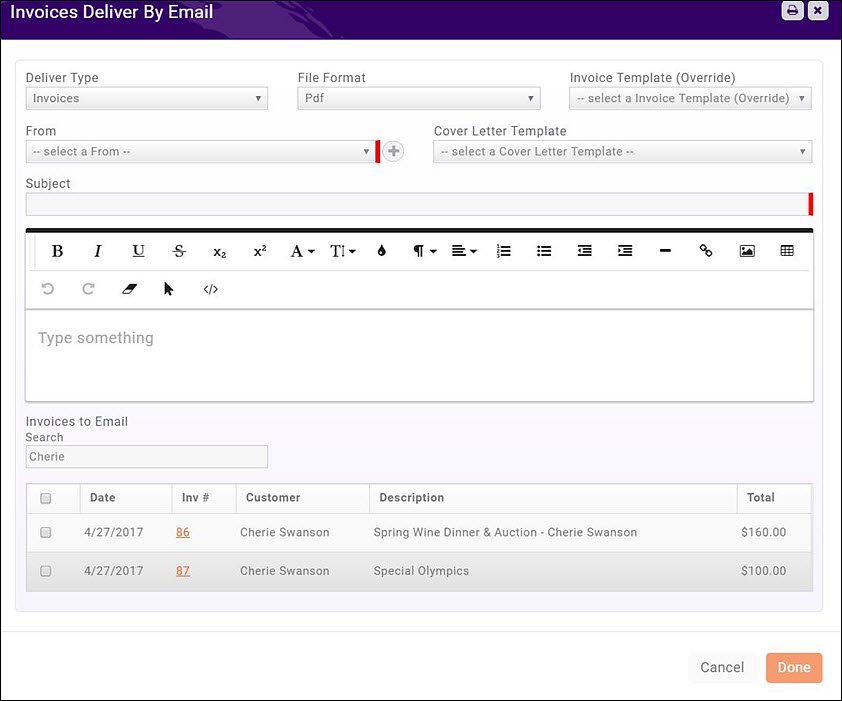
- Click Email.
-
- Select Invoice from the Deliver Type drop-down list.
- Select the desired File Format from the drop-down list.
- Select the desired invoice template from thehInvoice Template (Override) drop-down list.
- Select a From address from the list.
- Select a Cover Letter Template from the list.
- Enter a Subject and type in your message if you have not selected a cover letter template.
- Click the check-box for the invoices you want to email, or click the top-most check-box to select all invoices in the list.
-
- Click Done. The Past Due invoices have now been emailed.
Re-deliver Past Due Invoices via Print
- On the Sales/Invoices tab, filter the list to Past Due Invoices as described previously.
- Click the drop-down arrow on the New Invoice button.
- Click Print Invoices.
- Select the desired File Format from the list.
- Select the desired Invoice Template from the list.
- Select the desired Cover Letter Template from the list.
- Click the check-box for the invoices you want to print. Click the top-most check box to select all invoices in the list.
- Click Done to print the invoices.
Accept Payments
The Invoice tab will display all of your invoices, whether they have been paid or not. You can use this tab to analyze aging and make payments. The list may be filtered to just open invoices to make it easier to manage payments.
You can view the details of an invoice by clicking into the hyper-link for a particular invoice.
- Select Billing in the Navigation Panel.
- Click the Invoices tab. Customize the list to display only unpaid invoices to make it easier to locate the invoices for which you are accepting payment.
- Click the payment type in the Actions list. You may choose: check or credit card.
Accept a Check Payment
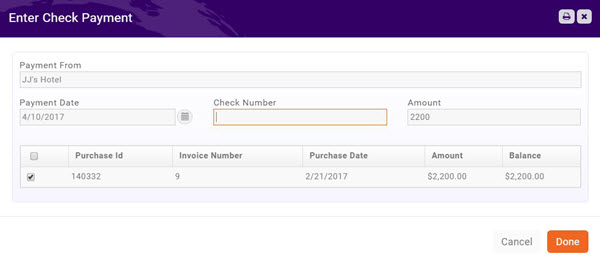
- Click the Enter Check icon in the Actions list.
- Payment From - This will display the member the invoice was sent to. You may change this if necessary.
- Payment Date This will display today's date. You may change this if necessary.
- Check Number - Enter the check number as a reference.
- Amount - The full amount of the invoice will be displayed by default. You may change this if necessary.
- Click Done.
Accept a Credit Card Payment
- Click the Enter Credit Card icon in the Actions list.
- Payment From - This will display the member the invoice was sent to. You may change this if necessary.
- Stored Payment Methods If a credit card has been stored for this member, you will be able to select this payment from the list.
- Card Information - Select the appropriate Payment Gateway.
- Enter Card Information - Enter the required credit card information fields.
- Store Payment Info For Future - if the member wishes you to do so, you may click this check-box to store this credit card number for future use.
- Amount - enter the amount to process in this transaction. The amount due on the invoice will be displayed by default, but you may change this.
- Click Done to process the credit card payment.
Void an Invoice
You may void an unpaid invoice by selecting it on the Billing module Invoices tab.
- Select Billing in the Navigation Panel.
- Click the Invoices tab. A list of all invoices is displayed, whether open or paid. To easily find the invoice to be voided, filter the results to Open Invoices.
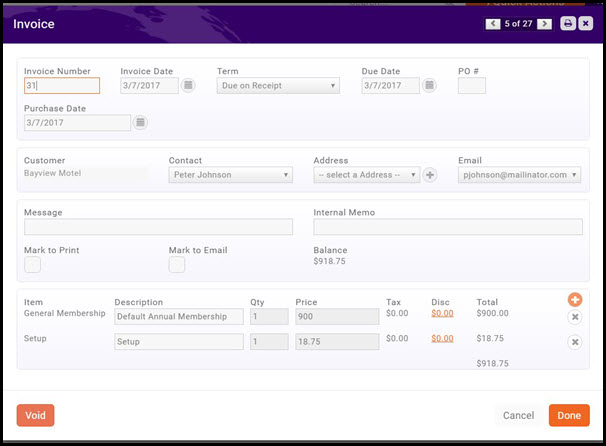
- Click the hyper-link in the Inv # column for the invoice you wish to void.
- Click the Void button.
- Click OK to confirm.
Refund a Payment
The Payments tab will display a list of all payments you have received. From this tab, you will be able to refund a payment.
- Select Billing in the Navigation Panel.
- Click the Payments tab.
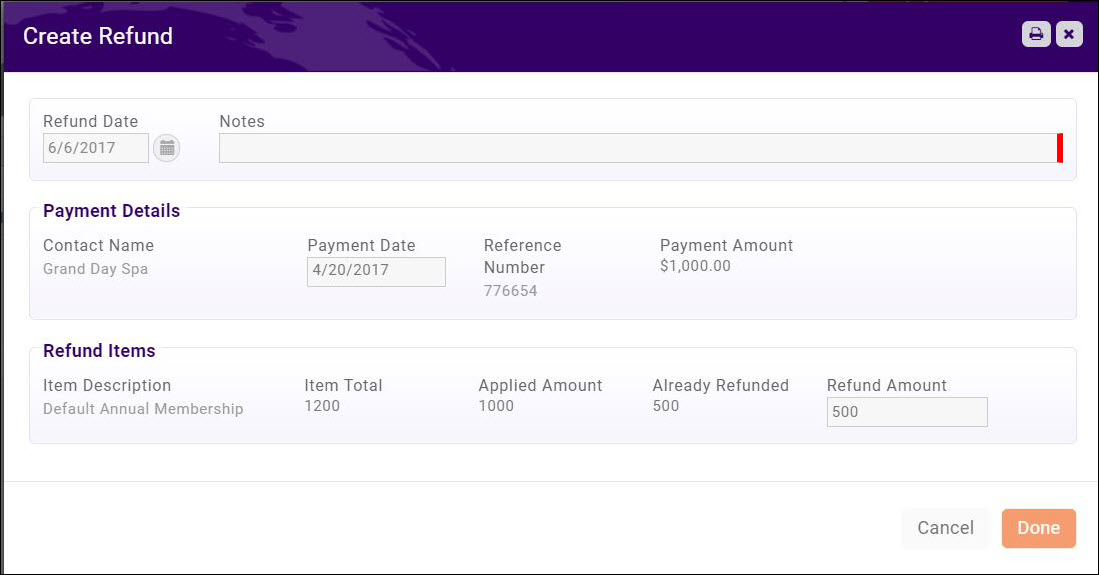
- Click the Refund Payments icon in the Actions column.
- NOTE: If the icon is not displayed, this indicates that a refund has already been created for the item.
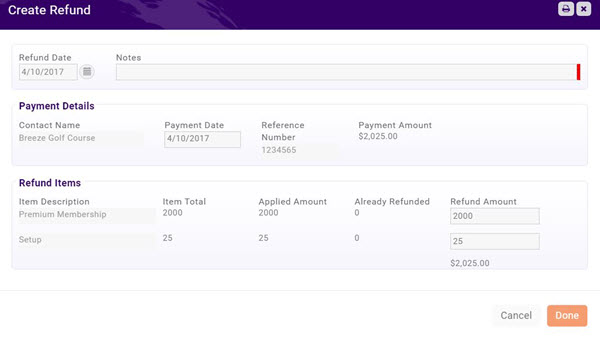
- Refund Date - The date will default to today's date. You may change it if necessary.
- Enter Notes. This is a required field.
- In the Refund Items section, the full amount of the fee items will be displayed.
- Click Done.
You can run the Refund Report (Reports > Refund Report) to view a list of all refunds that have been performed. Click Here for information on the Refund Report.
Partial Refunds
The Payments tab will display a list of all payments you have received. From this tab, you will be able to do a partial refund.
- Select Billing in the Navigation Panel.
- Click the Payments tab.
- Click the Refund Payments icon in the Actions column for the payment to which you wish to apply a partial payment.
- NOTE: If the icon is not displayed, this indicates that a refund has already been created for the item.
- Refund Date - The date will default to today's date. You may change it if necessary.
- Enter Notes. This is a required field.
- In the Refund Items section, the full amount of the fee items will be displayed. To issue a partial refund, enter the amount you wish to refund.
- Click Done.
You can run the Refund Report (Reports > Refund Report) to view a list of all refunds that have been performed. Click Here for information on the Refund Report.
Create a Write Off
When needed, you may create a write-off on the Billing module Invoices tab.
- Select Billing in the Navigation Panel.
- Click the Invoices tab. Customize the list to display only unpaid invoices to make it easier to locate the invoice you wish to write-off.
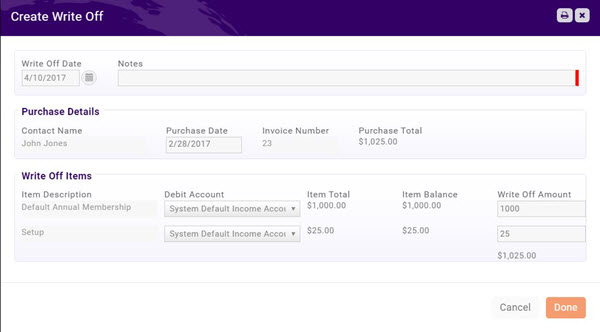
- Click the Create Write Off icon in the Actions column.
- Configure the following as necessary:
- Write Off Date - The date will default to the current date.
- Notes - This field is for internal use and is a required field.
- Purchase Details - This field displays the invoice details, and may not be edited.
- Write Off Items - This field displays the fee items on the invoice, and the associated account. The Write Off Amount will be populated with the original amount on the invoice.
- Click Done to complete the write-off.
Add a Credit Memo
You may add a Credit Memo on the Credit Memos tab.
- Select Billing in the Navigation Panel.
- Click the Credit Memos tab. A list of current credit memos is displayed.
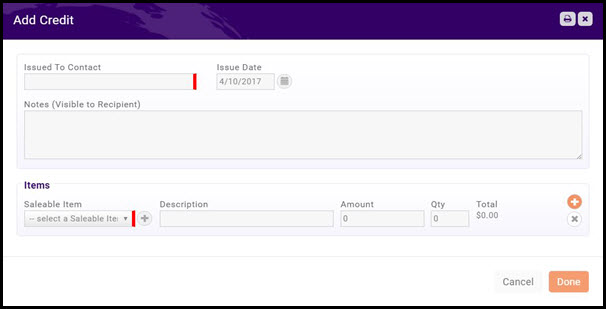
- Click the New Credit button.
- Configure the following:
- Issued To Contact - Type the name of the contact to which you are issuing the credit. Type ahead functionality will display options that match your input.
- Issue Date - The date will default to the current date. You may change this if needed.
- Notes (Visible to Recipient) - Enter notes describing the credit. These will be visible to the recipient in the Info Hub.
- Items
- Saleable Item - Select the type of goods/service to which this credit will be applied. You may click the + button to dynamically add a new good/service.
- Description - Enter a description.
- Amount - Enter the dollar value for the credit.
- Quantity - Enter the quantity (this is applied to the credit ammount).
- NOTE: You may add additional items by clicking the + button.
- Click Done.
Void a Credit Memo
- Select Billing in the Navigation Panel.
- Click the Credit Memos tab. A list of current credit memos is displayed.
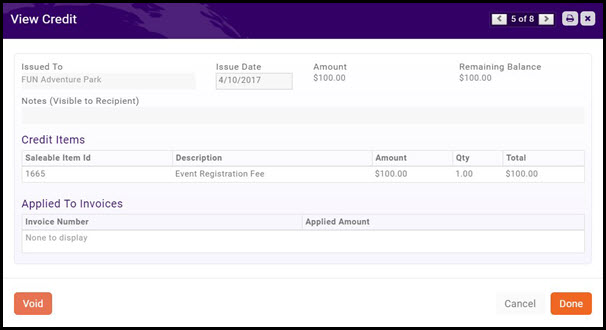
- Click the hyper-link for the Credit Memo you wish to void.
- Click the Void button.
Deleting an Invoice
The ability to delete an invoice is driven by the Transaction Deletion "Allow Deletion for (days)" window.
Generating Invoices for Upcoming (Recurring) Billing
The Upcoming Billing tab displays a list of all recurring billing (i.e. recurring membership dues).
To generate invoices for your recurring fees:
- On the Upcoming Billing tab click Run Upcoming Billing.
- Select the month for which you want to generate invoices. This step will process any upcoming billings with a due date in the month that you select.
- Click Done.
Invoices for the month selected will be created, and will be available for processing on the Pending Delivery tab.
Deposits
View Previous Deposits
You may view previous deposits, and the payments associated to those deposits on the Billing module Deposits tab.
- Select Billing in the Navigation Panel.
- Click the Deposits tab. A list of your previous deposits will be displayed.
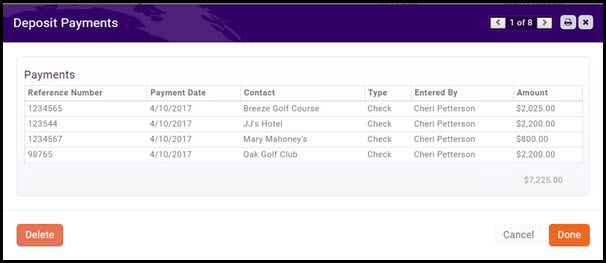
- Click the hyper-link in the Count of Payments column to view the payments associated with the deposit.
Prepare Deposits
The Overview tab in the Billing Module will display the quantity of un-deposited funds. Prepare your deposits by clicking the link on the Overview tab, or on the Deposits tab.
- Select Billing in the Navigation Panel.
- Click the Deposits tab. A list of your previous deposits will be displayed.
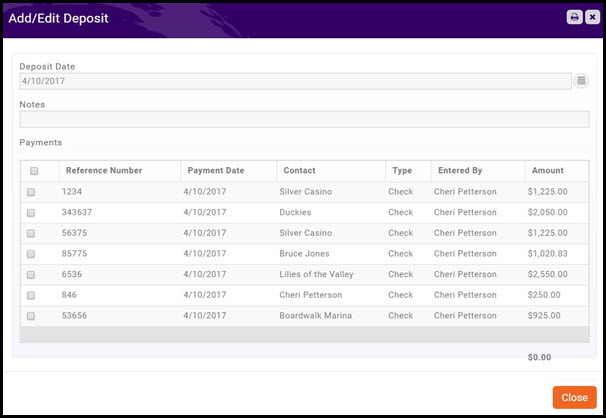
- Click the Create Deposit button.
- Deposit Date - The date will default to the current date, and may be changed if needed.
- Notes - You may add optional notes as needed.
- Payments - Select the payments you wish to include in this deposit. You may select all by clicking the uppermost check-box, or click individual payments.
- Click Close.
Billing Reporting
Your software provides a wide range of reports that can be used to monitor your billing and update your general accounting software.
Accounting Summary
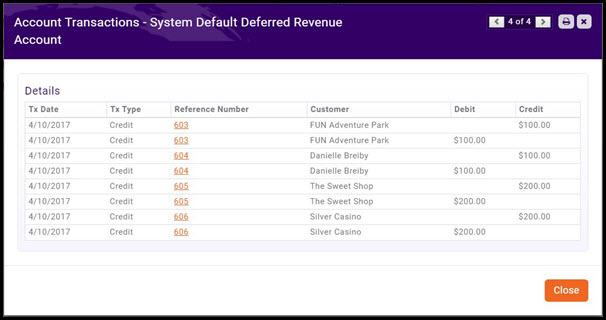
The Accounting Summary tab in the Billing module provides you with a summary of the credits and debits to your accounts. This summary may be filtered in the way that you need to update your general accounting software.
You can view the itemized transactions for each account by clicking the hyper-link for that account.
Best Practice is to reconcile the summary debits and credits for each account, rather than reconciling each individual transaction to the general accounting software.
Accounts Receivable Aging Summary
The Accounts Receivable Aging Summary provides a list of all invoices, and may be filtered by date range to identify invoices that are most overdue. R, eport filtering criteria include Good/Service Type
- On the Billing module overview tab, click Accounts Receivable in the Reports section.
- Select any desired filtering criteria: Report Date, Good/Service Type, Income Account, or additional Criteria / Filters.
- Select any desired fields to display on the report from the Display Options. This option will allow you to limit the results to a specific date range, for example 120 days +.
- Click Run Report.
You can perform the following actions with the report by clicking the down arrow on the Run Report button:
- Export as PDF
- Export as Excel.
- Export Summary as PDF
- Export Summary as Excel
- Email Report
- Add to List - This option will allow you to add the members to an existing list, or create a new list (by clicking the + button on the Add Contacts to list screeen). This can help you in sending emails to this group with reminders.
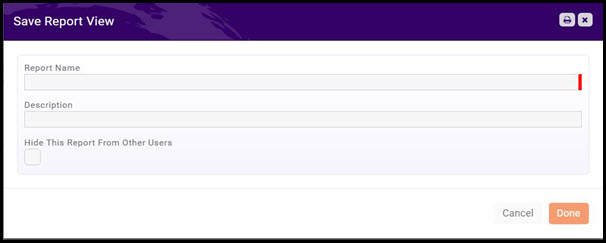
- Save as New Report - If you want to use this report with the same filtering options in the future, you can save the report.
- Add as a Favorite Report - you may save the report as a favorite, then easily identify it when filtering reports in the Reports module.
Integrated Processing Monthly Statement
The Integrated Processing Account Monthly Statement provides a monthly view of all integrated processing, including sales, refunds, disputes, dispute reversals, and transfers.
Integrated Processing Monthly Transfers
Integrated Processing Transactions
Integrated Processing Disputes
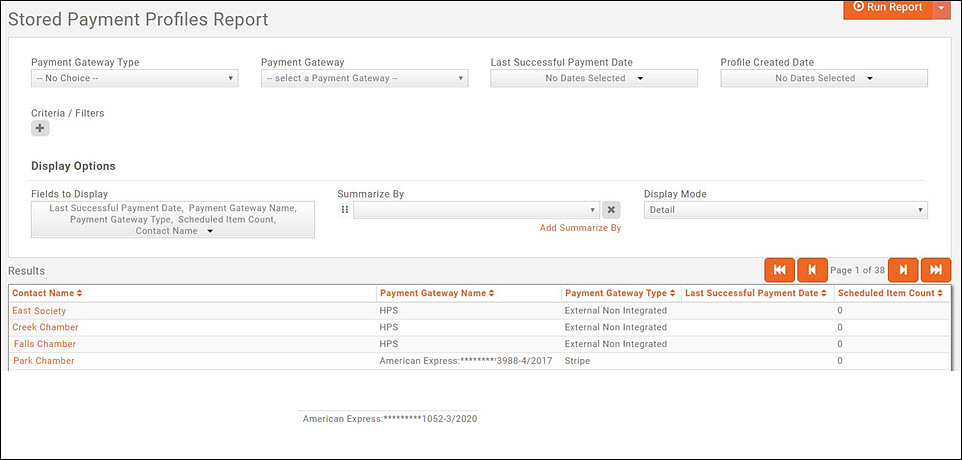
Stored Payment Profiles Report
The Stored Payment Profiles Report provides a list of your contacts and their stored payment profiles. Built-in filters allow you to generate the report based on Payment Gateway Type, Payment Gateway, Last Successful Payment Date, and Profile Created Date.
- Click Reports in the Navigation Panel
- Select Stored Payment Profiles Report.
- Select your search filtering criteria.
- Click Run Report.
You can perform the following actions with the report by clicking the down arrow on the Run Report button:
- Export as PDF
- Export as Excel.
- Export Summary as PDF
- Export Summary as Excel
- Email Report
- Add to List - This option will allow you to add the members to an existing list, or create a new list (by clicking the + button on the Add Contacts to list screeen). This can help you in sending emails to this group with reminders.
- Save as New Report - If you want to use this report with the same filtering options in the future, you can save the report.
- Add as a Favorite Report - you may save the report as a favorite, then easily identify it when filtering reports in the Reports module.
Scheduled Billing Report
Refund Report
The Refund Report will generate a report of all refunds you have performed over a given date range. You can generate the report to display specific Saleable Items (Goods/Services), Saleable Item Type, and/or apply additional filter criteria. By default the report will display: Amount of Refund, Contact, Date of Refund, Goods/Service and Reference #.
- Click Reports in the Navigation Panel
- Select Refund Report.
- Select your search filtering criteria.
- Click Run Report.
You can perform the following actions with the report by clicking the down arrow on the Run Report button:
- Export as PDF
- Export as Excel.
- Export Summary as PDF
- Export Summary as Excel
- Email Report
- Add to List - This option will allow you to add the members to an existing list, or create a new list (by clicking the + button on the Add Contacts to list screen). This can help you in sending emails to this group as necessary.
- Save as New Report - If you want to use this report with the same filtering options in the future, you can save the report.
- Add as a Favorite Report - you may save the report as a favorite, then easily identify it when filtering reports in the Reports module.
Accounting Transaction Report
The Accounting Transaction Report will generate a report of all of your transactions, and may be filtered to specific transaction types, accounts, date range, membership type, goods/services (saleable items), or product category. This report can be used to view all of the transactions in a particular account, or for a specific goods/service.
- Click Reports in the Navigation Panel
- Select Accounting Transaction Report.
- Select your search filtering criteria.
- Click Run Report.
You can perform the following actions with the report by clicking the down arrow on the Run Report button:
- Export as PDF
- Export as Excel.
- Export Summary as PDF
- Export Summary as Excel
- Email Report
- Add to List - This option will allow you to add the members to an existing list, or create a new list (by clicking the + button on the Add Contacts to list screen). This can help you in sending emails to this group as necessary.
- Save as New Report - If you want to use this report with the same filtering options in the future, you can save the report.
- Add as a Favorite Report - you may save the report as a favorite, then easily identify it when filtering reports in the Reports module.
FAQ's
How do I change a members preferred invoice delivery method?
You may change a members preferred invoice delivery method on the members Billing tab. Click the membership link, under Billing Fees and Schedule and make the desired change.
