Difference between revisions of "Marketing Automation"
| Line 78: | Line 78: | ||
=='''<span style="color:#800080">Landing Pages'''</span>== | =='''<span style="color:#800080">Landing Pages'''</span>== | ||
---- | ---- | ||
| − | |||
| − | |||
Landing Pages give you the ability to create a simple web page to engage the contacts in a Marketing Automation flow. This can be a static page or you can include a form/survey and gather responses to questions as contacts proceed through the workflow. Within a '''[[Marketing_Automation#Logic_Branch_Options|Logic Branch]]''' step, you have the ability to select either "Landing page has been viewed" or "Landing page form has been submitted". | Landing Pages give you the ability to create a simple web page to engage the contacts in a Marketing Automation flow. This can be a static page or you can include a form/survey and gather responses to questions as contacts proceed through the workflow. Within a '''[[Marketing_Automation#Logic_Branch_Options|Logic Branch]]''' step, you have the ability to select either "Landing page has been viewed" or "Landing page form has been submitted". | ||
Revision as of 14:38, 10 December 2020
Contents
Marketing Automation Overview
The GrowthZone Marketing Automation module provides the functionality to set up automated workflows designed specifically around varying communication goals. For example, you may want to have a work flow for new prospects, or perhaps a drip campaign for new members. A workflow can be tied to a campaign list, that will then allow you to automatically send targeted information to key individuals and groups.
Marketing Automation Pre-requisites
- Create the desired email templates to be used in your campaign. See Create and Manage Email Templates.
- Create the desired lists/committees, as needed. See Working with Lists/Committees.
Setup your Marketing Automation Workflows
- Click Marketing Automation in the left-hand navigation panel. A list of all current workflows will be displayed.
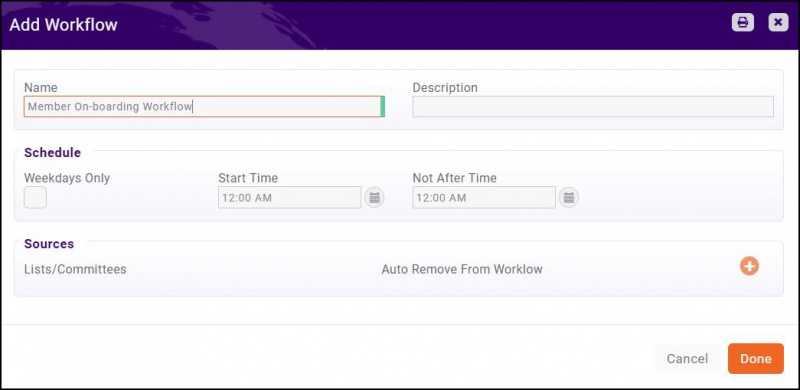
- Click the Add Workflow button.
- Configure the following:
- Name: Enter a name for the workflow. This is an internal name not displayed to the public.
- Description: Enter a description of this workflow. This is optional. This is an internal name not displayed to the public.
- Schedule: The schedule option allows you to define how frequently the system will check to see if a contact needs to be moved to the next step in the work-flow process. Enable Weekdays Only if you wish for workflow tasks to only be performed on weekdays. Enter Start Time and Not After time to restrict workflow tasks to certain times. For Example, you may wish for emails only to be sent on weekdays between 10am - 4pm.
- Sources: Lists/Committees are used for workflows. Click the
 orange plus, to select the desired Lists/Committees that you wish to include in this workflow. Did you know... You can use a smart list to feed new members into a Marketing Automation workflow! Save a membership report for members with a join date of today. Then create a list, enter the saved report, and use that list as a base for Marketing Automation!
See Update Contacts in Lists/Committees From Report Results for further details.
- Auto Remove From Workflow: Select this option if you wish the entire list/committee to be removed from the workflow after all steps are completed.
- Click Done.
Once you have completed the initial setup of your workflow, you will add steps to your workflow, described below.
Add Steps to Your Workflow
The workflow steps allow you to to build a campaign workflow by defining specific emails that will be sent under this program, including the sequence of the communication and time frame between each communication.
- On the Marketing Automation screen, click the Workflow to which you wish to add steps.
- Click the Workflow Steps tab.
- Click the Add Step button.
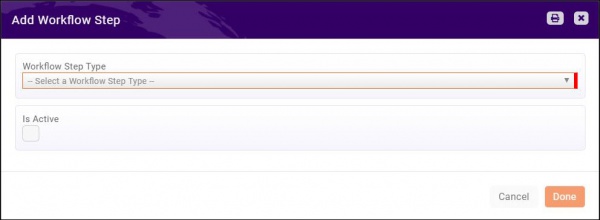
- Select the Workflow Step Type from the drop-down list. See Definitions of Workflow Step Types. Additional options will require configuration dependent on the type selected.
- Click the Is Active check-box.
- Complete additional settings for the selected Workflow Step Type.
- Click Done.
- Repeat steps 3 - 7 to add additional workflow steps to your workflow.
Definitions of Workflow Step Types
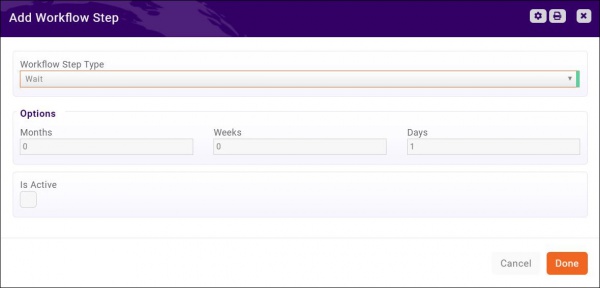
- Wait: This option will allow you to pause your work flow for a number of months, weeks, days. For example, if you are creating a new member on-boarding workflow, you may wish to wait a certain number of days between your initial email, and a follow-up email.
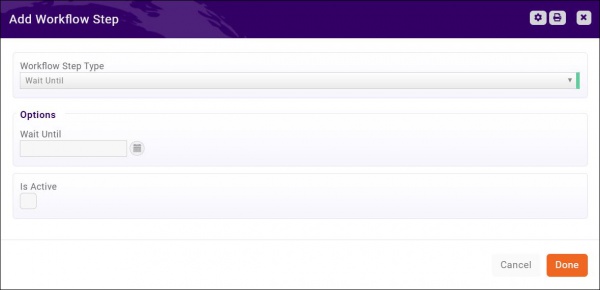
- Wait Until: This option allows you to pause the work flow until a specific date. Enter or select the date that you wish the work-flow to restart in the Wait Until text-box. The work-flow will restart on the day you enter.
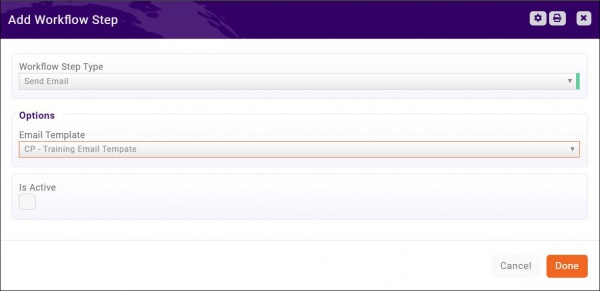
- Send Email: This option allows you to select the email you wish to send out. All email templates you have configured in your system will be available for selection in the Email Template drop-down list. See Create and Manage Email Templates for instructions on creating your templates.
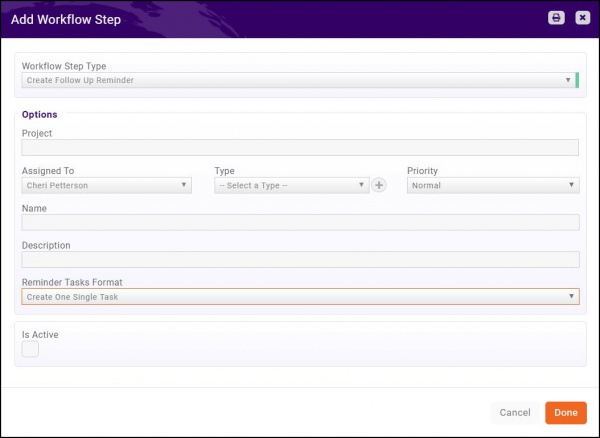
- Create Follow Up Reminder: This option allows you to create a follow-up reminder, for yourself, or another staff member. You may associate the reminder to a specific project, if applicable. Select the staff member to whom you wish to assign the reminder from the Assigned To drop-down list, select a reminder Type from the drop-down list (or click the
 to create a new reminder type), and enter a Name and Description of the reminder. You may select to either Create individual tasks or Create one Single Task.
- Add to List: This option will allow you to add a campaign participant to a specific list. Select the desired Group from the drop-down list, or click the
 to create a new list/committee. See Working with Lists/Committees for instructions on creating lists/committees.
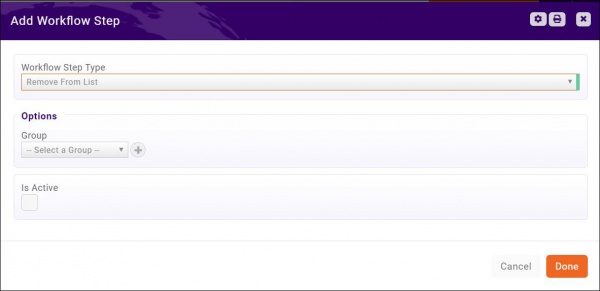
- Remove From List: This option allows you to remove a contact from a specific list. Select the Group from which you wish to remove the contact from the drop-down list.
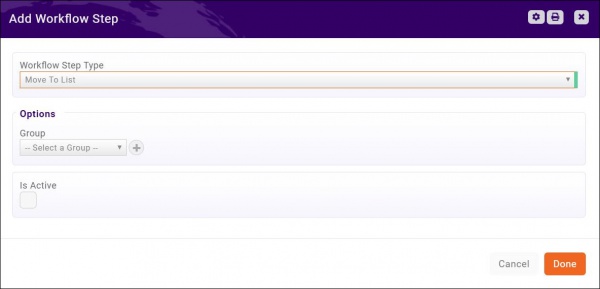
- Move to List: This option will allow you to move the contact to a new list. The contact will be removed from your campaign list, and added to the selected list. Select the desired Group from the drop-down list, or click the
 to create a new list/committee. See Working with Lists/Committees for instructions on creating lists/committees.
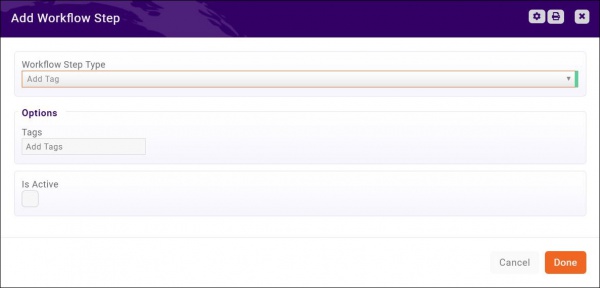
- Add Tag: This option allows you to add a tag to a contact. Type the tag into the Tag text-box, and click enter. Enter additional tags as needed. The tag will be displayed on the contacts page.
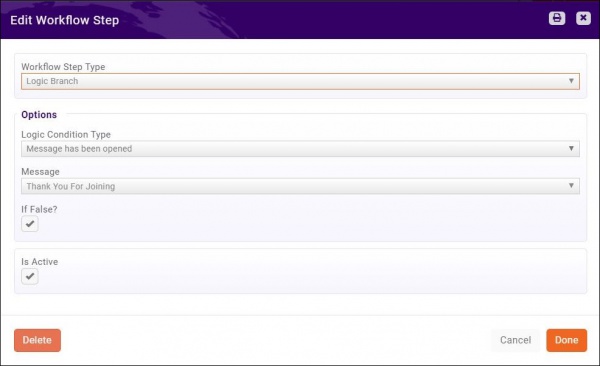
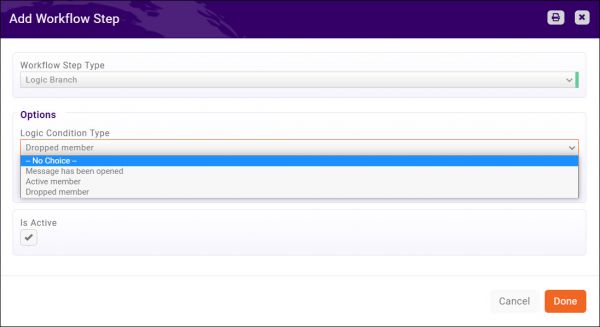
- Logic Branch: This option evaluates if a condition is true, and then determines the next step in the work-flow. For example, the system can evaluate if an email has been opened, and proceed to a certain step if it has not been, and a different step if it has been. Select the Logic Condition Type from the drop-down list. As of this writing, the only condition type available is Message has been opened. Select the Message that you wish to verify has been opened from the drop-down list.
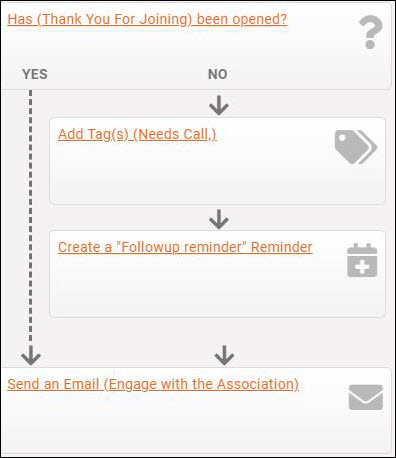
Once you have added the Logic Branch, you will now have two branches to your work flow, as shown below. Add workflow steps to each branch as needed. To do this, you will add the workflow step as described previously, then drag the step to the appropriate branch.
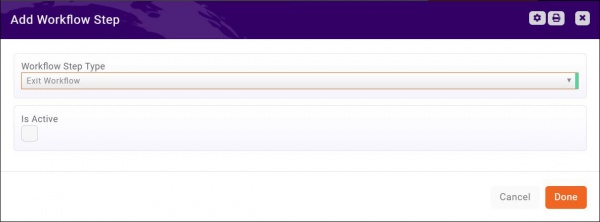
- Exit Workflow: This option completes the workflow, and immediately removes the contact from the workflow.
Logic Branch Options
There are several options for logic branches within your workflow.
- Message has been opened: This logic branch type will check to see if the message selected has been opened by the contact in the workflow. Selecting the "If False?" option will advance the step if the message has NOT been opened.
- Active Member: This logic branch type will check to see if the contact in the workflow has an active membership status. Selecting the "If False?" option will advance the step if the contact is NOT an active member.
- Dropped Member: This logic branch type will check to see if the contact in the workflow has a dropped membership status. Selecting the "If False?" option will advance the step if the contact does NOT have a dropped membership status.
Landing Pages
Landing Pages give you the ability to create a simple web page to engage the contacts in a Marketing Automation flow. This can be a static page or you can include a form/survey and gather responses to questions as contacts proceed through the workflow. Within a Logic Branch step, you have the ability to select either "Landing page has been viewed" or "Landing page form has been submitted".
Creating a Landing Page
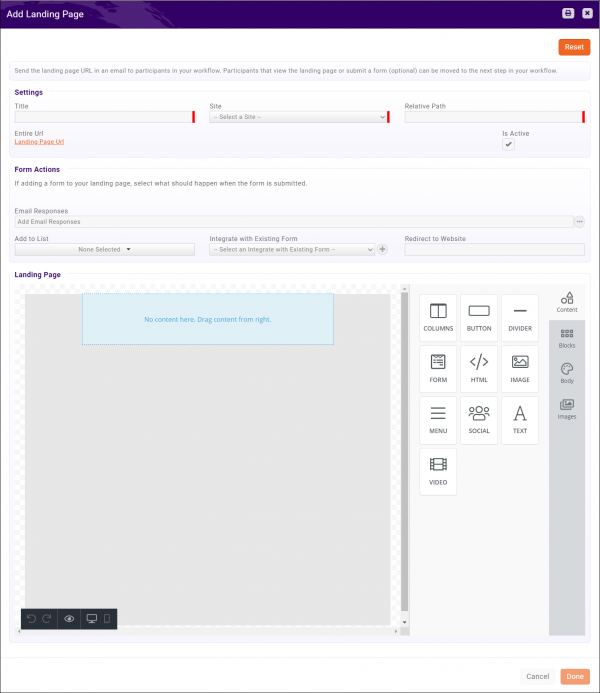
- In the Marketing Automation module, go to the Landing Pages tab.
- Click Add Landing Page.
Settings
- Title: Enter a Title for your landing page.
- Site: Select the site you wish to have your landing page reside within (you may only have "Default Site" as an option).
- Relative Path: This will be used to populate the URL that is system generated. It MUST be unique (there cannot be another webpage/module with the same path).
- Is Active: enable to allow selection within your Marketing Automation workflow(s).
- Entire URL: This will populate with the URL of the landing page after you click Done.
Form Actions
If adding a form/survey to your landing page, select what should happen when the form is submitted.
- Email responses: Select the email you wish responses to be emailed to.
- Add to List: When contacts complete the form, this will add them to a list/committee of your choosing.
- Integrate with Existing Form: if you have an existing form/survey in GrowthZone that you wish to associate the form fields/responses to, select a form from the list here. See Integrating with an Existing Form for additional configuration requirements.
- Redirect to Website: If you wish contacts to be directed to a specific website or page after completing the form, indicate the preferred page here.
Landing Page See Email Designer for more information on how to create your landing page using the tools and modules.
When you have completed designing your Landing Page, click the Done button.
Integrating with an Existing Form
| IMPORTANT: To use the "Integrate with Existing Form" option, you MUST have the Forms/Surveys module. |
When connecting your Landing Page form to an existing GrowthZone Form, there are a few things to setup prior:
- Your GZ Form needs to have “Accept User Responses via 3rd Party Source” enabled (under the advanced options checkbox)
- Ensure the same fields/questions exist in both places (your GZ Form and the Landing Page Form).
- The fields/questions should have the same names as well. Meaning the “Field Name” entered in the landing page form question AND the “Field Name from 3rd Party Application” entered in the GZ Form Question (under the advanced options checkbox) should be exactly the same.
- See Forms/Surveys for additional information.
Once you have ensured these steps above have been completed, your landing page form submissions will be brought into the GZ forms/survey responses area.
Workflow Metrics
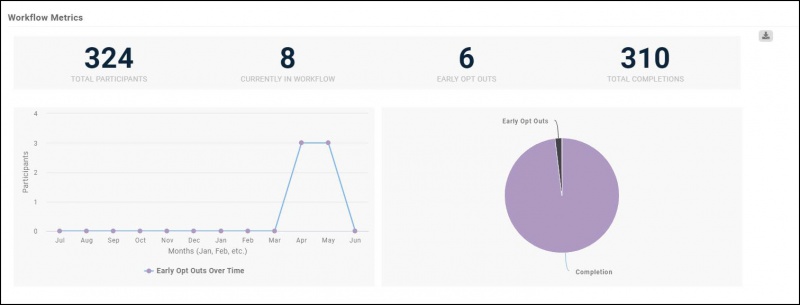
The General tab of your workflow, provides a variety of metrics for analysis.
- Total Participants: This provides an understanding of the total number of contacts that have participated in this workflow (for all time).
- Currently in Workflow: The total number of participants that are still in the workflow.
- Early Optouts: A participant will be marked as opted out when:
- The contact unsubscribes themselves from a list that is part of the workflow (and the contact is currently within the workflow steps).
- Staff removes a contact from list that is part of the workflow (and the contact is currently within the workflow steps).
| Note: If contacts are removed from a list feeding a workflow, the workflow metrics will continue to reflect the previous number of contacts until the next time the workflow executes (i.e. a new contact is added to the workflow). |
- Total Completions: The total number of participants that have completed the full workflow. NOTE: This number will be Total Participants - Currently in Workflow - Early Optouts.
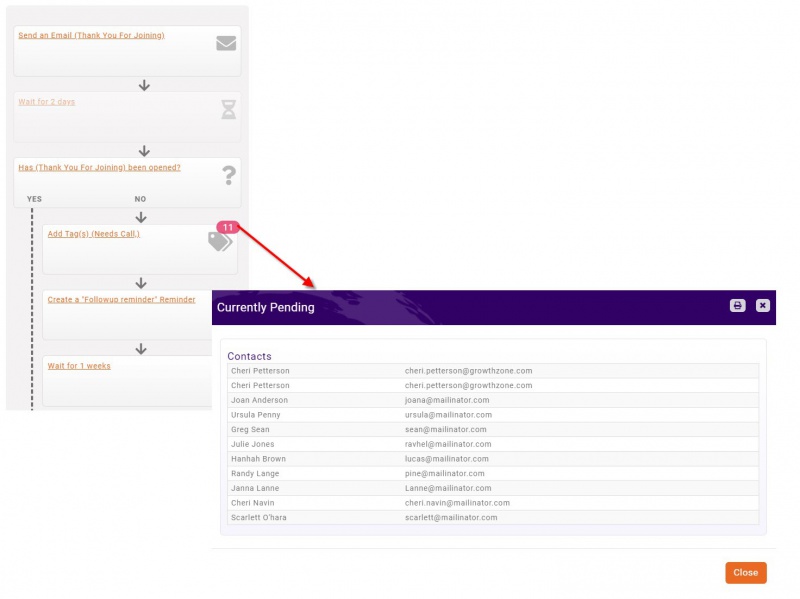
In addition to the metrics displayed on the general tab, on the Workflow Steps tab, you will be able to see, at a glance, how many people are in each step of your workflow, and who is in each step.
Use Cases
Click Here to review examples of workflows using the Marketing Automation module.

