Difference between revisions of "Real Estate Integration"
| Line 3,418: | Line 3,418: | ||
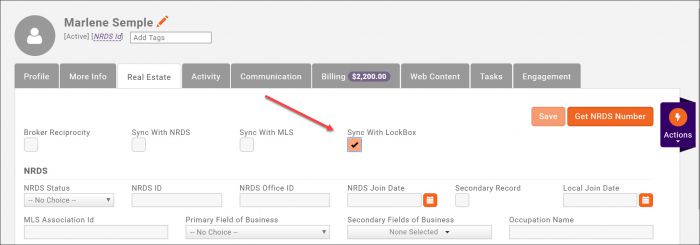
#For the desired agent, click the '''Real Estate''' tab. | #For the desired agent, click the '''Real Estate''' tab. | ||
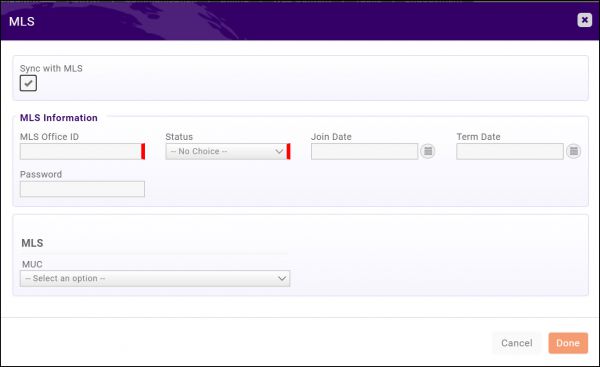
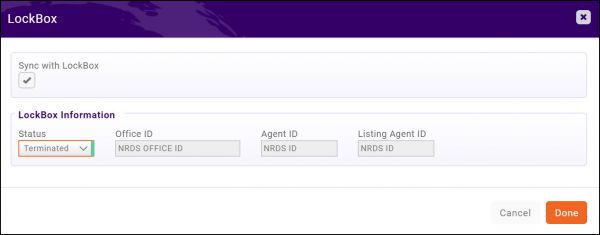
| − | #:[[File: | + | #Click the [[File:Cp orange pencil.jpg|35px]] icon in the '''LockBox - Supra''' section. |
| − | # | + | #:[[File:Supra agent terminated 2020.jpg|600px|center]] |
| − | # | + | #Click '''Sync With LockBox'''. |
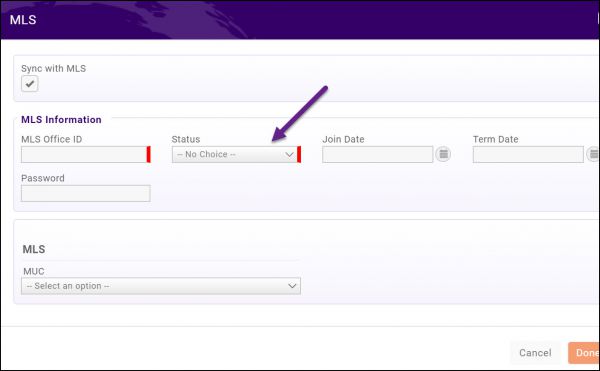
| − | + | #Select '''Terminated''' from the '''Status''' list. | |
| − | #Click ''' | + | #Click '''Done'''. |
| + | |||
| + | This change will automatically be included in the files sent to Supra every hour, no further interaction on your part is needed. | ||
======'''<span style="color:#800080">Suspend an Agent’s Supra Account Record'''</span>====== | ======'''<span style="color:#800080">Suspend an Agent’s Supra Account Record'''</span>====== | ||
Revision as of 14:21, 18 June 2020
GrowthZone's Real Estate Edition provides features required by most National Association of REALTORs Associations for managing their real estate data. The features include an additional tab on contact records to store real estate data, data sync management, and other necessary resources. The software supports integration to NRDS, various MLS, and Lock-box solutions.
Upon installation of the software, you will work with your on-boarding project manager to configure the settings necessary to seamlessly integrate to the various solutions.
Contents
- 1 NRDS Integration
- 1.1 NRDS Integration Initial Setup
- 1.2 Link NRDS, MLS, Lockbox Status to Membership Status (Available in Beta)
- 1.3 NRDS - Working with Offices
- 1.4 Secondary Agent Records
- 1.5 NRDS Education Records
- 1.6 NRDS Financial Record (COMING SOON)
- 1.7 Review NRDS Event Log
- 2 NAR E-Commerce
- 3 MLS Integration
- 3.1 MRED Integration
- 3.2 Corelogic Matrix Integration
- 3.3 Black Knight - Paragon MLS (Coming Soon)
- 4 LockBox Integration
- 4.1 SentriLock
- 4.2 Supra
NRDS Integration
The GrowthZone integration with the National Association of REALTORS’ NRDS database provides association staff an easy way to manage their contacts’ NRDS data. Select data entered or changed in GrowthZone is automatically pushed to NRDS, thereby updating agent and office records in NRDS. Data is pushed every ten minutes to ensure your records in NRDS are always up to date.
| IMPORTANT Transfers are NOT done in GrowthZone. If a transfer is needed, this must be done in NRDS |
NRDS Integration Initial Setup
Upon installation of the software, you will work with your on-boarding project manager to configure the settings necessary to seamlessly integrate to NRDS.
Link NRDS, MLS, Lockbox Status to Membership Status (Available in Beta)
Automatically deactivating or reactivating a member’s access to related real estate services (MLS, Lockbox, NRDS) based on their membership status with your association provides significant time savings for your staff. During initial configuration of your system you can set the rules to be applied to NRDS, MLS and Lockbox status, based on a change on an agent's membership status. When a membership is suspended, dropped, or reactivated, the system will reference these settings to adjust real estate service settings accordingly. NOTE: Prior to setting up this automation, you should have completed all integration setup for your MLS, Lock Box, and NRDS. Additionally, this step should be performed after your membership types have been created.
| See how it works! |
Define Membership Status to NRDS, MLS, Lockbox Status Rules
To define your rules:
- Click Setup in the left-hand navigation panel.
- Click Membership Settings in the Membership section.
- To set the rules for your membership types, click the Add button.
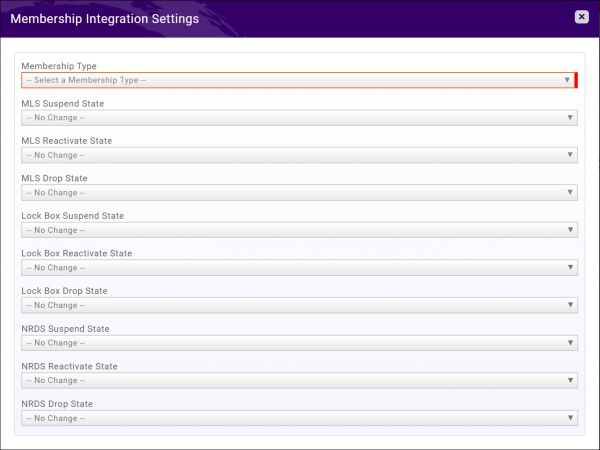
- Select the Membership Type to which you wish to apply rules.
- For each service, select the rule to be applied when the selected membership type is:
- Suspended
- Reactivated
- Terminated
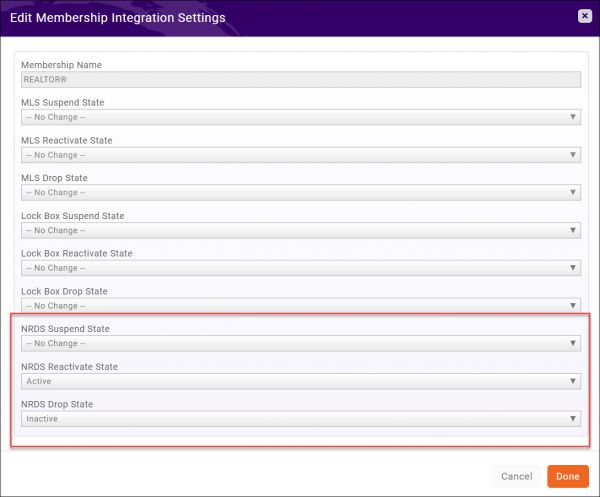
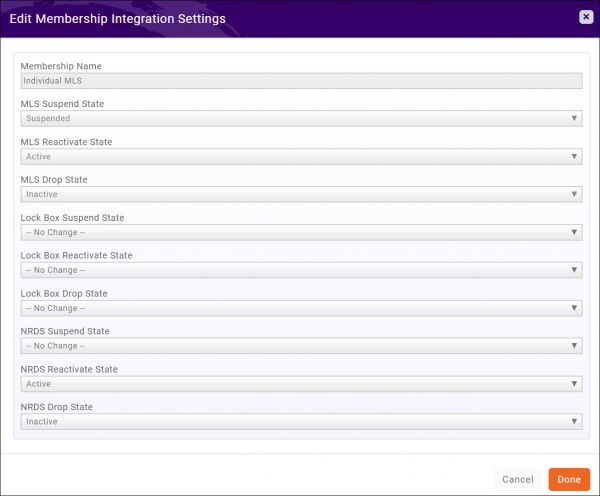
- Note: The choices available will be dependent on your service provider, and you do not have to set rules for all providers. In the example below, the REALTOR® membership will set the NRDS status to Inactive when the membership is dropped, Active when the membership is reactivated, and make no change when the membership is suspended. For all other services, there is no automated change.
- Click Done.
Repeat the steps above for each membership type to which you wish to apply rules. NOTE: You do not need to perform this step for all membership types. If no rules are set for a membership type, no changes to NRDS, MLS or Lockbox status will automatically occur.
| Sentrilock: The Null status is currently not available for selection when setting up automation. If your association is not updating an individual's SentriLock card status, the card status should be left as No Change. |
Change Membership Status to NRDS, MLS, Lockbox Status Rules
- Click Setup in the left-hand navigation panel.
- Click the
 icon in the Actions column.
- Make the desired changes.
- Click Done.
Edit Membership Status to NRDS, MLS, Lockbox Status Rules
- Click Setup in the left-hand navigation panel.
- Click the
 icon in the Actions column.
 - Click OK to confirm.
NRDS - Working with Offices
Although Offices are not "members" of the Realtor organization (the Realtor association is an individual member organization), the Office record must exist because each member must be linked to an office. This follows how licensure works in each state. Also, the office name, address, phone, etc is stored once in the office record so if an office changes the POE does not have to change that information in every agent record.
The POE for the Primary association of the Office can add or change an office for that association:
- Add tells NRDS to Add the record. If NRDS finds an office record already exists with the same Office ID it will process the Add as a Change without the necessity of sending the record again. There is one exception to this rule: if the Office Name in the Add is different than the Office Name in the existing record then NRDS will reject the record and require that the record be sent as a Change rather than an Add.
- Change tells NRDS to Change the record. If NRDS finds that an office record does not already exist by checking the Office ID it will process the Change as an Add without the necessity of sending another record.
Working with Primary Offices
Data sent to NRDS for a Primary Office
The fields described in the table below are synchronized to NRDS.
Field Name Description Data format Required Initial Setup POE Association (read only) This field will automatically fill in with Association’s Point of Entry ID. This i configured during initial setup of the association 9 Numeric Association Id (read only) The 4-digit local association ID where this office has primary membership. This is configured during initial setup of the association. 4 Numeric X Profile Tab Name Required. Business name of the office. 30 Alpha X Real Estate Tab NRDS ID The unique 9-digit NRDS ID assigned to this office location. 9 Numeric X Join Date The date the office joined the association. 8 Date NRDS Status Required. Status of the office record:
A Active
T Terminated
I Inactive
1 Alpha X StatusChangedDate Date of the last status change. 8 Date Non-member Salespersons The number of non-member salespersons affiliated with this office. If the POE has verified there are no non member salespersons in this office, then a zero '0' must be sent. 5 Numeric X Office DR NRDS ID The DR of this company, whether or not they are at this location. This must be a valid 9-digit member ID. 9 Numeric X Primary State Required. The 4-digit State association ID where this office has primary membership. 4 Numeric X Office Corporate Name Corporate name of the office, if different from the business name. 30 Alpha Office Type Used by association to track office type such as Residential, Commercial, Affiliate, etc. 4 Alpha NRDS Physical Address - Street Street name and address number of office. 30 Alpha X NRDS Physical Address - Attn/Care of This is a second line of address to be used for additional address information (building number, etc.) 30 Alpha NRDS Physical Address - City Name of city. 21 Alpha X NRDS Physical Address -State State abbreviation. 2 Alpha X NRDS Physical Address - Zip Code The 5-digit US Postal zip code. 5 Alpha X NRDS Physical Address - Zip + 6 Standard 4-digit ZIP extension plus 2-digit carrier route. 6 Alpha NRDS Mailing Address The mailing address where mail should be sent, if different from Street Address. 30 Alpha NRDS Mailing Address - Mail Attn/Care Of Additional line for mailing address. 30 Alpha NRDS Mailing Address - City City for mailing address. 21 Alpha NRDS Mailing Address - State State abbreviation for mailing address.Main 2 Alpha NRDS Mailing Address - Zip Code 5-digit zip code for mailing address. 5 Alpha NRDS Mailing Address - Zip + 6 4-digit Zip extension plus 2-digit carrier route for mailing address. 6 Alpha Phone Number - Office Area Code 3-digit area code for office’s phone number. 3 Numeric X Phone Number - Office Phone Number 7-digit phone number for the office. There is no need to type in the dash ( -) when entering numbers. 7 Numeric X Fax Number - Area Code 3-digit area code for office’s fax number. 3 Numeric Fax Number - Number 7-digit fax number for the office. There is no need to type in the dash ( -) when entering numbers. 7 Numeric Additional Phone Number Phone Number for secondary phone for the office, if needed. 7 Numeric Email Address Email address for office. 80 Alpha Website Internet address for office’s web page, if any. 80 Alpha Office DR NRDS ID The Designated Realtor (DR) for this 0ffice, whether or not they are at this location. This must be a valid 9-digit NRDS ID. If the DR does not exist in NRDS, NAR recommends using the 9 digit NRDS for an association staff member to enter the office into the NRDS database. Once the office has been entered into NRDS you will be able to add the Agent, and update the DR NRDS ID for the office. 9 Numeric X RE: Office Manager NRDS ID Required. This field is to track the contact person at this office location when it is not the same as the DR. When adding an Office, if this location's Office Contact Manager is the same as the Member entered for Office Contact DR, this field may be null. If Null, upon the Add, this field shall default to the same Member ID as was entered in Office Contact DR. 9 Numeric X Stop Mail Indicates whether mail should be stopped to this address. . 1 Alpha Stop Fax Indicates whether the office wishes the fax number to be used. 1 Alpha Stop Marketing Material Indicates whether the office wishes to receive “junk” mail from mailing lists, etc. 1 Alpha Additional Information Franchise ID This field is used to indicate the franchise, if any, with which this office is affiliated. Franchise ID must be a valid 9-digit Office NRDS ID in the NRDS database. 9 Numeric Parent Company NRDS ID This field is used if this office location is affiliated with a parent company. Parent ID must be a valid 9-digit Office NRDS ID in the NRDS database. 9 Numeric District Use reserved for association to track geographic or political districts. 4 Alpha Tax ID The taxpayer identification number for the business. 12 Alpha Corporate License The office’s corporate or business license. 12 Alpha Main Office ID If this office location is a branch office, use this field to enter the Main Office’s unique 9-digit ID. The main office must be a valid Office ID in the office database. 9 Numeric Branch Type Code to indicate if this location is:
M Main office
S Single office - no branch locations.
B Branch Office
1 Alpha Billing Office ID Used to track the office ID of the billing office. This ID must be a valid 9-digit ID in the office database. 9 Numeric Office Contact Unlicensed Alpha field for 30 characters. Enter the office contact name if they are not a member. 30 Alpha On Roster Y if office should be on roster; N if they should not. 1 Alpha MLS Online Status Status of office’s access to MLS system. 1 Alpha MLS Online Status Changed Date Date of last MLS status change. 8 Date MLS Office ID MLS ID number for this office. 10 Alpha Search NRDS Database for Offices
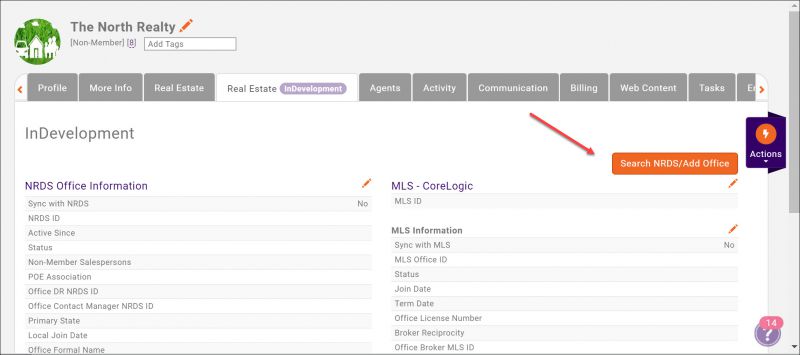
Prior to synchronizing any of your office data to NRDS, it is recommended that you search the NRDS database. By searching NRDS, you can verify whether the office already exists in the NRDS database and avoid duplication. NOTE:' The Search NRDS/Add Office button is only displayed when a NRDS ID has not been assigned to the office.
To search the NRDS database:
- For the desired office, click the Real Estate tab.
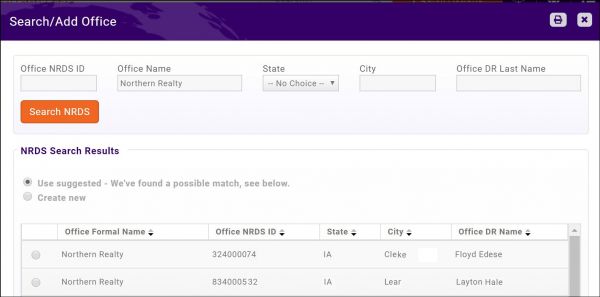
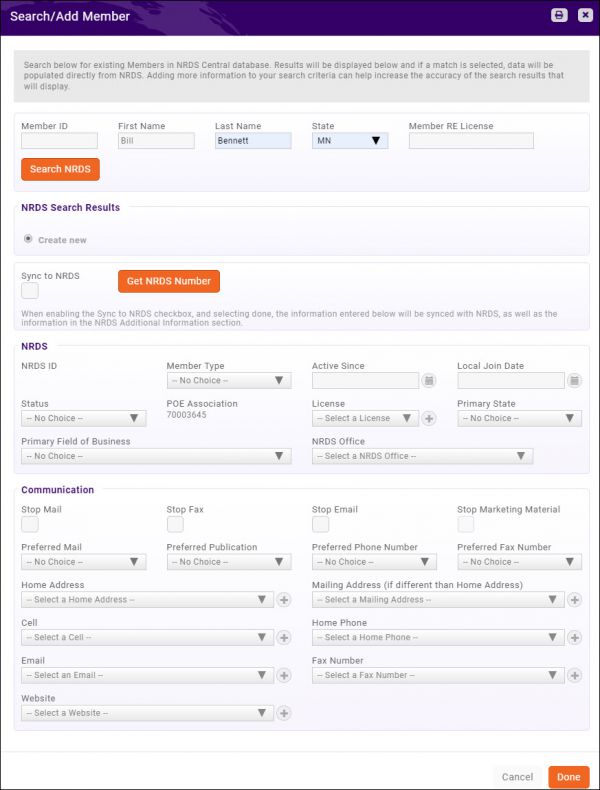
- Click the Search NRDS/Add Office button.
- Enter any of the fields to be used in searching NRDS. The more filters you can supply, the more efficient the search of NRDS will be.
- Click Search NRDS. Any matching results will be displayed.
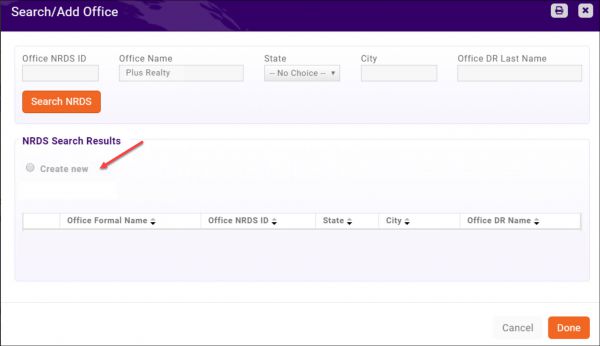
- If the office is NOT is found, and you are the POE for the office, select Create New. See Add a Primary Office for further instructions
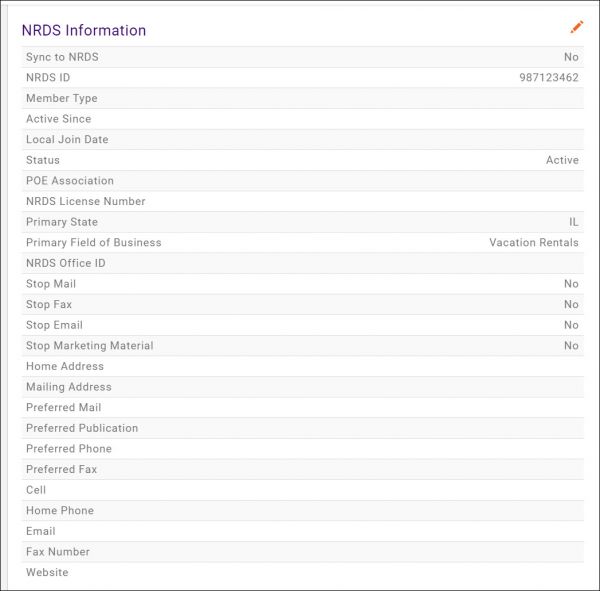
- If the office is found, select the matching office. Review the information returned by NRDS to GrowthZone in the NRDS Information section:
- If the office is Active with another POE, enter the office as a Secondary. See Add a Secondary Office.
- If the office is Inactive, you will not be able to sync with NRDS. You must access the NRDS database and update the record accordingly.
' NRDS - Add a Primary Office
Adding an office with NRDS is performed on the Real Estate tab. Offices are not members of NAR, but need to exist in the NRDS database. Prior to adding a new office to NRDS, search the NRDS database as described in Search NRDS Database for Office.
NOTE: If NRDS finds an office record already exists with the same Office ID it will process the Add as a Change without the necessity of sending the record again. There is one exception to this rule: if the Office Name in the Add is different than the Office Name in the existing record then NRDS will reject the record, and return an error. You will need to update the office name in NRDS OR change the name in GrowthZone to match the NRDS record. - For the desired office, click the Real Estate tab.
- Click the Search NRDS/Add Office button. By searching NRDS, you can verify whether the office already exists in the NRDS database and avoid duplication. Adding a brand new office, assumes that no matching records are found. Search NRDS Database for Office.
- Click the Create New radio button.
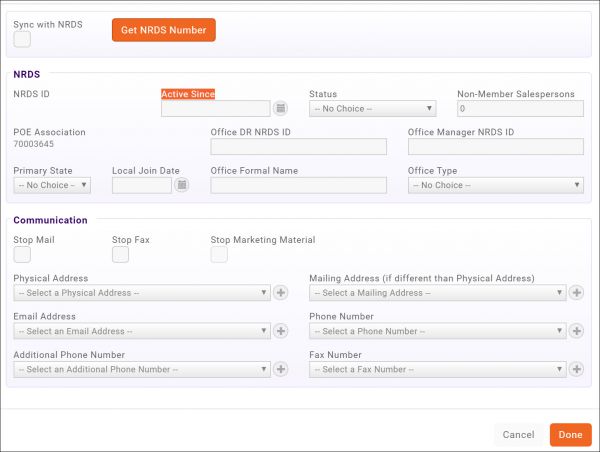
- Tick Sync to NRDS sync.
- Click the Get NRDS Number button. The next NRDS available will be assigned to the office. NOTE: If Tie Account Number To NRDS Number the account number for this office will be automatically updated with the NRDS ID.
- Complete the following fields, an asterisk denotes a required field. If the field is not populated the sync of this record to NRDS will fail. See Data Sent to NRDS for a Primary Office for a detailed description of each field.
- Active Since*: The date this office joined NRDS.
- NRDS Status*: Select the appropriate status for this office. For a new office, to be activated in NRDS, select Active.
- Non-Member Salespersons*: NM is Non-member licensees who work in this Realtor office but choose not to join the association. NOTE: Because it is a required field, if this office does not have any NM Salespersons, you must enter a zero in this field.
- Office DR NRDS ID*: Enter the NRDS ID of the The Designated REALTOR (DR) for this office. This must be a valid 9-digit member ID. The DR must exist in NRDS. See note below.
- Office Manager NRDS ID: This field is to track the contact person at this office location when it is not the same as the DR. If this location's Office Contact Manager is the same as the Member entered for Office Contact DR, this field may be left empty.
- Primary State: Select the state where this office has primary membership.
- Local Join Date: The date this office joined your association.
- Office Formal Name: This field can be used to enter the full name of the Office, up to 60 characters. Because the Office Business Name is limited to 30 characters due to mailing restrictions, use this field to fully describe the office name for your own use.
- Office Type: This field can be used to track office type such as Residential, Commercial, Affiliate, etc.
- Communication Options:
- Stop Mail: Tick the radio button to exclude the office from from mailings, including the Realtor Magazine.
- Stop Fax: Tick the radio button if the office does not wish the fax number to be used.
- Stop Marketing Material: Tick the radio button to stop any marketing materials from being sent to this office.
- Physical Address: Select the physical address to be used for this office. Addresses displayed in the list are those that you have configured on the Profile tab. If needed, click the
 icon to add another address.
 - Mailing Address (if different than Physical Address): Select a mailing address if needed. Addresses displayed in the list are those that you have configured on the Profile tab. If needed, click the
 icon to add another address.
 - Email Address: Select an email address for the office. Email addresses displayed in the list are those that you have configured on the Profile tab. If needed, click the
 icon to add another email address.
 - Phone Number: Select a phone number for the office. Phone Numbers displayed in the list are those that you have configured on the Profile tab. If needed, click the
 icon to add another phone number.
 - Additional Phone Number: Select an additional phone number for the office. Phone Numbers displayed in the list are those that you have configured on the Profile tab. If needed, click the
 icon to add another phone number.
 - Fax Number: Select a fax number for the office. Fax numbers displayed in the list are those that you have configured on the Profile tab. If needed, click the
 icon to add another fax number.
- Click Done.
The new office will be synched to NRDS within 15 minutes, no additional interaction is required on your part. Additional information for the office can be added under the Additional Information section on the Real Estate tab. See NRDS - Add Office Additional Information for further details.
IMPORTANT! NRDS requires that the Office DR NRDS ID be sent when you are adding a new office. This requires that the DR exist in the NRDS database as an Agent. However, when adding a new office AND a new agent to NRDS, the agent's NRDS record will not be present yet. So it will reject the office and the agent update. NRDS recommends the following process for handling this situation:
- Add the office using the NRDS ID of one of your staff members as the Office DR NRDS ID.
- Add the agent that will become the DR for the office, and sync to NRDS.
- After both the office and the agent have been added to NRDS you will then be able to update the Office DR NRDS ID in GrowthZone and this change will be sent to NRDS.
NRDS - Add Office Additional Information
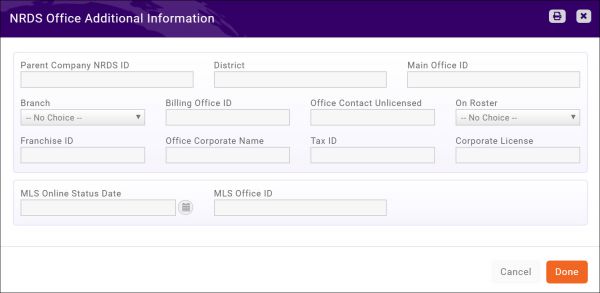
Additional information may be tracked for a NRDS office through your GrowthZone software, and synched to NRDS. This information is NOT required.
- For the desired office, click the Real Estate tab.
- Click the
 icon in the Additional Information section.
- Enter the following:
- Parent Company NRDS ID: Used if this office location is affiliated with a parent company. Parent ID must be a valid 9-digit Office ID in NRDS database. The system will check that any IDs in this field are valid Office IDs and are Active in NRDS. NRDS will reject any office records that contain an Office ID in any of these fields that is the same as the Office ID of the office record itself. You cannot self-reference the Office record’s Office ID in these fields.
- District: This is used for associations to track geographic or political districts.
- Main Office ID: If this office location is a branch office, use this field to enter the Main Office’s unique 9-digit NRDS ID. The main office must be a valid Office ID in the NRDS Database. The system will check that any IDs in this field are valid Office IDs and are Active in NRDS. NRDS will reject any office records that contain an Office ID in any of these fields that is the same as the Office ID of the office record itself. You cannot self-reference the Office record’s Office ID in these fields.
- Branch: This field is used to identify the branch type. Select from: Branch Office, Main Office, Single Office.
- Billing Office ID: Use this field to track the office ID of the billing office. This ID must be a valid 9-digit NRDS ID in the NRDS database. The system will check that any IDs in this field are valid Office IDs and are Active in NRDS. NRDS will reject any office records that contain an Office ID in any of these fields that is the same as the Office ID of the office record itself. You cannot self-reference the Office record’s Office ID in these fields.
- Office Contact Unlicensed: If the office is un-licensed, enter the office contact name if they are not a member.
- On Roster: Select Yes if office should be on roster; No if they should not.
- Franchise ID: Use to indicate the franchise, if any, with which this office is affiliated. Franchise ID must be a valid 9-digit NRDS Office ID in the NRDS database.
- Office Corporate Name: Corporate name of the office, if different from the business name.
- Tax ID: The taxpayer identification number for the business.
- Corporate License: The office’s corporate or business license.
- MLS Online Status Changed Date: This is a read only field, that indicates when the MLS On-line Status was updated.
- MLS Online Status: Date of last MLS status change.
- MLS Office ID: The MLS ID number for this office.
- Click Done.
NRDS - Change a Primary Office Record
Any changes to the NRDS data listed in Data sent to NRDS for a Primary Office will automatically be sent to NRDS as long as Enable Sync to NRDS is checked on the Real Estate tab for the office. All data fields are sent not just those that have changed.
NOTE: If NRDS finds that an office record does not already exist by checking the Office ID it will process the Change as an Add without the necessity of sending another record. NRDS - Update Primary Office NRDS Status
- Click the Real Estate tab.
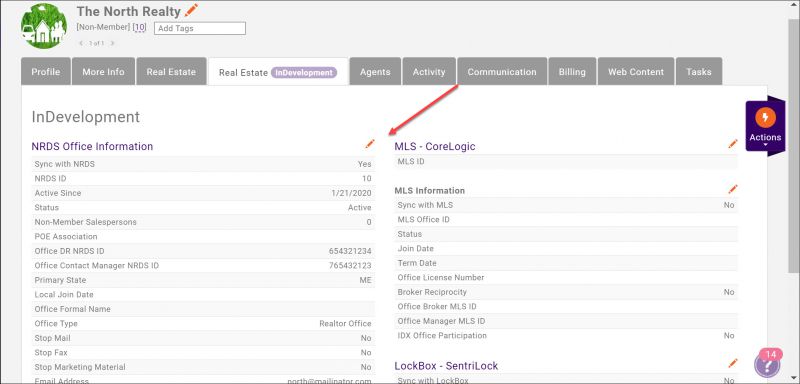
- Click the
 icon in the NRDS Office Information section.
 - Select the appropriate status from the Status list.
- Click Done.
IMPORTANT: When dropping, if there are active memberships on the office and individuals, drop the individuals first and then proceed to the office as NRDS will not accept an office drop if there are agents related to the office that are still activ. NRDS - Working with Secondary Offices
The secondary office settings allow you to track secondary relationships of offices. For example, if your association is not the POE for an office, but they have a membership with you, you will track this as a secondary record. A limited amount of information is sent to NRDS for a secondary record. As described in Data Sent to NRDS for Secondary Office record.
Data Sent to NRDS for Secondary Office record
The table below describes the data sent to NRDS for a supplemental record.
Field Name Description Data format Required Initial Setup Association Id (read only) The 4-digit local association ID assigned to the association itself. This is configured during initial setup of the accociation 4 Numeric X Real Estate Tab NRDS ID The unique 9-digit NRDS ID assigned to this office location. 9 Numeric X NRDS Status Required. Use this field to indicate the Status of the Secondary record. 1 Alpha X Status Changed Date Enter the date you changed the status of this Supplemental record 8 Date Non-member Salespersons The number of non-member salespersons affiliated with this office. If the POE has verified there are no non member salespersons in this office, then a zero '0' must be sent. 5 Numeric X NRDS - Add a Secondary Office
The primary association field, in NRDS, indicates which association first added this office. If your association also needs to be associated with this office because you have members linked there, you can add these with via your GrowthZone software, and the supplemental data will be synchronized to NRDS.
IMPORTANT: You can only add an Office Secondary record if the Office itself exists on NRDS and is Active. Perform a search of the NRDS database to confirm that the record exists. If the office does not exist or is Inactive, NRDS will reject the transaction. Be sure to review the Event Log for errors. - For the desired office, click the Real Estate tab.
- Search NRDS as described in Search NRDS Database for Offices to ensure that the record exists. Select the matched office. A limited amount of NRDS data will be returned by NRDS to GrowthZone. NOTE: The status of the office will be returned by NRDS. If the status is NOT active, you will not be able to sync a secondary record to NRDS. Changes to the status of the office will need to be performed within NRDS prior to being able to sync the secondary record.
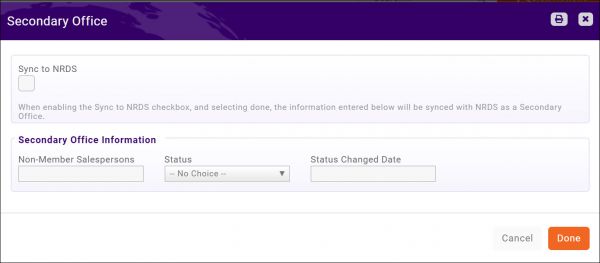
- Click the
 icon in the Secondary Office section.
- Click Sync to NRDS.
- Populate the following fields. An asterisk indicates a required field (NOTE: Status Changed Date will automatically be populated).
- Status*: Select Active from the drop-down list.
- NM Salesperson Count*: Use the field in this table to report the number of non-member salespersons in this office that the broker will pay for through his Secondary association.
- Click Done. The Done button will not be enabled if any of the required fields are missing.
The new secondary office record will immediately be sent to the NRDS processing queue. All data described in Data Sent to NRDS for Supplemental Office will be sent, no further action on your part is required.
Change a Secondary Office Record
The CHANGE will process the changes sent for an existing office supplemental. You cannot change the OfficeID/AssociationID. You would need to inactivate the record and add a new one. Only the POE who added the office supplemental record can change it. When Sync With NRDS is checked, on the Real Estate tab, any changes made to the fields listed Data Sent to NRDS for Secondary Office will trigger a change transaction. All fields will be sent, not just those that you have changed.
- On the Office Real Estate tab, click the
 icon in the Secondary Office section.
- Ensure Sync to NRDS is enabled.
- Make desired changes.
- Click Done. The changes to the supplemental office will immediately be sent to the NRDS processing queue, no further action is required. NOTE: The Done button will not be enabled if any of the required fields are missing.
Change NRDS Status of a Secondary Office
To change the status of a secondary office:
- On the Office Real Estate tab, click the
 icon in the Secondary Office section.
 - Ensure Sync to NRDS is enabled.
- Select the desired status from the Status list.
- Click Save. The changes to the supplemental office will immediately be sent to the NRDS processing queue, no further action is required. NOTE: The Save button will not be enabled if any of the required fields are missing.
NOTE: All fields listed in Data Sent to NRDS for Secondary Office Record will be sent to NRDS. Working with Primary Agents
The Agent record in NRDS is the "foundation" of the association. If you are the POE, via GrowthZone you can add and change your primary agent data in NRDS. The ADD will add a new member record in NRDS. A POE can add a member only for an Association ID for which they are the POE. The CHANGE will process the changes sent for an existing member. You cannot change a member that is inactive (Status I or T). Only the POE for the primary association can change a member. Only the POE for the Primary association of the agent can Add an agent to that association or change the agent record.
Agent Data sent to NRDS (Primary)
The table below describes the data that is sent to NRDS for a Primary Agent.
Field Name Description Data format Required Initial Setup POE Association (Read only) The Association’s Point of Entry ID. This is configured on initial setup of the GrowthZone database and will be read only on the Real Estate tab. This ID will automatically populate on the Real Estate tab as read only. 9 Numeric X Association ID The 4-digit local association for this member’s primary affiliation. This is configured upon initial setp of the GrowthZone database, and will be displayed - read only - on the Real Estate tab. 4 Numeric X Profile Tab First Name Required. Member’s first name. 12 Alpha X Middle Member’s middle name. 12 Alpha Last Name Required. Member’s last name, up to 30 characters. 30 Alpha X Suffix Family generation and other suffixed - e.g. Jr. Sr. III Esq. Note: do not enter designations here. There is a separate field for those. 3 Alpha Common Name Member’s nickname 12 Alpha Prefix Formal title which precedes member’s name Mr. Ms. Mrs. etc, 4 Alpha Gender Male/Female 1 Alpha Address 1 Street name and address number of member’s address. Type of address is assigned on the Real Estate tab. 30 Alpha X Address 2 (see above) This is a second line of address to be used for additional address information (building number, etc.). Type of address is assigned on the Real Estate tab. 30 Alpha City (see above) Name of city for the address. Type of address is assigned on the Real Estate tab. 21 Alpha X State (see above) State abbreviation. Type of address is assigned on the Real Estate tab. 2 Alpha X Postal Code (see above) The 5-digit US Postal zip code. Type of address is assigned on the Real Estate tab. 5 Alpha X Postal Code +4 (see above) Standard 4-digit ZIP extension plus 2-digit carrier route. Type of address is assigned on the Real Estate tab. 6 Alpha Address 1 The mailing address where mail should be sent, if different from Home Address, marked as Mailing Address on the Real Estate tab. 30 Alpha PR: Address 2 (see above) Additional line for mailing address. Type of address is assigned on the Real Estate tab. 30 Alpha City (see above) City for mailing address. Type of address is assigned on the Real Estate tab. 21 Alpha State (see above) State abbreviation for mailing address. Type of address is assigned on the Real Estate tab. 2 Alpha Postal code (see above) 5-digit zip code for mailing address. Type of address is assigned on the Real Estate tab. 5 Alpha Postal code +4 (see above) 4-digit Zip extension plus 2-digit carrier route for mailing address. Type of address is assigned on the Real Estate tab. 6 Alpha Real Estate Tab NRDS ID The unique, 9-digit NRDS ID for this member. Once this field it populated, it is greyed out and read only. 9 Numeric X Member Type The membership type of this agent Drop-down list X Active Since The date the member joined NRDS 8 Date X Local Join Date The date this agent joined the association. Status Member status
See NRDS Documentation for further explanation on how/when these are used.Drop-down list X Status Changed Date The date of last status change. Date format Primary State The State association where this member has primary membership. Drop-down list X License Required if Member Type is R or RA. Member’s real estate license number. This must match the format set by the state associations. 11 Alpha X RE: Primary Field of Business Indicates member’s primary field of business. Drop-down list X Office NRDS ID The unique 9-digit NRDS ID for this member's Office. This ID must be valid in the NRDS database. 9 Numeric X Real Estate Tab - Communications Stop Mail Indicates whether or not to exclude active members from mailings, including the Realtor Magazine. NOTE: Only the member themselves can update this field. Changes made in GrowthZone will NOT update the preference in NRDS. Check to indicate Yes Stop Fax Indicates if fax number is usable for fax mailings. NOTE: Only the member themselves can update this field. Changes made in GrowthZone will NOT update the preference in NRDS. Check to indicate Yes Stop Marketing Material Indicates whether the member wishes to receive marketing materials. If checked, the member is removed from NAR's Direct Mail mailing list. NOTE: Only the member themselves can update this field. Changes made in GrowthZone will NOT update the preference in NRDS. Check to indicate Yes Stop Email Indicates whether the member wishes to receive emails. NOTE: Only the member themselves can update this field. Changes made in GrowthZone will NOT update the preference in NRDS. Changes made in GrowthZone will NOT update the preference in NRDS. Check to indicate Yes Preferred Mail Indicates where the member would prefer to receive mail. Drop-down list X Preferred Publication Where the member prefers to receive their publication(s) Drop-down list X Preferred Phone Member’s preferred phone: Drop-down list X Preferred Fax Where the member prefers to receive faxes Drop-down list Home Address The address to be used as the member''s home address. Choices available in the list are configured on the Profile tab. Drop-down list X Mailing Address The address to be used as the member's mailing address if different than the home address. Choices available are configured on the Profile tab. Drop-down list X Cell 3-digit area code + 7-digit number of the member’s cell phone number. Choices available in the list are configured on the Profile tab. 3 Numeric Home Phone 3-digit area code + 7 digit phone number for Member’s home phone number. There is no need to type in the dash ( -) when entering numbers. Choices available in the list are configured on the Profile tab. 10 Numeric Cell 3-digit area code + 7-digit number of the member’s cell phone number. Choices available in the list are configured on the Profile tab. 10 Numeric Fax Number 3-digit area code + 7 digit number for member’s personal fax number. Choices available in the list are configured on the Profile tab. 10 Numeric Website Internet address for member’s web page, if any. 80 Alpha Email Required if Member Type is R or RA. Email address for member. Choices available in the list are configured on the Profile tab. 80 Alpha X Additional Information Waive Local Dues Indicates if local dues should be waived for the member (Y/N). Check to indicate Y Waive State Dues Indicates if state dues should be waived for the member (Y/N). Check to indicate Y Waive NAR Dues Indicates if National dues should be waived for the member (Y/N). Check to indicate Y NAR Dues Paid Date field in MMDDYYYY format for association to indicate NAR dues were paid. 8 Date State Dues Paid Date field in MMDDYYYY format for association to indicate State dues were paid. These two fields (NAR and State) are mainly used by associations for look-ups when processing transfers. 8 Date Secondary Fields of Business Numeric code that indicates member’s secondary field of business. 3 Numeric Secondary Fields of Business Numeric code that indicates member’s secondary field of business. 3 Numeric Member Subclass Used by States and Boards to exchange additional billing types for members. Drop-down list Member Birthdate Member’s date of birth. 8 Date Orientation Date The date the member completed the association’s orientation. 8 Date On Roster Indicates if member wishes to appear on roster (Y/N). 1 Alpha Previous Non Member Indicates if the member changed their status with the association from a non-member to a member. Valid choices are Y or N Check to indicate Y Arbitration Ethics Pending Flag indicating if arbitration or ethics investigation or proceedings are pending against this member. Check to indicate Y Reinstatement Code Code used to indicate if member has been reinstated. Check to indicate Y Reinstatement Date Date member was reinstated. 8 Date On Roster Indicates if member wishes to appear on roster (Y/N). Check to indicate Y Previous Non Member Indicates if the member changed their status with the association from a non-member to a member. Valid choices are Y or N 1 Alpha Occupation Name Member’s occupation. This is used for reporting RPAC contributions on various state and federal election reports. 20 Alpha Member Salutation Member’s name as it appears after Dear in the greeting of a mail merge letter. 24 Alpha MLS ID Member’s MLS ID number. 9 Alpha MLS Online Status Status of member’s online MLS access. 1 Alpha MLS Status Changed Date (read only) Date of last online MLS status change. 8 Date MLS Association ID The 4-digit association ID of the member’s primary regional MLS. 4 Numeric Search NRDS Database for an Agent
Best practice when working with your agents is to first search the NRDS database to verify whether a record exists for the agent. By searching the database, you ensure that there is no duplication of records. Additionally, by searching NRDS you can determine if the member is active in NRDS at another Association and they will need to add in their Association as the secondary.
- For the desired agent, click the Real Estate tab.
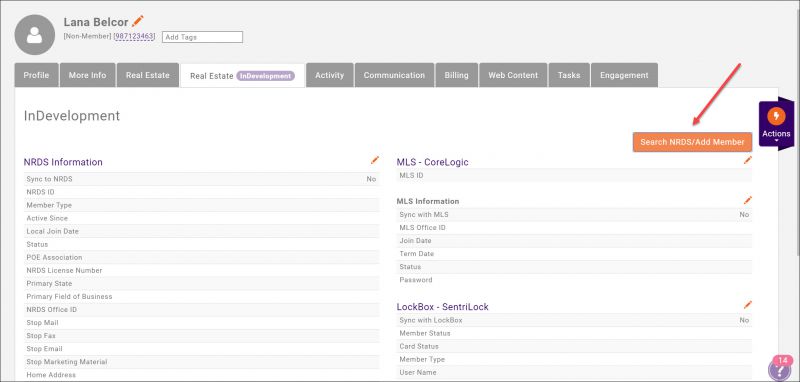
- Click the Search NRDS/Add Member button.
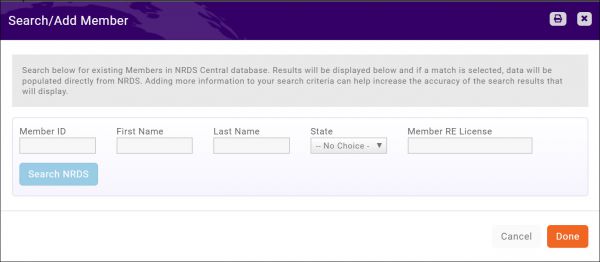
- Enter search criteria. Adding more information to your search criteria can help increase the accuracy and speed of the search results that will display. You may search on any combination of fields with the exception of the First Name only, Member Office State only, and RE License only. Wildcard searches, * "begins with only", can be performed on the First Name if it is used in combination with the Last Name.
- Click Search NRDS. If results are found, they will be displayed on screen.
- If this is a new agent (has not had a NAR membership previously), and you are the POE, no matching agent should be found. Click the Create New button to add the new agent to the NRDS database. See Add an Agent (Primary).
- If a matching agent is found in NRDS, and you are not the POE enter this agent as a secondary record. See Add an Agent - Secondary.
- If a matching agent is found in NRDS, but is inactive. Do NOT sync the agent with NRDS. You will need to go to the NRDS database and setup the agent appropriately.
NOTE: When you select a match from the search results, the following information is returned: - NRDS ID
- First Name
- Middle Name
- Last Name
- Generation
- Member Type
- Member Status
- MLS Association ID (Regional MLS if any)
- Office ID
- Office Name
- Office City
- Office State
- Office Zip
- Primary Local Assoc ID
- Primary State Assoc ID
Add an Agent (Primary)
If you are the POE for an agent, you can add them to your database, and sync the record to NRDS.
- Search the NRDS Database as described above. If no match is found, click the Create New radio button.
- Click Sync to NRDS.
- Click the Get NRDS Number button to generate a NRDS ID for this agent. Once a NRDS ID is generated and assigned to this agent, it cannot be changed. NOTE: The Account Number for the agent will automatically be updated to the NRDS ID if Tie Account Number To NRDS Number was enabled during the initial setup of your GrowthZone database.
- In the NRDS section, populate the following fields. All data entered will be sent to NRDS, however, only those marked with an asterisk are required (See Agent Data sent to NRDS for detailed descriptions and formatting of the fields.):
- Member Type*: Select this agent's member type from the list. NOTE: If the member type is R or RA you must also populate the license for this agent on the Profile tab.
- Active Since: Indicates the date that this agent joined NRDS.
- Local Join Date: The date the member transferred or reinstated into this current Primary association. NOTE: The field Join Date should not change when members move from association to association. Use this field to indicate that move. This cannot be a future date.
- Status*: Select Active from the list.
- POE Association: This field will automatically be populated with the POE Association ID for your organization.
- License: Choose the license associated to this agent, or click the
 icon to add a new license.
 - Primary State*: Select the state where this member has primary membership.
- Primary Field of Business*: Select the agent's primary field of business. NRDS approved fields of business are displayed in the list.
- NRDS Office*: Select this agent's office from the list. All offices associated to this agent will be displayed for selection. NOTE: The office must exist in NRDS database.
- In the Communications section, complete the following (an asterisk indicates a required field)
- Stop Mail: Indicates whether or not to exclude active members from mailings, including the Realtor Magazine. Check the box to exclude the agent.
- Stop Fax: Indicates whether the agent wants the fax number to be used. Check this box to indicate that the fax should not be used.
- Stop Email: This setting indicates whether the agent wishes to be on NAR's Direct Mail mailing list. Only an agent can change this field in their record. Anything a POE sends in this field will be ignored by NRDS.
- Stop Marketing Material: This setting indicates whether the agent wants to receive marketing materials from NRDS. Only an agent can change this. Anything the POE send in this field will be ignored by NRDS.
- Preferred Mail: Select the address type to which the agent prefers to have mail sent. Required if agent is R or RA.
- Preferred Publication: Select the address type to which the agent prefers to have publications sent. Required if agent is R or RA.
- Preferred Phone Number: Select the phone number type the agent prefers to be used for phone calls.Required if agent is R or RA.
- Preferred Fax Number: Select the fax number to which the agent prefers to receive faxes.
- Home Address: Select the agent's home address. All addresses you have added on the Profile tab are available for selection OR click the
 icon to add an address. NOTE: If the agent type is R or RA, this field is required.
 - Mailing Address: If the mailing address is different than Home Address, select the mailing address. All addresses you have added on the Profile tab are available for selection OR click the
 icon to add an address.
 - Cell: Select the agent's cell-phone number. All phone numbers you have added on the Profile tab are available for selection OR click the
 icon to add a phone number.
 - Home Phone: Select the agent's home phone number. All phone numbers you have added on the Profile tab are available for selection OR click the
 icon to add a phone number.
 - Email: Select the primary email for this agent. All emails you have added on the Profile tab are available for selection OR click the
 icon to add an email. NOTE: If the Agent is R or RA the email address is required.
 - Preferred Fax: Select the fax number the agent prefers to be used. All fax numbers you have added on the Profile tab are available for selection OR click the
 icon to add a fax number.
 - Website: Select the agent's web-site. All web-sites you have added on the Profile tab are available for selection OR click the
 icon to add a web-site url.
- Click Done.
The new agent will be synched to NRDS within 10 minutes, no further interaction is required on your part.
NOTE: When adding an agent, if NRDS finds a member record already exists with the same Member ID or License it will process the Add as a Change without the necessity of sending another record. There are two exceptions to this rule: if the Name in the add is different than the Name in the existing record, if the License in the add is different from the License in the existing record. Then NRDS will reject the record and require that the record be sent as a Change rather than an Add. Review the Event Log to ensure that there were no validation errors. Add Agent (Primary) Additional Information
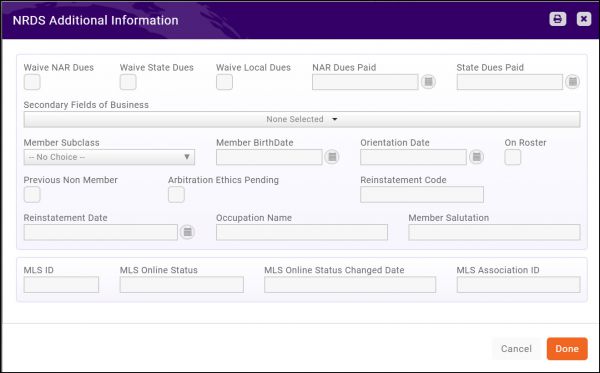
Additional information about your agents can be tracked in GrowthZone. This information is not required, but if populated will be synchronized to NRDS. NOTE: Only the POE can add/update additional agent information.
- For the desired agent, click the Real Estate tab.
- Click the
 in the NRDS Additional Information section. NOTE: If you are NOT the POE for this agent, you are not authorized to add/change the additional information and the
  will not be available.
- Enter the desired information. See Agent Data sent to NRDS (Primary) for detailed descriptions of the fields.
- Click Done. The updates will be sent to NRDS automatically with no further interaction on your part.
Change/Update an Agent (Primary)
If you are the POE for an agent you can change/update profile and NRDS information via GrowthZone. When Sync With NRDS is enabled on the Real Estate tab, changes to any of the fields described in Agent Data sent to NRDS (Primary) will trigger a synch to NRDS. All fields are sent, not just those that have been changed.
NOTE: NRDS will not process a change on an inactive member (Status of Inactive, Terminated or Deceased). If you want to change the agent’s record you must first change the member back to active or provisional within the NRDS database. Change an Agent's NRDS Status (Primary)
An agent's status can be updated within GrowthZone, and synchronized to NRDS. Agent statuses include:
- Active
- Inactive indicates that the member left voluntarily, in good standing. They may have decided not to renew their membership or may have simply resigned or retired from the business.
- Terminate indicates that the member was dropped because they did not meet an outstanding duty or obligation. This includes an unfulfilled code of ethics violation, hearing, outstanding arbitration obligation or not taking the COE course. In other words, this member did not leave in good standing. Choosing to simply not renew their membership would not fit in this category.
- Suspend was added to NRDS for the specific purpose of tracking members who had not taken their COE course by December 31 of each quadrennial. If a member does not take the COE course by December 31, 2012 the association must suspend that member, and by March 1 must terminate the member if they have not taken the course. Therefore there should be no members with status S in NRDS after March 1.
- Provisional status is available for associations who have adopted the Provisional bylaw. It allows you to enter a member into NRDS with a Member Type of REALTOR®/REALTOR® Associate and a Status of Provisional even before they have met all the requirements for orientation, etc. NAR will provide all services to these members (magazines, realtor.org, etc.) as they are considered REALTORS®/REALTOR® Associates with all rights and privileges.
Any update to the agent's status will trigger a CHANGE transaction to NRDS. To update an agent's NRDS status:
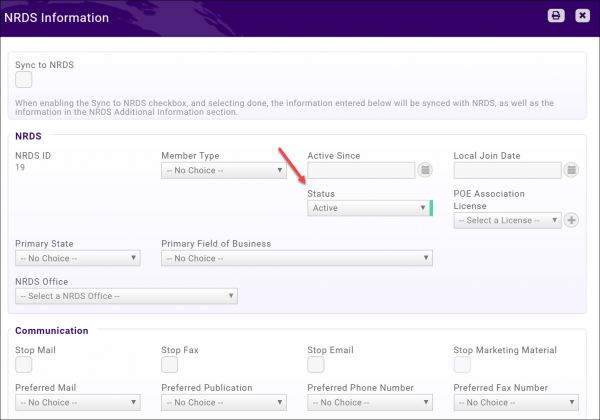
- Select the agent's Real Estate tab.
- Click the
 in the NRDS Information section. NOTE: If you are NOT the POE for this agent, you are not authorized to change this information and the
  will not be available.
- Ensure that Sync With NRDS check-box is selected.
- Select the desired Status from the list.
- Click Done.
Once you have saved, a change transaction is triggered. All fields described in Agent Data sent to NRDS (Primary) will be sent to NRDS within ten minutes, no additional interaction is required on your part.
Secondary Agent Records
The Agent Secondary record is used to store supplemental, or secondary records for a member. A member is in NRDS only once with one NRDS ID but you can link many secondary records to one member. The secondary record is used to indicate a member’s secondary associations, secondary offices, secondary licenses, etc. The Secondary record allows you to define additional relationships this agent may have to other offices, within an office, or other associations. There is no limit on the number of supplemental records attached to a member. Best practice when adding a secondary record, if the secondary record in NOT a secondary record for an agent for which you are POE, is to search NRDS to bring back data from NRDS for the record.
Data Sent to NRDS for Secondary Agent Records
The information below is sent to NRDS for secondary records. During synchronization All information is sent, but note the fields that are required. The data you enter will be dependent on the type of secondary record you are sending.
Field Name Description Data format Required Real Estate Tab NRDS ID The member's unique 9-digit NRDS ID. The member must exist in NRDS and be an active member in order to add a secondary record. 9 Numeric X Office ID Required. The Supplemental record is used to indicate any other Offices where a member works in addition to the ‘core’ Office in the Member record. If you are using this Supplemental record to indicate a member’s Secondary association, additional License, etc. and the Office is still the same as the one in their core Member record, select the same office id from the list. If you are using this Supplemental record to indicate another Office where this member is affiliated, enter the other office ID. All offices to which the agent is associated in your GrowthZone database will be available for selection. 9 Numeric X Type Required. Use this Supplemental record to indicate that the member has a different Member Type (usually in another Office or another Association).
If you are using this Supplemental record to indicate Secondary associations, secondary offices, etc. and the Member Type is still the same as in the member’s core Member record, enter the same Member Type here.4 Alpha X License The Secondary record can be used to indicate that the member has a different License Number (usually in another Office or another Association). You will be able to select a license from the list, or add a new license on the fly. Drop-down Choice Status Required. Use this field to indicate the Status of the Secondary record. For example, you set up a supplemental record to indicate the member worked at another Office. When that is no longer true, you would set the Status of this record to I (Inactive). Again, this Status relates ONLY to this particular secondary record 1 Alpha X Member Subclass Used in conjunction with Member Type by many associations. Again, you would use this in the same manner as Member Type to indicate supplemental information. 4 Alpha Local Join Date If using this record to add on a Secondary Association to the member, enter the date that the member joined this secondary association. 8 Date Billing Discount Used in conjunction with the Realtor Electronic Commerce Network - Dues Billing module. The EC Invoice allows an association to set up a discount applicable to members of a certain group. For this supplemental record attached to this member at this association, enter Y if the member is in that special discount group. 1 Alpha Add a Secondary Agent Record
The approach used to add a secondary record will depend on whether the agent currently exists in your GrowthZone database, with a valid NRDS ID.
The agent already has a NRDS ID in your database:
- On the agent's Real Estate tab, click the
 icon in the Secondary Member(s) section.
- Click Sync to NRDS.
- Enter the NRDS information. The fields indicated by an asterisk are required for a secondary (supplemental) record. See Data Sent to NRDS for Secondary Records for further information about these fields.
- NRDS Status*: Use this field to indicate the Status of the Supplemental Record.
- Office NRDS ID*: Select the Office NRDS ID, from the list, for the agent's secondary record. All offices to which this agent is associated will be displayed for selection.
- Status: Select the desired member status, for this agent as it applies to the secondary record.
- Member Type: Select the desired member type, as it applies to the secondary record.
- Member Subclass: Select the desired member subclass.
- Local Join Date: This field can be used to indicate when this agent joined this secondary association, office, etc.
- Billing Discount: Indicate by Yes or No whether this secondary qualifies for a billing discount.
- Click Done. No further interaction is required on your part. The secondary record will be synced to NRDS automatically. All information described in Data Sent to NRDS for Secondary Records will be sent.
The agent does NOT have a NRDS ID in your GrowthZone database
- On the agent's Real Estate tab, search NRDS for the agent as described above.
- Click the matched contact. NOTE: If you are NOT the POE for this agent, and no match is found, you will NOT be able to add this secondary record to NRDS. You will need to determine why the agent is not already associated to his/her primary association within NRDS before you can proceed.
- Click the
 icon in the Secondary Members section.
- Click Sync to NRDS.
- Enter the NRDS information. The fields indicated by an asterisk are required for a secondary (supplemental) record. See Data Sent to NRDS for Secondary Records for further information about these fields.
- NRDS Status*: Use this field to indicate the Status of the Supplemental Record.
- Office NRDS ID*: Select the Office NRDS ID, from the list, for the agent's secondary record. All offices to which this agent is associated will be displayed for selection.
- Status: Select the desired member status, for this agent as it applies to the secondary record.
- Member Type: Select the desired member type, as it applies to the secondary record.
- Member Subclass: Select the desired member subclass.
- Local Join Date: This field can be used to indicate when this agent joined this secondary association, office, etc.
- Billing Discount: Indicate by Yes or No whether this secondary qualifies for a billing discount.
- Click Done. No further interaction is required on your part. The secondary record will be synced to NRDS automatically. All information described in Data Sent to NRDS for Secondary Records will be sent.
Add Additional Secondary Agent Record(s)
You may add as many additional secondary records as needed.
- On the agent's Real Estate tab, click the
 icon in the Secondary Member(s) section.
 - Ensure that Sync to NRDS is selected.
- Click the
 icon.
icon. - Populate the desired fields.
- Click Done.
The additional secondary record will be sent to NRDS with no further action needed. All information described in Data Sent to NRDS for Secondary Records will be sent.
Update a Secondary Agent Record
- For the desired agent, click the Real Estate tab.
- Click the
 icon in the Secondary Member(s) section.
- Make the desired updates.
- Click Done
The changes to the secondary record will be sent to NRDS with no further action needed. All information described in Data Sent to NRDS for Secondary Records will be sent.
NRDS Education Records
Every 4 years, in a set cycle, every Realtor and Realtor Associate must take the NAR Code of Ethics course. This Education record can be added by any POE. They do not have to have a primary or secondary relationship with the member. Because members could take an education course at any association, this is the one record that can be added by any POE to any member. GrowthZone currently provides the ability to track agent's Code of Ethics (COE) training. Synchronization of the education records is made to NRDS within 10 minutes of the addition or update of the records.
Data sent to NRDS for Code of Ethics
The table below describes the Code of Ethics fields that are sent to NRDS.
Field Name Description Format Required NRDS ID The 9-digit unique member ID of the member. Note: The Member must be active (A or P) or Suspended (S). 9 Numeric X Education Course Code Unique course code assigned by the sponsoring or licensing association. Once the Group Code has been selected, use this field to enter the specific course code.
COE Course: For the Code of Ethics course, this should always be COEC. If the POE is entering a new member orientation COE course, it should be COENDrop-down choice X Education Course Number Assigned by the sponsoring or licensing Association.
COE Course: If this is for a COE course, it should always be the year followed by the cycle.
NOTE: if entering the course for new members, using the year as the Course Number is acceptable.
If the course was in 2012 for Cycle 3, it should be 2012C3. If the course was in 2013 for Cycle 4, it should be 2013C4, etc.
Several POE reports reply on the Course Number following these standards so always be sure to use this format for the COE course.
15 Alpha X Ethics Training Date Date course was completed. For one day courses, use this field for the course date. COE Course: For the COE course, this should be the date they completed the course. 8 Date X Add/Update Code of Ethics Training
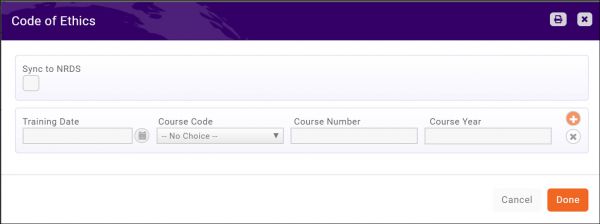
NOTE: The agent must have an NRDS ID and Sync to NRDS must be enabled. NRDS will not allow you to add an Education record for a member who is not active (or Suspended) in NRDS (Status A, P or S). - For the desired agent, click the Realtor's tab.
- Click the
 icon, in the Code of Ethics section.
- Click Sync to NRDS.
- Enter the following information (an asterisk denotes a required field):
- Training Date
- Education Course Code*
- Education Course Number*
- COE Year
- Click Done.
Your additions/updates to Code of Ethics training will be sent to NRDS within 10 minutes, with no additional interaction on your part.
NRDS Financial Record (COMING SOON)
GrowthZone provides the ability to sync the financial record to NRDS. The Financial record is used by Primary Local POEs, Primary State associations, as well as Secondary local and state associations to store members’ dues payment records. Other POEs can view this information online in NRDS so it can be very helpful as members transfer their primary membership for the new association to quickly check online to see if the member has paid their dues.
Some states require that their local POEs update this information in NRDS, many do not. NAR itself does not require this record nor is it used by NAR, however, you should check the bylaws for your state.
Financial Record Business Rules
- National dues can only be sent once a year (associations are not supposed to allow them to be paid monthly and NRDS will not accept monthly reported National dues payments), on the date they are paid. Other dues, such as state and local, can be sent monthly, quarterly, or yearly, on the date they are paid.
- GrowthZone will track if dues are paid late, and report to NRDS accordingly.
- You cannot change or delete an existing Financial record. Similar to an accounting general ledger entry, once it is posted you cannot delete it. You can only add an adjusting entry.
- The key for a Financial records, in NRDS, is the Member ID, Incurring Member ID, Payment Type, Billing Year, Dues Paid Date, Amount and Sign (ie. you can have two records with same member ID, Payment Type, Billing Year, Dues Paid Date and Amount as long as one Amount is ‘positive’ (45.00) and one is ‘negative’ (-45.00). NRDS will check for duplicates by looking at a combination of these fields.
- Adjusting Entry: to add an adjusting entry you would add a financial record with the same Member ID, Incurring Member ID, Payment Type and Billing Year as the original entry. In the Payment Amount field you would have a – (minus sign) in front of the amount you are adjusting. The Dues Paid Date can be different than or the same as the original Dues Paid Date.
- NRDS will not accept a Financial record for an inactive member. The member’s status must be A, P or S in NRDS. NRDS will also check that the Office ID is an active office in NRDS and that the member is a member of the association in the Primary Association ID field.
Review NRDS Event Log
Issues identified during synchronization with NRDS may be visible in the event log.
- Click Setup in the left-hand navigation panel.
- Click Event Log in the Miscellaneous section.
- Click Customize Results.
- Select NRDS Event from the Log Type list.
- Click Done.
To view details of an event, click the
 icon.
icon.
The table below describes some of the common errors that may be logged in the Event Log.
CODE MESSAGE TEXT MESSAGE DESCRIPTION 3510 ERROR-CODE:3510:[%S] required when [%S] entered: ([%S]) [%S] [%S] represents the field name. You are only sending part of a phone number, and the other part doesn’t exist in NRDS. 3521 ERROR-CODE:3521:Invalid state passed in for Street State value =: [%S] The two-character state code must match one of the states or territories recognized in the US. 3525 ERROR-CODE:3525:[%S] length is greater than maximum length [%S] allowed. This error will display if you are sending a field that is greater than the maximum allowed. Refer to fields sent to NRDS for correct formatting of the field. 3530 ERROR-CODE:3530:Invalid Number passed for [%S] value= [%S] What you are passing is not a number or is not a valid value for the field (negative, etc.). 3535 ERROR-CODE:3535:Invalid date/time passed for [%S] value = [%S] Invalid date/time passed for <Date/Time Field Name> value = <Date/Time Field Value> 3540 ERROR-CODE:3540:[%S] has invalid values. Value = [%S], Valid Values are [%S] [%S] represents the field name. Refer to fields sent to NRDS for correct formatting of the field. 3555 ERROR-CODE:3555:[%S] is a Required field. [%S] represents the field name. You have failed to send a required field. 3585 ERROR-CODE:3585:The record has changed since your last request. Please get the most recent record. The record has changed since your last request. You must include the most recent Timestamp for that record which you can get from NRDS via a Query Refresh. 3590 ERROR-CODE:3590:System application error, please contact NRDS Helpline. This usually refers to an invalid value either in the record in NRDS, or being passed as part of the transaction. See note. 3595 ERROR-CODE:3595:Invalid criteria provided <Data Field> Invalid criteria provided <Data Field> 3774 ERROR-CODE:3774:Invalid Search Criteria: Association Name must be at least three characters Invalid Search Criteria: Association Name must be at least three characters in a query. 3776 ERROR-CODE:3776:Invalid Search Criteria: Office Name must be at least three characters Invalid Search Criteria: Office Name must be at least three characters in a query. 3777 ERROR-CODE:3777:Invalid Search Criteria: First Name and/or Last Name total length must be at least three characters Invalid Search Criteria: First Name and/or Last Name total length must be at least three characters in a query. 3782 ERROR-CODE:3782:More than 100 matching records were found. Please search again and narrow your search criteria. More than 100 matching records were found. Please search again and narrow your search criteria. 3785 ERROR-CODE:3785:No records found with your Search criteria No records found with your Search criteria 3791 ERROR-CODE:3791:Invalid search criteria. Please search on the correct fields Invalid search criteria. Please search on the correct fields 3797 ERROR-CODE:3797:[%S][%S] Does not exist in the NRDS System [%S] represents the field name. <Member or Assoc><ID> Does not exist in the NRDS System 3868 ERROR-CODE:3868:The record has changed since your last request. Please get the current record. The record has changed since your last request. Please get the current record. 3660 ERROR-CODE:3660:[%S] Cannot process CHANGE as TRANSFER. Primary Association mismatch. Primary Association in NRDS is [%S] This occurs when you are trying to change a record's Primary Association ID. You must use Transfer in that case, not Change. 3500 ERROR-CODE:3500:[%S] [%S] is in the future. [%S] represents the field name. The ONLY date that may be in the future is Orientation Date in the member record. 3505 ERROR-CODE:3505:[%S] is not a valid email address Email addresses are assumed to follow the format of name@domain.topleveldomain 3511 ERROR-CODE:3511:Invalid phone number passed in for [%S] Phone Number value =: [%S] Phone numbers must be numeric and conform to the 7-digit US phone number standard. 3512 ERROR-CODE:3512:Invalid area code passed in for [%S] Area Code value =: [%S] Area codes passed must be numeric and conform to the 3-digit US area code standard. 3705 ERROR-CODE:3705:Sender ID [%S] is not the POE for Association [%S] You are attempting to change or add a record for which you are not the POE. This means the value in the primary association ID field does not match any association for which you are the POE. 3740 ERROR-CODE:3740:Sender [%S] is not Primary POE for the Association [%S] You are attempting to change or add a record for which you are not the POE. This means the value in the primary association ID field does not match any association for which you are the POE. NAR E-Commerce
GrowthZone provides integration with NAR E-Commerce. Through this integration you can:
- Easily handle splits of membership dues. You will have the ability to indicate distribution parameters and NAR will send along those amounts to state and national appropriately.
- Store cards in the back office for future use and allow your members to store cards via the Info Hub.
- Setup autopay for recurring purchases on stored cards.
- Process refunds through the GrowthZone backoffice
- Handle declined charges and receive notification of card processing failures.
NAR E-Commerce Initial Setup
The setup of the E-Commerce payment processing account in the GrowthZone software will be done by GrowthZone. The following pieces of information will be needed for setup:
- Association ID
- User ID
- Password
- Credit cards that you accept.
NAR E-Commerce Initial Setup - Dues Split
If you wish to setup dues splits, goods/services will need to be created for each share of a membership’s dues. For example, you will need a fee item called something like “Membership Dues - NAR” to account for the amount of the membership that should be sent to National. GrowthZone will assist you in the initial setup of Good/Services and in configuring the appropriate dues split.
General Setup/Process:
- Setup good/services for local, state, and national.
- Configure which good/services on a membership type go to state, national, association.
- When a payment is processed, distribution parameters are sent to NAR E-Commerce.
IMPORTANT
- GrowthZone only supports splits at the time of payment. You are unable to use E-Commerce to process monthly membership payments and then send a lump sum annually to state and national.
- E-Commerce will support up to 6 destination bank accounts, if just one account is being used, the splits will not need to be configured.
- GrowthZone supports creating refunds for memberships that include splits. However, the refund will auto-debit ALL of the refunded amount from the local association. This is because NAR does not support auto-debiting other associations; it will be up to the local association to contact the others (e.g. State and Nat’l) to recoup those funds. Questions/Concerns should be directed to NAR.
- GrowthZone does not charge additional transaction fees on top of NAR’s fees. For questions about rates and fees, please contact NAR.
- There are many specific rules & regulations for E-Commerce. Please contact NAR with questions.
NOTE: If changes are required after initial setup of the splits, contact gzsuppport@growthzone.com NAR E-Commerce Storing Credit Cards
Credit cards to be used by your members can be stored from the back-office, or by your members in the Info Hub.
NAR E-Commerce Storing Credit Cards from Back Office
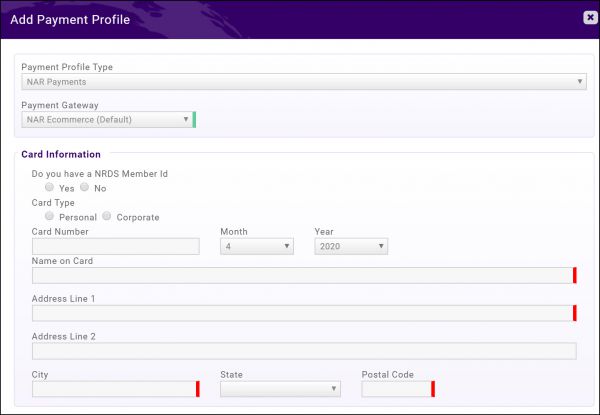
- For the desired member, click the Billing tab.
- Click the
 in the Stored Payment Profiles section.
- Select the Payment Profile Type from the list.
- Select your NAR E-Commerce Payment Gateway from the list.
- Card Information:
- Select Yes/No for Do you have a NRDS ID. If Yes is selected, the NRDS information for the member will be automatically populated.
- Select the Card Type.
- Enter required card information details.
- Click Done.
NAR E-Commerce Storing Credit Cards from Info Hub
- In the Info Hub, click My Info.
- Click the Billing tab.
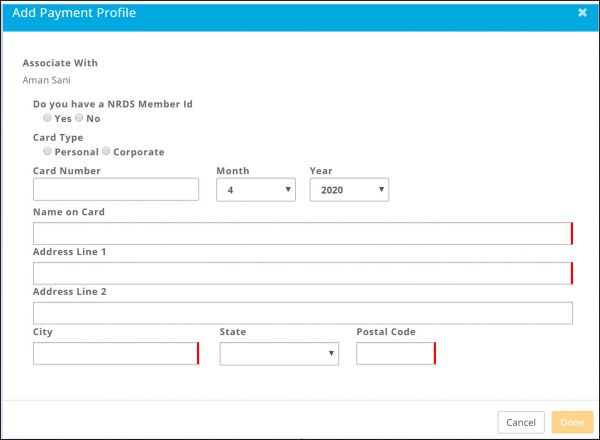
- Click the + icon in the Payment Profiles section.
- Card Information:
- Select Yes/No for Do you have a NRDS ID. If Yes is selected, the NRDS information for the member will be automatically populated.
- Select the Card Type.
- Enter required card information details.
- Click Done.
NAR E-Commerce Assign Store Card to Recurring Fees
If you or your member has stored a credit card, and you wish to assign the card to the members recurring fees, see Apply Store Cards to Recurring Fees. When generating your invoices for upcoming billing, the member's card will be automatically charged. See Manage Invoices for Upcoming Billing.
NAR E-Commerce Processing Refunds
If needed, you can easily process refunds from your GrowthZone software. See Refund a Payment.
IMPORTANT: Contractually, the E-commerce network will not allow one association to automatically debit the bank account of another association. For example, the ABC Local Association cannot initiate an E-Commerce transaction that is going to debit the bank account of the XYZ State Association, or the National Association. So if the original transaction sent by the local association was used to distribute dues payments among the local, state and national, the local association using this request can only debit their own bank accounts. NAR E-Commerce provides the following best practice:
- The original Purchase totaled $350. The distribution was $84 to National, $70 to state, and $196 to local. The local association (the original Association ID in the Purchase) could use this transaction to refund the member’s credit card the $350 total. The total will all come out of the local association’s bank. We recommend that the local contact their state and national association first to see if those two entities will agree to this refund. If they agree, then the state and national could then send an EFT transfer for the original net amount they received to the local’s bank account who could then use this transaction to refund the member’s credit card in total from the local association’s bank account. This is one way to credit the member’s credit card in whole rather than crediting the member’s credit card for just the local amount and then the local writes the member a check once the local receives the state and national dues back from those two entities.
View NAR E-Commerce Payments
The Payment Processing Report can be used to view payments over a selected date range. See Payment Processing Report.
IMPORTANT: The Payment Processing Report will provide you with the grand totals of your payments processed through NAR Ecommerce. You will need to use the statement received from NAR Ecommerce to find the fees for those charges, and update your accounting software appropriately.MLS Integration
GrowthZone offers a data integration with various MLS Solutions. This is a push-type integration which sends changes to contact information from GrowthZone to MRED’s MLS vendor, DynaConnections. The sync happens (when there are contact info changes) around 4 times hourly between the hours of 8 am (CST) and 8pm (CST), seven days a week. The purpose of the integration to an MLS is to establish an account for the member, to establish the member's access level within the MLS (defined by the agent's Member Type, and to track the member's status.
Currently, GrowthZone integrates to MRED and Corelogic. Black Knight coming soon.
MRED Integration
MRED Integration - Initial Setup
On initial installation of your software, GrowthZone will configure the initial connection to MRED. You will then be able to manage your agent's participation in MLS from the agent's Real Estate tab. GrowthZone will sync to MRED any additions or changes made to the MLS information on this tab. Records are synchronized every hour. MRED Office and Agent Files created, are zipped into one file and sent every hour to the FTP site.
Initial setup involves providing the FTP URL, Path, User Name and Password. This information is provided by MRED.
Initial Setup Considerations:
- You have the option to enable Use Membership To Determine MLS Status. Selecting this option will automate updates to MLS status. For example, if you drop an agent, who has an active MLS status, the status will automatically be updated to Inactive. Important: this is designed to work when your members have only one membership.
- You will decide if you wish to use the MLS ID Generator. If you select this option, a "Get MLS ID" button is available to you when assigning your MLS ID's. Enabling this option will prevent duplication of IDs.
MRED - Working with Agents
Via GrowthZone, you can add and update agent MRED information.
Data sent to MRED for an Agent
The table below described the data that is sent to MRED for agents. All data is sent, not just data that has changed.
Field Name Description Format Required Initial Setup MLS Board Number The 3 – 4 abbreviation for the association 4 Alpha X Profile Tab Last Name The agent’s last name 50 Alpha-numeric X First Name The agent’s first name 50 Alpha-numeric X Middle Initial The agent’s middle name or initial 50 Alpha-numeric Suffix The agent’s suffix, referred to as generation in MRED 50 Alpha-numeric Common Name The agent’s nick-name 50 Alpha-numeric Title The agent’s title 50 Alpha-numeric Home Street Number The street number for the address marked as home 50 Alpha-numeric Home Street Name The street name for the address marked as home 100 Alpha-numeric Home City The street city for the address marked as home 50 Alpha-numeric Home State The state for the address marked as home 2 Alpha-numeric Home Zip Code The zip code for the address marked as home 10 Numeric Home Zip + 6 The zip code + 6 for the address marked as home 6 Numeric Home Phone The agent’s phone – marked as home. NOTE: You cannot have a phone without an area code or it will be rejected from MLS. 16 Alpha-numeric Fax Number The agent’s fax number 16 Alpha-numeric Cell Phone The agent’s cell phone 16 Numeric Web-site The web-site, marked as primary, for this agent 50 Alpha-numeric Email The default email listed for this agent 80 Alpha-numeric License The first license number listed in the Professional Section on the Profile tab. 50 Alpha-numeric Real Estate Tab NRDS ID The Agent’s unique 9 digit NRDS ID 9 Numeric MLS Office ID The MLS ID for this agent's office. New MLS IDs must use MRED’s rules for creation. Please contact MRED if you need assistance. 25 Alpha-numeric X MLS Status This agent’s MLS Status Drop-down list X MLS ID The MLS ID for this agent. '''NOTE''': New MLS IDs must use MRED’s rules for creation. Please contact MRED if you need assistance. Once the MLS ID is created in GrowthZone, it cannot be changed. 25 Alpha-numeric X Agent Type The agent type drives the permissions the agent will have within the MLS. Drop-down list
Add an Agent to MRED
IMPORTANT!If creating new agents AND a new office, the office must be created first and then the agents assigned to the office. - For the desired agent, verify that all contact information required to sync an agent to MRED has been populated on the Profile tab. See Data sent to MRED for an Agent for details.
- Select the agent's Real Estate tab.
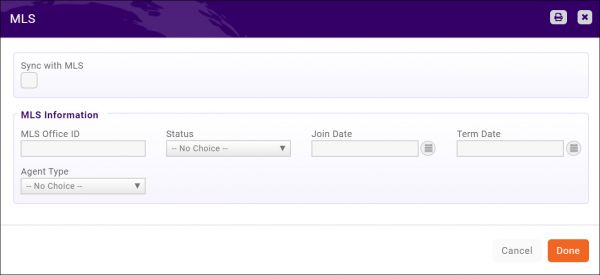
- Click the
 icon in the MLS - MRED section.
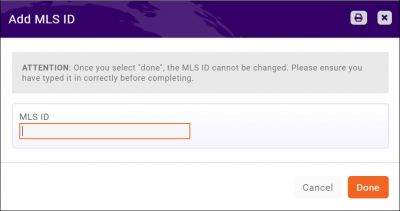
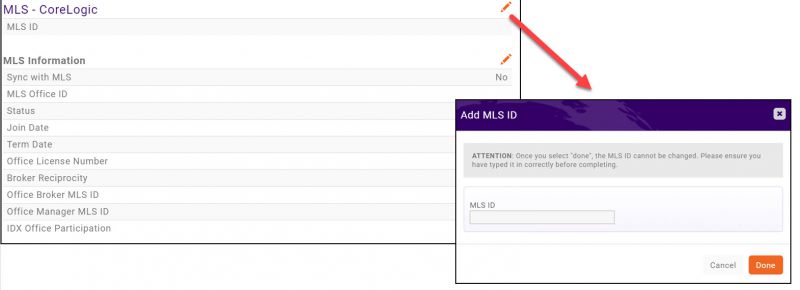
- Enter the agent's MLS ID. New MLS IDs must use MRED’s rules for creation. Please contact MRED if you need assistance. NOTE: If you have elected to enable MLS ID Generator during initial setup, a Get MLS ID button is displayed. Click the button to automatically create your MLS ID.
- Click Done. IMPORTANT: Once the MLS ID is saved, it cannot be changed. Ensure that the number is correct prior to clicking Done.
- Click the
 icon in the MLS Information section.
- Enter the following information (an asterisk indicates a required field):
- MLS Office ID*: Enter the MLS ID for this agent's office.
- MLS Join Date: Enter the date this agent became active with MRED.
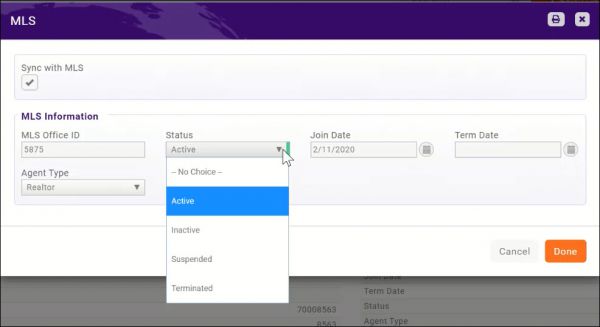
- MLS Status*: Select Active from the drop-down list. NOTE: By default, the MLS Status is NOT tied to the agent's GrowthZone membership status. If, during initial setup of the integration to MRED you have enabled Use Membership To Determine MLS Status, a change to the GrowthZone membership status will update the MLS status.
- Agent Type*: Select the appropriate agent type for this agent. The agent type drives the security role giving/restricting access the agent will have within the MLS. Agent Type is sometimes referred to as "class" .
- Term Date: Applicable when de-activating a member.
- Click Done.
Change MRED Agent Data
- Select the agent's Real Estate tab.
- Click the
 icon in the MLS Information section.
- Make desired changes to the agent data.
- Click Done.
Change MRED Agent Status
- Select the agent's Real Estate tab.
- Click the
 icon in the MLS Information section.
- Ensure that Sync with MLS is enabled.
- Select the desired status from the MLS Status list.
- (Optional) If you are inactivating an agent, enter the Term Date.
- Click Save.
NOTE: From MRED's point of view, there is no functional difference between Inactive, Terminated, Suspended; the member is denied access. MRED - Working with Offices
Data sent to MRED for an Office
The table below describes the data that is sent to MRED for an office. Ensure that all fields are formatted appropriately, and required fields are populated.
Field Name Description Format Required Profile Tab Name Office Business Name 50 Alpha X Address 1 Street Number (20 max) and street name (100 max) for the first address that is marked as mailing or physical and mailing. Must include a street number 120 Alpha X Address 2 (see above) Office Address Line 2 100 Alpha City (see above) Street City 50 Alpha X State (see above) Street State 2 Alpha X Postal Code (see above) 5 digit Street ZIP 10 Num X Postal Code (see above) Street ZIP+6 6 Num Phone number Office Phone Number. NOTE: You cannot have a phone without an area code or it will be rejected from MLS 16 Alpha Email Address Office E-Mail Address 80 Alpha Real Estate Tab NRDS ID The office’s 9 digit unique NRDS ID 9 Numeric MLS ID Office Tax ID. This is NEVER the same as a NRDS ID 20 Alpha MLS Status The office’s MLS status Drop-down list X Office License Number This is the license number for the office from the State. MLS Join Date The date the office began with the MLS 8 Date MLS Term Date Date of termination of agent/office with MLS provider 8 Date MRED - Add an Office
- Click the office Real Estate tab.
- Click the
 icon in the MLS - MRED section.
- Enter the MLS ID for this office. IMPORTANT: Once you click Done you will not be able to edit the ID.
- Click Done.
- Click the
 icon in the MLS Information section.
- Click Sync with MLS.
- Complete the following information, an asterisk indicates a required field. Refer to for details descriptions of the fields:
- MLS Office ID*: The MLS ID for this office.
- MLS Status*: Select Active from the list.
- Join Date: Enter the date this office joined MRED.
- Office License Number: Enter the license number, issued by the state, for this office.
- Broker Reciprocity: Enable this check-box if the office participated in broker reciprocity.
- Click Done.
The information listed in Data sent to MRED for an Office will automatically be sent to MRED, with no further interaction on your part.
MRED - Change Office Data
- For the desired office, click the Real Estate tab.
- Click the
 icon in the MLS Information section.
- Ensure that Sync with MLS is selected.
- Make the desired changes.
- Click Done.
When data for an office is changed, all data listed in Data sent to MRED for an Office is sent to MRED, not just the changed data. A record will be rejected if any of the required fields are missing or data is malformed.
MRED - Change Office MLS Status
When an office is inactive, suspended or terminated, you can update the information in GrowthZone and this will be synched to MRED.
IMPORTANT: If, during initial setup of MRED integration, you have enabled Use Membership To Determine MLS Status, the status of an office will automatically update to inactive when a member is dropped and vice versa. - For the desired office, click the Real Estate tab.
- Click the
 icon in the MLS Information section.
- Ensure that Sync with MLS is selected.
- Select the desired MLS Status. NOTE: From MRED's point of view, there is no functional difference between Inactive, Terminated, Suspended; the office is denied access.
- Click Done.
The changes will automatically be sent to MRED. All data listed in Data sent to MRED for an Office is sent to MRED, not just the changed data. A record will be rejected if any of the required fields are missing or data is malformed.
Corelogic Matrix Integration
CoreLogic's Matrix MLS is an MLS system that is a leader in this space. With GrowthZone integration you will be able to setup new agents in the MLS as well as manage the agent's security access to the system. Upon initial installation of the system custom fields will be created for agent and office security levels.
Corelogic Matrix Integration - Initial Setup
GrowthZone's team will configure the initial integration to CoreLogic Matrix.
Considerations:
- You can elect to use a member's status as the MLS status. For example: If this option is selected, and you drop a member, the MLS status will automatically be updated to Inactive. NOTE: This only functions when a member has one and only one membership.
- You must define the security access levels provided to your agents/offices. These should be the same security permission sets that you have setup within CoreLogic.
Corelogic Matrix - Working with Agents
Corelogic Matrix - Add an Agent
Adding a new agent to Corelogic is a two step process. First, you will assign an MLS ID, then you will provide the required information and sync.
- For the desired agent, ensure that all required contact information has been populated on the Profile tab. Refer to Data sent to Matrix for Agents for details.
- Click the agent's Real Estate tab.
- Ensure that a NRDS ID exists for this agent.
- Click the
 icon in the MLS - Corelogic section.
- Enter the desired MLS ID. IMPORTANT: Once you enter and save the MLS ID you will not be able to change it.
- Click Done.
- Click the
 icon in the MLS Information section.
- Click Sync With MLS.
- Populate the following information. An asterisk denotes a required field. Refer to Data sent to Matrix for detailed descriptions.
- MLS Office ID: This is the ID that the office for this agent is known by publicly
- MLS Join Date: The date this agent joined the MLS.
- MLS Status: Select this agent's status.
- MLS Password: You will set an initial password for the agent. The agent will be able to change this afterwards.
- MUC: Select this agent's security level. The security levels available are those that you provided to GrowthZone on initial setup of your database.
- Click Done.
The new agent will synchronized to Matrix with no further interaction on your part.
Corelogic Matrix - Update an Agent
Basic contact information is stored by Corelogic Matrix. If any changes are made to the data sent to Matrix is changed in GrowthZone, and Sync with MLS is enabled on the Real Estate tab, these changes will be automatically sent to Matrix with no interaction on your part. Changes to any of the data listed in Data sent to Matrix for Agents will trigger a change to be sent to Corelogic.
Corelogic Matrix - Change an Agent's status
- For the desired agent, click the Real Estate tab.
- Click the
 in the MLS Information section.
- Select the desired status from the MLS Status list.
- Click Done.
The change will be sent to Corelogic Matrix automatically, no further interaction is needed. NOTE: All information described in Data sent to Matrix for Agents is sent, not just what was changed.
Corelogic Matrix - Change an Agent's Security Level
- For the desired agent, click the Real Estate tab.
- Click the
 in the MLS Information section.
- Select the desired security level from the MUC list.
- Click Done.
The change will be sent to Corelogic Matrix automatically, no further interaction is needed. NOTE: All information described in Data sent to Matrix for Agents is sent, not just what was changed.
Data sent to Corelogic Matrix for Agents
The table below describes the information that is sent to Corelogic Matrix for Agents.
Field Name Description Format Required Profile Tab Prefix The agent’s prefix Suffix The agent’s suffix First Name The agent’s first name 50 Alpha X Prefix The agent’s prefix Last Name The agent’s last name 50 Alpha X Middle The agent’s middle name 50 Alpha Common Name The agent’s nickname First Name + Middle + Last Name The agent’s display name 150 Alpha Address 1 The agent’s Address 1 (the first record marked as Home) 50 Alpha Numeric Address 2 The agent’s Address 2 (the first record marked as Home) 50 Alpha Numeric City The city for the agent’s address (the first record marked as Home) 50 Alpha Postal Code Postal code for the agent’s address (first record marked as Home) 10 Alpha Numeric Postal Code +4 (Home) The A ZIP + 4 code uses the basic five-digit code plus an additional four digits 14 Alpha Numeric Fax Agent’s fax number 16 Alpha Numeric Phone (Home) Agent’s phone. First one marked as home 16 Alpha Numeric Phone (Cell) Agent’s phone marked as cell 16 Alpha Numeric Phone (Default) Agent’s phone marked as default 16 Alpha Numeric Email (primary/default) Agent’s email marked as primary/default 80 Alpha Numeric License Agent’s real estate license number. The first license entered into the Professional section on the Profile tab 50 Alpha Numeric Licensing Authority The state the agent’s license is with 2 Alpha Real Estate Tab NRDS ID The agent’s NRDS ID 25 Numeric MLS Password The agent’s MLS password MUC MUC defines the Member MLS Security Class (security) level for this agent. The options available for selection are defined during initial setup of the software. Drop-down choice X MLS Office ID This is the ID that the OFFICE for this is known by publicly 25 Alpha Numeric X MLS Status The agent’s MLS Status: - Active
- Inactive
- Suspended
- Terminated
Drop-down choice X Corelogic Matrix - Working with Offices
Through your integration with Corelogic-Matrix, you will be able to add offices, update those office, and de-activate offices. The integration between Corelogic and GrowthZone is an API call that occurs every 5 minutes.
Data Sent to Corelogic Matrix for Offices
The table below describes the information that is sent to Corelogic Matrix. If offices are added, or changes are made to existing offices, all data is sent, not just those that have changed. The integration between Corelogic and GrowthZone is an API call that occurs every 5 minutes.
Field Name Description Data format Required Profile Tab Name The Office Name Alpha-numeric 255 X Address 1 Office address 1 marked as default Alpha-numeric 50 Address 2 Office address 2 marked as default Alpha-numeric 50 City City for Office address 1 marked as default State State for Office address 1 marked as default Choice Postal Code Postal Code for Office address 1 marked as default Alpha-numeric 10 Phone The phone number marked as default for the Office Alpha-numeric 16 X Phone number Fax The phone number marked as fax for the office Alpha-numeric 16 Email Address The email address set as default for this Office Alpha-numeric 80 Web Address This office’s primary social site. The first one marked as social will be sent Alpha-numeric 255 More Info Tab Notes Any notes that you have added on the More Info tab Alpha-numeric 500 Realtor Tab MLS ID The MLS ID for this office Alpha-numeric 25 X NRDS ID The 9 digit unique NRDS ID for this office Numeric 9 MLS Office ID Used to indicate Parent MLS ID for this office (headquarters) Alpha-numeric 25 X MLS Status The Status of this Office Drop-down Choice - Active
- Inactive
- Suspended
- Terminated
X Office Broker MLS ID The MLS ID for this Office’s Broker Alpha-numeric 25 Office Manager MLS ID The MLS ID for the Office Manager for this Office. This may be multiple. Alpha-numeric 25 MLS IDX Office Participation This field indicates whether the office participated in Internet Data Display, which allows brokers to exchange consent to display one another's property listings on the Internet. Y/N Corelogic Matrix - Add an Office
- For the desired office, select the Real Estate tab.
- Click the orange pencil
 in the MLS - Corelogic section.
- Enter the MLS ID for this office. IMPORTANT: Once you have entered, and clicked Done you will not be able to change the ID.
- Click Done.
- Click the orange pencil
 in the MLS Information section.
- Click Sync With MLS.
- Enter the required information, indicated by a red bar on the right side of the field. See Data Sent to Corelogic-Matrix for Offices for further descriptions of the fields.
- Click Done.
The new office record will be sent to Corelogic Matrix automatically when the record is saved, no further interaction is required on your part.
Corelogic Matrix - Update an Office Record
If Sync with MLS is enabled for the office, a change to any of the information listed in Data Sent to Corelogic-Matrix for Offices will automatically be sent to Corelogic Matrix.
Corelogic Matrix - Inactivate an Office
- For the desired office, select the Real Estate tab.
- Click the orange pencil
 in the MLS Information section.
 - Ensure that Sync With MLS is enabled.
- Select Inactive from the Status list.
- Click Done.
The status of the office will automatically be sent to Corelogic Matrix with no further interaction on your part.
Black Knight - Paragon MLS (Coming Soon)
Black Knight's Paragon system is a nationwide MLS portal. By integration with GrowthZone additions and updates of agents and offices are seamlessly sent to Black Knight. GrowthZone will send a zipped file to Black Knight every hour.
Black Knight - Paragon Initial Setup(Coming Soon)
GrowthZone will assist you with the initial setup and integration to Black Knight. Following are considerations:
- Have you populated all the necessary Primary User Boards?
- Have you populated all Organization Types?
Black Knight - Paragon Synchronization Timing
Hourly a file with additions and changes are sent to Paragon's FTP site.
Black Knight Paragon - Working with Offices (Coming Soon)
Black Knight - Paragon Activate an Office (Coming Soon)
- Follow the steps to add an Office described in
- Click the Real Estate tab for the office.
- Click the
 icon in the MLS - Black Knight section.
- Enter the MLS ID for this office.
- Click Done. IMPORTANT: ensure that the MLS ID is accurate, you will NOT be able to change this after clicking done.
- Click the
 icon in the MLS Information section.
- Click Sync with MLS.
- REQUIRED: Select the office Status = Yes
- REQUIRED: Select the Office Type from the list. Office types available are those that you configured during initial setup.
- Enter the MLS Office ID.
- Enter the MLS Office Broker ID.
- Indicate whether this office should be included on rosters and mailing lists.
- Click Done.
The record will be synced to Paragon within the hour with no further interaction on your part. All data described in Black Knight Paragon - Data Sent for Offices will be sent.
Black Knight - Paragon Update an Office record
Changes made to the data listed in Data Sent to Paragon for Office Records will automatically be sent to Paragon. All data described in Black Knight Paragon - Data Sent for Offices will be sent, not just what you have changed.
Black Knight - Paragon Inactivate an Office
- For the desired office, click the Real Estate tab.
- Ensure Sync with MLS is selected.
- Change the Status to No.
- Click Done.
The record will be synced to Paragon within the hour with no further interaction on your part. All data described in Black Knight Paragon - Data Sent for Offices will be sent.
Black Knight Paragon - Data Sent for Offices
The table below describes the data that is sent to Paragon for offices.
Field Description Data format Required Profile Tab Name The office name 100 X Address 1 Default Address 1 for this office 30 X Address 2 Default Address 2 for this office 30 City Default Address City for this office 21 X State Default Address State for this office. Standard State Abbreviations 2 X Postal Code Default Address Zip/Postal Code for this office 20 X Mailing Address 1 Mailing Address 1 50 Mailing Address 2 Mailing Address 2 50 City Mailing Address City 50 State Mailing Address State. Standard State Abbreviations 2 Postal Code Mailing Address Zip/Postal Code 20 Phone (Default) The office default phone number 10 Phone (Fax) The office fax 10 Phone (Other) The office phone (other) 10 Email The office email 50 Web Address The web address for this office, the first one marked as social 80 Real Estate Tab Office Type The office organization type. Your association will customize the list of types during initial setup. Drop-down choice X MLS ID The office MLS ID 10 X Status Status of this office in MLS. Y or N X NRDS ID The 9 digit NRDS ID for this office 9 Office Broker MLS ID This is the MLS Id for the Office Broker 25 MLS Office ID Null if this is the main office; If this is a Branch then this would be the Main office MLS ID; Null if this is a standalone office. 25 Member of Board Indicates whether this office is member of board Y/N or Null Include in Mailing Lists Indicates whether this office should be included in mailing lists Y/N or Null Include in Rosters Indicates whether this office should be included in rosters Y/N or Null Black Knight Paragon - Working with Agents
Black Knight Paragon - Add an Agent
Prior to adding an agent to Black Knight, verify that you have all of the required information for the agent on the Profile tab. Refer to Black Knight MLS - Data Sent to Agents for details.
- Select the agent's Real Estate tab.
- Click the
 in the MLS - BlackKnight section.
 - If you are using the MLS ID generator, click Get MLS ID, this will automatically populate the ID OR enter the MLS ID.
- Click Done. IMPORTANT: Once you save the MLS ID, you will NOT be able to change it. Ensure that you have entered the number correctly prior to clicking Done.
- Click the
 in the MLS Information section.
 - Click Sync with MLS.
- Populate the required information. Refer to Black Knight MLS - Data Sent to Agents for details.
- Click Done.
Black Knight Paragon - Update an Agent
Any updates made to the date described in Black Knight MLS - Data Sent for Agents will be sent to the MLS. A file is delivered every hour.
Black Knight Paragon - De-activate an Agent
- Click the
 in the MLS Information section.
 - Ensure Sync with MLS is enabled.
- Select Inactive from the Status list.
- Click Done.
All information described in Black Knight MLS - Data Sent to Agents will be sent within the hour with no further interaction on your part.
Black Knight Paragon - Data Sent for Agents
The table below describes the data that is sent to Black Night. Files are sent to Black Knight's FTP site hourly.
Field Name Description Format Required Profile Tab First Name The agent’s first name. The first 50 characters are sent. 50 X Middle The agent’s middle name 50 Last Name The agent’s last name. The first 50 characters are sent. 50 X Common Name The agent’s nickname or salutation 50 Physical Address Physical Address 1 100 X Physical Additional Address Physical Address 2 50 Physical City Physical Address City 50 X Physical State Physical Address State 2 X Physical Zip Physical Address Zip Code 20 X Mailing Address (Mailing) Mailing Address 1 100 Mailing Additional Address Mailing Address 2 50 Mailing City Mailing Address City 50 Mailing State Mailing Address State 2 Mailing Zip Mailing Address Zip Code 20 Office Phone Number The agent’s office phone number 30 Home Phone Number The agent’s office home number 30 Fax Phone Number The agent’s fax number 30 Cell Phone Number The agent’s cell phone number 30 Other Phone Number The agent’s other phone number 30 Email The agent’s email address WebAddress (Social) The agent’s social web address 80 Real Estate Tab Status Indicates the status of this agent in the MLS: - Active
- Inactive
- Terminated
Drop-down choice X MLS ID The agent’s MLS ID 25 X MLS Login The agent’s MLS Login. This is not updateable after it is set. If we send a different Login Name it will create a new record in Paragon. 20 X Security Level The Agent’s permission level in Black Knight. This is defined by the agen’t MSL User Class. NOTE: If the agent is not active, Paragon will automatically set this to 0. 1 X Office MLS ID This is the MLS Office ID for the office to which this agent is associated. 25 X MLS Agent Type This agent’s MLS Type. These types are created in Paragon. On installation of the software these are populated under setup. Drop-down choice X MLS Status This agent’s MLS status. These are defined by Paragon: - A – Affiliate
- B - Board ONLY
- C – Commercial
- F -Staff
- M - MLS and Board
- N – Nonmember
- S - MLS Only
Drop-down choice X Include in Mailing Lists Indicates whether this agent should be included in mailing lists Check-box Include in Rosters Indicates whether this agent should be included in rosters Check-box MLS License This agent’s MLS License 25 Primary User Board The agent’s primary user board. This list is customizable by you on installation of the software 20 Real Estate tab – NRDS Info Member BirthDate This agent’s birth date. This is set under NRDS Additional Information. 10 NRDS ID This agent’s unique 9 digit NRDS ID 9 LockBox Integration
SentriLock
GrowthZone offers a data integration with SentriLock’s lockbox solution. The purpose of the synchronization to Sentri-lock is to activate an account for an office or agent, and define the security level afforded that office or agent. The sync happens in real time with updates appearing SentriLock in a matter of minutes. On the Real Estate tab of a contact, there is a "Sync with Lockbox" checkbox that needs to be ticked in order for the system to recognize the sync option. When enabled, GrowthZone will send updates to SentriLock whenever contact information is updated or entered new.
SentriLock - Synchronization Timing
Once SentriLock sync is enabled, updates are sent via API every 5 minutes.
SentriLock - Initial Integration Setup
The GrowthZone team will setup initial integration to SentriLock, with your input. During this process you will decide the following:
- What to use for the Lockbox Office Id Source: You will choose from NRDS ID, MLS ID or Custom. If NRDS or MLS are selected, the system will automatically use these ID’s and prompt you if these ID’s are not set. If you select Custom, you will populate your own unique ID each time you activate an agent or office with SentriLock.
- What to use for the Lockbox User Name Source: You will choose from NRDS ID, MLS ID or Custom. If NRDS or MLS are selected, the system will automatically use these ID’s and prompt you if these ID’s are not set. If you select Custom, you will populate your own unique ID each time you activate an agent or office with SentriLock.
- What to use for the Lockbox External Id Source: You will choose NRDS ID, MLS ID or Custom. If NRDS or MLS are selected, the system will automatically use these ID’s and prompt you if these ID’s are not set. If you select Custom, you will populate your own unique ID each time you activate an agent or office with SentriLock.
- Will you “Use Membership Status To Determine Lockbox Status”: If you choose this option, LockBox Member Status will automatically be updated, based on the status of the membership with your association. For example, if an agent has an active membership with your association, and a valid SentriLock status, when you drop that member, the SentriLock status will automatically be updated to Terminated.
SentriLock - Working with Agents
Data sent to SentriLock for Agents
The data described in the table below is synchronized to SentriLock. Each time data is sent to SentriLock, All data is sent, not just the fields that you changed.
IMPORTANT: GrowthZone data will not override any updates a user has entered directly in Sentrilock. For example, if a user changes their phone number, at any time, in Sentrilock, if a different phone number is sent from GrowthZone, the user entered phone number will NOT be over-written. Field Name Description Required Profile Tab First Name First name of the Agent X Last Name Last name of the Agent X Email Address (Primary) The email address of the Agent X Real Estate Tab NRDS ID The 9 digit unique ID issued to all NAR members. X Status The agent’s current status within the MLS or membership system. These statuses will control whether or not a user has access within the SentriLock system. X Card Status This field indicates the status of the Agent’s SentriCard®. Use to activate or terminate the card. X Member Type The Member Type indicates the level of access this user should receive to SentriLock X User Name This field indicates the user name for a user to log into the SentriLock system. This field is not required, if not populated SentriLock will generate the User Name. Password The user's login password for SentriLock. This field is not required, if left blank, SentriLock will automatically generate a password for the agent. External ID The unique ID of an agent in the SentriLock system as supplied by the MLS. The exact context of this value will vary from MLS to MLS. You can enter a custom number OR during initial setup you can elect to automatically assign the Agent NRDS ID or MLS ID X Office ID The office number, or unique id of the office that the agent belongs to. This is required to give them proper office access to the SentriLock system. You may enter an office ID OR, during initial setup you can elect to automatically assign the agents NRDS Office ID or MLS Office ID. X Activate an Agent in SentriLock
- For the desired agent, click the Real Estate Tab.
- Click the
 icon in the LockBox - SentriLock section.
- Click Sync with LockBox.
- Enter the LockBox Information (an asterisk denotes a required field):
- Status*: Select Active from from the list.
- Card Status*: Select the agent's card status. Status controls whether or not the agent has access within the SentriLock system.
- Member Type:
- User Name*: Enter this agent's user name to be used for access to the SentriLock software. NOTE: If, during initial setup of your SentriLock integration, you elected to use the NRDS ID or MLS ID this will be noted in the field and the field will be read only.
- Password: This field is not required. You can enter a temporary password for your agent OR if this field is left empty, SentriLock will automatically generate a password for the agent.
- External ID: Enter the the SentriLock ID for this agent OR if, during initial setup, you have elected to use the agent's MLS ID or NRDS ID this will be indicated, and the field will be read only.
- NRDS Office ID: Enter the NRDS office id for this agent OR if, during initial setup, the agent's NRDS Office ID or MLS Office ID this will be indicated, and the field will be read only.
- Click Done. The record will be automatically sent to SentriLock with no further interaction needed. All data described in Data Sent to SentriLock for Agents will be sent.
Terminate an Agent's Card Status in SentriLock
The agent's card status controls whether or not the agent has access within the SentriLock system. To change the card status:
- For the desired agent, click the Real Estate Tab.
- Click the
 icon in the LockBox - SentriLock section.
- Click Sync with LockBox.
- Select Terminated from the Card Status list.
- Click Done. The updated status will be automatically sent to SentriLock with no further interaction needed. All data described in Data Sent to SentriLock for Agents will be sent.
Terminate/Suspend an Agent in SentriLock
- For the desired agent, click the Real Estate Tab.
- Click the
 icon in the LockBox - SentriLock section.
- Click Sync with LockBox.
- Select Terminated or Suspended from the Status list.
- Click Done. The updated status will be automatically sent to SentriLock with no further interaction needed. All data described in Data Sent to SentriLock for Agents will be sent.
SentriLock - Working with Offices
Data sent to SentriLock for an Office
The table below describes the data that is sent to SentriLock when an office record is added or changed.
IMPORTANT: GrowthZone data will not override any updates a user has entered directly in Sentrilock. For example, if a user changes their phone number, at any time, in Sentrilock, if a different phone number is sent from GrowthZone, the user entered phone number will NOT be over-written. Field Name Description Required Profile Tab Contact Name The name of the Office X Address 1 Street address line 1 X Address 2 Street address line 2 City City X State State or province abbreviation X Postal Code Zip or postal code X Phone Number The contact phone number of the user. This contact number is used to send text notifications of codes, or showing notifications if the user chooses those options. SentriLock only accepts a single phone number. GrowthZone will send the phone marked as default. X Real Estate Tab Status The office's current status within the MLS or membership system. These statuses will control whether or not members in that office have access to the SentriLock system. X External ID The identifier for this office in SentriLock. Association's can use any ID they wish or, during initial setup, elect to use the Office MLS ID or NRDS ID. X Activate an Office in SentriLock
- For the desired office, click the Real Estate tab. NOTE: The office must have a NRDS ID.
- Click the
 icon in the LockBox - SentriLock section.
- Click Sync with LockBox.
- Select Valid from the Status list.
- Enter an External ID or, the field will display NRDS ID or MLS ID if, during initial setup, you have elected to default to one of these ID's.
- Click Done. The office record will be sent to SentriLock within five minutes, with no additional interaction on your part.
Suspend/Terminate an Office in SentriLock
- For the desired office, click the Real Estate tab. NOTE: The office must have a NRDS ID.
- Click the
 icon in the LockBox - SentriLock section.
- Click Sync with LockBox.
- Select Suspended or Terminated from the Status list.
- Click Done. The updated status will be sent to SentriLock within five minutes, with no additional interaction on your part.
Supra
Supra has provided keyboxes to the real estate industry since 1955, bringing efficiency to real estate professionals and peace of mind to home sellers. By integration with GrowthZone, you are able to setup accounts for your agents/office each has to access a lock-box. In addition to activating new accounts with Supra, you will also be able to change the account, and importantly terminate accounts when needed.
Supra Synchronization Timing
When synchronization is enabled, files are transferred to Supra every hour.
Supra - Working with Agents
Data Sent to Supra for Agents
The table below describes the data that is synchronized with Supra. Hourly, your GrowthZone system will look for additions or changes to Supra Data. If there have been any, all of the information in the table below is sent.
Field Name Description Data format Required Profile Tab Last Name Last name of agent 21 Alpha X First Name First name of agent 17 Alpha X Middle Middle initial of the agent 3 Alpha City (primary) City 31 Alpha X State (primary) State 2 Alpha X Phone (primary) Area code of & phone number of agent's phone number 23 Numeric Address 1 (primary) First line of agent's address line 35 Alpha Address 2 (primary) Second office address line 35 Alpha Zip (primary) Zip code of agent address 11 Alpha Country (primary) Country 4 Alpha Fax Number (primary) Area code & Phone number of agent's fax number marked as primary 23 Alpha Email (primary) Email marked as primary 64 Alpha Real Estate Tab Lock Box Agent ID Unique Agent ID
During initial setup with GrowthZone you may chose this to be one of the following:
- Agent NRDS ID
- Agent MLS ID
- Office NRDS ID
- Office MLS ID
- Custom – an ID of your choice
15 Alpha X Lock Box Member Status Agent Status – Active, Hold, Inactive Drop-down choice X LockBox Listing Agent ID Listing Agent ID
During initial setup with GrowthZone you may chose this to be one of the following:
- Agent NRDS ID
- Agent MLS ID
- Office NRDS ID
- Office MLS ID
- Custom – an ID of your choice
32 Alpha X LockBox Office ID Office ID
During initial setup with GrowthZone you may chose this to be one of the following:
- Agent NRDS ID
- Agent MLS ID
- Office NRDS ID
- Office MLS ID
- Custom – an ID of your choice
Activate an Agent’s Supra Account
- For the desired agent, click the Real Estate tab.
- Click the
 icon in the LockBox - Supra section.
- Click Sync With LockBox.
- Select Valid from the Status list.
- Enter the agent's Office ID, or, if during initial setup you have elected to use the NRDS ID or MLS ID, this field will display your choice and be read only.
- Enter the agent's Agent ID, or, if during initial setup you have elected to use the NRDS ID or MLS ID, this field will display your choice and be read only.
- Enter the agent's Listing ID, or, if during initial setup you have elected to use the NRDS ID or MLS ID, this field will display your choice and be read only.
- Click Done.
Files are automatically sent to Supra every hour, no further interaction is required. All data defined in Data Synchronized to Supra for Agent will be sent.
IMPORTANT: If, during initial setup, you have elected to use NRDS ID or MLS ID for Agent ID, Listing Agent ID and/or Office ID these must be populated for the agent's record. The Done button will not be enabled if these fields are not populated for the agent's record. Change an Agent’s Supra Account Record
Any changes made the fields described in Data Synchronized to Supra, above, will result in a change record being sent to Supra. As long a Sync to LockBox is enabled, the system will “notice” these changes and send them within the hour, with no interaction on your part.
Terminate an Agent’s Supra Account Record
- For the desired agent, click the Real Estate tab.
- Click the
 icon in the LockBox - Supra section.
- Click Sync With LockBox.
- Select Terminated from the Status list.
- Click Done.
This change will automatically be included in the files sent to Supra every hour, no further interaction on your part is needed.
Suspend an Agent’s Supra Account Record
- On the Agent’s Profile tab, ensure that all required information, defined in Data Synchronized to Supra, above, has been populated.
- Click the Real Estate tab.
- Ensure that Sync With LockBox is checked.
- In the LockBox section, select Terminated from the LockBox Member Status list.
- Click Save.
Disable Synchronization of an Individual Agent to Supra
Any additions or changes to an agent's record, will automatically be synchronized to Supra. You can disable this for an individual agent, if needed:
- On the Agent’s the Real Estate tab, deselect Sync With LockBox.
- Click Save.
Deselecting this will NOT remove the contact's data from Supra, it will simply stop the updates to the record from being sent.
Supra - Working with Offices
Data Sent to Supra for Offices
The table below describes the information that is sent to Supra for offices. Anytime an office is added, or changed 'All data is sent.
Field Name Description Data format Required Profile Tab Name (Organization) Office Name 35 Alpha X Address 1 (primary) First office address line 35 Alpha Address 2 (primary) Second office address line 35 Alpha City (primary) City 31 Alpha State (primary) State 2 Alpha Country (primary) Country 4 Alpha Zip (primary) Zip 11 Alpha Phone - Area Code (primary) Area code of work number 3 Numeric Phone (primary) Work phone number 32 Alpha Fax (primary) Fax phone number 32 Alpha Fax (primary) Area code of fax number 3 Numeric Email (primary) Email 64 Alpha Real Estate Tab Office Id The unique ID for this office in Supra. You can enter a custom ID, or, if during initial setup you have elected to use NRDS ID or MLS Id it will automatically be populated. 15 Alpha-numeric X Status Office Status - Active, Suspended, Terminated 1 Alpha X Activate an Office's Supra Account
- For the desired office, click the Real Estate tab.
- Click the
 icon in the LockBox - Supra section.
- Click Sync With LockBox.
- Select Valid from the Status list.
- Enter the Office ID for this office, or, if during initial setup you have elected to use Office MLS ID or NRDS ID, this will be displayed and the field will be read only.
- Click Done.
Suspend/Terminate an Office's Supra Account
- For the desired office, click the Real Estate tab.
- Click the
 icon in the LockBox - Supra section.
- Click Sync With LockBox.
- Select Suspended or Terminated from the Status list.
- Click Done.
IMPORTANT If an Office’s LockBox Supra Account is Terminated, all agent’s associated to this office will also be “locked out” of LockBox. Change an Office’s Supra Account Record
Any changes made the fields described in Data Sent to Supra for Offices, will result in a change record being sent to Supra. As long as Sync to LockBox is enabled, the system will “notice” these changes and send them within the hour, with no interaction on your part.
NOTE: All fields are sent to Supra, not just those that have changed. Disable Synchronization of an Individual Office to Supra
Any additions or changes to an Office's record, will automatically be synchronized to Supra. You can disable this for an individual office, if needed:
- For the desired office, click the Real Estate tab.
- Click the
 icon in the LockBox - Supra section.
- DeselectSync With LockBox.
- Click Done.
NOTE: Disabling the Sync with LockBox will NOT remove the office's data from Supra, it will simply stop updates to the record from being sent from GrowthZone.
- Click the office Real Estate tab.
- On the agent's Real Estate tab, click the
- For the desired office, click the Real Estate tab.

