Difference between revisions of "Marketing Automation"
Jump to navigation
Jump to search
Cpetterson (talk | contribs) |
Cpetterson (talk | contribs) |
||
| Line 23: | Line 23: | ||
#*'''Sources''': Lists/Committees are used for workflows. Click the [[File:Orange plus icon.jpg|25px]] orange plus, to select the desired '''Lists/Committees''' that you wish to include in this workflow. | #*'''Sources''': Lists/Committees are used for workflows. Click the [[File:Orange plus icon.jpg|25px]] orange plus, to select the desired '''Lists/Committees''' that you wish to include in this workflow. | ||
#'''Auto Remove From Workflow''': Select this option if you wish the entire list/committee to be removed from the workflow after all steps are completed. | #'''Auto Remove From Workflow''': Select this option if you wish the entire list/committee to be removed from the workflow after all steps are completed. | ||
| − | #'''Is Active''': Once this is selected, your workflow process will begin. When selected, and you click ''' | + | #'''Is Active''': Once this is selected, your workflow process will begin. When selected, and you click '''Done''', the system will begin the first step in your workflow process. |
| − | #Click ''' | + | #Click '''Done'''. |
| + | |||
| + | Once you have completed the initial setup of your workflow, you will add your work flow steps, described below. | ||
| + | |||
| + | ==='''<span style="color:#800080">Add Steps to Your Workflow'''</span>=== | ||
| + | ---- | ||
| + | |||
| + | #On the '''Marketing Automation''' screen, click the '''Workflow''' to which you wish to add steps. | ||
| + | #:[[File:New Workflow.jpg|1200px|center]] | ||
| + | #Click the '''Workflow Steps''' tab. | ||
| + | #Click the '''Add Step''' button. | ||
| + | #:[[File:Add Workflow Step.jpg|600px|center]] | ||
| + | #Select the '''Workflow Step Type''' from the drop-down list. Additional options will require configuration dependent on the type selected: | ||
| + | #*'''Wait''': | ||
| + | #*'''Wait Until''': | ||
| + | #*'''Send Email''': | ||
| + | #*'''Create Follow Up Reminder''': | ||
| + | #*'''Add to List''': | ||
| + | #*'''Remove From List''': | ||
| + | #*'''Move to List''': | ||
| + | #*'''Add Tag''': | ||
| + | #*'''Logic Branch''': | ||
| + | #*'''Exit Workflow''': | ||
Revision as of 23:12, 9 January 2019
Contents
Marketing Automation Overview
The GrowthZone Marketing Automation module provides the functionality to set up automated workflows designed specifically around varying communication goals. For example, you may want to have a work flow for new prospects, or perhaps a drip campaign for new members. A workflow can be tied to a campaign list, that will then allow you to automatically send targeted information to key individuals and groups.
Marketing Automation Pre-requisites
- Create the desired email templates to be used in your campaign. See Create and Manage Email Templates.
- Create the desired lists/committees, as needed. See Working with Lists/Committees.
Setup your Marketing Automation Workflows
- Click Marketing Automation in the left-hand navigation panel. A list of all current workflows will be displayed.
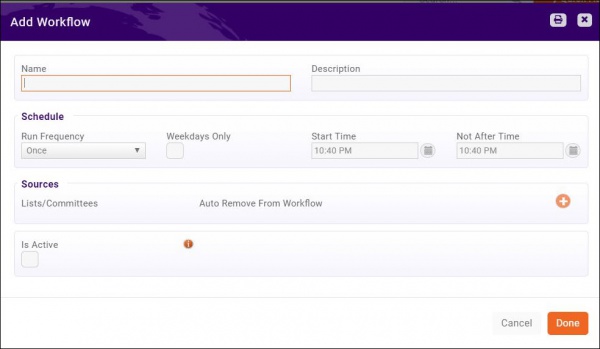
- Click the Add Workflow button.
- Configure the following:
- Name: Enter a name for the workflow.
- Description: Enter a description of this workflow. This is optional.
- Schedule: The schedule option allows you to define how frequently the system will check to see if a contact needs to be moved to the next step in the work-flow process.
- Sources: Lists/Committees are used for workflows. Click the
 orange plus, to select the desired Lists/Committees that you wish to include in this workflow.
- Auto Remove From Workflow: Select this option if you wish the entire list/committee to be removed from the workflow after all steps are completed.
- Is Active: Once this is selected, your workflow process will begin. When selected, and you click Done, the system will begin the first step in your workflow process.
- Click Done.
Once you have completed the initial setup of your workflow, you will add your work flow steps, described below.
Add Steps to Your Workflow
- On the Marketing Automation screen, click the Workflow to which you wish to add steps.
- Click the Workflow Steps tab.
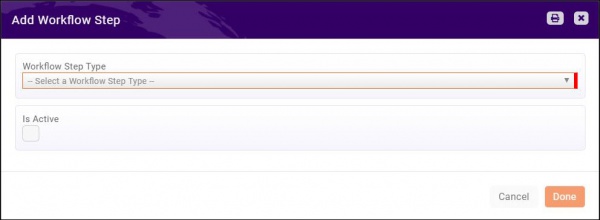
- Click the Add Step button.
- Select the Workflow Step Type from the drop-down list. Additional options will require configuration dependent on the type selected:
- Wait:
- Wait Until:
- Send Email:
- Create Follow Up Reminder:
- Add to List:
- Remove From List:
- Move to List:
- Add Tag:
- Logic Branch:
- Exit Workflow:


