Difference between revisions of "Projects"
Cpetterson (talk | contribs) |
Cpetterson (talk | contribs) |
||
| Line 50: | Line 50: | ||
Project templates can be created for projects that are repeatable, such as New Member On-boarding, Member Acquisition, Events, etc. You can then use these templates and customize them as needed when you create new projects. Creating a template is a two step process (1) Create the template (2) Add tasks to the template. Adding tasks to a template is optional, however, if your project will contain standard repeatable tasks, you can save time by entering them into the template. | Project templates can be created for projects that are repeatable, such as New Member On-boarding, Member Acquisition, Events, etc. You can then use these templates and customize them as needed when you create new projects. Creating a template is a two step process (1) Create the template (2) Add tasks to the template. Adding tasks to a template is optional, however, if your project will contain standard repeatable tasks, you can save time by entering them into the template. | ||
| − | + | ===Create Template=== | |
#Click '''Setup''' in the Navigation Panel. | #Click '''Setup''' in the Navigation Panel. | ||
| Line 61: | Line 61: | ||
#Click '''Done'''. | #Click '''Done'''. | ||
| − | + | ===Add Tasks to Template=== | |
Adding tasks to a template is optional, however, if completing the project entails performing repeatable tasks, you can save time by entering them into the template. | Adding tasks to a template is optional, however, if completing the project entails performing repeatable tasks, you can save time by entering them into the template. | ||
Revision as of 20:43, 14 September 2018
The Project Management module will help you to organize and manage projects from beginning to end. The module can be used to manage your member acquisition, member on-boarding, events, and more. If you have projects that are repeatable (such as member on-boarding) you can create a project template to be re-used, saving you time. Additionally, the project management module allows you to create and monitor individual tasks that you may need outside of an actual project.
Contents
Initial Project Management Setup
Initial setup of your Project Management module allows you to setup default task types, project types, project result types, and project templates. This initial setup will save you time when you are creating projects and/or adding tasks. You will also have the ability to create these items dynamically within the Project Management Module.
Task Types
Task Types allow you to identify common tasks that you will use in your projects. The task types are the selectable, and available for filtering and reporting purposes. If you are creating a member onboarding project, and example of a task type might be "Personal Visit". You can create your task types pro-actively through the Setup options, or you may create them dynamically when creating a new project or task.
- Click Setup on the Navigation Panel.
- Click Task Types in the Projects section. A list of the task types that are currently configured in your system will be displayed.
- Click the Add button.
- Configure the following:
- Name - Provide a name for the task type. This is the name that will display when you are selecting tasks, and will be used for filtering and reporting purposes.
- Description - Provide a description of the task. This will help you in understanding the purpose of the task.
- Cas Color - N/A
- Click the Is Active check-box to activate this task.
- Click Done.
Setup Project Result Types
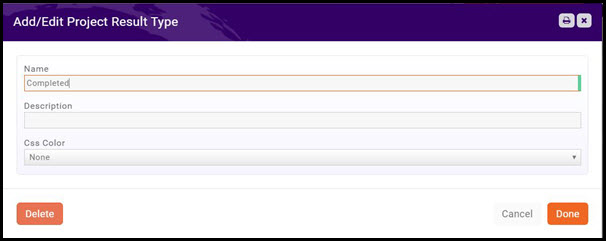
Project Management Result Types allow you to identify expected outcomes for your projects. Examples of result type include: Completed, Cancelled, Acquired, and so on.
- Click Setup in the Navigation Panel.
- Click Project Result Types in the Projects section. A list of the Project Result Types currently configured in your system will be displayed.
- Click the Add button.
- Configure the following settings:
- Name - This is the name that will appear for selection when working on tasks and projects. This will also be used for filtering and reporting.
- Description - Provide a description of the result type.
- Cas Color - N/A.
- Click Done.
Setup Project Types
Project types allow you to group together projects with similar characteristics. Examples of project types include: Event, Membership, Store Merchandising, and so on. You can create Project Types initially, or you can create types dynamically when you are creating projects.
- Click Setup in the Navigation Panel.
- Click Project Project Types in the Projects section. A list of the Project Types currently configured in your system will be displayed.
- Click the Add button.
- Enter a Name for the new project type.
- Click Done.
Setup Project Templates
Project templates can be created for projects that are repeatable, such as New Member On-boarding, Member Acquisition, Events, etc. You can then use these templates and customize them as needed when you create new projects. Creating a template is a two step process (1) Create the template (2) Add tasks to the template. Adding tasks to a template is optional, however, if your project will contain standard repeatable tasks, you can save time by entering them into the template.
Create Template
- Click Setup in the Navigation Panel.
- Click Project Templates in the Projects section. A list of the Project Templates currently configured in your system will be displayed.
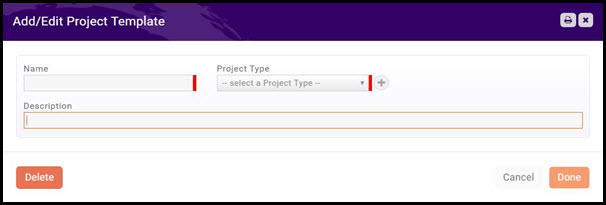
- Click the Add button.
- Enter a Name for the new template.
- Select a Project Type. You can select from the list, or you can click the + button to add a new project type.
- Enter a Description of the template.
- Click Done.
Add Tasks to Template
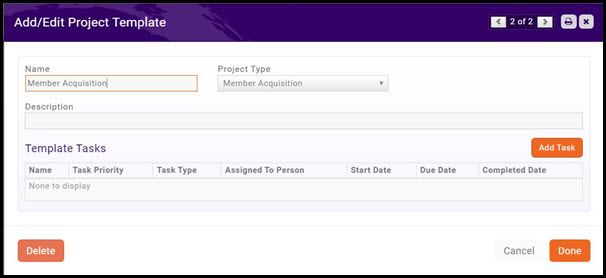
Adding tasks to a template is optional, however, if completing the project entails performing repeatable tasks, you can save time by entering them into the template.
- In the list of project templates, click the template to which you wish to add tasks.
- Click the Add Task button.
Create a New Project
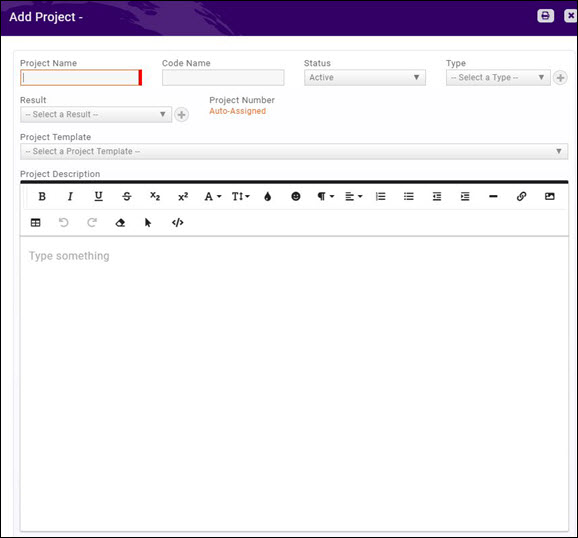
When creating a project, you may either create a project from scratch, or you may use a template. Projects may be created from the Projects/Tasks module, from the Contact module (on the profile tab) or in the events module (on the events tab). To create a project from the Projects/Tasks module:
- Click Projects/Tasks in the left-hand navigation panel.
- Click on the Projects tab, click the Add button.
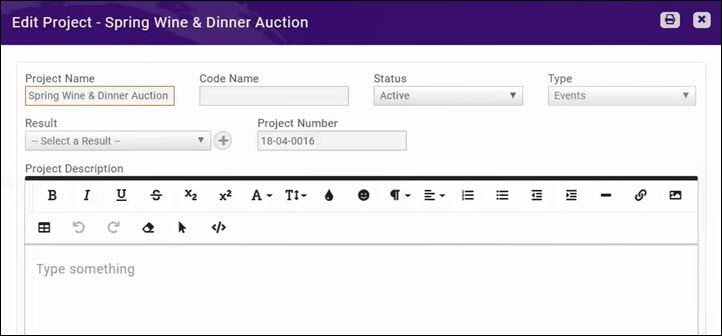
- Configure the following:
- Project Name: Enter a name for the project. Best practice is to provide a name that provides a good understanding of the project.
- Code Name:
- Status: Select Active from the drop-down. Changes to the status of the project may be updated through the lifetime of the project.
- Result: Select the desired result from the drop-down list. This field may be updated through-out the life of the project. For Example, if this is a project for membership acquisition, a result might be "Acquired". If the prospect is not acquired, you may return to the project to change the result.
- Project Template: If you wish to use an existing project template, select it from the drop-down.
- Project Description: Enter a description of the project. This is a good location to document your project scope, etc.
- Custom Fields: If there is additional information you wish to track about this project, click the + sign to add custom fields.
- Start Date: Enter the start date of the project. The system will default to the current date.
- Estimated End Date: Enter the estimated end date of the project.
- End Date: When creating the project, this field should be left blank. You can fill this in once the project has been completed.
- Owner: Select the owner of the project from the drop-down list.
- Project Contacts: If this project is to be tied to a contact in your database, enter the name of the contact. Once the project is save, you will see the project on the contact's profile tab. NOTE: Alternately, the project could have been created directly from the contact's profile tab.
- Categories: Select a category from the drop-down list. Categories make it easy for you to search, filter and report on projects.
- Event: If this project is to be tied to an event, enter the name of the event. Once the project is saved, the project will be displayed on the event's tasks tab.
Add Tasks to New Project
If not using a template to create a project, once the project has been created you will add tasks to it. A task may be a single stand alone task to be performed, or it may have sub-tasks within it.
- Click Projects/Tasks in the left-hand navigation panel.
- Click the desired project from the projects list.
- Once the project is open, click the Tasks tab. A list of all tasks associated to the project will be displayed.
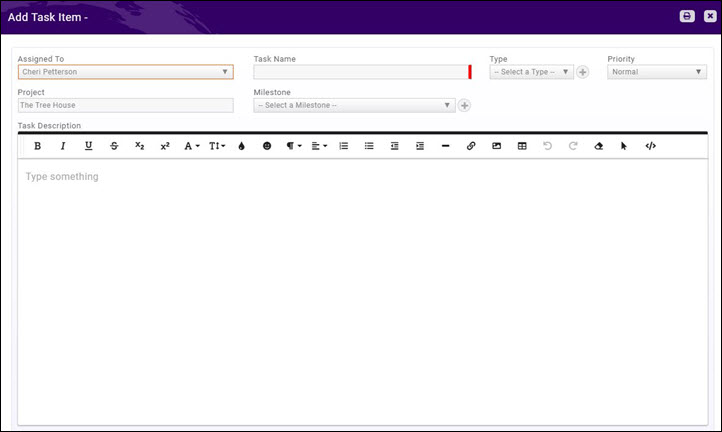
- Click the Add button.
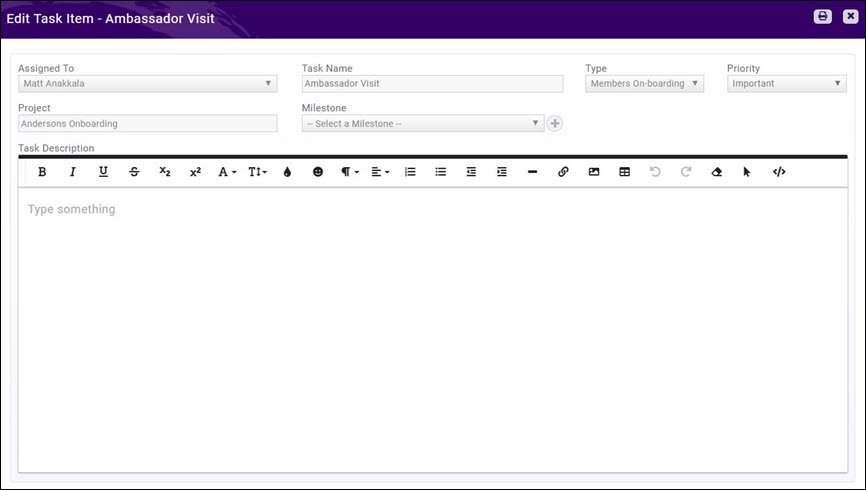
- Configure the following:
- Assigned To: Select the person you wish to assign this task to. Once the task is saved, the person the task has been assigned to will receive the Task Assigned automated email notification.
- Task Type: Select a task type from the list. Task types are a way by which you will be able to report, search and filter tasks. If you wish to add a new task, click the
 icon. For further information on creating task types, see Task Types.
 - Priority: Select the desired priority for this task.
- Project: The name of your project will be displayed.
- Milestone: Select the desired milestone from the drop-down. By using milestones, you can divide the project into specific phases. If you wish to add a new milestone, click the
 icon.
icon. - Task Description: Provide a description of the task.
- Tasks Items: If the task includes sub items, click the
 to add.
- Enter a name for the sub-task. The completed check-box, and completed date should be left blank when you first are creating the task.
- To add additional tasks, click the
 .
. - Status:
- Start Date: Enter the desired start date for this task.
- Due Date: Select the desired due date for this task.
- Estimate Hours: Enter the number of hours that you estimate this task will take to complete.
- Dependent On: If other tasks must be completed in order to complete this task, select the dependent task(s) from the drop-down list. You will not be allowed to mark this task as completely until the dependent tasks have been completed.
- Completed On: This is the date that the dependent task is completed. If this task has been completed, the completed date will be automatically populated.
- Click Done.
Monitoring & Updating Projects
Project Monitoring refers to the process of keeping track of all project-related metrics including team performance and task duration, identifying potential problems and taking corrective actions necessary to ensure that the project is within scope and meets the specified deadlines.
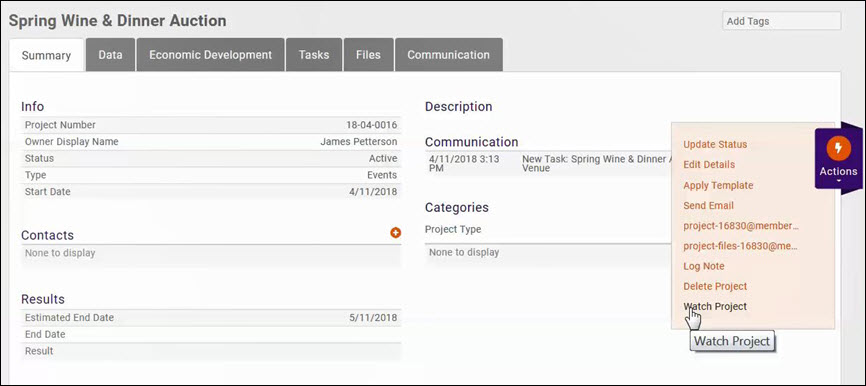
Watch a Project
Staff may watch a project, and be sent notifications when:
- A project they are watching is completed
- When a task is completed for a project they are watching
- Click Projects/Tasks in the left-hand navigation panel.
- On the Projects tab, select the project you wish to update.
- Click the common tasks Action button.
- Click Watch Project.
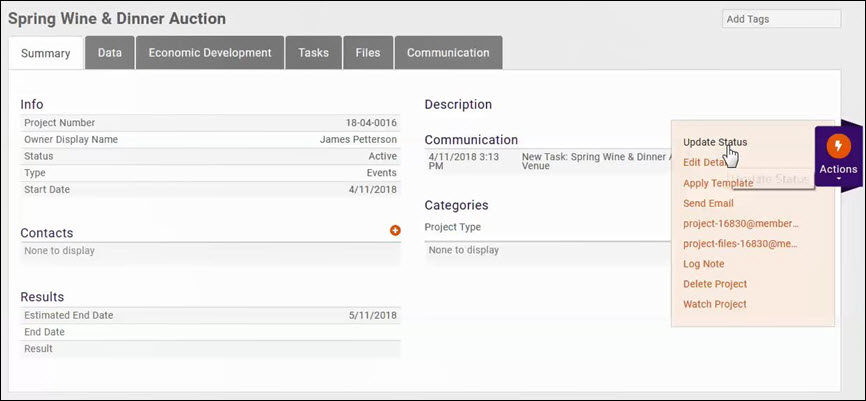
Update the Status of a Project
To update the status, result, and end date of a project:
- Click Projects/Tasks in the left-hand navigation panel.
- On the Projects tab, select the project you wish to update.
- Click the common tasks Action button.
- Click Update Status.
- Update Status as needed.
- Update Result as needed.
- Update End Date as needed.
- Click Done.
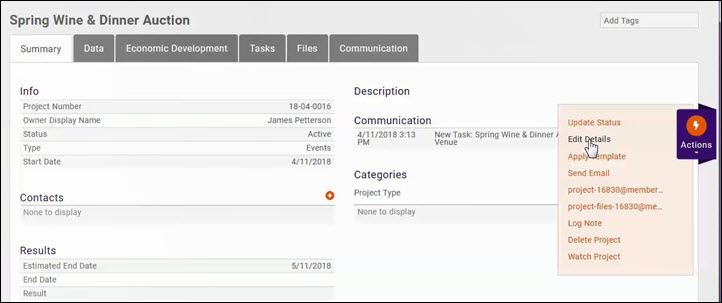
Edit Project Details
To edit project details, such as the description, type, contacts, etc.:
- Click Projects/Tasks in the left-hand navigation panel.
- On the Projects tab, select the project you wish to update.
- Click the common tasks Action button.
- Click Edit Details.
- Edit the desired fields.
- Click Done.
Monitoring/Updating Individual Tasks
Once tasks have been assigned, the staff person to whom the task has been assigned will be sent an email notification. The staff person can view and update tasks in all locations that the tasks are displayed. For example, if an event task has been assigned, the tasks will be displayed on the event tasks tab. Alternately, the staff person can navigate to the Projects/Tasks module:
- Click Projects/Tasks in the left-hand navigation panel.
- Click the Tasks tab.
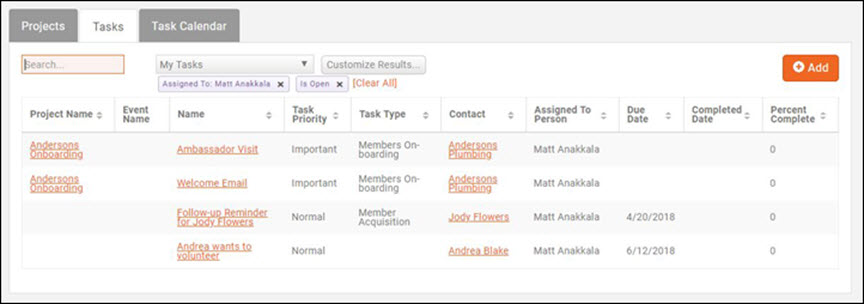
- Filter in the Show Only drop-down list to My Tasks.
The list of tasks displayed is now filtered to the specific staff member. At a glance, the list displays the name of the task, the priority of the task, the due date, percent complete, etc.
Updating Individual Tasks
By updating individual tasks, you can re-assign the task to another staff member, add notes, mark individual sub-tasks as completed,
- Click Projects/Tasks in the left-hand navigation panel.
- Click the Tasks tab.
- Filter in the Show Only drop-down list to My Tasks.
- The list of tasks displayed is now filtered to the specific staff member. At a glance, the list displays the name of the task, the priority of the task, the due date, percent complete, etc.
- Click the link for the task you wish to update.
Re-assign a Task
To re-assign a task, open the task as described above:
- In the Assigned to drop-down list, select the the staff member to whom this task is to be re-assigned.
- Click Done.
An automated email will be sent to the staff member assigned.
Update Task Completion Progress
To update the completion progress of a task:
NOTE: Follow this procedure if there are no sub-tasks associated with the task. If sub-tasks are associated to the task, see ??? for updating completion progress of sub-tasks.
- Open the task, as described above.
- Scroll to the Status section.
- If the task is partially completed, enter the percent completed, or click the check-box to mark the task as completed. The Completed Date will be automatically populated with the current date.
Update Status of Sub-tasks
To update the completion status of Sub-tasks:
- Open the task, as described above.
- Scroll to the Task Items section.
- Click the checkbox for the items that have been completed. The Completed Date will automatically be populated with the current date.
- Click Done.
NOTE: After saving the update, the Percent Complete in the Status section will automatically be updated.
Project Management Reports
Project Started by Quarter
The Project Started by Quarter report allows you to generate a list of all projects started in each quarter of a selected year. The report may be filtered on project status, project categories, and custom filtering options.
- Click Reports in the Navigation Panel
- Select Project Started by Quarter.
- Select your search filtering criteria. For example, if you wish to view only a specific project category, select from the Project Categories drop down list.
- Optional - Enter a Search/Filter query.
- Select Display Options. They system is setup with default fields to display in your report. You may remove fields by clicking on the Fields to Display drop-down arrow. By default, the report will include Q1, Q2, Q3, Q4, Type and total.
- Select Summarize by criteria. This optional field allows you to select how you wish report results grouped. For example, you may choose to group results by project Type.
- Click Run Report.
You can perform the following actions with the report by clicking the down arrow on the Run Report button:
- Export as PDF
- Export as Excel.
- Export Summary as PDF
- Export Summary as Excel
- Email Report
- Add to List - This option will allow you to add the members to an existing list, or create a new list (by clicking the + button on the Add Contacts to list screen). This can help you in sending emails to this group as necessary.
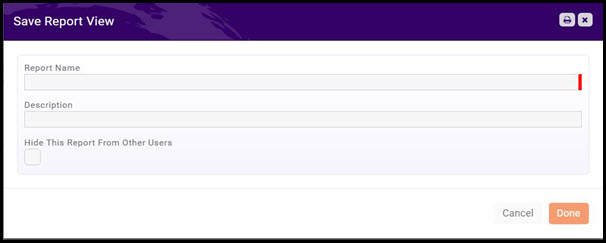
- Save as New Report - If you want to use this report with the same filtering options in the future, you can save the report.
- NOTE: To make this report available to all users, do not select the Hide This Report From Other Users check-box. If selected, the report will only be available to you.
- Add as a Favorite Report - you may save the report as a favorite, then easily identify it when filtering reports in the Reports module. NOTE: This option will not be available if the report has already been saved as a favorite.
Project Summary Report
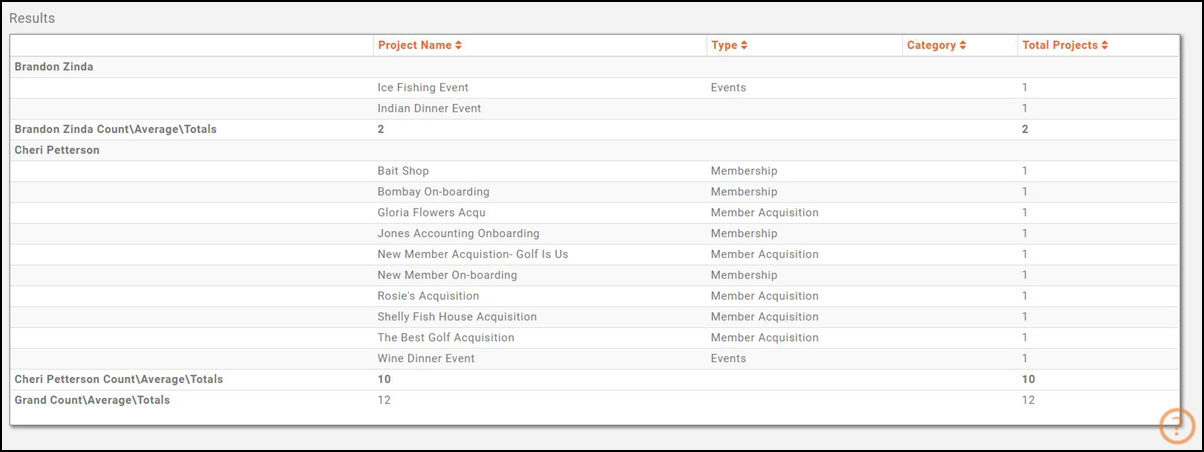
The Project Summary Report allows you to generate a list of some or all projects along with the name of the project owner. The report may be filtered by project status, project type, project start and/or end date, project category, and custom filter criteria. This report can be useful in analyzing the number of open projects, number of projects assigned to an individual, and so on.
- Click Reports in the Navigation Panel
- Select Project Summary Report.
- Select your search filtering criteria. For example, if you are looking for a specific type of project, select a Project Type from the drop-down list.
- Optional - Enter a Search/Filter query. For example, if you are looking for projects assigned to a specific staff member, select Project Owner.
- Select Display Options. They system is setup with default fields to display in your report. You may add or remove fields by clicking on the Fields to Display drop-down arrow. By default, the report will include project name, category, project owner, type, and total projects.
- Select Summarize by criteria. This optional field allows you to select how you wish report results grouped. For example, you may choose to group results by project owner.
- Click Run Report.
You can perform the following actions with the report by clicking the down arrow on the Run Report button:
- Export as PDF
- Export as Excel.
- Export Summary as PDF
- Export Summary as Excel
- Email Report
- Add to List - This option will allow you to add the members to an existing list, or create a new list (by clicking the + button on the Add Contacts to list screen). This can help you in sending emails to this group as necessary.
- Save as New Report - If you want to use this report with the same filtering options in the future, you can save the report.
- NOTE: To make this report available to all users, do not select the Hide This Report From Other Users check-box. If selected, the report will only be available to you.
- Add as a Favorite Report - you may save the report as a favorite, then easily identify it when filtering reports in the Reports module. NOTE: This option will not be available if the report has already been saved as a favorite.
Projects Report
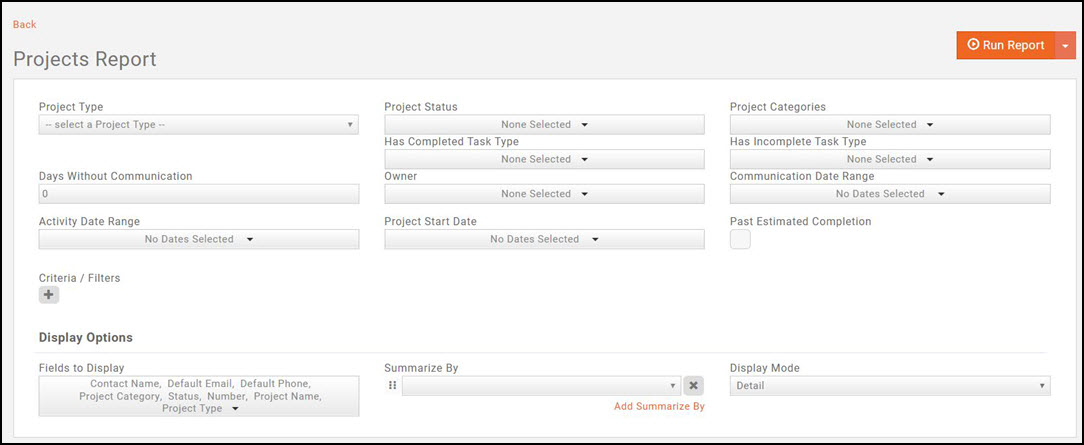
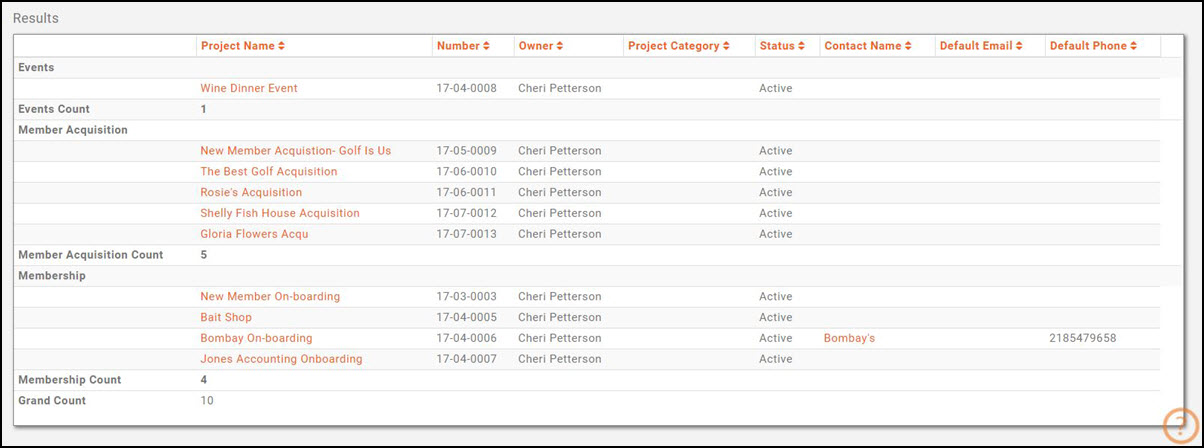
The Projects Report can be used to analyze the status of your current project, for example, project that are past complettion date. The report may be generated based on project type, project status, project category, completed or incompleted tasks, last communication, past estimated completion date, date range, and custom filtering criteria.
- Click Reports in the Navigation Panel
- Select Projects Report.
- Select your search filtering criteria. For example, if you are looking for a specific type of project, select a Project Type from the drop-down list.
- Optional - Enter a Search/Filter query.
- Select Display Options. They system is setup with default fields to display in your report. You may add or remove fields by clicking on the Fields to Display drop-down arrow.
- Select Summarize by criteria. This optional field allows you to select how you wish report results grouped. For example, you may choose to group results by project type.
- Click Run Report.
You can perform the following actions with the report by clicking the down arrow on the Run Report button:
- Export as PDF
- Export as Excel.
- Export Summary as PDF
- Export Summary as Excel
- Email Report
- Add to List - This option will allow you to add the members to an existing list, or create a new list (by clicking the + button on the Add Contacts to list screen). This can help you in sending emails to this group as necessary.
- Save as New Report - If you want to use this report with the same filtering options in the future, you can save the report.
- NOTE: To make this report available to all users, do not select the Hide This Report From Other Users check-box. If selected, the report will only be available to you.
- Add as a Favorite Report - you may save the report as a favorite, then easily identify it when filtering reports in the Reports module. NOTE: This option will not be available if the report has already been saved as a favorite.
Task Report
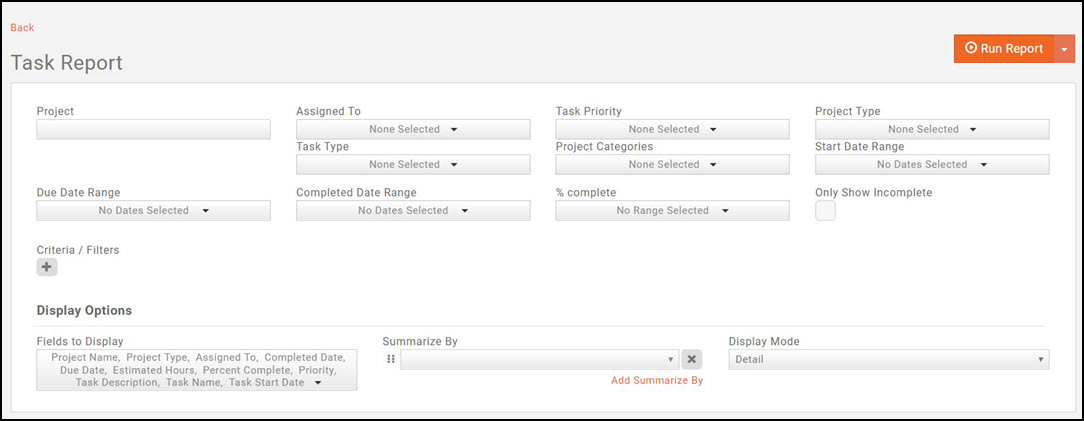
The Task Report allows you to generate a list of all tasks. This report may be useful to identify open tasks, tasks assigned to specific staff members, incomplete tasks, and so on.
- Click Reports in the Navigation Panel
- Select Task Report.
- Select your search filtering criteria. For example, if you are looking for tasks assigned to a specific staff member, select the staff member name from the Assigned to drop-down list.
- Optional - Enter a Search/Filter query. For example, if you wish to view tasks that are estimated to be completed by a certain date, select Estimate End Date.
- Select Display Options. They system is setup with default fields to display in your report. You may add or remove fields by clicking on the Fields to Display drop-down arrow.
- Select Summarize by criteria. This optional field allows you to select how you wish report results grouped. For example, you may choose to group results by Assigned To.
- Click Run Report.
You can perform the following actions with the report by clicking the down arrow on the Run Report button:
- Export as PDF
- Export as Excel.
- Export Summary as PDF
- Export Summary as Excel
- Email Report
- Add to List - This option will allow you to add the members to an existing list, or create a new list (by clicking the + button on the Add Contacts to list screen). This can help you in sending emails to this group as necessary.
- Save as New Report - If you want to use this report with the same filtering options in the future, you can save the report.
- NOTE: To make this report available to all users, do not select the Hide This Report From Other Users check-box. If selected, the report will only be available to you.
- Add as a Favorite Report - you may save the report as a favorite, then easily identify it when filtering reports in the Reports module. NOTE: This option will not be available if the report has already been saved as a favorite.

