Difference between revisions of "Growth Zone Staff App"
Cpetterson (talk | contribs) |
|||
| (5 intermediate revisions by one other user not shown) | |||
| Line 1: | Line 1: | ||
| + | <p style="font-size:30px">NEW!! Find all of your answers in the [https://helpdesk.growthzone.com/kb/article/855-contents-staff-app// GrowthZone Knowledge Base!]</p> | ||
| + | |||
==GrowthZone Staff App Overview== | ==GrowthZone Staff App Overview== | ||
| Line 29: | Line 31: | ||
---- | ---- | ||
| − | The GrowthZone Staff App is available for both Apple and Android devices. Search for “GrowthZone” in the app store. | + | The GrowthZone Staff App is free and is available for both Apple and Android devices. Search for “GrowthZone” in the app store. |
'''Compatibility''': | '''Compatibility''': | ||
| − | :Apple: Requires iOS | + | :Apple: Requires iOS 10.0 or later. Compatible with iPhone, iPad and iPod touch |
:Android: Requires Android 4.4 or greater | :Android: Requires Android 4.4 or greater | ||
| Line 501: | Line 503: | ||
| − | We recommend the follow readers | + | We recommend the follow readers: |
{| class="wikitable" | {| class="wikitable" | ||
| Line 516: | Line 518: | ||
|- | |- | ||
| − | + | ||
| − | |||
| − | |||
| − | |||
|- | |- | ||
| [[File:App Blue Tooth Reader.jpg|200px|center]] || '''ID Tech BTMag Wireless Credit Card Reader''' - This credit card reader uses your mobile device’s Bluetooth feature to wirelessly connect the card reader and your device. This allows for greater flexibility and can solve pesky connection problems where protective cases cause jack-based card readers to not seat correctly. Available for purchase at [https://posguys.com/mobile-card-reader_68/ID-Tech-BTMag_2420/ POSGuys.com]. A micro-B USB charger (common mobile phone charger) is necessary for charging the reader and is not included. '''NOTE''': Credit card readers are non-returnable. This reader currently works only with Apple iOS mobile devices. Please ensure you have an Apple iOS device before ordering this reader. | | [[File:App Blue Tooth Reader.jpg|200px|center]] || '''ID Tech BTMag Wireless Credit Card Reader''' - This credit card reader uses your mobile device’s Bluetooth feature to wirelessly connect the card reader and your device. This allows for greater flexibility and can solve pesky connection problems where protective cases cause jack-based card readers to not seat correctly. Available for purchase at [https://posguys.com/mobile-card-reader_68/ID-Tech-BTMag_2420/ POSGuys.com]. A micro-B USB charger (common mobile phone charger) is necessary for charging the reader and is not included. '''NOTE''': Credit card readers are non-returnable. This reader currently works only with Apple iOS mobile devices. Please ensure you have an Apple iOS device before ordering this reader. | ||
| Line 546: | Line 545: | ||
|- | |- | ||
|IDTech VP3300 BT ||Bluetooth||X||X || Swipe & EMV | |IDTech VP3300 BT ||Bluetooth||X||X || Swipe & EMV | ||
| − | |||
| − | |||
| − | |||
| − | |||
| − | |||
| − | |||
|- | |- | ||
| ID Tech BTMag || Bluetooth || X|| || Swipe | | ID Tech BTMag || Bluetooth || X|| || Swipe | ||
Latest revision as of 12:34, 1 April 2021
NEW!! Find all of your answers in the GrowthZone Knowledge Base!
Contents
- 1 GrowthZone Staff App Overview
- 2 GrowthZone Staff App Compatibility Requirements
- 3 Staff App Navigation
- 4 Using the Staff App for Contact Management
- 4.1 View Contacts with the GrowthZone Staff App
- 4.2 Update Existing Contact Information with the GrowthZone Staff App
- 4.3 Add Additional Contact Information to an Existing Contact using the Staff App
- 4.4 Call a Contact using the Staff App
- 4.5 Email a Contact using the Staff App
- 4.6 Add Contacts with the GrowthZone Staff App
- 4.7 View/Manage a Contact's Membership using the Staff App
- 4.8 View/Manage a Contact's Balance using the Staff App
- 4.9 Manage an Individual Contact's Info Hub Access using the Staff App
- 4.9.1 Assign Info Hub Access and Send Login instructions using the Staff App
- 4.9.2 Change a User's Access Level using the Staff App
- 4.9.3 Change a User's Username using the Staff App
- 4.9.4 Send User Log-in Instruction Email using the Staff App
- 4.9.5 Send User Log-in Instruction Email using the Staff App
- 4.9.6 Manually Reset a User Log-in using the Staff App
- 5 Managing Communications using the Staff App
- 6 Managing Events with the GrowthZone App
- 6.1 Add an Event using the Staff App
- 6.2 Viewing Events in the Staff App
- 6.3 Add Registrations to an Event using the Staff App
- 6.4 Checking in Event Attendees with the GrowthZone Staff App
- 6.5 Accepting Payment for Event Registrations with the GrowthZone App
- 7 Review and Manage Tasks using the Staff App
- 8 Managing Lists/Committees using the Staff App
GrowthZone Staff App Overview
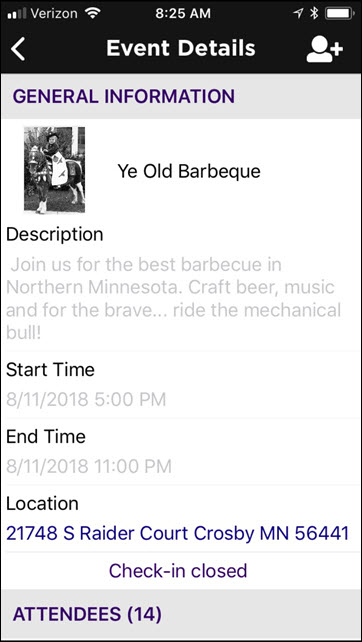
The GrowthZone Staff App is designed to help association/chamber staff accomplish tasks while on the road meeting members or managing an event. It provides great flexibility for staff working with memberships and events, and has the ability to receive payment on site at events. Any work you do in the Staff App, including edits, will be reflected in your database.
The GrowthZone Staff App consists of 4 of modules:
Contacts:
- Allows user to Add/Edit contacts
- Ability to sort contacts
- Scan business cards to add contact to database
- Contact’s information is “clickable” – which means tapping an address opens their location in device’s default map app, their email address opens a new email draft, and a phone number triggers a phone call to start.
Events
- Register and Check users into an event
- Ability to scan QR codes to check people in
- Calendar events can be added to devices default calendar app
Lists/Committees
- View members of lists/committees
- Add members to lists/committees
- Remove members from lists/committees
Tasks
- Ability to view active tasks that are assigned to you on the go
- Ability to mark tasks as completed
GrowthZone Staff App Compatibility Requirements
The GrowthZone Staff App is free and is available for both Apple and Android devices. Search for “GrowthZone” in the app store.
Compatibility:
- Apple: Requires iOS 10.0 or later. Compatible with iPhone, iPad and iPod touch
- Android: Requires Android 4.4 or greater
| IMPORTANT! The GrowthZone Staff app is NOT compatible with Microsoft Surface devices. |
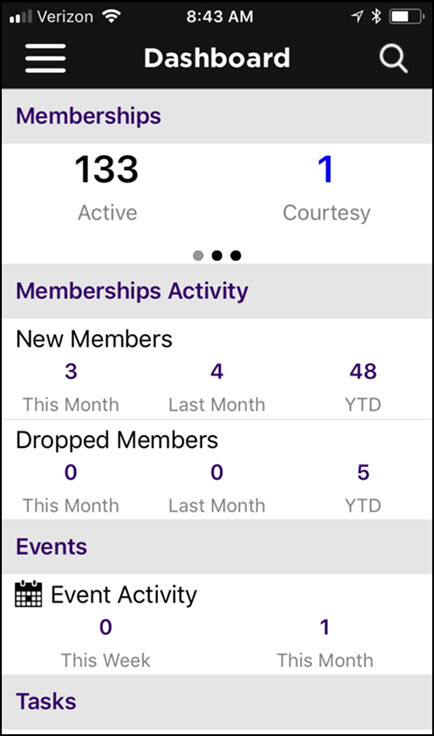
When the Staff App is first launched, your Dashboard will be displayed. The Dashboard provides an at a glance understanding of your Memberships, Events, Tasks and Lists and Committees.
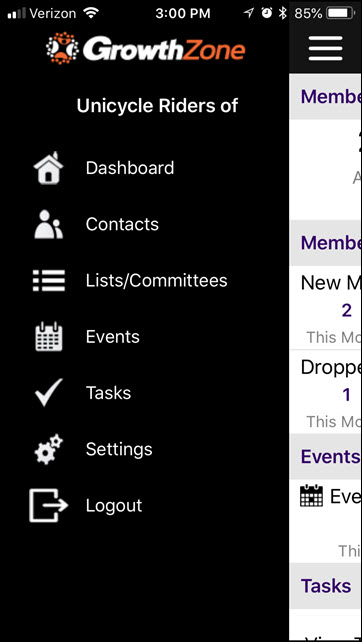
Click the ![]() icon, to view system navigation options.
icon, to view system navigation options.
Using the Staff App for Contact Management
Using the GrowthZone Staff app you can easily view, edit and add contacts to your database.
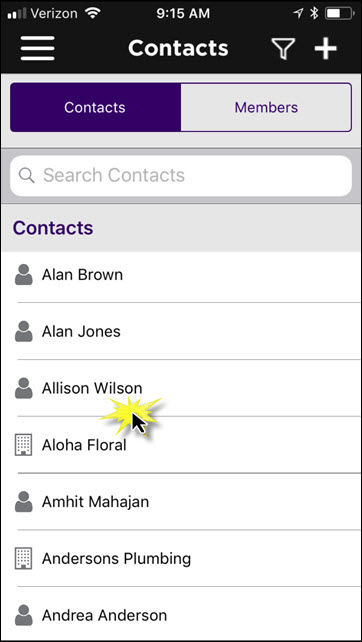
View Contacts with the GrowthZone Staff App
- Click the
 icon.
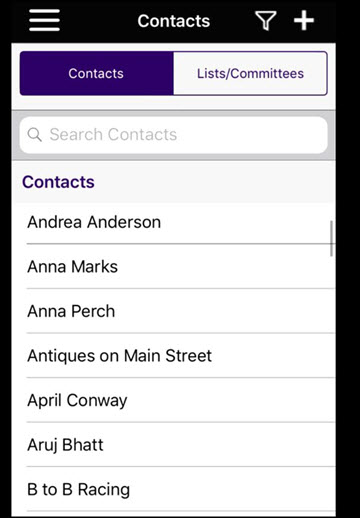
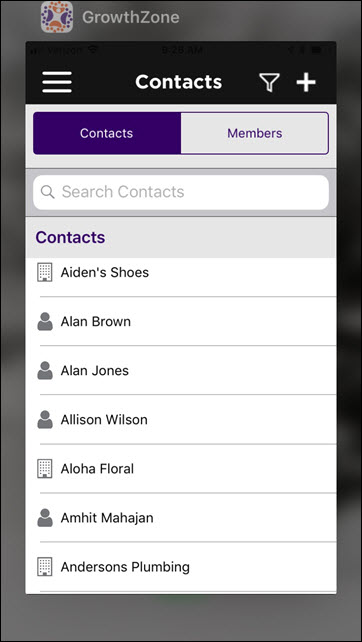
icon. - Select Contacts from the app menu. A list of all contacts in your database will be displayed.
- Scroll through your list of contacts to locate the desired contact, or click the
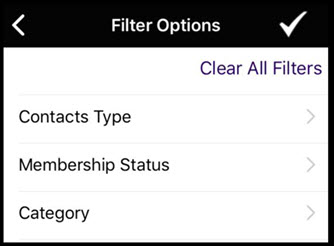
 filter icon to filter the list. The list may be filtered by contact type, membership status and/or category.
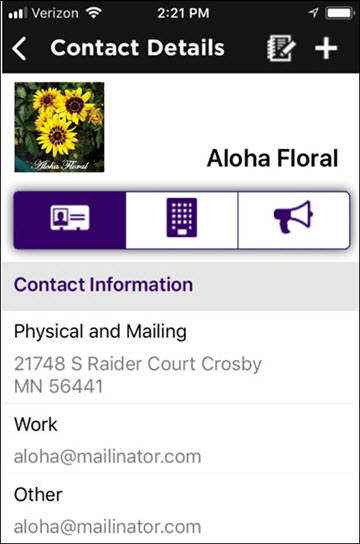
The Contacts module displays three tabs:
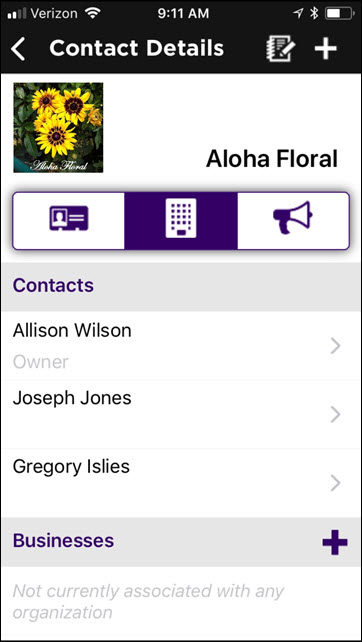
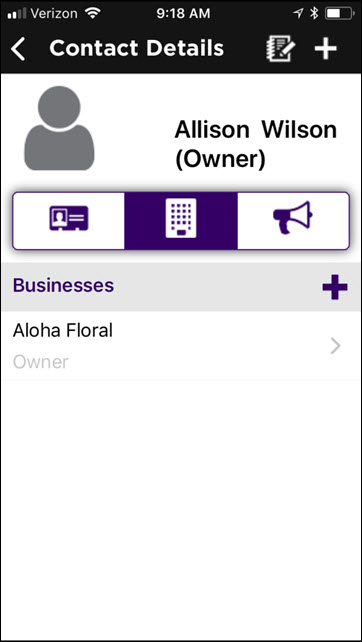
If working with an organization, you can view the individuals related to that organization.
- Click the
 icon.
icon. - Select Contacts from the app menu. A list of all contacts in your database will be displayed.
- Scroll through your list of contacts to locate the desired organization, or click the
 filter icon to filter the list. The list may be filtered by contact type, membership status and/or category.
 - Click the desired contact in the list.
- Click the
 tab.
tab.
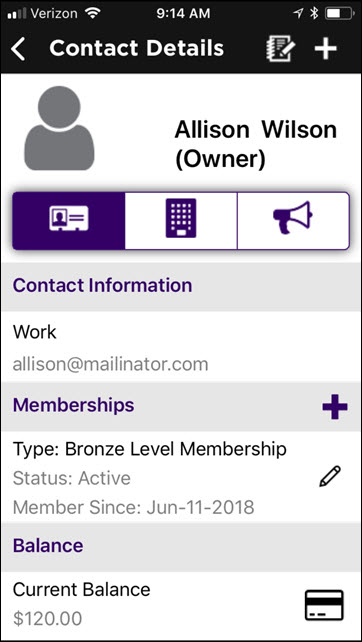
If working with an individual, you can view the organizations related to that individual.
- Click the
 icon.
icon. - Select Contacts from the app menu. A list of all contacts in your database will be displayed.
- Scroll through your list of contacts to locate the desired individual, or click the
 filter icon to filter the list. The list may be filtered by contact type, membership status and/or category.
 - Click the desired individual contact in the list.
- Click the
 tab.
tab.
Update Existing Contact Information with the GrowthZone Staff App
Contact information that currently exists in your database is easily updated using the Staff App.
- Click the
 icon.
icon. - Select Contacts from the app menu. A list of all contacts in your database will be displayed.
- Scroll through your list of contacts to locate the desired contact, or type the name of the contact into the Search Contacts text box.
- Click the desired contact in the list.
- Click the Contact Information that you wish to change:
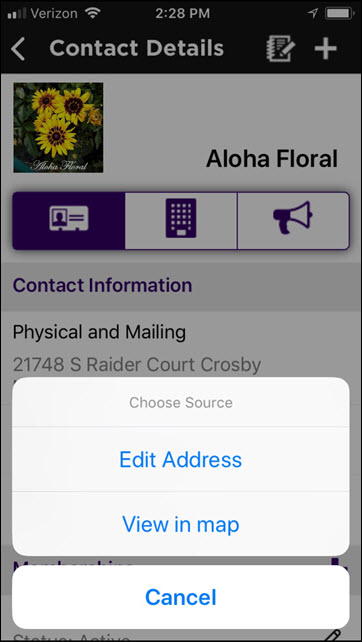
- If you click on an address field, you can choose to update the address OR view the location of the address on a map.
-
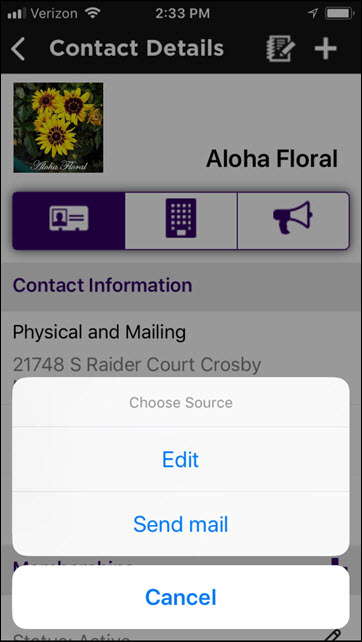
- If you click on an email field, you can choose to update the email address OR send an email.
NOTE: If you wish to add contact information to an existing contact, while on that contact's page, click the ![]() icon.
icon.
Add Additional Contact Information to an Existing Contact using the Staff App
Additional contact information can easily be added to an existing contact using the Staff App.
- Click the
 icon.
icon. - Select Contacts from the app menu. A list of all contacts in your database will be displayed.
- Scroll through your list of contacts to locate the desired contact, or type the name of the contact into the Search Contacts text box.
- Click the desired contact in the list.
- Click the
 icon.
icon.
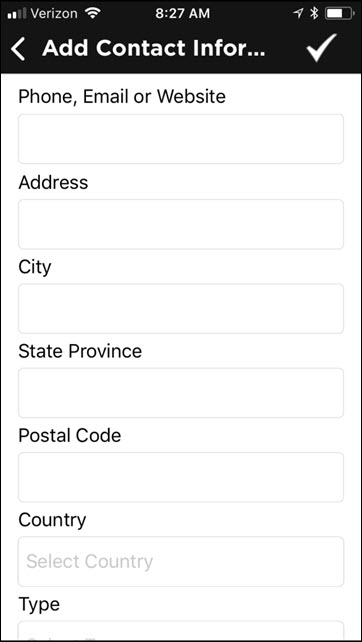
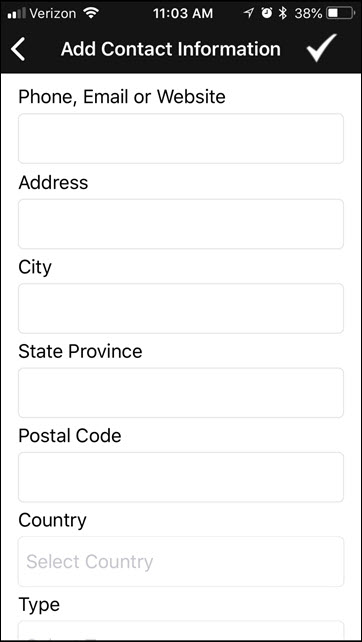
- Enter all the new Contact Information needed.
- Click the
 icon to save changes.
Call a Contact using the Staff App
- Click the
 icon.
icon. - Select Contacts from the app menu. A list of all contacts in your database will be displayed.
- Scroll through your list of contacts to locate the desired contact, or type the name of the contact into the Search Contacts text box.
- Click the desired contact in the list.
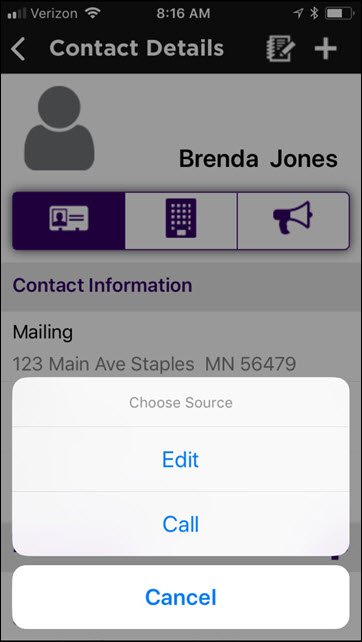
- On the Contact Information tab, click the contact's phone number.
- Click Call.
Email a Contact using the Staff App
- Click the
 icon.
icon. - Select Contacts from the app menu. A list of all contacts in your database will be displayed.
- Scroll through your list of contacts to locate the desired contact, or type the name of the contact into the Search Contacts text box.
- Click the desired contact in the list.
- On the Contact Information tab, click the contact's email address.
- Click Send mail. The New Message screen will be displayed. Compose and send your email.
Add Contacts with the GrowthZone Staff App
Add Contact Manually
- Select Contacts from the app menu.
- From the list of contacts, click the
 icon.
icon.
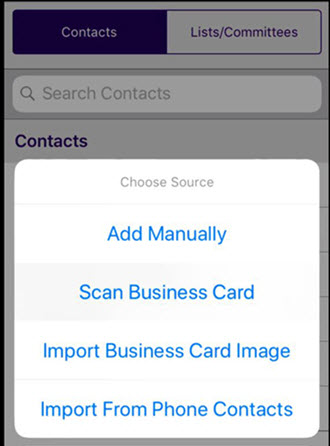
- Click Add Manually.
- Enter the desired contact information, then click the
 icon to save changes.
NOTE: You may also add a Profile Image while adding a contact manually.
Add a Contact by Scanning a Business Card
You can easily add new contacts to the database by just scanning their business card.
- Select Contacts from the app menu.
- Click the
 icon.
icon.
- Click Scan Business Card. The camera on your phone will be enabled.
- Take photo of the business card.
- Click Use Photo or Retake as necessary. When Use Photo is selected, the app will process the photo and and populate the contact information in the appropriate fields.
- Click the
 icon to save the new contact.
Add a Contact by Importing a Business Card Image
This option allows you to select an image of a business card from the photos on your phone.
- Select Contacts from the app menu.
- Click the
 icon.
icon.
- Click Import Business Card Image. The photos on your phone will be available for you to select the desired business card image.
- Select the desired image, the app will process the business card information and populate the appropriate fields.
- Click the
 icon to save the new contact.
Add a Contact by Importing from Phone Contacts
- Select Contacts from the app menu.
- Click the
 icon.
icon.
- Click Import from Phone Contacts. Your phone address book will be displayed.
- Select the contact you wish to add.
- Click the
 icon to save the new contact.
View/Manage a Contact's Membership using the Staff App
Using the staff app, you can easily add a membership to a contact, view an existing member's current membership, as well as drop or delete a membership.
Drop a Membership using the Staff App
- Click the
 icon.
icon. - Select Contacts from the app menu. A list of all contacts in your database will be displayed.
- Scroll through your list of contacts to select the desired contact. Alternately, simply type the name of the contact in the Search Contacts text box.
- On the Contact Information tab, scroll to the Memberships section.
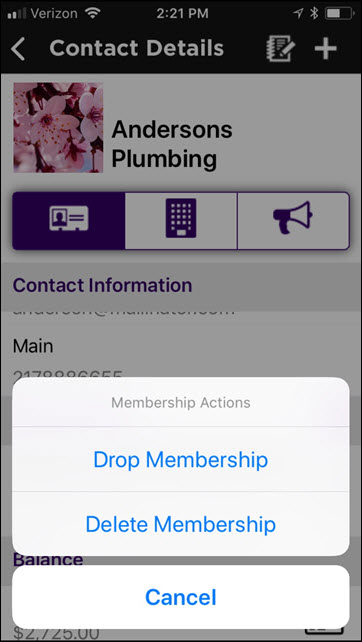
- Click Memberships.
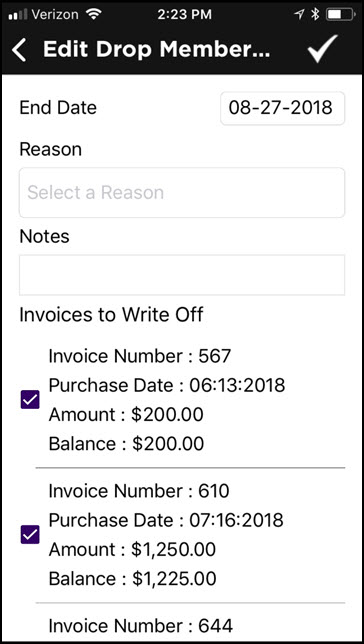
- Click Drop Membership.
- Enter desired drop information. Refer to Drop Membership for details on drop reasons, open invoices, and staff permissions.
- Click the
 icon to complete the drop.
Delete a Membership using the Staff App
- Click the
 icon.
icon. - Select Contacts from the app menu. A list of all contacts in your database will be displayed.
- Scroll through your list of contacts to select the desired contact. Alternately, simply type the name of the contact in the Search Contacts text box.
- On the Contact Information tab, scroll to the Memberships section.
- Click Memberships.
- Click Delete Membership
- Click OK in the confirmation screen.
View a Contact's Membership Recurring Fees Schedule using the Staff App
- Click the
 icon.
icon. - Select Contacts from the app menu. A list of all contacts in your database will be displayed.
- Scroll through your list of contacts to select the desired contact. Alternately, simply type the name of the contact in the Search Contacts text box.
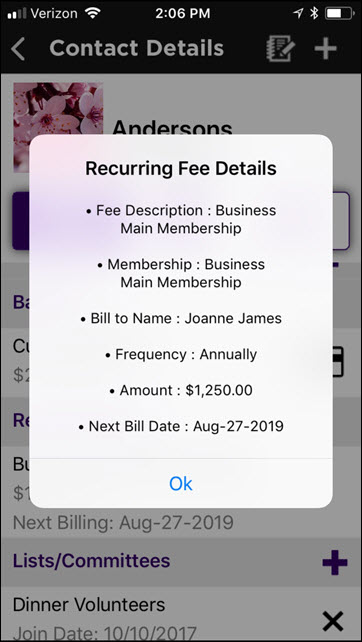
- On the Contact Information tab, scroll to the Recurring Fees section.
- Click on the Membership type listed in the Membership section. If no membership is displayed, this contact does not have an active membership.
- Click OK on the Recurring Fees Details screen to close the screen.
Add a Membership to a Contact using the Staff App
- Click the
 icon.
icon. - Select Contacts from the app menu. A list of all contacts in your database will be displayed.
- Scroll through your list of contacts to select the desired contact. Alternately, simply type the name of the contact in the Search Contacts text box.
- On the Contact Information tab, scroll to the Membership section.
- Click the
 icon.
icon.
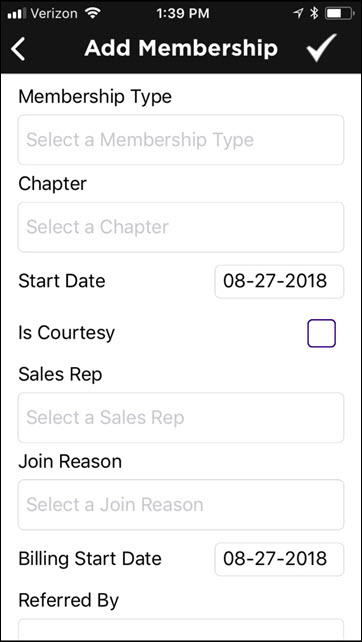
- Click into the Select a Membership Type text box. A list of membership types will be displayed at the bottom of the screen.
- Click the Membership Type you wish to assign, and click Done.
- Configure the following if needed:
- Start Date: The start date will default to the current date. If you wish to change the date, click into the Start Date text box, a list of dates will be displayed at the bottom of the screen. Select the desired date, and click Done.
- Is Courtesy: Select the check-box if this is a courtesy membership.
- Sales Rep: (Optional) If you wish to assign a Sales Rep, click into the Select a Sales Rep text box. A list of your staff will be displayed. Click the desired sales rep, and click Done.
- Join Reason: (Optional) If you wish to assign a Join Reason, click into the Select a Join Reason text box. A list of your join reasons will be displayed. Click the desired join reason, and click Done.
- Billing Start Date: The Billing Start Date will default to the current date. If you wish to change this, click the billing start date text of dates will be displayed. Select the desired date, and click Done.
- Referred By: (Optional) If you wish to enter a referred by contact, begin typing the name of the contact. Type ahead functionality will bring up a list of matching contacts. Click the desired contact.
All settings for the selected membership type will automatically be populated. NOTE: No changes can be made to pricing, etc. for the membership type using the Staff App.
View/Manage a Contact's Balance using the Staff App
Using the staff app, you can easily view a contact's open invoices, and, if using GrowthZone Pay accept credit card payment for open invoices.
View a Contact's Billing Balance/Open Invoices using the Staff App
- Click the
 icon.
icon. - Select Contacts from the app menu. A list of all contacts in your database will be displayed.
- Scroll through your list of contacts to select the desired contact. Alternately, simply type the name of the contact in the Search Contacts text box.
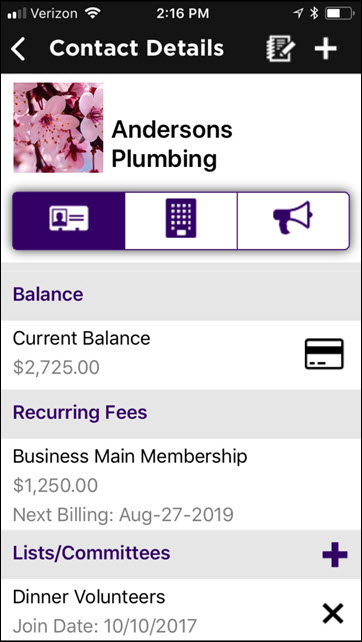
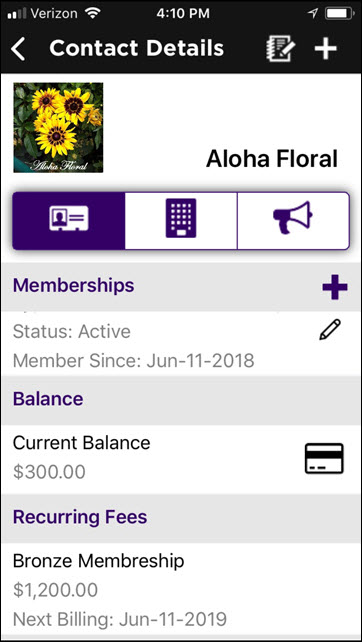
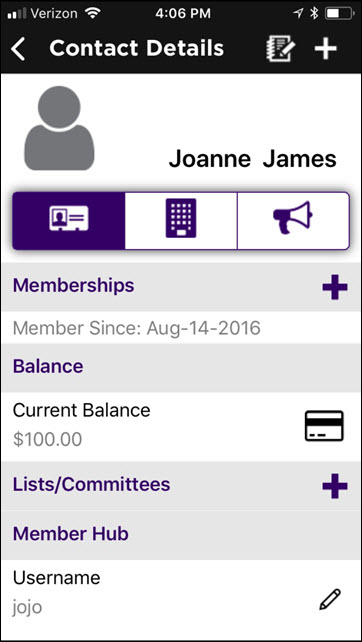
- On the Contact Details tab, the current balance for the contact will be displayed in the Balance section.
- Click the
 icon to view a list of open invoices.
Pay a Contact's Open Invoice(s) using the Staff App
- Click the
 icon.
icon. - Select Contacts from the app menu. A list of all contacts in your database will be displayed.
- Scroll through your list of contacts to select the desired contact. Alternately, simply type the name of the contact in the Search Contacts text box.
- On the Contact Details tab, the current balance for the contact will be displayed in the Balance section.
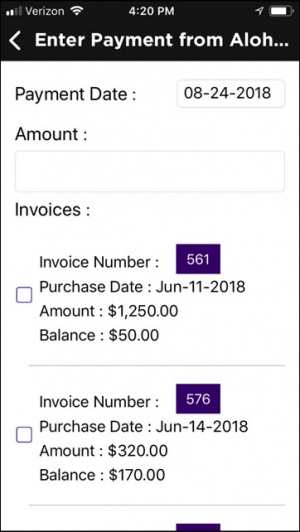
- Click the
 icon to view a list of open invoices.
- Click into the Amount text-box and enter the amount to be paid OR click the check-box(es) for the invoices to be paid. When invoices are selected, the amount of the invoice is automatically populated in the Amount field.
- Click the
 button at the bottom of the screen.
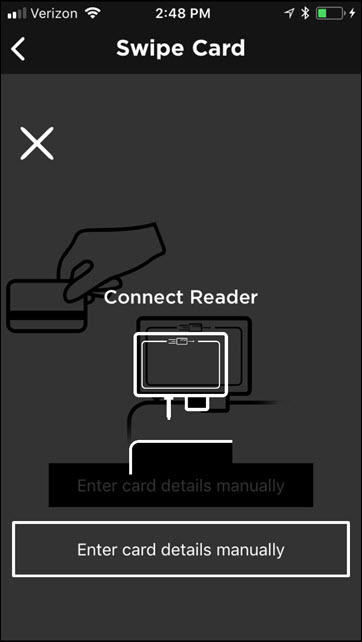
- If not connected, connect your card reader and swipe the card. For information on recommended mobile card readers, see Using Mobile Card Readers with the Staff App.
- OR
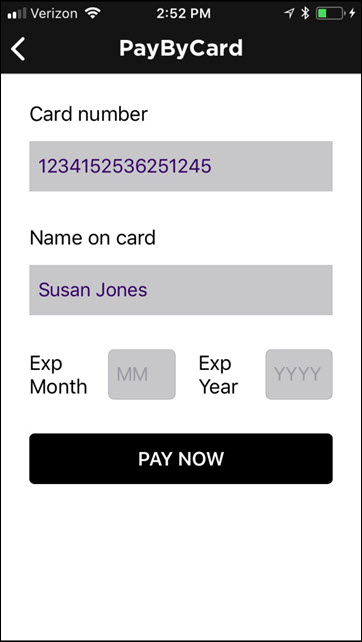
- Click Enter card details manually and enter required credit card information.
- Click Pay now.
Manage an Individual Contact's Info Hub Access using the Staff App
Using the Staff App you can change a user's access level to the Hub, send a user the login instruction email, send a password reset email or manually reset a password.
Assign Info Hub Access and Send Login instructions using the Staff App
If a user does not have access to the Info Hub, you can easily setup access using the Staff App.
- Click the
 icon.
icon. - Select Contacts from the app menu. A list of all contacts in your database will be displayed.
- Scroll through your list of contacts to select the desired contact. Alternately, simply type the name of the contact in the Search Contacts text box.
- Click the desired contact's name in the list.
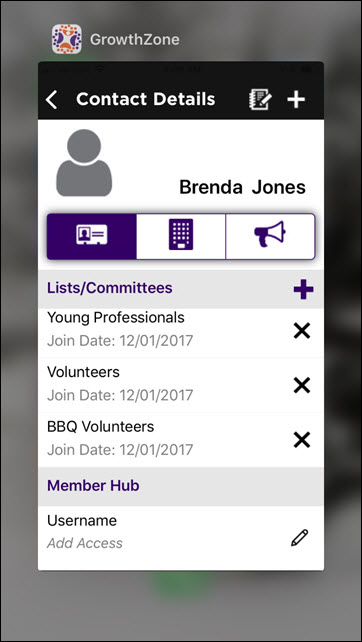
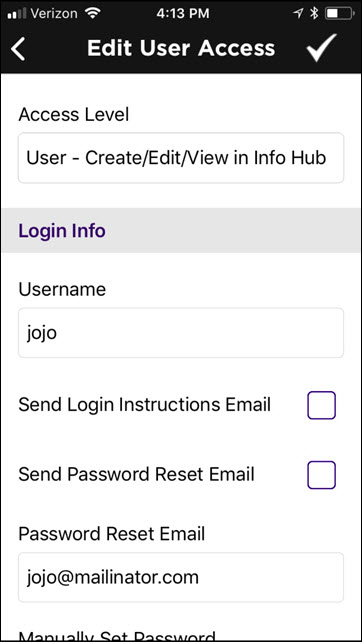
- In the Member Hub section, click the pencil icon next to Add Access. NOTE: if the contact already has access to the Info Hub, a username will be displayed.
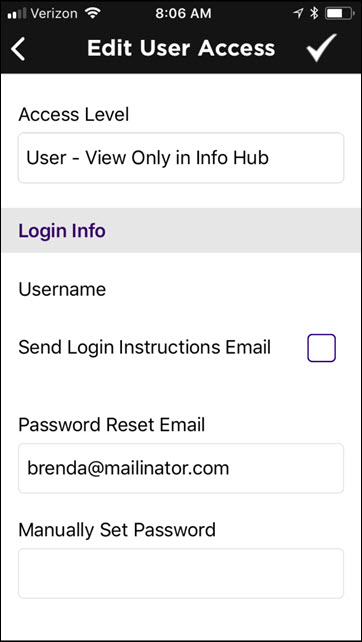
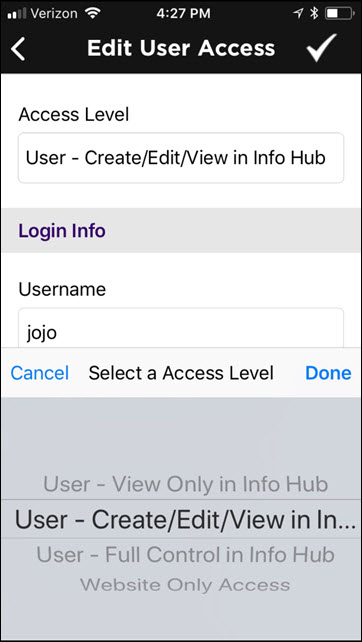
- Click on the current access level displayed in the Access Level text-box. A list of all the access levels you have configured in your system will be displayed, at the bottom of your screen.
- Click the access level you wish to assign.
- Click the Send Login Instructions Email check-box. NOTE: A Password Reset Email must be populated in order for the email to be sent.
- Click the
 icon to save your changes and send the email.
Change a User's Access Level using the Staff App
- Click the
 icon.
icon. - Select Contacts from the app menu. A list of all contacts in your database will be displayed.
- Scroll through your list of contacts to select the desired contact. Alternately, simply type the name of the contact in the Search Contacts text box.
- On the Contact Details tab, scroll to the Member Hub section.
- Click Member Hub.
- Click on the current access level displayed in the Access Level text-box. A list of all the access levels you have configured in your system will be displayed, at the bottom of your screen.
- Click the access level you wish to assign.
- Click Done.
- Click the
 icon to save your changes.
Change a User's Username using the Staff App
- Click the
 icon.
icon. - Select Contacts from the app menu. A list of all contacts in your database will be displayed.
- Scroll through your list of contacts to select the desired contact. Alternately, simply type the name of the contact in the Search Contacts text box.
- On the Contact Details tab, scroll to the Member Hub section.
- Click Member Hub.
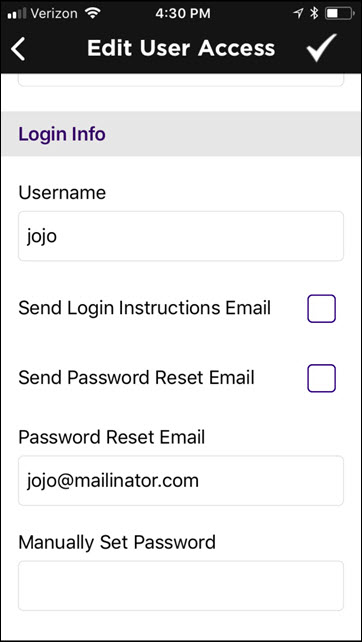
- Type the new user-name in the Username text-box.
- Click the
 icon to save your changes.
Send User Log-in Instruction Email using the Staff App
- Click the
 icon.
icon. - Select Contacts from the app menu. A list of all contacts in your database will be displayed.
- Scroll through your list of contacts to select the desired contact. Alternately, simply type the name of the contact in the Search Contacts text box.
- On the Contact Details tab, scroll to the Member Hub section.
- Click Member Hub.
- Click the Send Login Instructions Email check-box.
- Click the
 icon to send the email.
Send User Log-in Instruction Email using the Staff App
- Click the
 icon.
icon. - Select Contacts from the app menu. A list of all contacts in your database will be displayed.
- Scroll through your list of contacts to select the desired contact. Alternately, simply type the name of the contact in the Search Contacts text box.
- On the Contact Details tab, scroll to the Member Hub section.
- Click Member Hub.
- Click the Send Password Reset Email check-box.
- Click the
 icon to send the email.
Manually Reset a User Log-in using the Staff App
- Click the
 icon.
icon. - Select Contacts from the app menu. A list of all contacts in your database will be displayed.
- Scroll through your list of contacts to select the desired contact. Alternately, simply type the name of the contact in the Search Contacts text box.
- On the Contact Details tab, scroll to the Member Hub section.
- Click Member Hub.
- Enter the new password into the Manually Reset Password text-box.
- Click the
 icon to save the password.
NOTE: The manually set password is temporary. The user will be prompted to change the password after first use.
Managing Communications using the Staff App
Using the staff app, you can review communications, log notes, and send emails to your contacts.
View Communications using the Staff App
- Click the
 icon.
icon. - Select Contacts from the app menu. A list of all contacts in your database will be displayed.
- Click the name of the contact for which you wish to review communications.
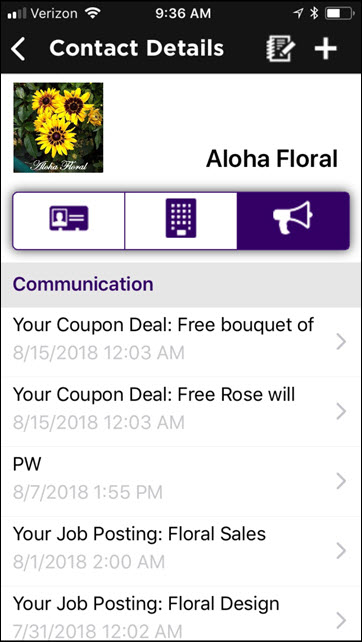
- Click the
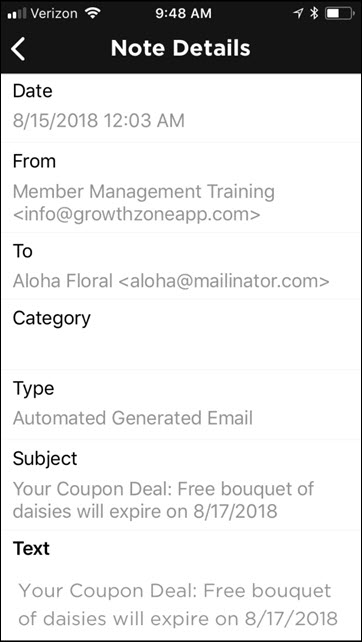
 icon to view the Communications tab. A list of all communications, including emails and notes will be displayed.
- To view further details of a communication, click the communication entry.
Log Notes using the Staff App
- Click the
 icon.
icon. - Select Contacts from the app menu. A list of all contacts in your database will be displayed.
- Click the name of the contact for which you wish to log a note.
- Click the
 icon in the header bar.
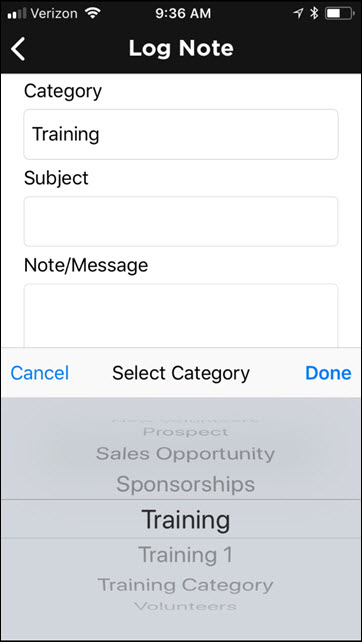
- Select a Category: Click into the category text box. A list of the communications categories you have configured in the database will be displayed at the bottom of the screen. Click the desired category, and click Done.
- Enter the Subject of your note.
- Enter the Note/Message and click Done.
- Click Save to save the note.
Send an eMail using the Staff App
See Email a Contact using the Staff App
Managing Events with the GrowthZone App
Add an Event using the Staff App
- Click Events in the left-hand navigation panel.
- Click the
 in the header bar.
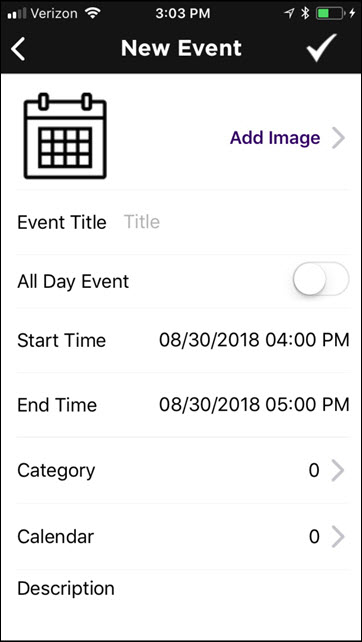
- Enter desired details of the event.
- Click the
 icon to save the event.
Viewing Events in the Staff App
You can easily view and manage events using the Staff App.
- Click Events in the left-hand navigation panel.
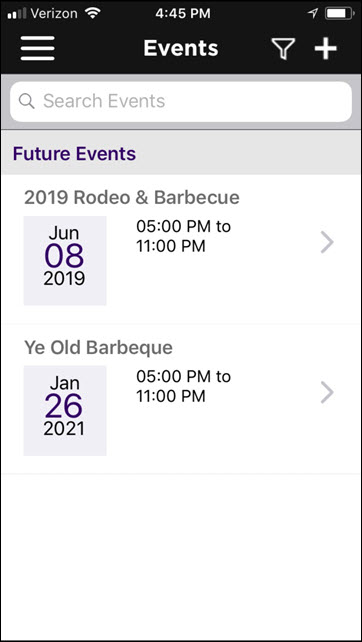
- By default, all future events will be displayed.
- (Optional) Filter events by clicking the
 . Filter options include:
- Status: Approved, Cancelled, Declined, Draft, Pending Approval
- Category: All categories you have configured for events will be displayed for selection
- Calendar: All calendars you have created in the database will be displayed for selection
- Show Only: This option allows you to specify specific dates "ranges" i.e. Future, Today, Last Week, etc.
- NOTE: You can select multiple criteria for filtering options.
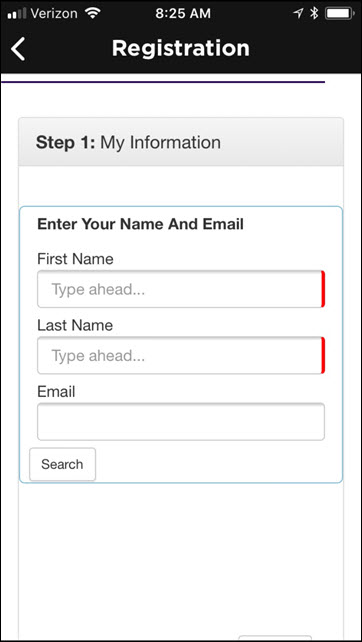
Add Registrations to an Event using the Staff App
Registrations may be entered using the Staff App, and dependent on your settings the registrant may be invoiced, or you can accept credit card payment at the time of registrations.
- Click Events in the left-hand navigation panel.
- Click the event to which you wish to add a registration(s).
- Click the
 . The event registration page will be displayed.
- Enter all required registration information.
- Select Pay by Invoice or enter credit card information (swiping a credit card is not an available option).
- Click Submit.
The registration is now logged in your database, and a confirmation email (if selected) has been sent to the registrant.
Checking in Event Attendees with the GrowthZone Staff App
The GrowthZone Staff App makes it easy for your staff to check-in event attendees. In addition to checking in your attendees, staff will be able to accept payment for open registration invoices, and see the registration type and the additional items the attendee has purchased. NOTE: mobile readers are only compatible with a GrowthZone Pay payment gateway. Click Here for information on recommended mobile readers. NOTE: Check-in for events is only available the day of the event.
Manually Checking in an Event Attendee with the GrowthZone Staff App
- Click Events in the left-hand navigation panel.
- Click the
 to select Today as your filter for events.
 - Select the desired event from the list.
- In the Attendees section, click the check-box next to the attendee you wish to check-in.
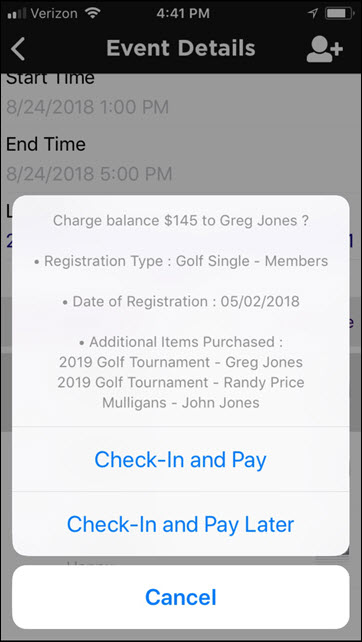
- If the attendee has a balance due, the dollar bill icon will be displayed. When you select to check this attendee in, you will be prompted to Check-In And Pay or Check-in and Pay Later. If you select Check-in And Pay you will be prompted to swipe a credit card (or manually enter the card). For information on recommended mobile card readers, see Using Mobile Card Readers with the Staff App. If the attendee is paying by check, or is not ready to pay, you can select Check-in and Pay Later.
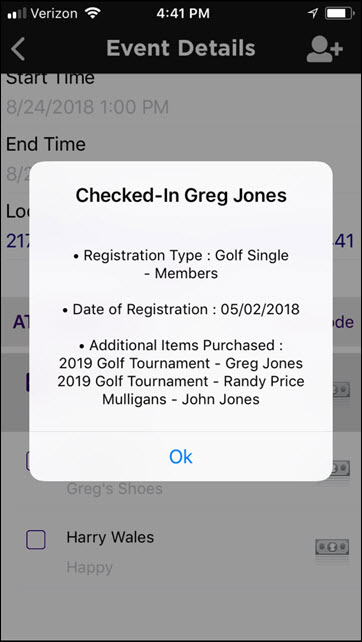
- If the attendee does not have a balance due, the attendees registration information will be displayed (along with a list of any additional purchases made).
- Click Check-in to check the attendee in.
The attendee will be checked in and your database will be updated appropriately with attendance, payment made, or balance due.
Using Mobile Readers with the Staff App
| IMPORTANT: The use of Mobile Readers for processing payments is ONLY available for those using GrowthZone Pay for credit card processing. Click here to see more information about GrowthZone Pay. |
We recommend the follow readers:
| Mobile Reader | Description |
|---|---|
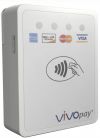
| Recommended!!! When your mobile devices have a bluetooth connection, we recommend you purchase the VP3300 BT Model #IDMR-BT93133A. See the product data sheet here.
You may purchase the reader anywhere you prefer. However, distributor, IDScan.net, has given a reduced price and free shipping for USPS ground shipping in the continental US.
| |
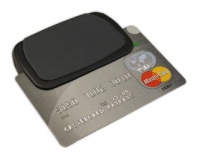
| ID Tech BTMag Wireless Credit Card Reader - This credit card reader uses your mobile device’s Bluetooth feature to wirelessly connect the card reader and your device. This allows for greater flexibility and can solve pesky connection problems where protective cases cause jack-based card readers to not seat correctly. Available for purchase at POSGuys.com. A micro-B USB charger (common mobile phone charger) is necessary for charging the reader and is not included. NOTE: Credit card readers are non-returnable. This reader currently works only with Apple iOS mobile devices. Please ensure you have an Apple iOS device before ordering this reader.
BLUE TOOTH SETUP: Before attempting to setup your card reader, please ensure it is fully charged. Charging is complete when the LED indicator stops flashing red.
The reader should now show as “Connected” on your device and the LED indicator on the reader should be blue. If you have difficulties pairing, please restart or power off/on your devices and try again. USE Once paired, you will be able to use the reader from the normal payment screens within the app.
|
Mobile Reader Compatibility at a Glance
| Product | Connection | Compatible w/ iOS | Compatible w/ Android | Payment Methods |
|---|---|---|---|---|
| IDTech VP3300 BT | Bluetooth | X | X | Swipe & EMV |
| ID Tech BTMag | Bluetooth | X | Swipe |
Important:
- Only readers without manufacturer key-injection are compatible with GrowthZone/ChamberMaster Apps.
- Card readers are not specific to a mobile OS version but the apps are. Please ensure the app itself is compatible with your device before purchasing a card reader.
Pairing the VP3300BT
- Make sure Bluetooth is turned on, on your mobile device. You should see the little Bluetooth symbol at the top of your phone’s screen. If you don’t, go into the settings to enable it.
- IMPORTANT With Android devices, the IDTech VP3300 BT must be paired with their mobile devices when NOT plugged in. It must only be using the bluetooth connection when the pairing occurs. After that, the reader can be plugged into a USB connection if desired (which would be the case if you were charging the device).
- VP3300BT will stay connected to the host indefinitely (via Bluetooth) if powered via the USB cable. If the unit is operating on battery power, it will go to sleep after 20 seconds of idling, to extend battery life. To perform a transaction again, simply press down on the Bluetooth function button to re-establish the Bluetooth connection.
Processing a Card with VP3300BT and IOS Device
Connecting the Device
- Ensure that your Bluetooth is turned on for your IOS Device.
- Turn on the power on the card reader.
| NOTE: You do NOT need to pair your IOS Device to the Card Reader prior to use. You will connect the reader during the checkout process. |
Processing the Card
| NOTE: The reader must be powered on in order to process cards. A slow blinking blue light will indicate that the reader can be connected to. The device is set to go to sleep after 20 seconds, if connected only via Bluetooth. You simply need to press the start power button on the left side of the device to wake it up when you need to use it. If you wish to keep the device from going to sleep, connect the USB cable to the device after it has been paired. Pairing must happen when disconnected to the USB cable; then you can connect to the USB. The USB cable connects to any device with a USB connection such as a laptop or a USB charging cord. |
- Select the invoice that you wish to pay. You can use the card reader to pay for contact's open invoices as well as event registration invoices.
- Proceed to check-out, to reach the “Payment by Card Reader” screen.
- On the Payment by Card Reader screen, if the reader is available, the App will look for it to connect. NOTE: If you do not see Looking for card reader… then, click Check for Reader Now and then choose VP3300BT when prompted.
- If necessary, wake up the card reader by clicking the power button on the left side of the device. The blue light will begin a fast blink when it has connected to your IOS device.
- Click Swipe/Tap Card or Insert Card. NOTE: Tap Card refers to ApplePay / GooglePay. This is a feature that is not yet available. Swipe or Insert are the only choices at this time.
- Swipe or Insert the Credit Card. NOTE: When swiping a card, you will hear a loud beep indicating that the card has been read. When inserting a card, the yellow led light will come on while the card is being read.
- If the card is successfully read the green led light will turn on temporarily (you may not see this light, but an indication that the card was read successfully will be displayed in the App.). Click Submit Payment in the App.
- If the card can’t be read or the transaction fails, the red light will come on. An indication will be displayed in the App.
LED Indicators
| Color | Description |
|---|---|
| Blue |
|
| Yellow |
|
| Red |
|
| Green |
|
Processing a Card with VP3300BT an Android Device
Connecting the device
- Ensure that your Bluetooth is turned on for your Android Device.
- Turn on the power on the card reader.
- Follow Android instructions for pairing the card reader with your Android device. NOTE: You MUST pair prior to processing payments. Once paired, you will see the blue light flashing quickly. Leave the Reader unplugged after pairing and ensure that the blue light is no longer flashing before connecting to the app during checkout.
- Optional: After pairing, you can test connecting your device to the reader by tapping Settings > Card Reader Status in the app. Tap “VP3300BT” when prompted. Then press the power button on the Bluetooth reader. If successful, the reader will display a green light for 2 seconds and in the App the Card Reader Status will display “Connected”.
Processing the Card
| NOTE: The reader must be powered on in order to process cards. A slow blinking blue light will indicate that the reader can be connected to. The device is set to go to sleep after 20 seconds, if connected only via Bluetooth. You simply need to press the start power button on the left side of the device to wake it up when you need to use it. If you wish to keep the device from going to sleep, connect the USB cable to the device after it has been paired. Pairing must happen when disconnected to the USB cable; then you can connect to the USB. The USB cable connects to any device with a USB connection such as a laptop or a USB charging cord. |
- Select the invoice that you wish to pay. You can use the card reader to pay for contact's open invoices as well as event registration invoices.
- Proceed to check-out (this will vary dependent on the type of sale: POS item vs. Event Registration), to reach the “Payment by Card Reader” screen.
- Once you reach the Payment by Reader screen, power up the reader by clicking the button on the left-hand side. The blue LED will display a fast blink when connected.
- Once connected, the App will display options to swipe, insert or manually enter card. Click the option you will use. NOTE: “Tap Card” refers to ApplePay / GooglePay a feature that is not yet available. Swipe or Insert are the only choices at this time.
- If the card is read successfully, confirmation will be displayed in the App. Click Submit Payment Now.
- If the card can’t be read or the transaction fails, the red light will come on. An indication will be displayed in the App.
LED Indicators
| Color | Description |
|---|---|
| Blue |
|
| Yellow |
|
| Red |
|
| Green |
|
Do you have any tips on making sure my blue tooth mobile device and the VP3300BT are able to pair with each other?
- Make sure the two devices are in close enough proximity to one another. While you wouldn’t think someone might try to pair an iPad with a keyboard if the two weren’t sitting right next to each other, it’s probably worth noting that you should make sure any devices you're trying to pair are within five feet of one other.
- Power the devices off and back on. A soft reset sometimes can resolve an issue. With phones, an easy way to do this is by going into and out of airplane mode.
- Remove old Bluetooth connections. If you're having trouble pairing your phone with the reader, it could be because the you phone is trying to connect to an old device. Some older devices are very simple. They just try to connect with the last thing they paired with. If a Bluetooth device was previously paired with something else, turn off that other gadget. And if you are no longer planning on using that other gadget, unpair it from your Bluetooth device to prevent future issues. In iOS settings, you can remove a device by tapping on its name and then Forget this Device. In Android settings, tap on a device’s name, then Unpair. After removing a device, start at step 1 above. You can also reset Bluetooth on devices that can pair to more than one device. This clears all pairings from the device so you can start fresh. Search "reset" device name to instructions from the manufacturer.
- Charge up both devices you're trying to pair. Some devices have smart power management that may turn off Bluetooth if the battery level is too low.
- Delete a device from a phone and rediscover it. If your phone sees a device but isn’t receiving data from it, sometimes it helps to start from scratch. In iOS settings, you can remove a device by tapping on its name and then Forget this Device. In Android settings, tap on a device’s name, then Unpair. After removing a device, start at step 1 above.
- Move away from the Wi-Fi router. Another potential obstacle to successful pairing is interference from devices that use the same spectrum, such as your Wi-Fi router. Wi-Fi has been designed to cope with this, but it might not be a good idea to have your devices directly on top of the router.
- Move away from a USB 3.0 port. Interference from USB 3.0 is also possible. Newer laptops, for example, often have the higher-speed USB 3.0 port, so if the connection isn't happening, try pairing your Bluetooth gadgets away from the computer.
- Make sure the devices you want to pair are designed to connect with each other. Whether it’s a headset, speaker, mouse, keyboard, camera or something else, your device has a specific profile that spells out what it can connect with. If you’re not sure, check the user manual.
- Update the hardware’s firmware. If you’re not sure how to get the latest firmware for your hardware, check with the device manufacturer.
- Limit data shared between devices. Android and Windows devices let you choose the information you share between devices. So, for instance, you can choose to share phone audio, media audio, contacts and text messages with your car. If you don't need to share all of the data, deselecting one or more of the types of information may enable the devices to pair. For Android devices, go to Settings > Bluetooth and select the device. If there are options to select, they will appear. For Windows, go to Control Panel > Hardware and Sound > Devices and Printers and right click on the Bluetooth device in question. Then select the Services tab to choose which types of information to share.
- Clear the Bluetooth cache (Android only). Sometimes apps will interfere with Bluetooth operation and clearing the cache can solve the problem. Go Settings > Backup and restart > Reset network settings.
VP3300BT FAQ's
- Does it matter what mobile device I use as along as the device supports bluetooth? You can use any device that supports bluetooth. The VP3300 works with all blue tooth devices including the BLE (BlueTooth Low Energy).
- Is there a warranty on my VP3300BT device? The warranty on the VP3300Bt is one year from the date of purchase with IDTech. If there are hardware troubles, you should contact IDTech directly to troubleshoot. To check the warranty status, you will need the model, or P/N and the S/N.
Scanning QR Codes for Event Check-in
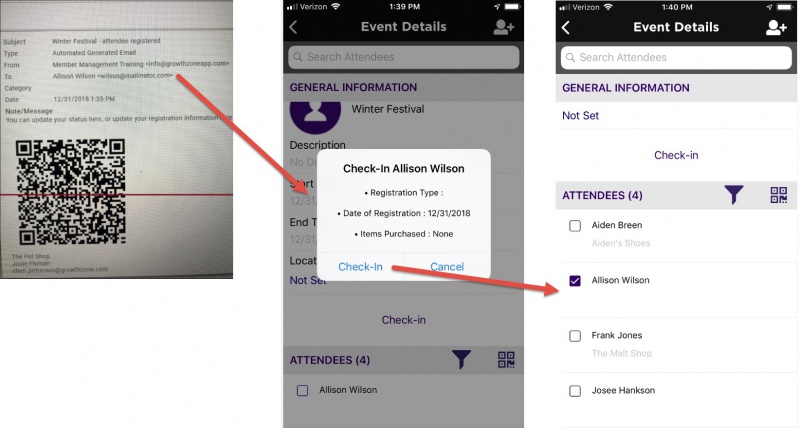
You may choose to check in attendees using the QR codes that are included in event confirmation emails.
| NOTE: Check-in using the Staff App is available the day of the event only. |
- Click Events in the left-hand navigation panel.
- Click the
 to select Today as your filter for events.
 - Select the desired event from the list.
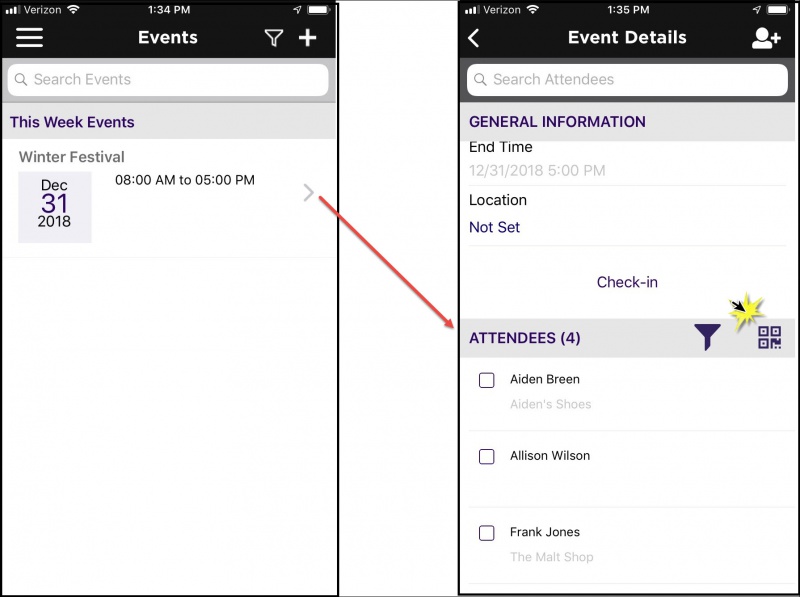
- In the Attendees section, click the Scan QR Code link

- Align your phone with the QR code. The QR code will be automatically scanned.
Accepting Payment for Event Registrations with the GrowthZone App
If an attendee has an open invoice, you can accept a credit card payment for that invoice when you check the member in. See Checking in Event Attendees with the GrowthZone Staff App for instructions on accepting a credit card payment for registration.
If you are registering a new attendee, using the Staff App, you can process a credit card payment for the registration fees at the same time. See Add Registrations to an Event using the Staff App. NOTE: When adding a registration via the staff app, you must manually enter the credit card information. Swiping a credit card is not an available option.
Review and Manage Tasks using the Staff App
View Tasks using the Staff App
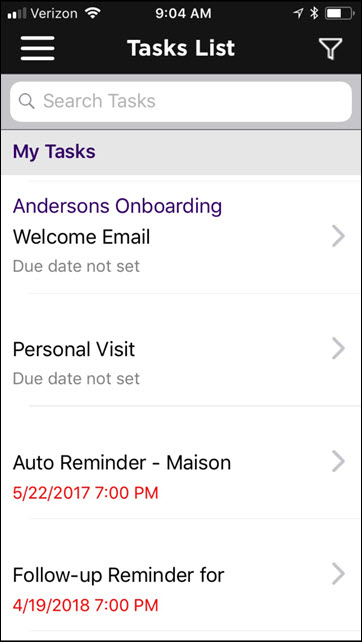
Using the staff app, you have the ability to review tasks assigned to you as well as others. Additionally, you can filter the tasks based on whether they are overdue, open, or have a due date.
- Click Tasks in the left-hand navigation panel.
- By default, the task list will display tasked assigned to the user that is logged in. You can search for a task by entering the task name in the Search Tasks text box, or filter the task list as described below.
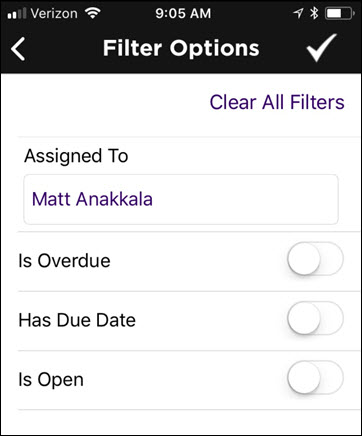
- Filter the task list as needed. Click the
 icon. Filtering options include by staff member, is over-due, has due-date or is open.
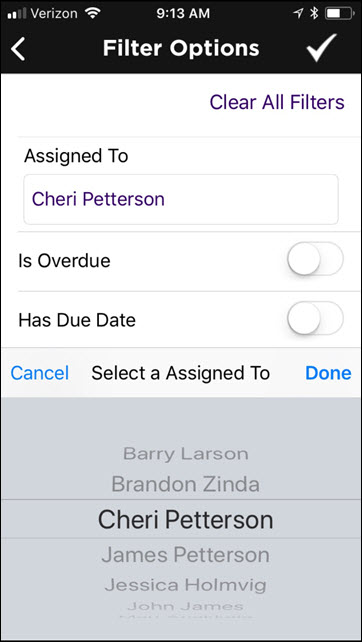
- Select desired filtering options. If you wish to view tasks for a different staff member:
- Click the name in the Assigned To text-box. A list of staff members will be displayed at the bottom of the screen.
- Select the desired staff member from the list, and click Done.
- Once you have selected all desired filtering options, click the
 icon to apply the filters.
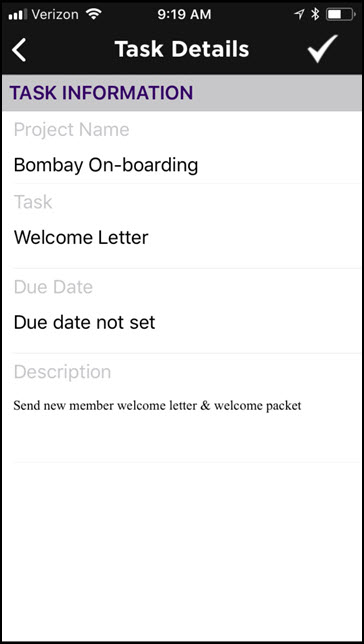
 - To view the details of a task, click the task name in the task list.
NOTE: Tasks are read-only in the Staff App. No changes may be made to task name, due date or description.
Mark Tasks Completed using the Staff App
- Click Tasks in the left-hand navigation panel.
- For the task that you wish to mark as completed, click the task name in the task list.
- Click the
 icon.
icon.
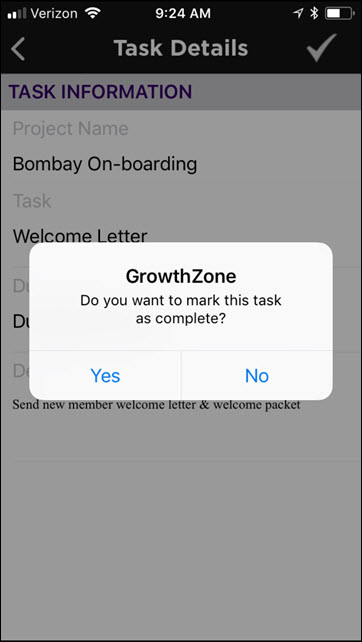
- Click Yes. The task is now marked as completed, and the change will be reflected in the database.
Managing Lists/Committees using the Staff App
Using the Staff App, you can easily view all of the contacts in a list/committee, add contacts to a list/committee and remove contacts from lists/committees.
View List/Committee Roster using the Staff App
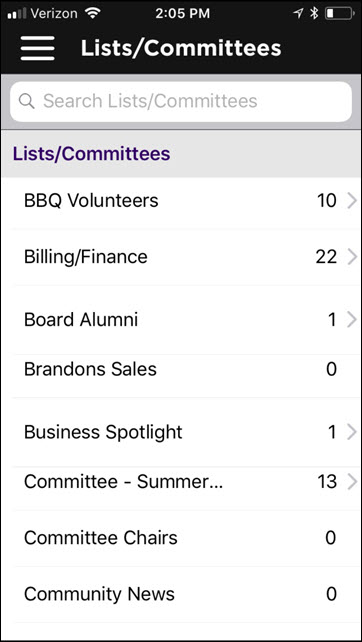
- Click Lists/Committees in the left-hand navigation panel.
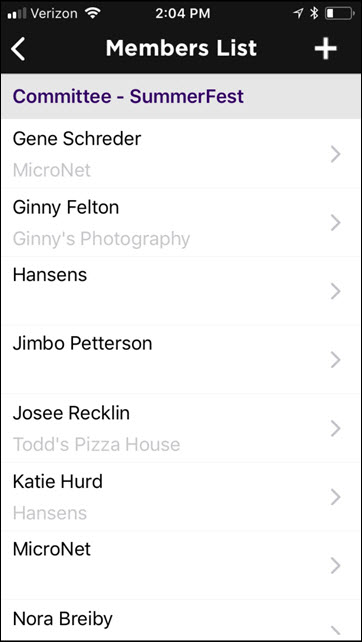
- Click the list/committee for which you wish to see the roster.
To view further details of a contact, click the > next to the contact name. The Contact Details screen will be displayed.
Remove Contact from List/Committee Roster using the Staff App
- Click Lists/Committees in the left-hand navigation panel.
- Click the list/committee to view the roster.
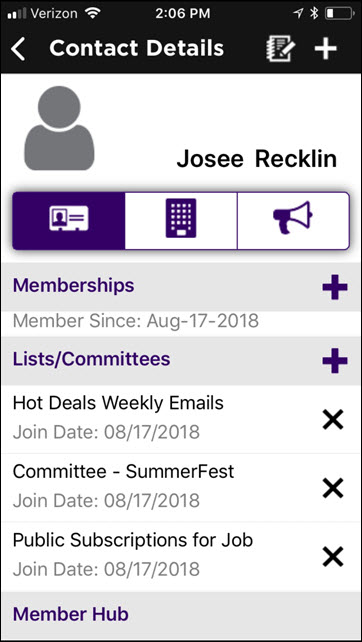
- Click the name of the contact to be removed from the list/committee. The Contacts Details page will be displayed.
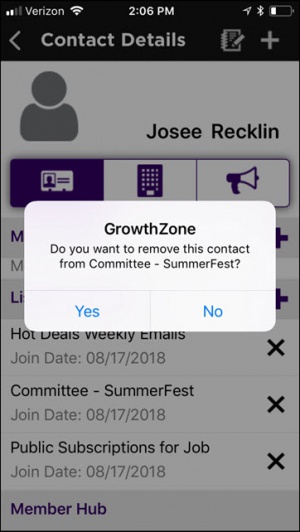
- In the Lists/Committees section, click the
 next to the group from which the contact is to be removed.
- Click OK.
NOTE: You can also go directly to a contact, via the Contacts module, to remove a contact from a list.
Add a Contact to a List/Committee using the Staff App
- Click Lists/Committees in the left-hand navigation panel.
- Click the list/committee for which you wish to see the roster.
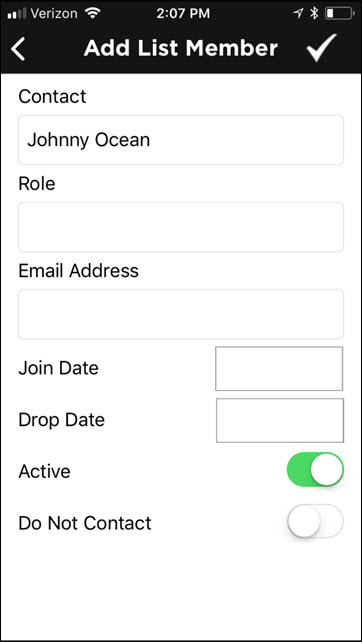
- Click the
 next to Members List.
- Begin typing the name of a contact into the Search Contact text box. A list of your contacts will display at the bottom of the screen. Select the desired contact.
- Click into the Join Date text box, select the join date from the bottom of the screen.
- Click the
 icon to add the contact to the list/committee.
