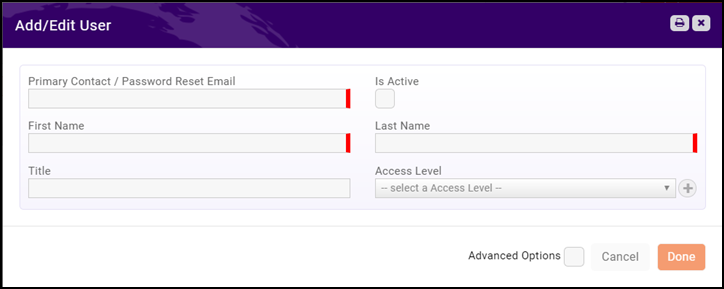
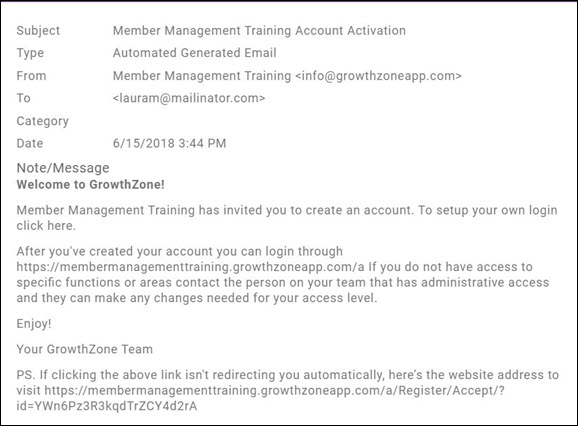
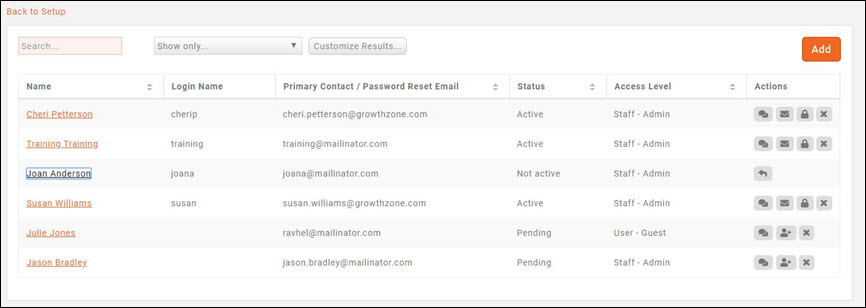
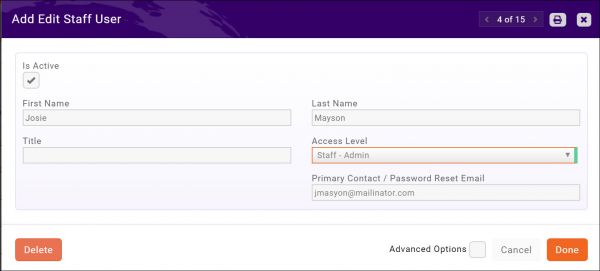
Difference between revisions of "Getting Started"
| (79 intermediate revisions by 6 users not shown) | |||
| Line 1: | Line 1: | ||
| + | <p style="font-size:30px">NEW!! Find all of your answers in the [https://growthzonesupport.happyfox.com/kb/article/911-contents-getting-started// GrowthZone Knowledge Base!]</p> | ||
| + | ---- | ||
| + | |||
| + | =='''<span style="color:#800080">Introduction'''</span>== | ||
| + | ---- | ||
| + | GrowthZone is the smart association software designed to help you: | ||
| + | *Grow your membership | ||
| + | *Retain and engage your existing organizations or individuals | ||
| + | *Do more with less time | ||
| + | |||
| + | New to the software? See '''[[Getting_Started#Dashboard_-_Getting_Started_Tab|Dashboard - Getting Started Tab]]''' for resources available to learn more about the software. | ||
| + | |||
| + | |||
| + | =='''<span style="color:#800080">GrowthZone Privacy Policy'''</span>== | ||
| + | ---- | ||
| + | |||
| + | Review GrowthZone's privacy policy [http://micronet.growthzoneapp.com/privacypolicy/Details/growthzone-privacy-policy-2617 here]. | ||
| + | |||
=='''<span style="color:#800080">View Product Updates'''</span>== | =='''<span style="color:#800080">View Product Updates'''</span>== | ||
---- | ---- | ||
| + | {| class="wikitable" | ||
| + | |- | ||
| + | | | ||
| + | [[File:Video-call-24.jpg|link=https://www.screencast.com/t/6VqeG5akiddP]] | ||
| + | | style="width: 100%"| '''See Viewing Product Updates in Action!''' | ||
| + | |} | ||
GrowthZone regularly releases new features and functionality. Notifications will be displayed on the main screen, and you may view the release notes and product details: | GrowthZone regularly releases new features and functionality. Notifications will be displayed on the main screen, and you may view the release notes and product details: | ||
| − | #Click | + | #Click the arrow next to your name in the header bar. |
| − | #:[[File: | + | #:[[File:ViewProductUpdates01.png|200px|center]] |
| + | |||
#Click '''Product Updates'''. | #Click '''Product Updates'''. | ||
| − | + | [[File:ViewProductUpdates02.png|center]] | |
| − | [[File: | ||
{| class="wikitable" | {| class="wikitable" | ||
| Line 15: | Line 39: | ||
[[File:Smallest.png|25px]] | [[File:Smallest.png|25px]] | ||
| style="width: 100%"| '''NOTE:''' The [[File:Q Mark.jpg|30px]] in the bottom right-hand corner of the screen will also notify you that there are product updates to be reviewed. | | style="width: 100%"| '''NOTE:''' The [[File:Q Mark.jpg|30px]] in the bottom right-hand corner of the screen will also notify you that there are product updates to be reviewed. | ||
| + | |} | ||
| + | |||
| + | =='''<span style="color:#800080">Browsers Supported'''</span>== | ||
| + | ---- | ||
| + | Your GrowthZone software is web-based, you can log-in from anywhere that you have access to the internet. We support the latest version of the following browsers: | ||
| + | * Chrome | ||
| + | * FireFox | ||
| + | |||
| + | {| class="wikitable" | ||
| + | |- | ||
| + | | | ||
| + | [[File:One Row.png|25px]] | ||
| + | | style="width: 100%"| '''INTERNET EXPLORER USERS''': For the best experience, we encourage you to use one of the browsers listed above. You can still access your GrowthZone software through Internet Explorer; however, some of the screen may not function as expected. | ||
|} | |} | ||
| Line 24: | Line 61: | ||
==='''<span style="color:#800080">Dashboard - Getting Started Tab'''</span>=== | ==='''<span style="color:#800080">Dashboard - Getting Started Tab'''</span>=== | ||
---- | ---- | ||
| + | The Dashboard '''Getting Started''' tab is a resource for all staff members new to the software. It provides a guide to overview training around the core areas of the software with links to training on key topics. Use this guide to review each training topic that is applicable to your role and complete the desired training. Check the box next to each section title when complete (or if they are not applicable to your role). When all sections have been completed, complete the form at the bottom of this page, and we'll send you a GrowthZone Basics Certificate of Completion. | ||
| − | + | [[File:Getting Started tab 2020.jpg|800px|center]] | |
| − | |||
| − | [[File:Getting Started.jpg|center]] | ||
| − | |||
| − | |||
| − | |||
| − | |||
| − | |||
| − | |||
==='''<span style="color:#800080">Dashboard - Metrics'''</span>=== | ==='''<span style="color:#800080">Dashboard - Metrics'''</span>=== | ||
| Line 39: | Line 69: | ||
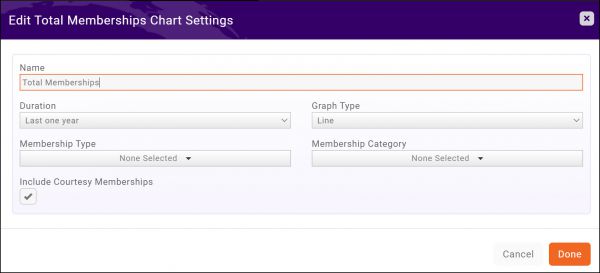
The '''Metrics''' tab displays a variety of charts and metrics providing an at a glance view of your organization. | The '''Metrics''' tab displays a variety of charts and metrics providing an at a glance view of your organization. | ||
| + | |||
| + | {| class="wikitable" | ||
| + | |- | ||
| + | | | ||
| + | [[File:Video-call-24.jpg|link=https://www.screencast.com/t/XRjUi35cPRDF]] | ||
| + | | style="width: 100%"| '''See Working with Widgets in Action!''' | ||
| + | |} | ||
[[File:My dashboard.jpg|center]] | [[File:My dashboard.jpg|center]] | ||
| Line 44: | Line 81: | ||
===='''<span style="color:#800080">Rearrange Dashboard Metrics'''</span>==== | ===='''<span style="color:#800080">Rearrange Dashboard Metrics'''</span>==== | ||
---- | ---- | ||
| − | |||
To place the charts and metrics in the positions you wish on your Dashboard: | To place the charts and metrics in the positions you wish on your Dashboard: | ||
#Click the [[File:Gear Icon.jpg]] icon | #Click the [[File:Gear Icon.jpg]] icon | ||
| Line 52: | Line 88: | ||
[http://www.screencast.com/t/R1PoTmnsQMH Show Me!] | [http://www.screencast.com/t/R1PoTmnsQMH Show Me!] | ||
| + | |||
| + | ===='''<span style="color:#800080">Edit Chart Layouts'''</span>==== | ||
| + | ---- | ||
| + | To place the charts and metrics in the positions you wish on your Dashboard: | ||
| + | #Click the [[File:Gear Icon.jpg]] icon. | ||
| + | #Select '''Edit Widget'''. | ||
| + | #:[[File:Edit widget 2020.jpg|600px|center]] | ||
| + | #Configure the widget as needed. Options available will depend on the widget you are working with. | ||
| + | #Click '''Done'''. | ||
===='''<span style="color:#800080">Add Widgets to the Dashboard'''</span>==== | ===='''<span style="color:#800080">Add Widgets to the Dashboard'''</span>==== | ||
| Line 60: | Line 105: | ||
#Click the '''Add Widgets''' button. | #Click the '''Add Widgets''' button. | ||
#Select the widget you wish to add. The widget will be added in the top left hand side of the dashboard. | #Select the widget you wish to add. The widget will be added in the top left hand side of the dashboard. | ||
| − | |||
| − | |||
| − | |||
| − | |||
| − | |||
| − | |||
| − | |||
| − | |||
| − | |||
| − | |||
| − | |||
| − | |||
| − | |||
==='''<span style="color:#800080">Setting Time Zone & Organization Logo'''</span>=== | ==='''<span style="color:#800080">Setting Time Zone & Organization Logo'''</span>=== | ||
| Line 79: | Line 111: | ||
#Click '''Setup''' in the Navigation Panel. | #Click '''Setup''' in the Navigation Panel. | ||
#In the '''Miscellaneous''' section, click '''General Settings'''. | #In the '''Miscellaneous''' section, click '''General Settings'''. | ||
| − | #:[[File: | + | #:[[File:Gz general settings 2020.png|800px|center]] |
#Select your time zone from the '''Current Timezone''' drop-down list. | #Select your time zone from the '''Current Timezone''' drop-down list. | ||
#Select your locale from the '''Culture''' list. This will customize dates, times and currency to your locale. | #Select your locale from the '''Culture''' list. This will customize dates, times and currency to your locale. | ||
| Line 93: | Line 125: | ||
| style="width: 100%"| '''NOTE:''' The pencil icon will only display when you hover your mouse below '''Primary Logo'''. | | style="width: 100%"| '''NOTE:''' The pencil icon will only display when you hover your mouse below '''Primary Logo'''. | ||
|} | |} | ||
| + | ==='''<span style="color:#800080">Display Country on Contact Profile'''</span>=== | ||
| + | ---- | ||
| + | If you are an organization that spans different countries, this setting will allow you to display country on the contact's '''Profile''' tab, and when viewing your contact list when displayed in card view. | ||
| + | |||
| + | #Click '''Setup''' in the Navigation Panel. | ||
| + | #In the '''Miscellaneous''' section, click '''General Settings'''. | ||
| + | #:[[File:Gz general settings 2020.png|800px|center]] | ||
| + | #Select '''Display Country on Contacts Module'''. | ||
| + | #Click '''Save'''. | ||
| + | |||
| + | ==='''<span style="color:#800080">Enable Printing Pop-up Windows'''</span>=== | ||
| + | ---- | ||
| + | If you enable this option, a print option will be available on pop-up windows throughout the software. This feature is no longer supported, but certain print options may meet your needs. | ||
| + | #Click '''Setup''' in the Navigation Panel. | ||
| + | #In the '''Miscellaneous''' section, click '''General Settings'''. | ||
| + | #:[[File:Gz general settings 2020.png|700px|center]] | ||
| + | #Select '''Enable Printing Pop-up Windows'''. | ||
| + | #Click '''Save'''. | ||
==='''<span style="color:#800080">Setup your Terminology'''</span>=== | ==='''<span style="color:#800080">Setup your Terminology'''</span>=== | ||
---- | ---- | ||
| + | {| class="wikitable" | ||
| + | |- | ||
| + | | | ||
| + | [[File:Video-call-24.jpg|link=https://www.screencast.com/t/dOIVLLdCJWJS]] | ||
| + | | style="width: 100%"| '''See General System Settings and Customizing System Terminology in Action!''' | ||
| + | |} | ||
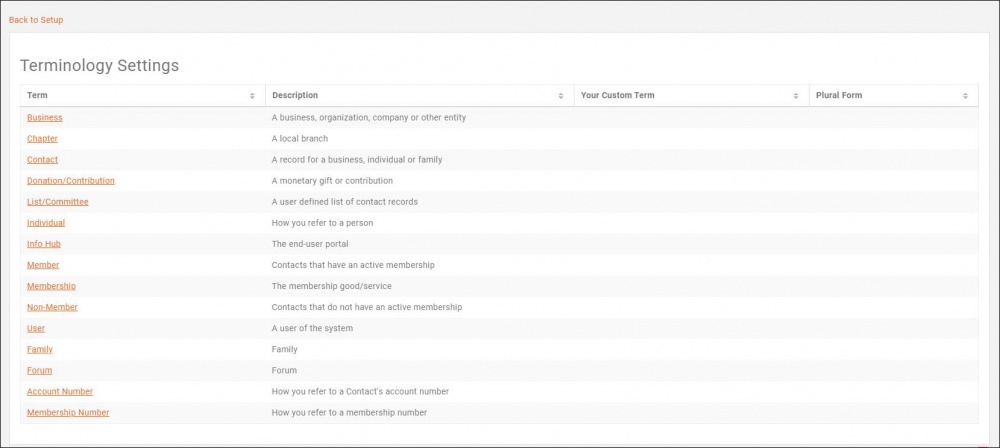
GrowthZone is built to be very customizable for your needs. If needed, you can customize the terminology used in the database. For instance, if you wish you may change the default name "Organization" to "Business". | GrowthZone is built to be very customizable for your needs. If needed, you can customize the terminology used in the database. For instance, if you wish you may change the default name "Organization" to "Business". | ||
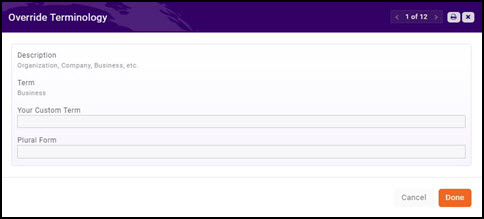
| Line 107: | Line 163: | ||
#Enter the plural version of your custom term in the '''Plural Form''' text box. | #Enter the plural version of your custom term in the '''Plural Form''' text box. | ||
#Click '''Done''' to save your changes. | #Click '''Done''' to save your changes. | ||
| + | |||
| + | ==='''<span style="color:#800080">Genders'''</span>=== | ||
| + | ---- | ||
| + | See the new '''[https://helpdesk.growthzone.com/home/| GrowthZone Knowledge Base]''' for a new feature- the ability to '''[https://helpdesk.growthzone.com/kb/article/1899-genders/| customize additional gender selections]'''! | ||
| + | |||
==='''<span style="color:#800080">Custom Fields'''</span>=== | ==='''<span style="color:#800080">Custom Fields'''</span>=== | ||
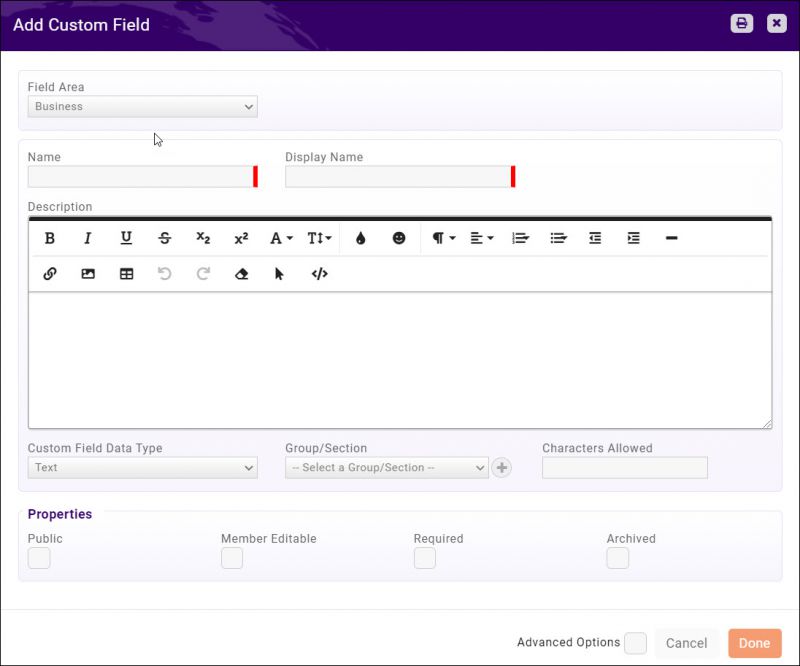
| Line 116: | Line 177: | ||
#Click '''Custom Fields''' in the '''Miscellaneous''' section. A list of the custom fields currently configured in your database will be displayed. | #Click '''Custom Fields''' in the '''Miscellaneous''' section. A list of the custom fields currently configured in your database will be displayed. | ||
#Click the '''Add''' button. | #Click the '''Add''' button. | ||
| − | #:[[File: | + | #:[[File:CustomField 08042020.jpg|800px|center|Add Custom Field window]] |
# On the '''Add/Edit Custom Field''' screen, configure the following: | # On the '''Add/Edit Custom Field''' screen, configure the following: | ||
#:*'''Field Area''' - Select a field area from the drop-down list. This selection dictates where you would like to use the custom field. For example, if you wish to create a field to be used in your Web Content, you would select '''Content Item'''. | #:*'''Field Area''' - Select a field area from the drop-down list. This selection dictates where you would like to use the custom field. For example, if you wish to create a field to be used in your Web Content, you would select '''Content Item'''. | ||
| Line 126: | Line 187: | ||
#:*'''Properties''' - Define the properties for the custom field: | #:*'''Properties''' - Define the properties for the custom field: | ||
#:**'''Public''' - Select this check-box if you wish this field to be displayed for the public. This will allow the field to be displayed in the InfoHub, Directories and for use in membership applications. | #:**'''Public''' - Select this check-box if you wish this field to be displayed for the public. This will allow the field to be displayed in the InfoHub, Directories and for use in membership applications. | ||
| − | #:**'''Member | + | #:**'''Member Editable''' - Select this check-box to allow users to edit this custom field in their hub profile. If a custom field is to appear in the hub, but is not to be editable, you need only check the property '''Public'''. |
| − | #:**'''Required''' - | + | #:**'''Required''' - Select this check-box to make this field required. '''NOTE:''' Making a field required only applies when the member is filling out the form/application/registration/etc- it does not force that field to be required when it is displayed in the back office. |
| − | #:**'''Archived''' - | + | #:**'''Archived''' - If you no longer wish to use this custom field, selecting this check-box will hide the field from being used in the back office, but historical data will be maintained. |
# Click '''Done'''. | # Click '''Done'''. | ||
| Line 203: | Line 264: | ||
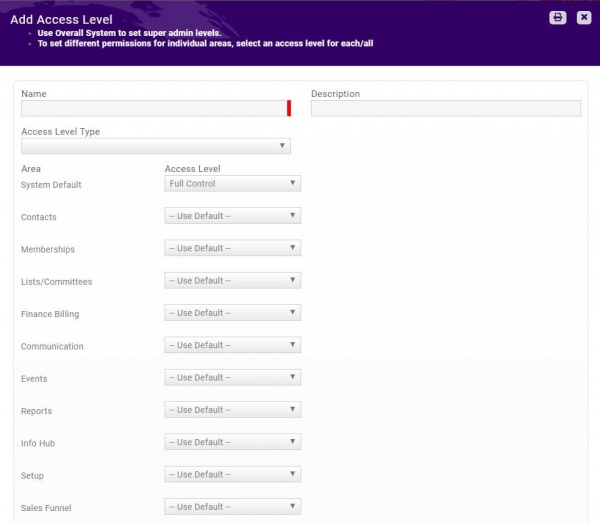
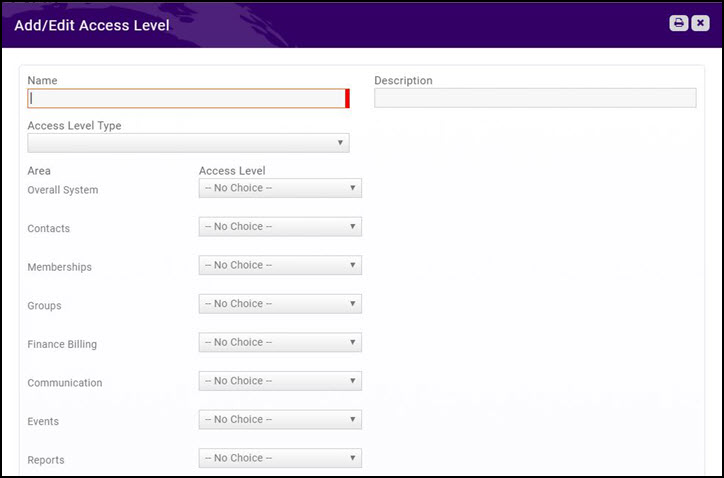
===='''<span style="color:#800080">Create a New Access Level - Staff'''</span>==== | ===='''<span style="color:#800080">Create a New Access Level - Staff'''</span>==== | ||
---- | ---- | ||
| + | |||
| + | {| class="wikitable" | ||
| + | |- | ||
| + | | | ||
| + | [[File:Video-call-24.jpg|link=https://www.screencast.com/t/v4Z9Iof8F]] | ||
| + | | style="width: 100%"| '''See Creating a New Staff Access Level in Action!''' | ||
| + | |} | ||
| + | |||
#In the Navigation panel, select '''Setup'''. | #In the Navigation panel, select '''Setup'''. | ||
#Click the '''Access Level''' link in the '''Users''' section. The '''Access Levels''' screen will display a list of the pre-configured Access Levels, and the number of people assigned to each level. You may view the permissions that are associated to a particular level by clicking the hyper-link. You will see a list of each of the main functions of the database, and the access level granted. The '''Users''' column displays the number of users assigned to the access level. To view a list of the users click the numbered hyper-link. | #Click the '''Access Level''' link in the '''Users''' section. The '''Access Levels''' screen will display a list of the pre-configured Access Levels, and the number of people assigned to each level. You may view the permissions that are associated to a particular level by clicking the hyper-link. You will see a list of each of the main functions of the database, and the access level granted. The '''Users''' column displays the number of users assigned to the access level. To view a list of the users click the numbered hyper-link. | ||
| Line 256: | Line 325: | ||
*'''Refer Others''': This tab is controlled by the '''Referrals setting'''. The display of the tab and the ability to refer others is controlled by whether this setting is set to Edit or None. | *'''Refer Others''': This tab is controlled by the '''Referrals setting'''. The display of the tab and the ability to refer others is controlled by whether this setting is set to Edit or None. | ||
| − | === | + | ===='''<span style="color:#800080">View/Edit User (Member) Access Levels'''</span>==== |
| + | ---- | ||
| + | #In the Navigation Panel, click '''Setup'''. | ||
| + | #Click '''Access Levels''' in the '''Users''' section. | ||
| + | #Click the link for the access level you wish to view/update. | ||
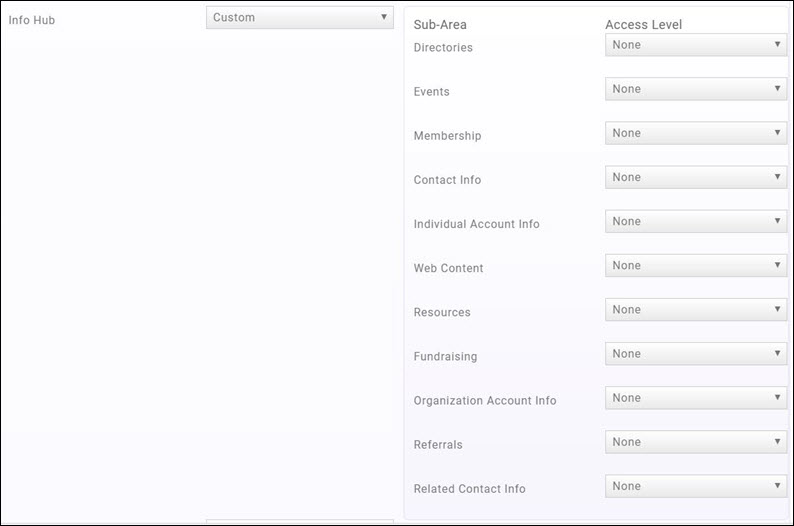
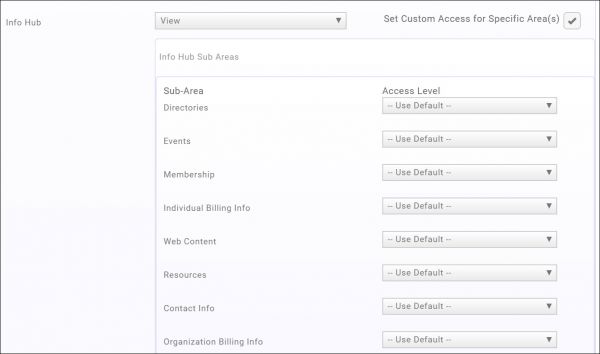
| + | #Scroll to '''Info Hub'''. The default access level for all functions within the Info Hub is displayed, or if '''Set Custom Access for Specific Area(s)''' is enabled, all areas of the Info Hub are displayed, with the associated access level. | ||
| + | #:[[File:Info Hub Access Levels 2019.jpg|600px|center]] | ||
| + | #If you wish to change access for certain area of the Info Hub, select the desired access for that area. If an area is set to '''Use Default''' access to that area will be driven by the overall Info Hub setting. | ||
| + | #After making changes, click '''Save'''. | ||
| + | '''Access Level Settings''' | ||
| + | |||
| + | :*'''View''': This access level allows the user to retrieve and view information from the database in read only mode. | ||
| + | :*'''Edit''': This access level allows the user to retrieve and change/update '''existing''' database information. | ||
| + | :*'''Create''': This access level allows the user to add new content to the database, as well as view and update existing information. | ||
| + | :*'''Delete''': This access level allows the user to remove existing content from the database as well as create, update and view. | ||
| + | :*'''Use Default''': When this access level is selected, the user will be given the access level selected for the Info Hub overall. | ||
| + | :*'''None''': By selecting this option, the user will have no access to the specified area. | ||
| + | |||
| + | ==='''<span style="color:#800080">Setup Staff User Credentials'''</span>=== | ||
| + | ---- | ||
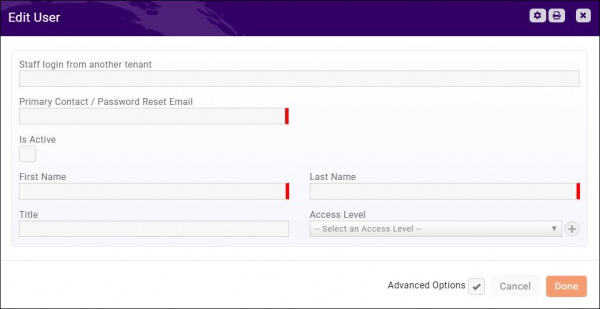
Each member of your staff who will need access to the database will need to be provided with login credentials. | Each member of your staff who will need access to the database will need to be provided with login credentials. | ||
===='''<span style="color:#800080">Add Staff Member'''</span>==== | ===='''<span style="color:#800080">Add Staff Member'''</span>==== | ||
---- | ---- | ||
| + | |||
| + | {| class="wikitable" | ||
| + | |- | ||
| + | | | ||
| + | [[File:Video-call-24.jpg|link=https://www.screencast.com/t/HhFwciRhS]] | ||
| + | | style="width: 100%"| '''See Adding a Staff Member in Action!''' | ||
| + | |} | ||
#In the Navigation Panel, click Setup. | #In the Navigation Panel, click Setup. | ||
| Line 287: | Line 382: | ||
==='''<span style="color:#800080">View Staff Users'''</span>=== | ==='''<span style="color:#800080">View Staff Users'''</span>=== | ||
---- | ---- | ||
| + | |||
| + | {| class="wikitable" | ||
| + | |- | ||
| + | | | ||
| + | [[File:Video-call-24.jpg|link=https://www.screencast.com/t/vbTHIJQSe8m]] | ||
| + | | style="width: 100%"| '''See Viewing and Working with Staff Users in Action!''' | ||
| + | |} | ||
#In the Navigation Panel, click '''Setup'''. | #In the Navigation Panel, click '''Setup'''. | ||
| Line 292: | Line 394: | ||
[[File:Staff Users CP.jpg|center]] | [[File:Staff Users CP.jpg|center]] | ||
| + | |||
| + | ===='''<span style="color:#800080">Change Staff Access Level'''</span>==== | ||
| + | ---- | ||
| + | |||
| + | #Click '''Setup''' in the left-hand navigation panel. | ||
| + | #Click '''Staff Users''' in the '''Users''' section. | ||
| + | #:[[File:Staff user.jpg|800px|center]] | ||
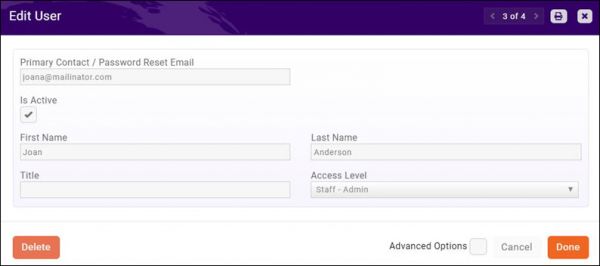
| + | #Click the name of the staff member for whom you wish to change access level. | ||
| + | #:[[File:Update staff access.jpg|600px|center]] | ||
| + | #Select the desired access level from the '''Access Level''' list. | ||
| + | #Click '''Done'''. | ||
===='''<span style="color:#800080">Resend User Credentials Setup Instructions'''</span>==== | ===='''<span style="color:#800080">Resend User Credentials Setup Instructions'''</span>==== | ||
| Line 365: | Line 478: | ||
#Click '''Staff Users''' in the '''Users''' section. A list of all of your staff users will be displayed. | #Click '''Staff Users''' in the '''Users''' section. A list of all of your staff users will be displayed. | ||
#Click the hyper-link for the staff user you wish to delete. | #Click the hyper-link for the staff user you wish to delete. | ||
| − | #:[[File:Edit Staff User CP.jpg|center]] | + | #:[[File:Edit Staff User CP.jpg|600px|center]] |
#Click the '''Delete''' button. You will be asked to confirm that you wish to delete this staff user. | #Click the '''Delete''' button. You will be asked to confirm that you wish to delete this staff user. | ||
#Click '''OK'''. | #Click '''OK'''. | ||
| + | ===='''<span style="color:#800080">Reassign Staff'''</span>==== | ||
| + | ---- | ||
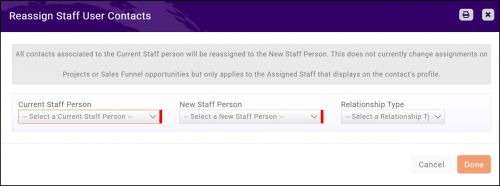
| + | If a staff person leaves or their contacts need to be assigned to another staff member, use the '''Reassign Staff''' option under Setup>Staff Users. All contacts associated to the current staff person will be reassigned to the new staff person you pick. '''NOTE''': This does not currently change assignments on Projects or Sales Funnel opportunities it only applies to the '''Assigned Staff''' that displays on the contact’s profile. | ||
| + | #In the Navigation Panel, click '''Setup'''. | ||
| + | #Click '''Staff Users''' in the '''Users''' section. A list of all of your staff users will be displayed. | ||
| + | #:[[File:Staff users 2020.jpg|800px|center]] | ||
| + | #Click the '''Reassign Staff''' button. | ||
| + | #:[[File:Reassign staff 2020.jpg|500px|center]] | ||
| + | #Select the '''Current Staff Person'''. This is the staff member who is currently assigned to the contacts. | ||
| + | #Select the '''New Staff Person'''. This is the staff member to whom you wish to assign the contacts. | ||
| + | #Select the desired '''Relationship Type'''. | ||
| + | #Click '''Done'''. | ||
==='''<span style="color:#800080">Subscribe to Automated Staff Notifications'''</span>=== | ==='''<span style="color:#800080">Subscribe to Automated Staff Notifications'''</span>=== | ||
---- | ---- | ||
| − | Your system can be automated to send notifications when certain events occur. For Example: An automated notification can be sent to a staff member when an On-line Membership Application is submitted | + | Your system can be automated to send notifications when certain events occur. For Example: An automated notification can be sent to a staff member when an On-line Membership Application is submitted. |
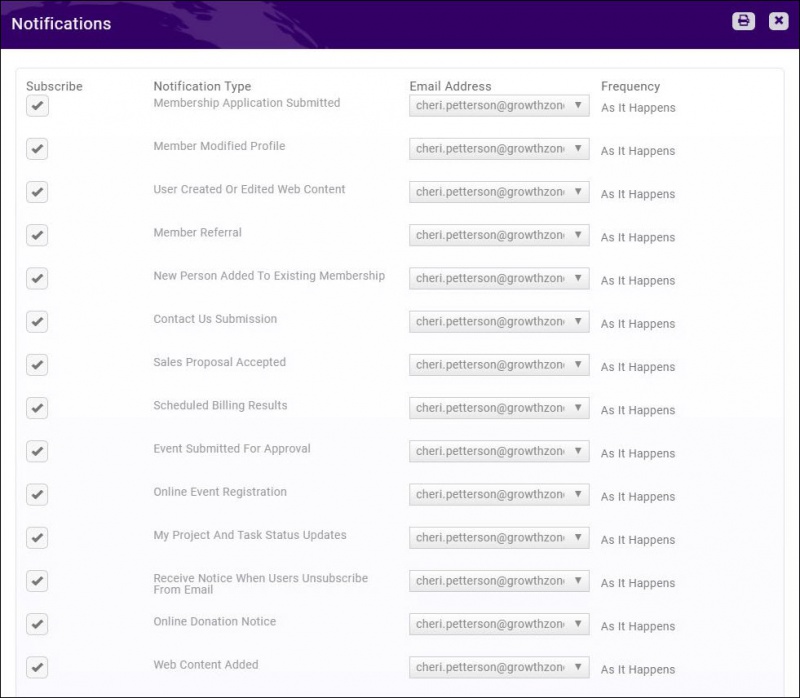
| + | #Click the '''Notifications''' icon [[File:Notifications Icon.jpg|frameless]] in the '''Actions''' column. | ||
| + | #:[[File:Notifications1.jpg|800px|center]] | ||
| + | #Click the notifications to which you want to subscribe this user. | ||
| + | #Select the users email address. | ||
| + | #Select how frequently you want this user to receive notifications: '''As it Happens''' or '''Daily'''. | ||
| + | #Click '''Done'''. | ||
| + | {| class="wikitable" | ||
| + | |- | ||
| + | | | ||
| + | [[File:One Row.png|25px]] | ||
| + | | style="width: 100%"| '''NOTE:''' Staff Users may also setup their own notifications by clicking their name in the header bar, and selecting '''My Notifications''' | ||
| + | |} | ||
| + | |||
| + | The table below describes the message to which staff may subscribe. An administrator can setup the notifications for a staff member on the '''Users''' page '''OR''' each staff member can subscribe themselves by clicking their name in the header bar and clicking '''My Notifications'''. | ||
{| class="wikitable" | {| class="wikitable" | ||
|- | |- | ||
| Line 400: | Line 539: | ||
| My Projects and Tasks Status Updates || | | My Projects and Tasks Status Updates || | ||
|- | |- | ||
| − | | Receive Notice When User Unsubscribe from Email || | + | | Receive Notice When User Unsubscribe from Email || This notification is sent when someone unsubscribes from mass/group emails. |
|- | |- | ||
| − | | Online Donation Notice || | + | | Online Donation Notice || This notification is sent when someone makes an online donation. |
|- | |- | ||
| − | | Web Content Added || | + | | Web Content Added || This notification is sent when a web content item has been submitted. |
|- | |- | ||
| − | | New Store Order Created || | + | | New Store Order Created || This notification is sent when a new store order is place. |
|- | |- | ||
| Membership Renewal Response Submitted|| For memberships using '''Renewal Notification''' only. This email will be sent to staff when a member accepts or declines renewal of their membership. | | Membership Renewal Response Submitted|| For memberships using '''Renewal Notification''' only. This email will be sent to staff when a member accepts or declines renewal of their membership. | ||
| Line 427: | Line 566: | ||
|- | |- | ||
| GrowthZone Pay Account Update Completed || | | GrowthZone Pay Account Update Completed || | ||
| + | |- | ||
| + | | Integration Connection Failure || A notification when the access to Constant Contact or MailChimp is broken and re-authentication is required. The notification provides a link to the integration page so the staff person can re-connect. This should be a rare scenario. | ||
| + | |- | ||
| + | | Charge Capture Failed || | ||
| + | |- | ||
| + | | Charge Returned || A notification for staff when a charge is rejected by Stripe (GZ Pay) and the payment refunded. This notification is already sent to the email address listed on the Payment Gateway setup screen so this notification is necessary only if you desire addition staff to receive the notice. | ||
|- | |- | ||
| Unregistered Attendee || This notification is sent when an attendee cancels an event registration. This helps staff to know, especially if a refund needs to be given to the registrant. | | Unregistered Attendee || This notification is sent when an attendee cancels an event registration. This helps staff to know, especially if a refund needs to be given to the registrant. | ||
|- | |- | ||
| − | | | + | | Monthly Recap Notificaton || This email is sent monthly and includes This email will include : |
| + | * Membership Changes: New Memberships, Pending Memberships, Renewed Memberships, Memberships Upgraded or Downgraded, and Dropped Members. | ||
| + | * Contacts: New Contacts Added, New Staff users created | ||
| + | * Communication: Count of Communications Logged, Number of active lists/committees | ||
| + | * Event Activity: Events Created, Events Occurred, Event Registrations | ||
| + | * Web Content: Web Content New Postings | ||
| + | * Project Tracking: Projects Started, Projects Completed | ||
|} | |} | ||
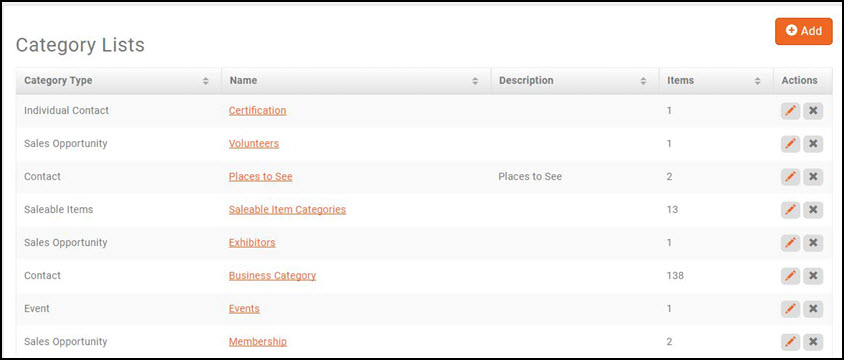
| − | + | =='''<span style="color:#800080">Category Lists'''</span>== | |
| − | + | ---- | |
| − | |||
| − | |||
| − | # | ||
| − | |||
| − | |||
| − | |||
| + | Categories allow you to create filtering and grouping options for such things are member directory, store items, web content etc. It is recommended that you use categories: | ||
| + | *If intended for public or internal use and is used to segment records into groups. For example: You may have categories of products in your store, categories in your directory search, etc. | ||
| + | *If you wish to allow visitors to your directory, web content, events, etc. ability to filter to specific categories | ||
| + | *If you wish to display this information publicly or in the Info Hub. | ||
{| class="wikitable" | {| class="wikitable" | ||
|- | |- | ||
| | | | ||
| − | [[File: | + | [[File:Smallest.png|25px]] |
| − | | style="width: 100%"| '''NOTE:''' | + | | style="width: 100%"| '''NOTE:''' Your GrowthZone software allows you to use tags, custom fields and categories. To guide your decision in which to use, see a comparison list [https://supportwiki.memberzone.org/images/4/43/Comparison_of_Tags_Custom_Fields_Categories.pdf here.] |
|} | |} | ||
| − | |||
| − | |||
| − | |||
| − | |||
| − | |||
==='''<span style="color:#800080">Category List Options'''</span>=== | ==='''<span style="color:#800080">Category List Options'''</span>=== | ||
| Line 472: | Line 616: | ||
*'''Tickets''' - not currently available to use in GrowthZone | *'''Tickets''' - not currently available to use in GrowthZone | ||
*'''Saleable Items''' - Goods/Services in the Setup | *'''Saleable Items''' - Goods/Services in the Setup | ||
| + | |||
| + | {| class="wikitable" | ||
| + | |- | ||
| + | | | ||
| + | [[File:Smallest.png|25px]] | ||
| + | | style="width: 100%"| '''NOTE:''' Your GrowthZone software allows you to use tags, custom fields and categories. To guide your decision in which to use, see a comparison list [https://supportwiki.memberzone.org/images/4/43/Comparison_of_Tags_Custom_Fields_Categories.pdf here.] | ||
| + | |} | ||
==='''<span style="color:#800080">Create a Category List'''</span>=== | ==='''<span style="color:#800080">Create a Category List'''</span>=== | ||
---- | ---- | ||
| + | {| class="wikitable" | ||
| + | |- | ||
| + | | | ||
| + | [[File:Video-call-24.jpg|link=https://www.screencast.com/t/aeErgu0kMC6Q]] | ||
| + | | style="width: 100%"| '''See Viewing & Adding Category Lists in Action!''' | ||
| + | |} | ||
| + | |||
#Select '''Setup''' in the Navigation Panel. | #Select '''Setup''' in the Navigation Panel. | ||
#Click '''Category Lists''' in the '''Categories''' section. | #Click '''Category Lists''' in the '''Categories''' section. | ||
| − | # | + | #:[[File:Category lists 2021 1.jpg|800px|thumb|center]] |
| − | #Choose the appropriate Category Type | + | #Click the '''Add''' button. |
| − | #Name the category list | + | #Choose the appropriate '''Category Type'''. The type is important as it will drive where the category list is available in the future. For example, if you are creating a category list for Events, select '''Event'''. |
| − | #Check the box for | + | #Provide a '''Name''' for the category list. |
| − | # | + | #'''Is Active''' will default to be checked, this allows the category to be used in the software. When a category list is no longer needed, best practice will be to de-activate the category list rather than deleting. |
| − | # | + | #(Optional) Add a '''Description''' if needed. This is for internal purposes only. |
| − | #Click Done to save | + | #Check the box for '''Available to Public?''' if you would like the option to add this category as a filter for your directories, events, web content etc. |
| + | #Check the box for '''Available to Members (Info Hub)''' if you wish to allow members to view this category list in the Info Hub. Some of your category lists may be for internal use only in which case you would mot enable this option. | ||
| + | #(Optional) Click the '''Advanced Options''' check-box to configure the following: | ||
| + | #*'''Allow Members To Edit (Info Hub)''': Enable this option if members should be allow to make changes to this category list in the Info Hub. | ||
| + | #'''Is Required''': If you are creating a business or individual contact category list, and you wish to display this category on the members profile tab even if a category has not been assigned, check the '''Required''' box. This allows the category list to act much like custom fields, with high visibility on the profile tab. | ||
| + | #'''Minimum Quantity/Maximum Quantity''': This settings allow you to limit the number of categories that may be selected from this list. | ||
| + | #Click '''Done''' to save the new list. | ||
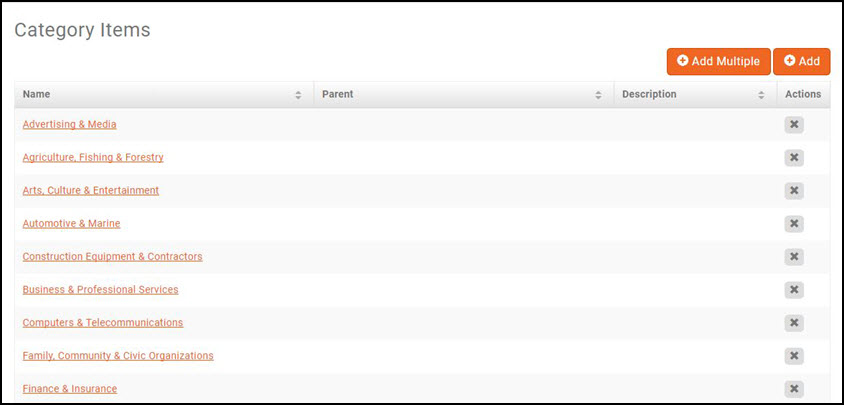
| − | Once the assigned Name appears in the Category List, click on the Name to add items to the category list. You may add multiple items at one time by clicking on [[File:Add_multipleAA.JPG]], adding one item per line. Or you may use the [[File:New_button.JPG]] to add one item to the list. | + | Once the assigned Name appears in the Category List, click on the Name to add items to the category list. You may add multiple items at one time by clicking on [[File:Add_multipleAA.JPG|100px]], adding one item per line. Or you may use the [[File:New_button.JPG|75px]] to add one item to the list. |
==='''<span style="color:#800080">View Directory Categories'''</span>=== | ==='''<span style="color:#800080">View Directory Categories'''</span>=== | ||
| Line 498: | Line 662: | ||
==='''<span style="color:#800080">Add Categories to your Directory'''</span>=== | ==='''<span style="color:#800080">Add Categories to your Directory'''</span>=== | ||
---- | ---- | ||
| − | |||
New top level categories (those that appear in bold in your active directory) or sub categories may be added to your directory. | New top level categories (those that appear in bold in your active directory) or sub categories may be added to your directory. | ||
| − | |||
#Select '''Setup''' in the Navigation Panel. | #Select '''Setup''' in the Navigation Panel. | ||
#Click '''Category Lists''' in the '''Categories''' section. A list of all categories will be displayed. By default your system is populated with the '''Contact Business Category'''. These business categories are available for selection when assigning your members to directory categories. | #Click '''Category Lists''' in the '''Categories''' section. A list of all categories will be displayed. By default your system is populated with the '''Contact Business Category'''. These business categories are available for selection when assigning your members to directory categories. | ||
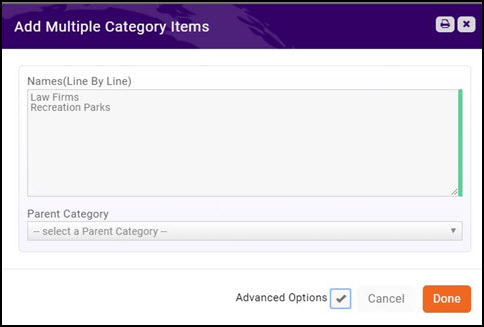
| Line 515: | Line 677: | ||
#*'''Names(Line By Line)''' - Enter each category line by line. This is the name that will appear in the active directory. | #*'''Names(Line By Line)''' - Enter each category line by line. This is the name that will appear in the active directory. | ||
#*'''Parent Category''' - (Optional) Select the parent category. If a parent category is selected, the new categories will be displayed below the parent in the active directory. If no parent is selected, the new categories will be a top level category shown in bold in your active directory. You may select only one parent category for all the new categories you have listed. '''NOTE:''' This option is visible when you enable the '''Advanced Options'''. | #*'''Parent Category''' - (Optional) Select the parent category. If a parent category is selected, the new categories will be displayed below the parent in the active directory. If no parent is selected, the new categories will be a top level category shown in bold in your active directory. You may select only one parent category for all the new categories you have listed. '''NOTE:''' This option is visible when you enable the '''Advanced Options'''. | ||
| + | #Click '''Done'''. | ||
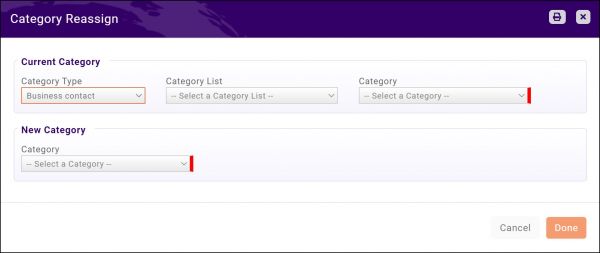
| + | ==='''<span style="color:#800080">Reassign Categories'''</span>=== | ||
| + | ---- | ||
| + | '''****COMING SOON***''' | ||
| + | When a category is assigned but you realize you’ve already created a category with a similar name, you may want to move everyone in that original category and assign them the new name so you can delete the original category. | ||
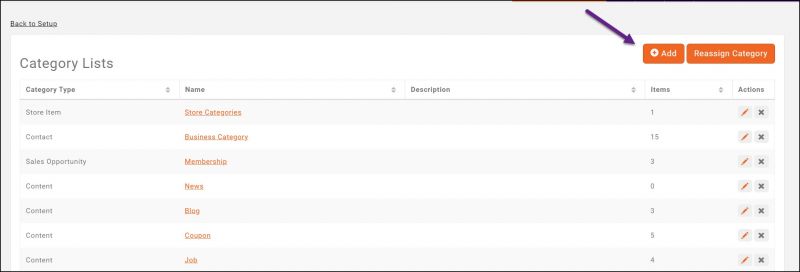
| + | #Click '''Setup''' in the left-hand navigation panel. | ||
| + | #Click '''Category Lists''' in the '''Categories''' section. | ||
| + | #:[[File:Reassign categories 2020.jpg|600px|center]] | ||
| + | #Click the '''Reassign Category''' button. | ||
| + | #:[[File:Reassign cat 2020.jpg|600px|center]] | ||
| + | #Select the desired '''Category Type''' from the list. | ||
| + | #Select the desired '''Category List''' from the list. | ||
| + | #Select the category that you wish to reassign from the '''Category''' list. | ||
| + | #Select the category that you wish to reassign to from the '''Category''' list in the '''New Category''' section. | ||
#Click '''Done'''. | #Click '''Done'''. | ||
| Line 520: | Line 696: | ||
---- | ---- | ||
| − | '''Directory Display Settings''' control what information about a business or individual is displayed if you choose to publish a directory of members to your website. You may, perhaps, have different levels of listings based on membership type. A basic level might include just a business name and a logo, where as an enhanced listing may include photo galleries, videos, maps, etc. A default directory listing, '''Standard Listing''' is seeded in the database upon setup. You can use this as designed or customize it to meet your needs. '''NOTE:''' The '''Standard Listing''' directory display settings are used in your membership types '''by default'''. See [[Membership_Management#Adding_a_New_Membership_Type|Adding Membership Types]] for further information on selecting alternate display settings | + | '''Directory Display Settings''' control what information about a business or individual is displayed if you choose to publish a directory of members to your website. You may, perhaps, have different levels of listings based on membership type. A basic level might include just a business name and a logo, where as an enhanced listing may include photo galleries, videos, maps, etc. A default directory listing, '''Standard Listing''' is seeded in the database upon setup. You can use this as designed or customize it to meet your needs. '''NOTE:''' The '''Standard Listing''' directory display settings are used in your membership types '''by default'''. See [[Membership_Management#Adding_a_New_Membership_Type|Adding Membership Types]] for further information on selecting alternate display settings. |
| + | |||
| + | {| class="wikitable" | ||
| + | |- | ||
| + | | | ||
| + | [[File:Video-call-24.jpg|link=https://www.screencast.com/t/ya2UVJGGJ6]] | ||
| + | | style="width: 100%"| '''See Directory Display Settings in Action!''' | ||
| + | |} | ||
| Line 537: | Line 720: | ||
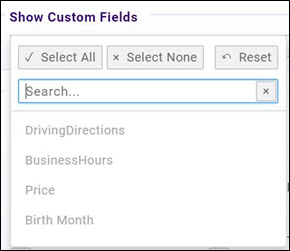
#:*'''Show Custom Fields''' - Select the custom fields you want to display in the directory. The drop-down list will display the fields that have been configured for '''Directory Listing'''. | #:*'''Show Custom Fields''' - Select the custom fields you want to display in the directory. The drop-down list will display the fields that have been configured for '''Directory Listing'''. | ||
#:[[File:Show Custom Fields.jpg|center]] | #:[[File:Show Custom Fields.jpg|center]] | ||
| + | #:*'''Display Related Contacts''' - Here you can decide which individual contacts will display in the listing. | ||
| + | #:[[File:DirectoryDisplaySettings01 10062020.jpg|800px|center]] | ||
| + | #:**'''Show Related Contacts''' - If selected, all individual contacts related to the business will display. | ||
| + | #:**'''Show Contacts With Memberships''' - If you have an organization with only certain selected contacts related to the membership, this option will only display the individuals related to the membership. If you select this option, "Show Related Contacts" should be disabled, as that setting will override this one. | ||
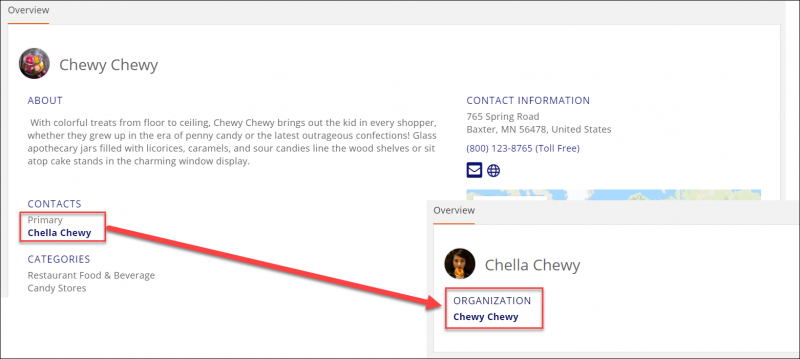
| + | #:**'''Show Primary Contact/Organization''' - Enabling this option will flag the primary contact for the business, and will display their primary organization on their individual listing (if they have one). | ||
| + | #:[[File:ShowPrimaryContactOrg 10062020.png|800px|center]] | ||
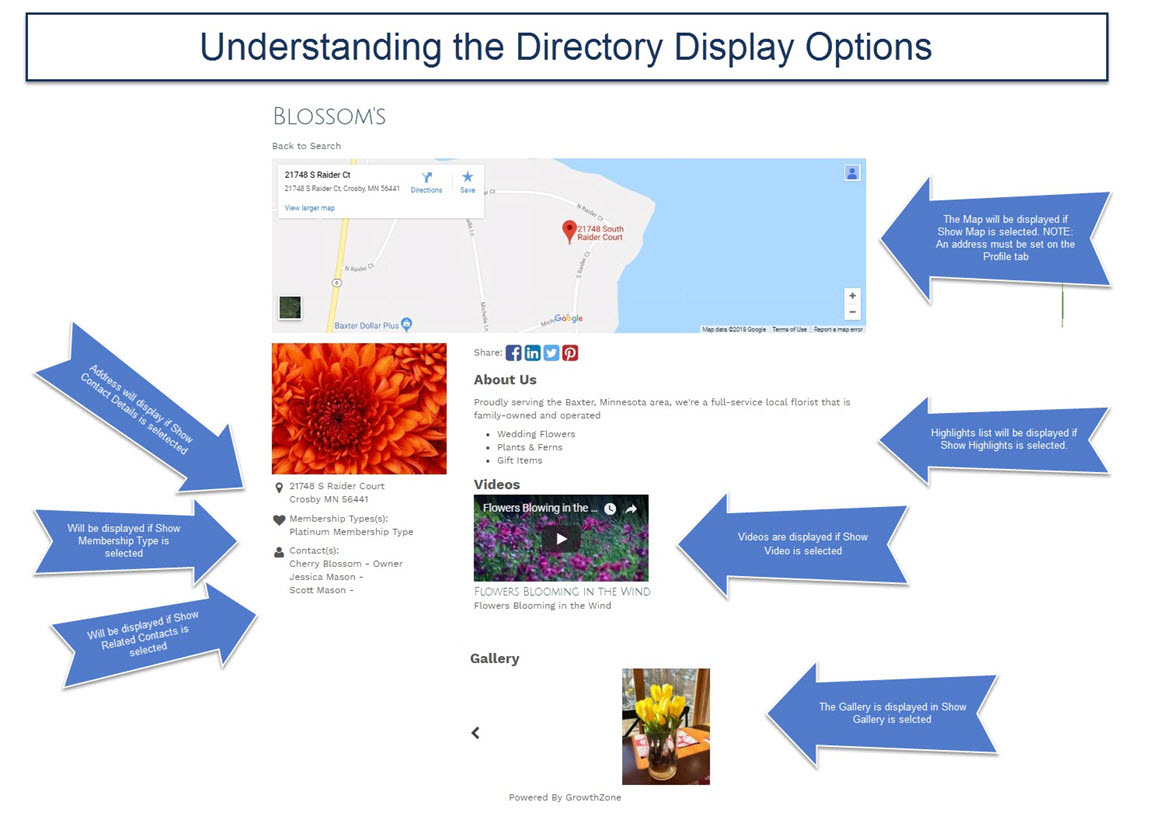
#:*'''Options''': Select additional display options. To see how your selections will impact the display in your activity, see [[Getting_Started#Understanding_the_Directory_Display_Options|Understanding the Directory Display Options]]. | #:*'''Options''': Select additional display options. To see how your selections will impact the display in your activity, see [[Getting_Started#Understanding_the_Directory_Display_Options|Understanding the Directory Display Options]]. | ||
#:[[File:Options.jpg|center]] | #:[[File:Options.jpg|center]] | ||
#:**'''Show Membership Type''' - If selected the member's membership type will be displayed in the directory. | #:**'''Show Membership Type''' - If selected the member's membership type will be displayed in the directory. | ||
| + | #:**'''Show Public Web Content Postings''': (Coming Soon) Enabled this option if you wish to display icons on the member's directory page when they have web content (i.e. job postings, hot deals, etc) available. | ||
#:**'''Show Search Logo''' - If selected the member's primary image will be displayed when the directory is searched. | #:**'''Show Search Logo''' - If selected the member's primary image will be displayed when the directory is searched. | ||
#:**'''Show Highlights''' If selected, a highlights section will be displayed on the web-page. | #:**'''Show Highlights''' If selected, a highlights section will be displayed on the web-page. | ||
| Line 545: | Line 735: | ||
#:**'''Show Search Description''': If selected, and using V1 directory, the short description will be displayed in the directory list. If using the v2 public modules, this setting has no impact. | #:**'''Show Search Description''': If selected, and using V1 directory, the short description will be displayed in the directory list. If using the v2 public modules, this setting has no impact. | ||
#:**'''Show Gallery''': If selected, the member may display a gallery of photos on the web-page. | #:**'''Show Gallery''': If selected, the member may display a gallery of photos on the web-page. | ||
| − | #:**'''Show Video''': If selected, the member may display a video on the web-page. | + | #:**'''Show Video''': If selected, the member may display a video on the web-page. '''NOTE:''' At this time, only links to YouTube videos are supported. |
#:**'''Show Map''': If selected, the location of the organization will be displayed on map on the web-page. | #:**'''Show Map''': If selected, the location of the organization will be displayed on map on the web-page. | ||
#:**'''Show Primary Contact''': If selected, the name of the primary contact will be displayed on the web-page. | #:**'''Show Primary Contact''': If selected, the name of the primary contact will be displayed on the web-page. | ||
| Line 561: | Line 751: | ||
---- | ---- | ||
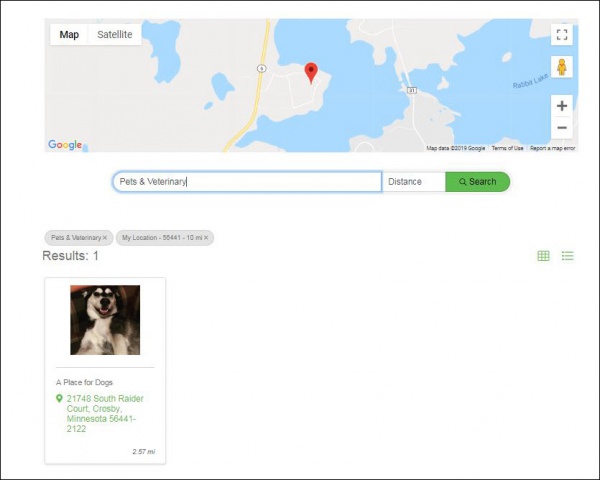
| − | The '''Enhanced Directory''' add-on module provides additional search functionality to your directory. With the '''Enhanced Directory''' | + | The '''Enhanced Directory''' add-on module provides an additional "Distance" search functionality to your directory (V2 of public modules ONLY). With the '''Enhanced Directory''', visitors to your website will be able to search for members within a given radius of a provided ZIP/Postal code. |
| − | + | ||
| − | #Select the '''Distance''' option | + | {| class="wikitable" |
| + | |- | ||
| + | | | ||
| + | [[File:Smallest.png|25px]] | ||
| + | | style="width: 100%"| '''NOTE:''' If you wish to purchase the Enhanced Directory module, contact our sales team, [mailto:sales@growthzone.com sales@growthzone.com] for pricing. The zip code search is only available in the US. | ||
| + | |} | ||
| + | |||
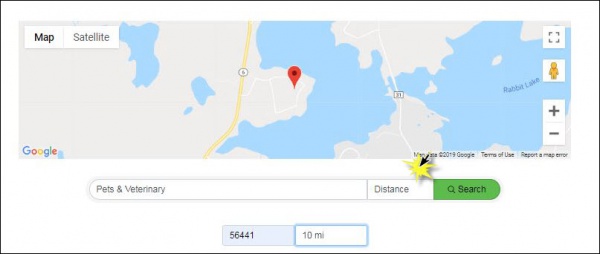
| + | #On the "Search" page, enter your search term(s). | ||
| + | #Select the '''Distance''' option. | ||
#:[[File:ED Search.jpg|600px|center]] | #:[[File:ED Search.jpg|600px|center]] | ||
#Enter a zip code, and select the distance (choices include 1, 5, 10 and 50 miles) from that zip code to narrow search results to a specific radius. | #Enter a zip code, and select the distance (choices include 1, 5, 10 and 50 miles) from that zip code to narrow search results to a specific radius. | ||
| Line 570: | Line 768: | ||
[[File:Enhanced Dir Search 2.jpg|600px|center]] | [[File:Enhanced Dir Search 2.jpg|600px|center]] | ||
| − | |||
| − | |||
| − | |||
| − | |||
| − | |||
| − | |||
| − | |||
| − | |||
=='''<span style="color:#800080">Setup your Directories'''</span>== | =='''<span style="color:#800080">Setup your Directories'''</span>== | ||
| Line 592: | Line 782: | ||
#Click '''Directories''' in the '''Website/Content Management System''' section. A list of the directories currently configured in your system will be displayed. | #Click '''Directories''' in the '''Website/Content Management System''' section. A list of the directories currently configured in your system will be displayed. | ||
#Click the '''Add''' button. | #Click the '''Add''' button. | ||
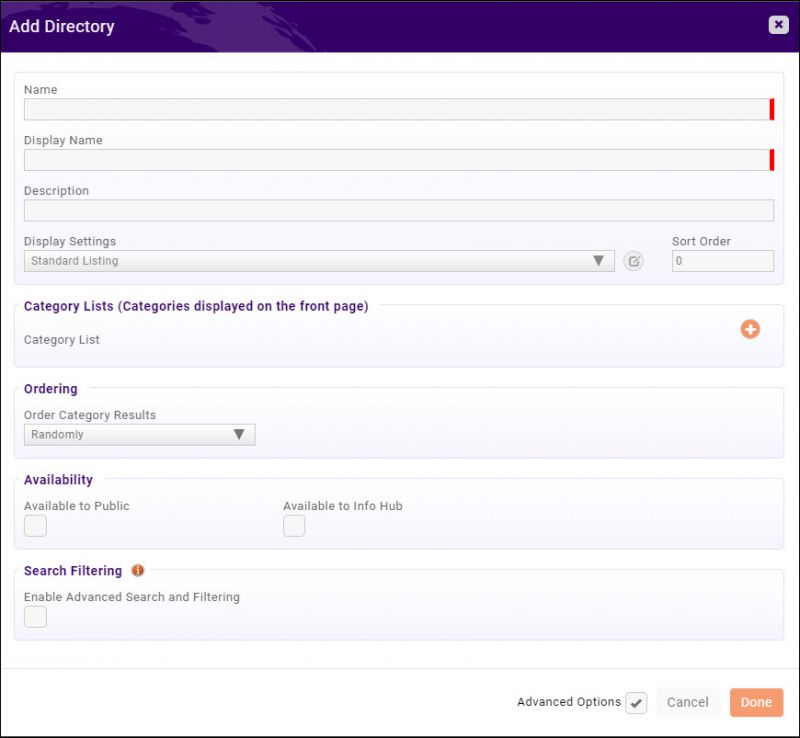
| − | #:[[File: | + | #:[[File:Add directory 2020.jpg|800px|center]] |
#Configure the following: | #Configure the following: | ||
| − | #:*'''Name''' | + | #:*'''Name''': Enter a name for the directory. |
| − | #:*'''Description''' | + | #:*'''Display Name''': Enter the name that you would like to display for this directory on your web-site. |
| − | #:*Select the '''Display Settings''' you wish to associate, by default, with this directory | + | #:*'''Description''': Enter a description of this directory. This description will be displayed on your web-site. |
| + | #:*Select the '''Display Settings''' you wish to associate, by default, with this directory. You can view and/or edit an existing display settings by clicking the [[File:Edit Policies.jpg]] icon, or, you can configure new display settings by clicking the [[File:Plus icon.jpg]] icon. | ||
| + | #:*'''Sort Order''': This setting allows you to set the display order for directory links in the left navigation in the Info Hub. | ||
#:*Select the '''Category List''' to associate to this directory. You can view and/or edit an existing category list by clicking the [[File:Edit Policies.jpg]] icon, or, you can configure new category list by clicking the [[File:Plus icon.jpg]] icon. | #:*Select the '''Category List''' to associate to this directory. You can view and/or edit an existing category list by clicking the [[File:Edit Policies.jpg]] icon, or, you can configure new category list by clicking the [[File:Plus icon.jpg]] icon. | ||
#:*'''Ordering:''' Select the desired '''Order Category Results'''. This option allows you to define how category results will be displayed in the directory. If '''Randomly''' is selected, category results will be displayed in random order. If '''By Name''' is selected, individuals are sorted by the first letter of their last name. '''NOTE:''' The Info Hub has it's own ordering options so randomization and ranking defined here are not applicable in the Hub. | #:*'''Ordering:''' Select the desired '''Order Category Results'''. This option allows you to define how category results will be displayed in the directory. If '''Randomly''' is selected, category results will be displayed in random order. If '''By Name''' is selected, individuals are sorted by the first letter of their last name. '''NOTE:''' The Info Hub has it's own ordering options so randomization and ranking defined here are not applicable in the Hub. | ||
#:*'''Availability''': Click the '''Available to Info Hub''' check-box if you want to include this directory on the Info Hub pages and/or click the '''Available to Public''' check-box if you wish to include this directory on your public web-site. | #:*'''Availability''': Click the '''Available to Info Hub''' check-box if you want to include this directory on the Info Hub pages and/or click the '''Available to Public''' check-box if you wish to include this directory on your public web-site. | ||
| − | #:'''Optional Custom Icon''' You can now customize the icons you use for your directory(s) placed in the left hand navigation of the InfoHub, using Font Awesome icons. Enter the code for your custom icon. If you have multiple directories, this is a great way to differentiate them. For Example, if you wish to add a restaurant icon to a "Places to Eat" directory, you could enter the code '''fa-cutlery''' and the [[File:Cutlery.jpg]] icon would be displayed next to your directory link in the InfoHub. '''[https://fontawesome.com/ | + | #:'''Optional Custom Icon''' You can now customize the icons you use for your directory(s) placed in the left hand navigation of the InfoHub, using Font Awesome Version 5 icons. Enter the code for your custom icon. If you have multiple directories, this is a great way to differentiate them. For Example, if you wish to add a restaurant icon to a "Places to Eat" directory, you could enter the code '''fa-cutlery''' and the [[File:Cutlery.jpg]] icon would be displayed next to your directory link in the InfoHub. '''[https://fontawesome.com/icons?d=gallery&m=free Click Here]''' to learn more about Font Awesome Icons. |
#Click the '''Advanced Options''' check-box. | #Click the '''Advanced Options''' check-box. | ||
#Click the '''Allow Search Filtering''' check-box. | #Click the '''Allow Search Filtering''' check-box. | ||
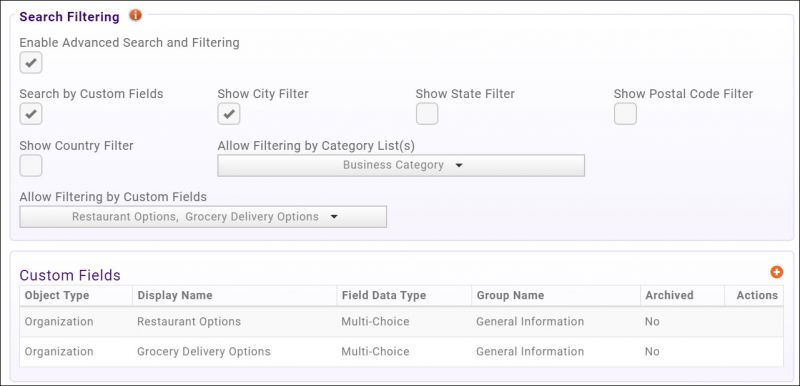
| − | #:[[File: | + | #:[[File:Search filtering 2020.jpg|800px|center]] |
| − | #:*Click '''Search by Custom Fields''' if you want to allow searching based on custom fields | + | #:*Click '''Search by Custom Fields''' if you want to allow searching based on custom fields. This is applied to the key word search, and results will be returned if the key word is in the custom field. When this option is enabled, if a keyword is entered in the directory. When you select this option, choose the custom fields to be included for the search from the '''Custom Fields''' section at the bottom of the screen. This is applicable to v1 public modules only. |
#:*Enable '''City''', '''State''' and '''Postal Code''' if you wish to provide these as filtering options. | #:*Enable '''City''', '''State''' and '''Postal Code''' if you wish to provide these as filtering options. | ||
#:*To '''Allow Filtering by Category List(s)''', select the category lists you wish to allow search on from the drop-down. | #:*To '''Allow Filtering by Category List(s)''', select the category lists you wish to allow search on from the drop-down. | ||
#:*To '''Allow Filtering by Custom Fields''', select the custom field you wish to allow search on from the drop-down. | #:*To '''Allow Filtering by Custom Fields''', select the custom field you wish to allow search on from the drop-down. | ||
#:*Click '''Done'''. | #:*Click '''Done'''. | ||
| + | |||
| + | ==='''<span style="color:#800080">Edit Directory Settings'''</span>=== | ||
| + | ---- | ||
| + | #Click '''Setup''' in the left-hand navigation panel. | ||
| + | #Click '''Directories''' in the '''Website/Content Management System''' section. A list of the directories currently configured in your system will be displayed. | ||
| + | #Click the hyper-link for the directory you wish to edit. | ||
| + | #Make the desired changes. See '''[[Getting_Started#Create_a_New_Directory|Create a New Directory]]''' above for description of the settings. | ||
| + | #Click '''Done'''. | ||
| + | |||
| + | ==='''<span style="color:#800080">Enable Directory Filtering by Custom Fields'''</span>=== | ||
| + | ---- | ||
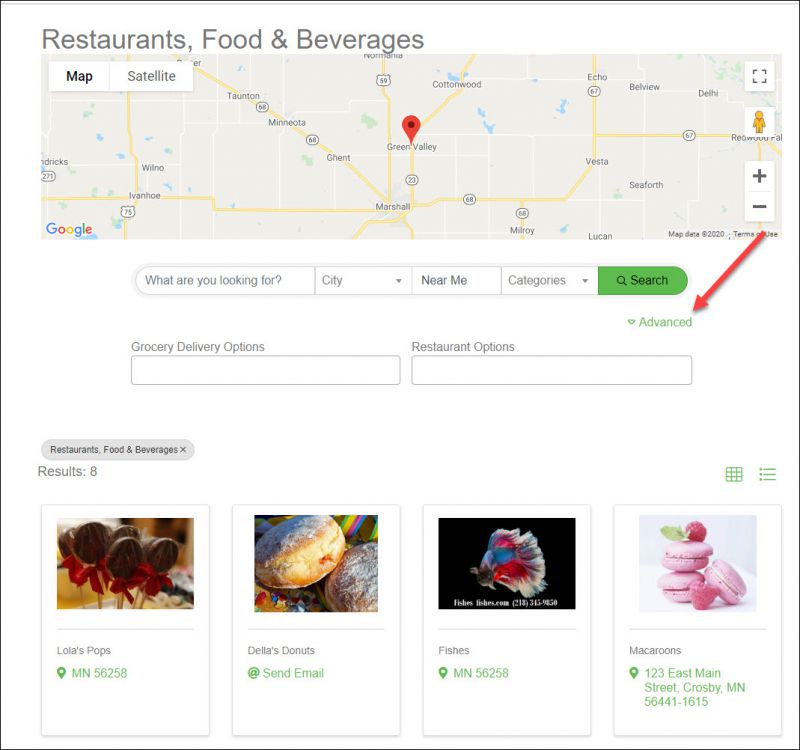
| + | Custom fields provide a great way for visitors to your web-site to find just the member they are looking for. By enabling the filtering option, and '''Advanced''' filtering option is available on the directory, and visitors can select options from custom fields. | ||
| + | [[File:Advanced filter 2020.jpg|800px|center]] | ||
| + | |||
| + | To enable filtering by custom fields: | ||
| + | #Access the directory: Setup > Directory, click the hyper-link for the desired directory. | ||
| + | #Click the '''Advanced Options''' check-box. | ||
| + | #In the '''Search Filtering''' section, click '''Enable Advanced Search and Filtering'''. | ||
| + | #Select the custom fields you wish to allow filtering by from the '''Allow Filtering by Custom Fields''' list. Custom Fields that you have created for organizations or individuals and set to '''Public''' will be displayed. | ||
| + | #Click '''Done'''. | ||
=='''<span style="color:#800080">Setup Your Document Templates'''</span>== | =='''<span style="color:#800080">Setup Your Document Templates'''</span>== | ||
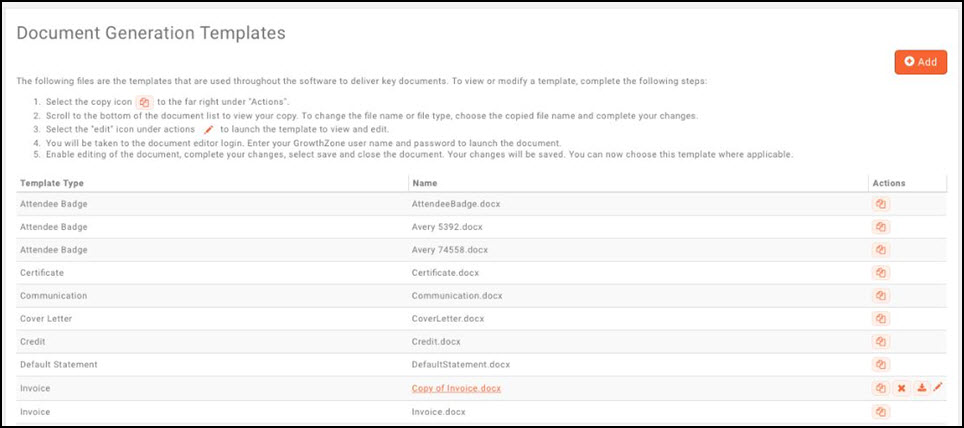
| Line 617: | Line 829: | ||
==='''<span style="color:#800080">View/Modify Template (PC Instructions)'''</span>=== | ==='''<span style="color:#800080">View/Modify Template (PC Instructions)'''</span>=== | ||
---- | ---- | ||
| + | |||
| + | {| class="wikitable" | ||
| + | |- | ||
| + | | | ||
| + | [[File:Video-call-24.jpg|link=https://www.screencast.com/t/DLEP0vik]] | ||
| + | | style="width: 100%"| '''See Viewing and Editing Document Generation Templates in Action!''' | ||
| + | |} | ||
| + | |||
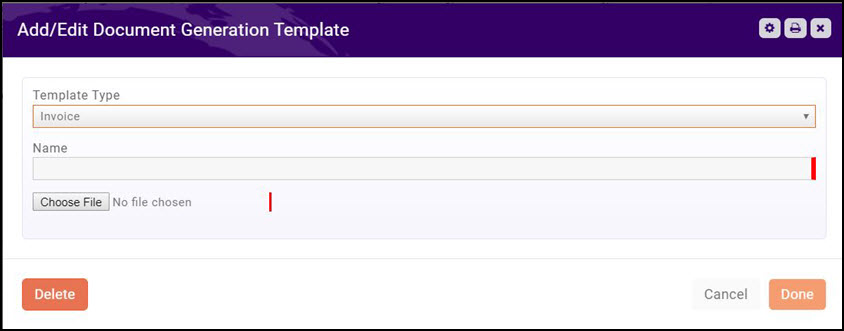
#Click '''Setup''' in the Navigation Panel. | #Click '''Setup''' in the Navigation Panel. | ||
#Click '''Document Generation Templates''' in the '''Document Generation''' section. A list of existing templates will be displayed. | #Click '''Document Generation Templates''' in the '''Document Generation''' section. A list of existing templates will be displayed. | ||
| Line 662: | Line 882: | ||
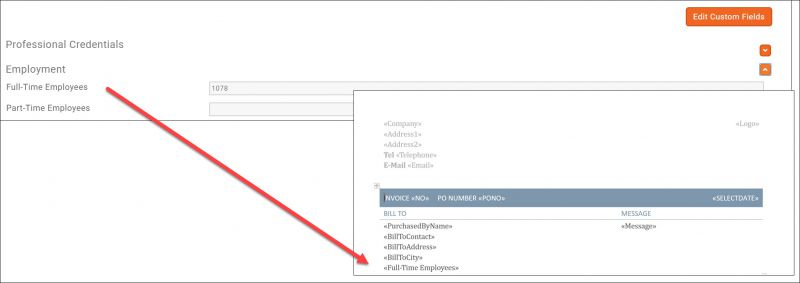
==='''<span style="color:#800080">Add Merge Fields to a Document Template'''</span>=== | ==='''<span style="color:#800080">Add Merge Fields to a Document Template'''</span>=== | ||
---- | ---- | ||
| − | Many database fields (merge fields) are available to customize your document templates. To add merge fields to a template: | + | Many database fields (merge fields) are available to customize your document templates. |
| + | |||
| + | COMING SOON: there will be a | ||
| + | [[File:Available merge fields icon 2020.jpg|25px]] icon in the '''Actions''' column for the desired template to view a list of available merge fields. | ||
| + | [[File:View merge fields 2020.jpg|800px|center]] | ||
| + | |||
| + | {| class="wikitable" | ||
| + | |- | ||
| + | | | ||
| + | [[File:Video-call-24.jpg|link=https://www.screencast.com/t/NLRhlTlnAKp]] | ||
| + | | style="width: 100%"| '''See Updating a Merge Field in Action!''' | ||
| + | |} | ||
| + | |||
| + | To add merge fields to a template: | ||
#Click '''Setup''' in the Navigation Panel. | #Click '''Setup''' in the Navigation Panel. | ||
| Line 725: | Line 958: | ||
|- | |- | ||
|BillToCity || Billing City, State, & Zip Code. || X | |BillToCity || Billing City, State, & Zip Code. || X | ||
| + | |- | ||
| + | |BillToCountry || Billing Country || | ||
|- | |- | ||
|BillToContact || Billing Contact Name (if applicable). || X | |BillToContact || Billing Contact Name (if applicable). || X | ||
| Line 794: | Line 1,029: | ||
|- | |- | ||
| UFBillingAddressCountry || The country associated to the address selected when the invoice was created.|| | | UFBillingAddressCountry || The country associated to the address selected when the invoice was created.|| | ||
| + | |- | ||
| + | |UFPurchaseCreatedDate || The date an invoice was created. | ||
|} | |} | ||
| Line 937: | Line 1,174: | ||
Standard merge fields available for '''Component Certificates''' are described in '''[[Getting_Started#Continuing_Education.2FCertificates_Merge_Fields|Continuing Education/Certificates Merge Fields]]'''. You may also add an individual custom field to a component certificate. To do this, create a merge field in Word that starts with UFCertificationContact and then the name of the custom field. | Standard merge fields available for '''Component Certificates''' are described in '''[[Getting_Started#Continuing_Education.2FCertificates_Merge_Fields|Continuing Education/Certificates Merge Fields]]'''. You may also add an individual custom field to a component certificate. To do this, create a merge field in Word that starts with UFCertificationContact and then the name of the custom field. | ||
| − | '''For Example''': If your custom field is called NPN #, your merge field would look like <<UFCertificationContactNPN>> and the code in Word would be { MERGEFIELD UFCertificationContactNPN /* MERGEFORMAT } The custom field should be a single word with no special characters like “#” or “*”. The display name | + | '''For Example''': If your custom field is called NPN #, your merge field would look like <<UFCertificationContactNPN>> and the code in Word would be { MERGEFIELD UFCertificationContactNPN /* MERGEFORMAT } The custom field should be a single word with no special characters like “#” or “*”. '''IMPORTANT''': The display name should be the same as the merge field name. |
{| class="wikitable" | {| class="wikitable" | ||
| Line 1,028: | Line 1,265: | ||
#Add the representative, who requires access, to '''your''' Organization as a contact. See '''[[Contact_Management#Add_Individual_Contacts_to_an_Organization.2FBusiness|Add Individual Contacts to an Organization/Business]]''' for information on adding a contact to a business. | #Add the representative, who requires access, to '''your''' Organization as a contact. See '''[[Contact_Management#Add_Individual_Contacts_to_an_Organization.2FBusiness|Add Individual Contacts to an Organization/Business]]''' for information on adding a contact to a business. | ||
| − | #Setup Access Level with '''Has Contact Relationship Restriction''' enabled | + | #Setup Access Level with '''Has Contact Relationship Restriction''' enabled. |
#Add a staff login (Setup > Staff Login) for the member representative, and assign the access level created above to him/her. See '''[[Getting_Started#Add_Staff_Member|Add Staff Member]]''' for instructions. | #Add a staff login (Setup > Staff Login) for the member representative, and assign the access level created above to him/her. See '''[[Getting_Started#Add_Staff_Member|Add Staff Member]]''' for instructions. | ||
#On the contact's organization '''Profile''' tab, assign the individual to the organization as '''Assigned Staff'''. See '''[[Contact_Management#Assign_Staff_to_a_Business.2FOrganization|Assign Staff to a Business/Organization]]''' for instructions. | #On the contact's organization '''Profile''' tab, assign the individual to the organization as '''Assigned Staff'''. See '''[[Contact_Management#Assign_Staff_to_a_Business.2FOrganization|Assign Staff to a Business/Organization]]''' for instructions. | ||
| Line 1,034: | Line 1,271: | ||
==='''<span style="color:#800080">Configure Designations'''</span>=== | ==='''<span style="color:#800080">Configure Designations'''</span>=== | ||
---- | ---- | ||
| − | You may assign designations to individual contacts in your database. To configure designations: | + | You may assign designations to individual contacts in your database. |
| + | |||
| + | {| class="wikitable" | ||
| + | |- | ||
| + | | | ||
| + | [[File:Video-call-24.jpg|link=https://www.screencast.com/t/xOkykCA3RmbG]] | ||
| + | | style="width: 100%"| '''See Adding Designations in Action!''' | ||
| + | |} | ||
| + | |||
| + | To configure designations: | ||
#Click '''Setup''' in the left-hand navigation panel. | #Click '''Setup''' in the left-hand navigation panel. | ||
| Line 1,043: | Line 1,289: | ||
#Repeat steps 3 - 4 above to add additional designations. | #Repeat steps 3 - 4 above to add additional designations. | ||
#Click '''Save'''. | #Click '''Save'''. | ||
| + | |||
| + | ==='''<span style="color:#800080">General Data Protection Regulation Basics (GDPR)'''</span>=== | ||
| + | ---- | ||
| + | The General Data Protection Regulation (GDPR) is a European Union law enacted in 2016 which will take effect with enforcement beginning on May 25th, 2018. This law was enacted with the goal of providing better data and privacy protection and security for European Union (EU) member states’ citizens. | ||
| + | |||
| + | ===='''<span style="color:#800080">Brexit Impact'''</span>==== | ||
| + | In early 2017, UK Prime Minister May outlined several technology related impacts of the impending exit of the UK from the EU (Brexit) which have been reiterated by UK Digital Minister Hancock. According to these reports, the UK plans to keep GDPR provisions by mirroring it via UK regulations. These regulations are not yet in place and will require legislation to be passed in parliament. However, it should be noted that the Brexit process is currently unlikely to terminate prior to the EU GDPR deadline in 2018. Thus, UK customers are recommended to stick with May 25th, 2018 deadline for compliance. | ||
| + | |||
| + | ===='''<span style="color:#800080">GDPR Responsibilities & Accountability'''</span>==== | ||
| + | In dealing with GDPR Compliance, it is important to understand where accountability lies. | ||
| + | |||
| + | For GrowthZone software (including the MIC/Hub), GrowthZone is responsible for complying with the GDPR, communicating compliance to chambers and associations, and reporting issues. Our staff and member apps, as extensions of the back office and MIC/Hubs, fall under this definition as well. SmartCMS and GrowthZoneCMS do not collect member or visitor data. On pages where member or visitor data appears to be collected by these systems, it is in fact due to an integration of the Chambermaster/Memberzone and GrowthZone software and thus these systems do not fall under the GDPR requirements. | ||
| + | |||
| + | Customers that use third party systems for websites or integrations with Chambermaster and GrowthZone software need to be aware GrowthZone is not responsible for the compliance of these systems; GrowthZone is responsible for GDPR compliance of its products only. Chambers and associations are accountable to ensure overall GDPR compliance for the mix of systems they are using to collect and process member and visitor data. | ||
| + | |||
| + | ===='''<span style="color:#800080">Components'''</span>==== | ||
| + | All information regarding the specific regulations can be found on the GDPR site. Requirements of the GDPR are broken down into the following categories or “rights” of individuals: | ||
| + | |||
| + | #The right to be informed | ||
| + | #The right of access | ||
| + | #The right to rectification | ||
| + | #The right to erasure | ||
| + | #The right to restrict processing | ||
| + | #The right to data portability | ||
| + | #The right to object | ||
| + | #Rights in relation to automated decision making and profiling. | ||
| + | |||
| + | These rights when viewed together are meant to provide individual users greater clarity and understanding of what personal data is being stored, how it is being used, and how to access/delete that data. In the end, the goal is to provide greater personal data privacy, access and protection. Here’s a brief summary of obligations for GDPR compliance. | ||
| + | |||
| + | #'''Right to be informed:''' Obligation of organization to inform users submitting personal data as to how the data will be kept private and used. Usually issued as part of a privacy notice that must be viewed.. | ||
| + | #'''Right of access:''' Obligation to confirm a user’s request as to whether their data is being held/processed and the obligation to grant them access to their personal data | ||
| + | #'''Right of rectification:''' Obligation to provide access to rectify any personal data deemed incorrect. Obligation to disclose any personal data given to 3rd parties and contact information for rectification | ||
| + | #'''Right of erasure:''' Obligation to remove/erase all stored personal data upon request | ||
| + | #'''Right to restrict processing:'''Obligation to halt the processing of data that is deemed restricted by the user | ||
| + | #'''Right to data portability:''' Obligation to provide a .csv/export of personal data within one month of request | ||
| + | #'''Right to object:''' Obligation, if requested, to halt processing of data for marketing, profiling, interest, or research purposes | ||
| + | #'''Rights in relation:''' Obligation to provide clarity on types of decisions that are automated and allow for human interaction for those that have a significant legal impact. | ||
| + | |||
| + | A chamber or association may receive a request from an individual regarding these rights or a request from a governmental agency for records and documentation of compliance. Additionally, organizations have specific obligations regarding accountability, data protection, and breach notifications that vary depending on the types of data being collected and processed; these records may also be requested. | ||
| + | |||
| + | ===='''<span style="color:#800080">GDPR Compliance at GrowthZone'''</span>==== | ||
| + | GrowthZone is compliant with current GDPR requirements. To verify, you can go to the [https://www.privacyshield.gov/list Privacy Shield website] and search for "GrowthZone". | ||
| + | |||
| + | ===='''<span style="color:#800080">Express Consent'''</span>==== | ||
| + | To ensure users are aware of the types of data being collected and for what purpose it is being used along with the need to opt-in, there will be changes, additions, and privacy notices added to screens that collect information. This can include features like the membership application, event registration, etc. | ||
| + | Privacy Settings | ||
| + | Areas such as the MIC and Hub will see additions allowing members even more control over their personal data including contact information, profile information and visibility settings. | ||
| + | |||
| + | ===='''<span style="color:#800080">Reports'''</span>==== | ||
| + | One of the key goals of the GDPR is to provide understanding of what data is stored, allow users access to correct it, and delete it if they choose. Reporting regarding GDPR compliance and specific personal data reports will be added so that chambers and associations to easily identify and document the types of data stored and find specific user’s personal data if requested. | ||
| + | |||
| + | '''<span style="color:#800080">Training</span>''' | ||
| + | |||
| + | GDPR documentation and training will be provided starting in 2018 helping chambers and associations tackle specific GDPR compliance issues. Offerings will include both technical trainings and general communication with topics ranging from help understanding the law, to running reports, to dealing data. | ||
Latest revision as of 21:13, 18 May 2021
NEW!! Find all of your answers in the GrowthZone Knowledge Base!
Contents
- 1 Introduction
- 2 GrowthZone Privacy Policy
- 3 View Product Updates
- 4 Browsers Supported
- 5 Working with the Dashboard
- 6 Review your Organization Information
- 7 Setup Up User Access Level and Credentials
- 8 Category Lists
- 9 Setup Directory Display Settings
- 10 Setup your Directories
- 11 Setup Your Document Templates
- 12 Getting Started - Special Topics
Introduction
GrowthZone is the smart association software designed to help you:
- Grow your membership
- Retain and engage your existing organizations or individuals
- Do more with less time
New to the software? See Dashboard - Getting Started Tab for resources available to learn more about the software.
GrowthZone Privacy Policy
Review GrowthZone's privacy policy here.
View Product Updates
| See Viewing Product Updates in Action! |
GrowthZone regularly releases new features and functionality. Notifications will be displayed on the main screen, and you may view the release notes and product details:
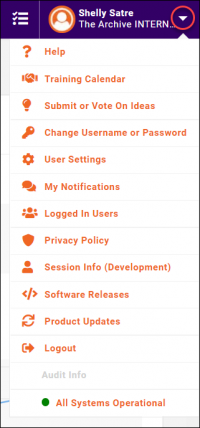
- Click the arrow next to your name in the header bar.
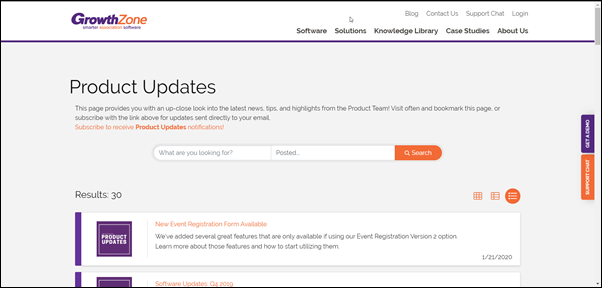
- Click Product Updates.
| NOTE: The |
Browsers Supported
Your GrowthZone software is web-based, you can log-in from anywhere that you have access to the internet. We support the latest version of the following browsers:
- Chrome
- FireFox
| INTERNET EXPLORER USERS: For the best experience, we encourage you to use one of the browsers listed above. You can still access your GrowthZone software through Internet Explorer; however, some of the screen may not function as expected. |
Working with the Dashboard
The Dashboard Module provides you with quick-select options to view metrics, manage the initial setup of your database and follow your success plan.
Dashboard - Getting Started Tab
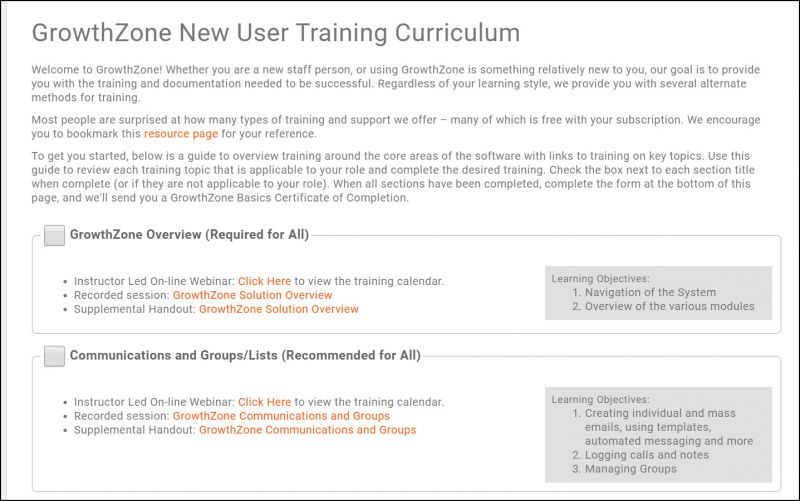
The Dashboard Getting Started tab is a resource for all staff members new to the software. It provides a guide to overview training around the core areas of the software with links to training on key topics. Use this guide to review each training topic that is applicable to your role and complete the desired training. Check the box next to each section title when complete (or if they are not applicable to your role). When all sections have been completed, complete the form at the bottom of this page, and we'll send you a GrowthZone Basics Certificate of Completion.
Dashboard - Metrics
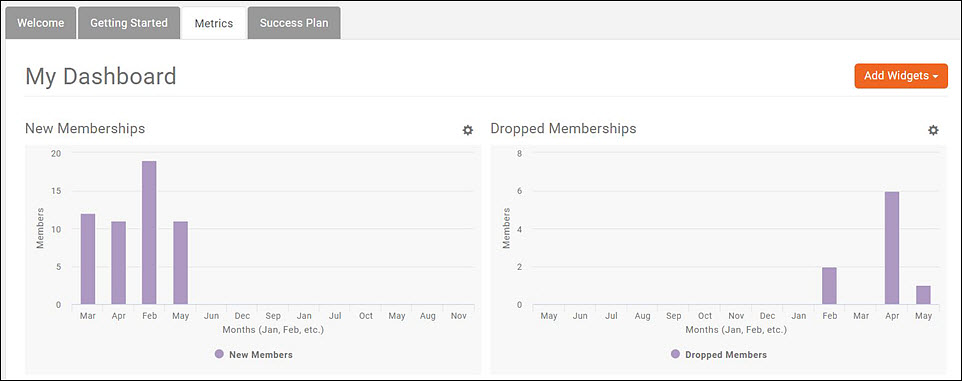
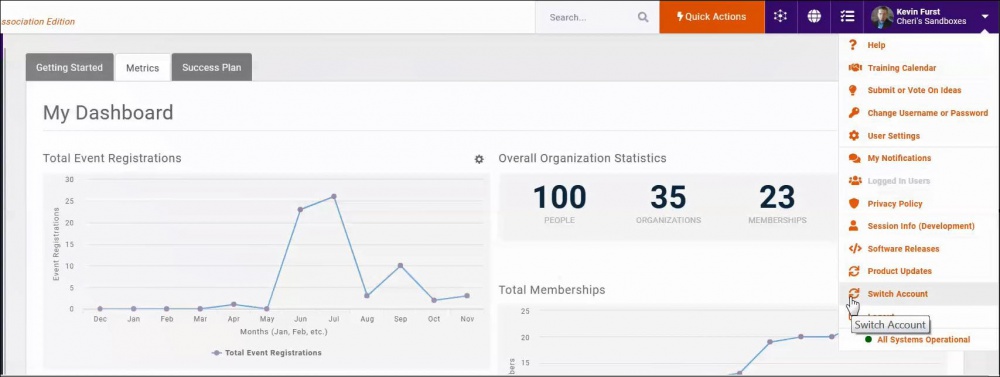
The Metrics tab displays a variety of charts and metrics providing an at a glance view of your organization.
| See Working with Widgets in Action! |
Rearrange Dashboard Metrics
To place the charts and metrics in the positions you wish on your Dashboard:
- Click the
 icon
icon - Click Move Widget. This will enable you to move all of the widgets into your desired placement.
- Click and hold down on the
 icon. You can now move the widgets where you wish to place them on the dashboard.
 - Click the Done button when you have completed your arrangement.
Edit Chart Layouts
To place the charts and metrics in the positions you wish on your Dashboard:
- Click the
 icon.
icon. - Select Edit Widget.
- Configure the widget as needed. Options available will depend on the widget you are working with.
- Click Done.
Add Widgets to the Dashboard
Additional charts and reports may be added to your Dashboard:
- Click the Add Widgets button.
- Select the widget you wish to add. The widget will be added in the top left hand side of the dashboard.
Setting Time Zone & Organization Logo
- Click Setup in the Navigation Panel.
- In the Miscellaneous section, click General Settings.
- Select your time zone from the Current Timezone drop-down list.
- Select your locale from the Culture list. This will customize dates, times and currency to your locale.
- Primary Logo - Click the pencil icon below Primary Logo to import your logo. The Image Manager window will open.
- In the Image Manager, click Upload. You will then navigate to your computer/server location of your logo.
- Select your logo and click open. You may position and crop the logo as needed.
- Click Crop and Save to save your logo.
| NOTE: The pencil icon will only display when you hover your mouse below Primary Logo. |
Display Country on Contact Profile
If you are an organization that spans different countries, this setting will allow you to display country on the contact's Profile tab, and when viewing your contact list when displayed in card view.
- Click Setup in the Navigation Panel.
- In the Miscellaneous section, click General Settings.
- Select Display Country on Contacts Module.
- Click Save.
Enable Printing Pop-up Windows
If you enable this option, a print option will be available on pop-up windows throughout the software. This feature is no longer supported, but certain print options may meet your needs.
- Click Setup in the Navigation Panel.
- In the Miscellaneous section, click General Settings.
- Select Enable Printing Pop-up Windows.
- Click Save.
Setup your Terminology
| See General System Settings and Customizing System Terminology in Action! |
GrowthZone is built to be very customizable for your needs. If needed, you can customize the terminology used in the database. For instance, if you wish you may change the default name "Organization" to "Business".
- Click Setup in the Navigation Panel.
- In the Miscellaneous section, click System Terminology. A list of terms that may be customized is displayed.
- Click the link for the term you wish to customize. The Override Terminology screen will be displayed.
- Enter the term you wish to use in the Your Custom Term text box.
- Enter the plural version of your custom term in the Plural Form text box.
- Click Done to save your changes.
Genders
See the new GrowthZone Knowledge Base for a new feature- the ability to customize additional gender selections!
Custom Fields
Custom Fields are designed to give ultimate flexibility in managing your data. When adding a custom field, you will create a database field that is available for tracking additional desired information. For example, you may wish to track an individuals birth month so that you can send out birthday greetings. Fields may be added to your Member Application Form to capture the information at the time of application, or fields may be added directly to a record.
- Click Setup in the Navigation Panel.
- Click Custom Fields in the Miscellaneous section. A list of the custom fields currently configured in your database will be displayed.
- Click the Add button.
- On the Add/Edit Custom Field screen, configure the following:
- Field Area - Select a field area from the drop-down list. This selection dictates where you would like to use the custom field. For example, if you wish to create a field to be used in your Web Content, you would select Content Item.
- Name - Enter a name for the custom field. This will be used internally by the database.
- Display Name - Enter a display name. This is the field that will be displayed to the public. For example, if you are creating a "Meal" field for selection of a meal choice on an Event, you may wish the enter "Please select your meal choice" to be displayed to the public. This field may include a question or statement, as needed.
- Custom Field Data Type - Select the data type for the custom field. NOTE: Selecting Drop-down will allow you to setup a list of options, and one option may be chosen. Selecting Drop-down with fill-in will allow the user to fill in an option. Multi-choice would allow the user to select more than one option.
- Group/Section - (Optional) Select the desired group section of this custom field. Group sections are used through-out the software, and you may wish to group together similar custom fields.
- Characters Allowed - This option would limit the number of characters that could be entered in a text box response. If you have selected a text box option (text or multi-text) you MUST enter in the number of characters allowed, and the value may not be 0.
- Properties - Define the properties for the custom field:
- Public - Select this check-box if you wish this field to be displayed for the public. This will allow the field to be displayed in the InfoHub, Directories and for use in membership applications.
- Member Editable - Select this check-box to allow users to edit this custom field in their hub profile. If a custom field is to appear in the hub, but is not to be editable, you need only check the property Public.
- Required - Select this check-box to make this field required. NOTE: Making a field required only applies when the member is filling out the form/application/registration/etc- it does not force that field to be required when it is displayed in the back office.
- Archived - If you no longer wish to use this custom field, selecting this check-box will hide the field from being used in the back office, but historical data will be maintained.
- Click Done.
Review your Organization Information
When your database is first installed, your organization is added as a contact with non-member status in the database. Review the contact information to ensure all address information and email are correct. The data populated is the information provided to GrowthZone initially, and you may edit as needed.
- Select Contacts in the Navigation Panel.
- Enter the name of your organization in the Search box.
- Click the hyper-link for your organization.
- On the Profile tab, review your organization information in the Contact Info section. If editing is needed, click the pencil icon to open the edit dialog box as needed.
| NOTE: Country must be selected when entering address information. If country has not been selected, drop-down lists for picking states will not be available to you in such things as the membership application form, registration for events, etc. |
Update your Organization Information
Your organization exists as a contact in the database. If address, web-site, phone, emails, etc. need to be updated, see Update a Contact Organization/Business Profile Information.
Re-branding your Organization
If you are re-branding your organization with a new logo, you can update your logo under your organization's information.
- Select Contacts in the Navigation Panel.
- Enter the name of your organization in the Search box.
- Click the hyper-link for your organization.
- Click your logo in the header.
- Upload your new logo, and Crop & Save.
| NOTE: If you have also included an alternate logo for your invoices, update the logo in the Finance Settings. See Configure Finance Defaults & Logo for Invoices & Statements for further information'. |
Setup Up User Access Level and Credentials
Access to the database and to the Info Hub are "access level-driven". A staff or members may only view, edit, delete and/or create based on the Access Level they have been given.
Setup Staff Access Levels
Access Levels drive what functions your staff will be able to perform in the database. You may view existing access levels by selecting Setup in the Navigation Panel, and clicking Access Levels in the Users section.
The system is populated with the following access levels:
- Staff - Admin - this access level provides full control of the entire database. Individuals with this access level will be able to view, edit, create and delete.
- Staff - Guest - this access level provides read only access in the database.
- Staff - Standard - this access level provides read/edit/create/delete of the system, with the exception of the Finance sections, which are view only.
- Staff - Finance - this access level provides full editing, and full Finance access.
- Staff - Website - this access level allows the staff user to ONLY edit or login to the website (by clicking the globe icon in the header bar). All other areas of the database are set to None.
- User - View Only in Info Hub - this access level provides view only access in Info Hub.
- User - Create/Edit/View in Info Hub - this access level provides Create/Edit in Info Hub but not the ability to delete.
- User - Full Control in Info Hub - this access level provides full control in Info Hub. Users with this access can view, add, edit & delete.
The above access levels may be used as initially setup, or you may customize them to meet your needs.
| NOTE: Click here for information on setting up your member's access to the Info Hub. |
Create a New Access Level - Staff
| See Creating a New Staff Access Level in Action! |
- In the Navigation panel, select Setup.
- Click the Access Level link in the Users section. The Access Levels screen will display a list of the pre-configured Access Levels, and the number of people assigned to each level. You may view the permissions that are associated to a particular level by clicking the hyper-link. You will see a list of each of the main functions of the database, and the access level granted. The Users column displays the number of users assigned to the access level. To view a list of the users click the numbered hyper-link.
- Click the ADD button.
- Enter a Name for the new Access Level – best practice would be to provide a name that at a glance tells you what the access level is for.
- Select the Access Level Type. Select Staff. The Staff and User options are a way for the system to differentiate between which access level it should display when you are creating access for a member of your chamber or association vs. creating access for a staff person.
- For each function, select the level of access you wish to provide. If you wish to provide access to the entire system with one level of access, you can do this by selecting the access level for System Default. Or, if you wish to set specific access to individual functions, select the access for that function.
- Once all selections have been made, click Done.
Access Level Settings
- View: This access level allows the user to retrieve and view information from the database in read only mode.
- Edit: This access level allows the user to retrieve and change/update existing database information.
- Create: This access level allows the user to add new content to the database, as well as view and update existing information.
- Delete: This access level allows the user to remove existing content from the database as well as create, update and view.
- Use Default: When this access level is selected, the user will be given the access level selected in System Default.
- None: By selecting this option, the user will have no access to the specified area.
| NOTE: If you set the access to the overall system - this setting will apply to all modules, unless you have specifically set access levels for some of the modules. The module level will supercede Use Default the System Default. If you do not set the System Default, you must select access level for each and all modules. If you select Use Default the System Default setting will apply. If you select None this will be applied and the user will have no access to a particular module. |
Create a New Access Level - Users (Members)
- In the Navigation panel, select Setup.
- Click Access Level in the Users section.
- The Access Level screen will display a list of the pre-configured Access Levels, and the number of people assigned to each level. You may view the permissions that are associated to a particular level by clicking the hyper-link. You will see a list of each of the main functions of the database, and the access level granted. The Users column displays the number of users assigned to the access level. To view a list of the users click the numbered hyper-link.
- Click the ADD button.
- Enter a Name for the new Access Level – best practice would be to provide a name that at a glance tells you what the access level is for.
- Select the Access Level Type. Select User. The Staff and User options are a way for the system to differentiate between which access level it should display when you are creating access for a member of your chamber or association vs. creating access for a staff person.
- For User (Member) access, scroll to Info Hub in the Area list.
-
- You may set access to the overall Info Hub by selecting an option from the Access Level drop-down list OR
- Click Custom to display a list of all areas in the Info Hub to set specific access to each area. For Example: you may wish to setup an access level that provides an individual access to update and manage their own account information, but not the organization account information. In this case, you would set Individual Account Info to Edit and set Organization Account Info to None. Or, if you wish to hide certain items from this access level, for example Resources, you would set Resources to None. NOTE: If you set the access to the overall system - this setting will apply to all modules, unless you have specifically set access levels for some of the modules. The module level will supersede the overall system level. If you do not set the overall system, you must select access level for each and all modules. If you select None the menu option will not be displayed in the Info Hub Navigation panel.
-
- Once all selections have been made, click Done.
NOTE: The My Info page in the Info Hub contains multiple tabs. The access to these tabs may be controlled individually:
- Contact Info: This tab displays contact information for the individual logged into the Info Hub. Access to this is controlled by the Contact Info setting.
- Membership: This tab displays the individual's membership, and is controlled by the Membership setting. However, if the individual does not have access to the Organization Account Info the pricing information for the membership will not display.
- Account: This tab displays billing information. You can control an individuals access to individual billing and organization billing information by the Individual Account Info and the Organization Account Info settings. Note also, a user must have at least View rights to store and edit credit card information.
- Related Businesses: The Related Business tab displays the business (organization) to which the individual is related. An individual with appropriate access may update company information, etc. on this tab. This tab is controlled by the Related Contact Info setting.
- Related Contacts: This tab displays the individual contacts associated to a business. This tab is controlled by the Related Contact Info setting.
- Refer Others: This tab is controlled by the Referrals setting. The display of the tab and the ability to refer others is controlled by whether this setting is set to Edit or None.
View/Edit User (Member) Access Levels
- In the Navigation Panel, click Setup.
- Click Access Levels in the Users section.
- Click the link for the access level you wish to view/update.
- Scroll to Info Hub. The default access level for all functions within the Info Hub is displayed, or if Set Custom Access for Specific Area(s) is enabled, all areas of the Info Hub are displayed, with the associated access level.
- If you wish to change access for certain area of the Info Hub, select the desired access for that area. If an area is set to Use Default access to that area will be driven by the overall Info Hub setting.
- After making changes, click Save.
Access Level Settings
- View: This access level allows the user to retrieve and view information from the database in read only mode.
- Edit: This access level allows the user to retrieve and change/update existing database information.
- Create: This access level allows the user to add new content to the database, as well as view and update existing information.
- Delete: This access level allows the user to remove existing content from the database as well as create, update and view.
- Use Default: When this access level is selected, the user will be given the access level selected for the Info Hub overall.
- None: By selecting this option, the user will have no access to the specified area.
Setup Staff User Credentials
Each member of your staff who will need access to the database will need to be provided with login credentials.
Add Staff Member
| See Adding a Staff Member in Action! |
- In the Navigation Panel, click Setup.
- Click Staff Users in the Users section. A list of all active staff in your system will be displayed.
- Click the Add button.
- Configure the following:
- Primary Contact / Password Reset Email - Enter an email address for the user. This email address is used to send an initial email to the user to complete their login credentials, and is also used when an email needs to be sent to reset a password.
- First Name
- Last Name
- Access Level - select the access level you wish to assign to this user.
- Click Done.
An email will be sent to the staff member. Within the email is a link to create their account. The link is valid for 72 hours. If they do not create their credentials in the 72 hour window, they will receive an error. In this circumstance, you would need to resend the log-in setup email. In this circumstance, you can resend the instructions email. Click Here for further information on resending instructions.
| NOTE: If the new user already exists in the database, the system will display this on the screen, this will prevent you from creating a duplicate user. |
View Staff Users
| See Viewing and Working with Staff Users in Action! |
- In the Navigation Panel, click Setup.
- Click Staff Users in the Users section. A list of all of your staff users will be displayed.
Change Staff Access Level
- Click Setup in the left-hand navigation panel.
- Click Staff Users in the Users section.
- Click the name of the staff member for whom you wish to change access level.
- Select the desired access level from the Access Level list.
- Click Done.
Resend User Credentials Setup Instructions
When a new user is setup in your system, an email is automatically sent to them to create their user name and password. If a user does not receive notification to setup credentials, or they have not setup their credentials, you can resend the setup instructions from the Users page (Setup > Users > Staff Users).
Click the Resend Invite icon ![]() in the Actions column.
in the Actions column.
Send Staff User Password Reset Instructions
You can send an email providing instructions to the user on how to reset their password on the Users page (Setup > Users > Staff Users)
Click the Send Reset Email icon ![]() in the Actions column.
in the Actions column.
| NOTE: If multiple staff members use the same e-mail address, each will receive the reset password email. Within the email a link in the email to each associated account is provided. For Example: If Betty and Sue both use the email address info@mychamber.com but each have their own login name to the tenant. Betty asks for a password reset email and when it arrives she knows which reset link to select because it is identified with the login name that she is used to using. |
Reset a Staff Users Password
You can reset a users password on the Users page (Setup > Users > Staff Users).
Click the Reset Password icon ![]() in the Actions column.
in the Actions column.
Disable Staff Login
You may disable the login for a user, without deleting the user. This function may be useful, for example, when someone is out on leave. By disabling the log-in, the username and log-in will be reserved for this staff user which will make it easy to re-able the user as needed. If you wish to completely remove the staff member from your database, see Delete a Staff User.
- In the Navigation Panel, click Setup.
- Click Staff Users in the Users section. A list of all of your staff users will be displayed.
- Click the Disable Staff Login icon
 for the desired user. You will be asked to confirm that you wish to disable this user's login.
- Click OK.
The status of this user will now be displayed as Not Active. The user will no longer be able to login to the database. If they attempt to log-in the Account is disabled message will be displayed on the log-in screen.
| NOTE: If the staff person is also a member of your organization, who wishes to setup access to the Info Hub, he/she will NOT be able to use these same credentials for access to the Info Hub. |
Re-enable a Staff User
When you have disabled a staff user log-in, you can easily enable it:
- In the Navigation Panel, click Setup.
- Click Staff Users in the Users section. A list of all of your staff users will be displayed.
- Click the Enable Login icon
 for the desired user. You will be asked to confirm that you wish to enable this user's login.
- Select the Is Active check-box.
- Click Done.
The status of this user will now be displayed as Active and the user will be able to use the same user name and password used previously.
Delete a Staff User
Unlike disabling a login for a staff user, when deleting a staff user, you will release the username and password associated to the user, and not have the ability to re-enable the log-in. If the staff member is also a member of your organization, he/she may wish to use their staff credentials to access the Info Hub. In this case, best practice would be to delete them as staff. If you wish to simply disable the login for the staff member (perhaps he/she is on leave) best practice is to disable the login, so that you can easily re-enable when he/she returns. If you delete the user, you will need to add them back to the system, and re-create login credentials. See Disable Staff Login for further information.
To delete a staff member:
- In the Navigation Panel, click Setup.
- Click Staff Users in the Users section. A list of all of your staff users will be displayed.
- Click the hyper-link for the staff user you wish to delete.
- Click the Delete button. You will be asked to confirm that you wish to delete this staff user.
- Click OK.
Reassign Staff
If a staff person leaves or their contacts need to be assigned to another staff member, use the Reassign Staff option under Setup>Staff Users. All contacts associated to the current staff person will be reassigned to the new staff person you pick. NOTE: This does not currently change assignments on Projects or Sales Funnel opportunities it only applies to the Assigned Staff that displays on the contact’s profile.
- In the Navigation Panel, click Setup.
- Click Staff Users in the Users section. A list of all of your staff users will be displayed.
- Click the Reassign Staff button.
- Select the Current Staff Person. This is the staff member who is currently assigned to the contacts.
- Select the New Staff Person. This is the staff member to whom you wish to assign the contacts.
- Select the desired Relationship Type.
- Click Done.
Subscribe to Automated Staff Notifications
Your system can be automated to send notifications when certain events occur. For Example: An automated notification can be sent to a staff member when an On-line Membership Application is submitted.
- Click the Notifications icon
 in the Actions column.
- Click the notifications to which you want to subscribe this user.
- Select the users email address.
- Select how frequently you want this user to receive notifications: As it Happens or Daily.
- Click Done.
| NOTE: Staff Users may also setup their own notifications by clicking their name in the header bar, and selecting My Notifications |
The table below describes the message to which staff may subscribe. An administrator can setup the notifications for a staff member on the Users page OR each staff member can subscribe themselves by clicking their name in the header bar and clicking My Notifications.
| Event | Description |
|---|---|
| Membership Application Submitted | An email notification will be sent when a new membership application form is submitted. Within the email, a link is available to access the applicants contact page to review the applicant information. |
| Member Modified Profile | An email notification is sent when a contact modifies profile information via the Info Hub. |
| User Created or Edited Web Content | An email notification is sent when a contact adds web-content, or changes existing web content via the Info Hub. |
| Member Referral | An email notification is sent when a contact makes a referral via the Info Hub. |
| New Person Added to An Existing Membership | An email notification is sent when a new rep is added to an existing membership, either via the Info Hub, or from the back-office. |
| Contact Us Submission | An email notification is sent when a new Contact Us form is submitted. |
| Sales Proposal Accepted | An email notification is sent when a prospect accepts a sales proposal via the on-line link. |
| Scheduled Billing Results | Example |
| Event Submitted for Approval | An email notification is sent when a contact enters an event via the Info Hub. Within the email is an Approve Event link. When clicking the link, if you are currently authenticated in the software (logged in), you will be taken to the event's Overview tab. If you are not currently authenticated in the software (not logged in), you will need to log-in and navigate to the event's Overview tab. See Approve Events submitted by Members. |
| Online Event Registration | An email notification is sent when someone registers for an event via the on-line registration page. |
| My Projects and Tasks Status Updates | |
| Receive Notice When User Unsubscribe from Email | This notification is sent when someone unsubscribes from mass/group emails. |
| Online Donation Notice | This notification is sent when someone makes an online donation. |
| Web Content Added | This notification is sent when a web content item has been submitted. |
| New Store Order Created | This notification is sent when a new store order is place. |
| Membership Renewal Response Submitted | For memberships using Renewal Notification only. This email will be sent to staff when a member accepts or declines renewal of their membership. |
| Renewals Emails Sent | For memberships using Renewal Notification only. This email will be sent to staff when the initial renewal emails are sent out to members. |
| New Certification Enrollment | This email notification is sent when a Contact selects to enroll for a certification via the HUB. |
| New Certification Application | This email notification is sent to the Staff when a Contact selects to apply on a certification in the Info Hub. |
| Member Completed Certification | This email notification is sent when a contact completes all requirements for a certification, and the status of the certification is changed to Active. |
| Invoice Payment Received | This email notification is sent when an invoice is paid on-line. |
| Auto Payment Failed | This email notification is sent when a payment scheduled for auto-payment fails. |
| Forum Topic Added | This email notification is sent when a new topic is added to a Forum. |
| Forum Topic Comment Added | This email notification is sent when a new comment is added to a topic in the Forum. |
| GrowthZone Pay Account Update Completed | |
| Integration Connection Failure | A notification when the access to Constant Contact or MailChimp is broken and re-authentication is required. The notification provides a link to the integration page so the staff person can re-connect. This should be a rare scenario. |
| Charge Capture Failed | |
| Charge Returned | A notification for staff when a charge is rejected by Stripe (GZ Pay) and the payment refunded. This notification is already sent to the email address listed on the Payment Gateway setup screen so this notification is necessary only if you desire addition staff to receive the notice. |
| Unregistered Attendee | This notification is sent when an attendee cancels an event registration. This helps staff to know, especially if a refund needs to be given to the registrant. |
| Monthly Recap Notificaton | This email is sent monthly and includes This email will include :
|
Category Lists
Categories allow you to create filtering and grouping options for such things are member directory, store items, web content etc. It is recommended that you use categories:
- If intended for public or internal use and is used to segment records into groups. For example: You may have categories of products in your store, categories in your directory search, etc.
- If you wish to allow visitors to your directory, web content, events, etc. ability to filter to specific categories
- If you wish to display this information publicly or in the Info Hub.
| NOTE: Your GrowthZone software allows you to use tags, custom fields and categories. To guide your decision in which to use, see a comparison list here. |
Category List Options
There are several options available to choose from which will define where the category will be able to be used throughout the software.
- Business contact - organization record (business)
- Individual contact - individual record (person)
- Contact - both organization and individual record
- Store item - products in the Store module (if applicable)
- Membership - membership types
- Sales Opportunity - Sales Funnel module (if applicable)
- Content - Web Content module (if applicable)
- Job - Job pages in the Web Content module (if applicable)
- Hot deals - Hot Deals pages in the Web Content module (if applicable)
- Event - Event module for organizing the calendar
- Projects - Projects module (if applicable)
- Certifications - Continuing Education module (if applicable)
- Resource - uploaded materials in the Cloud>Resources area for the Info Hub
- Tickets - not currently available to use in GrowthZone
- Saleable Items - Goods/Services in the Setup
| NOTE: Your GrowthZone software allows you to use tags, custom fields and categories. To guide your decision in which to use, see a comparison list here. |
Create a Category List
| See Viewing & Adding Category Lists in Action! |
- Select Setup in the Navigation Panel.
- Click Category Lists in the Categories section.
- Click the Add button.
- Choose the appropriate Category Type. The type is important as it will drive where the category list is available in the future. For example, if you are creating a category list for Events, select Event.
- Provide a Name for the category list.
- Is Active will default to be checked, this allows the category to be used in the software. When a category list is no longer needed, best practice will be to de-activate the category list rather than deleting.
- (Optional) Add a Description if needed. This is for internal purposes only.
- Check the box for Available to Public? if you would like the option to add this category as a filter for your directories, events, web content etc.
- Check the box for Available to Members (Info Hub) if you wish to allow members to view this category list in the Info Hub. Some of your category lists may be for internal use only in which case you would mot enable this option.
- (Optional) Click the Advanced Options check-box to configure the following:
- Allow Members To Edit (Info Hub): Enable this option if members should be allow to make changes to this category list in the Info Hub.
- Is Required: If you are creating a business or individual contact category list, and you wish to display this category on the members profile tab even if a category has not been assigned, check the Required box. This allows the category list to act much like custom fields, with high visibility on the profile tab.
- Minimum Quantity/Maximum Quantity: This settings allow you to limit the number of categories that may be selected from this list.
- Click Done to save the new list.
Once the assigned Name appears in the Category List, click on the Name to add items to the category list. You may add multiple items at one time by clicking on , adding one item per line. Or you may use the
to add one item to the list.
View Directory Categories
- Select Setup in the Navigation Panel.
- Click Category Lists in the Categories section. A list of all categories will be displayed. By default your system is populated with the Contact Business Category. These business categories are available for selection when assigning your members to directory categories.
- Click the Business Category hyper-link. A list of internet standard directory categories will be displayed.
Add Categories to your Directory
New top level categories (those that appear in bold in your active directory) or sub categories may be added to your directory.
- Select Setup in the Navigation Panel.
- Click Category Lists in the Categories section. A list of all categories will be displayed. By default your system is populated with the Contact Business Category. These business categories are available for selection when assigning your members to directory categories.
- Click the Business Category hyper-link. A list of internet standard directory categories will be displayed.
- To add an individual category, click the Add button.
- Name - Enter a name for the category. This is the name that will appear in the active directory.
- Description - (Optional) Enter a description of the category.
- Color - Select the color to highlight this category.
- Parent Category - (Optional) Select the parent category. If a parent category is selected, your new category will be displayed below the parent in the active directory. If no parent is selected, the new category will be a top level category shown in bold in your active directory.NOTE: This option is visible when you enable the Advanced Options.
- To add multiple top-level categories, click the Add Multiple button.
- Names(Line By Line) - Enter each category line by line. This is the name that will appear in the active directory.
- Parent Category - (Optional) Select the parent category. If a parent category is selected, the new categories will be displayed below the parent in the active directory. If no parent is selected, the new categories will be a top level category shown in bold in your active directory. You may select only one parent category for all the new categories you have listed. NOTE: This option is visible when you enable the Advanced Options.
- Click Done.
Reassign Categories
****COMING SOON*** When a category is assigned but you realize you’ve already created a category with a similar name, you may want to move everyone in that original category and assign them the new name so you can delete the original category.
- Click Setup in the left-hand navigation panel.
- Click Category Lists in the Categories section.
- Click the Reassign Category button.
- Select the desired Category Type from the list.
- Select the desired Category List from the list.
- Select the category that you wish to reassign from the Category list.
- Select the category that you wish to reassign to from the Category list in the New Category section.
- Click Done.
Setup Directory Display Settings
Directory Display Settings control what information about a business or individual is displayed if you choose to publish a directory of members to your website. You may, perhaps, have different levels of listings based on membership type. A basic level might include just a business name and a logo, where as an enhanced listing may include photo galleries, videos, maps, etc. A default directory listing, Standard Listing is seeded in the database upon setup. You can use this as designed or customize it to meet your needs. NOTE: The Standard Listing directory display settings are used in your membership types by default. See Adding Membership Types for further information on selecting alternate display settings.
| See Directory Display Settings in Action! |
Use the following procedure to setup your Directory Listing Types:
- Click Setup in the Navigation Panel
- Click Directory Display Settings in the Website section. A list of the Directory Display Settings currently configured in your system will be displayed. NOTE: Standard Listing and Deluxe Listing are seeded into your database by default. The Standard Listing is used as the default when you create Membership Types.
- Click Add.
- On the Add/Edit Directory Display Settings configure the following:
- Name - Provide a name for the Directory Display Settings.
- Description - Provide a description of the Directory Display Settings.
- Rank/Priority Placement - This setting allows you to dictate where organizations that are assigned to this directory listing this will be displayed the directory. Entering a value of 1 will place at the top of the directory, entering a value of 255 will place at the bottom of the directory.
- Show Individual Details - These settings are used for individual based memberships. Select which details for your individuals will be displayed when this directory display setting is used.
- Show Contact Details - These settings are used for organization and individual based memberships. Select which address, phone, and email information you would like displayed. NOTE: When address, email and phone are selected, you can then choose which address type (i.e. mailing, physical, etc.), which email type (work, personal, etc.) and which phone type (main, toll, etc.) you will display with this listing type. If no selection is made to type the information will not be displayed in the directory.
- Show Custom Fields - Select the custom fields you want to display in the directory. The drop-down list will display the fields that have been configured for Directory Listing.
-
- Display Related Contacts - Here you can decide which individual contacts will display in the listing.
-
- Show Related Contacts - If selected, all individual contacts related to the business will display.
- Show Contacts With Memberships - If you have an organization with only certain selected contacts related to the membership, this option will only display the individuals related to the membership. If you select this option, "Show Related Contacts" should be disabled, as that setting will override this one.
- Show Primary Contact/Organization - Enabling this option will flag the primary contact for the business, and will display their primary organization on their individual listing (if they have one).
-
- Options: Select additional display options. To see how your selections will impact the display in your activity, see Understanding the Directory Display Options.
-
- Show Membership Type - If selected the member's membership type will be displayed in the directory.
- Show Public Web Content Postings: (Coming Soon) Enabled this option if you wish to display icons on the member's directory page when they have web content (i.e. job postings, hot deals, etc) available.
- Show Search Logo - If selected the member's primary image will be displayed when the directory is searched.
- Show Highlights If selected, a highlights section will be displayed on the web-page.
- Show Related Contacts: If selected, contacts related to the organization will be displayed on both the directory search results and on the organization's information page. NOTE: At the individual contact level a selection may also be made to include or exclude an individual contact from displaying on the directory. See Add Individual Contact for further information on configuring show related contacts individually.
- Show Search Description: If selected, and using V1 directory, the short description will be displayed in the directory list. If using the v2 public modules, this setting has no impact.
- Show Gallery: If selected, the member may display a gallery of photos on the web-page.
- Show Video: If selected, the member may display a video on the web-page. NOTE: At this time, only links to YouTube videos are supported.
- Show Map: If selected, the location of the organization will be displayed on map on the web-page.
- Show Primary Contact: If selected, the name of the primary contact will be displayed on the web-page.
- Use Contacts Website for Listing page: If selected, clicking on the member on your public web-page will lead to the contacts website, instead of your page. Applicable only when assigned to a public directory (not available in the Hub).
- Retargeting
- Google Tag Manager Container ID - Enter the Container Id you were provided on installation of Google Tag Manager. Google Tag Manager is a free tool that makes it easy for marketers to add and update website tags -- including conversion tracking, site analytics, remarketing, and more—with just a few clicks, and without needing to edit your website code.
- Click Done.
Understanding the Directory Display Options
Enhanced Directory Add-on Module
The Enhanced Directory add-on module provides an additional "Distance" search functionality to your directory (V2 of public modules ONLY). With the Enhanced Directory, visitors to your website will be able to search for members within a given radius of a provided ZIP/Postal code.
| NOTE: If you wish to purchase the Enhanced Directory module, contact our sales team, sales@growthzone.com for pricing. The zip code search is only available in the US. |
- On the "Search" page, enter your search term(s).
- Select the Distance option.
- Enter a zip code, and select the distance (choices include 1, 5, 10 and 50 miles) from that zip code to narrow search results to a specific radius.
The results will display the distance to the member locations.
Setup your Directories
You system will contain a default directory, Active Member Directory. This directory is tied to your Business Category and may contain all of your valued members. It also is configured with the Standard Listing directory listing type. Advanced options, including searching by custom field may be configured for the default.
Create a New Directory
You may create multiple directories as needed. For example, if you have several chapters, and want a separate directory for each chapter.
- Click Setup in the Navigation Panel
- Click Directories in the Website/Content Management System section. A list of the directories currently configured in your system will be displayed.
- Click the Add button.
- Configure the following:
- Name: Enter a name for the directory.
- Display Name: Enter the name that you would like to display for this directory on your web-site.
- Description: Enter a description of this directory. This description will be displayed on your web-site.
- Select the Display Settings you wish to associate, by default, with this directory. You can view and/or edit an existing display settings by clicking the
 icon, or, you can configure new display settings by clicking the
  icon.
icon. - Sort Order: This setting allows you to set the display order for directory links in the left navigation in the Info Hub.
- Select the Category List to associate to this directory. You can view and/or edit an existing category list by clicking the
 icon, or, you can configure new category list by clicking the
  icon.
icon. - Ordering: Select the desired Order Category Results. This option allows you to define how category results will be displayed in the directory. If Randomly is selected, category results will be displayed in random order. If By Name is selected, individuals are sorted by the first letter of their last name. NOTE: The Info Hub has it's own ordering options so randomization and ranking defined here are not applicable in the Hub.
- Availability: Click the Available to Info Hub check-box if you want to include this directory on the Info Hub pages and/or click the Available to Public check-box if you wish to include this directory on your public web-site.
- Optional Custom Icon You can now customize the icons you use for your directory(s) placed in the left hand navigation of the InfoHub, using Font Awesome Version 5 icons. Enter the code for your custom icon. If you have multiple directories, this is a great way to differentiate them. For Example, if you wish to add a restaurant icon to a "Places to Eat" directory, you could enter the code fa-cutlery and the
 icon would be displayed next to your directory link in the InfoHub. Click Here to learn more about Font Awesome Icons.
- Click the Advanced Options check-box.
- Click the Allow Search Filtering check-box.
-
- Click Search by Custom Fields if you want to allow searching based on custom fields. This is applied to the key word search, and results will be returned if the key word is in the custom field. When this option is enabled, if a keyword is entered in the directory. When you select this option, choose the custom fields to be included for the search from the Custom Fields section at the bottom of the screen. This is applicable to v1 public modules only.
- Enable City, State and Postal Code if you wish to provide these as filtering options.
- To Allow Filtering by Category List(s), select the category lists you wish to allow search on from the drop-down.
- To Allow Filtering by Custom Fields, select the custom field you wish to allow search on from the drop-down.
- Click Done.
-
Edit Directory Settings
- Click Setup in the left-hand navigation panel.
- Click Directories in the Website/Content Management System section. A list of the directories currently configured in your system will be displayed.
- Click the hyper-link for the directory you wish to edit.
- Make the desired changes. See Create a New Directory above for description of the settings.
- Click Done.
Enable Directory Filtering by Custom Fields
Custom fields provide a great way for visitors to your web-site to find just the member they are looking for. By enabling the filtering option, and Advanced filtering option is available on the directory, and visitors can select options from custom fields.
To enable filtering by custom fields:
- Access the directory: Setup > Directory, click the hyper-link for the desired directory.
- Click the Advanced Options check-box.
- In the Search Filtering section, click Enable Advanced Search and Filtering.
- Select the custom fields you wish to allow filtering by from the Allow Filtering by Custom Fields list. Custom Fields that you have created for organizations or individuals and set to Public will be displayed.
- Click Done.
Setup Your Document Templates
Your GrowthZone software contains a variety of templates for statements, invoices, badges, sales proposals and so on. These templates may be used as they are designed, or edited to meet your specific business needs.
View/Modify Template (PC Instructions)
| See Viewing and Editing Document Generation Templates in Action! |
- Click Setup in the Navigation Panel.
- Click Document Generation Templates in the Document Generation section. A list of existing templates will be displayed.
- Click the copy icon
 for the template you wish to view/modify.
 - Click OK in the confirmation dialog box. A copy of the template will be available in the list of templates.
- To view the template, click the pencil icon (Edit Template Document). The Open URL:Word Protocol dialog box will be displayed.
- Click Open URL:Word Protocol. You will be taken to the document editor login. Enter your GrowthZone user name and password to launch the document.
- Enable editing of the document.
- Complete your changes.
- Save your document.You can now choose this template where applicable.
View/Modify Template (MAC Instructions)
- Click Setup in the Navigation Panel.
- Click Document Generation Templates in the Document Generation section. A list of existing templates will be displayed.
- Click the copy icon
 for the template you wish to view/modify.
 - Click OK in the confirmation dialog box. A copy of the template will be available in the list of templates.
- To edit the copy, click the download icon
 in the Actions column.
 - Open the downloaded file.
- Click Enable Editing and make desired edits.
- Save the downloaded file.
- On the Document Generations Template screen, click the Add
 button.
- Enter a Name for the new template.
- Click Choose File to navigate to your saved copy and upload.
- Click Done. You will now be able to choose this template where applicable.
Upload a Documentation Template
If you have created a documentation template, you can upload it to the database:
- Click Setup in the Navigation Panel.
- Click Document Generation Templates in the Document Generation section. A list of existing templates will be displayed.
- Click the Add
 button.
- Select the Template Type. This setting will define where the template is available to you in the software. For example, document templates of type Invoice will only be available where billing functions are performed.
- Enter a Name for the new template.
- Click Choose File to navigate to your saved copy and upload.
- Click Done. You will now be able to choose this template where applicable.
Add Merge Fields to a Document Template
Many database fields (merge fields) are available to customize your document templates.
COMING SOON: there will be a
![]() icon in the Actions column for the desired template to view a list of available merge fields.
icon in the Actions column for the desired template to view a list of available merge fields.
| See Updating a Merge Field in Action! |
To add merge fields to a template:
- Click Setup in the Navigation Panel.
- Click Document Generation Templates in the Document Generation section. A list of existing templates will be displayed
- Make a copy of the template as described above.
- Open the downloaded file as described above.
- Click Enable Editing.
- To insert merge fields:
- Highlight & copy an existing merge field.
- Paste the merge field at the desired location in the document.
- Right click on the pasted merge field and click Edit Merge Field.
- Enter the name of the merge field you wish to add in the Field Name text box. The Field Name must be entered exactly as you see in the list below.
- After completing your edits, save the downloaded file, and upload to your database following the instruction above.
The tables below describe the fields available for various types of documents:
Available Invoice Merge Fields
When using merge fields on invoices, the system will look to the invoice(s) for the appropriate information to be included via merge fields. Many of the fields are included on the default invoice. Other fields may be added manually by editing the invoice.
| Merge Field Name | Description | Included On Default Template |
|---|---|---|
| Company | This is the name of your association/chamber. | X |
| Address1 | This is Address 2 for your association/chamber. | X |
| Address2 | This is Address 2 for your association/chamber. | X |
| Telephone | This is the telephone number for your association/chamber. | X |
| Fax | This is the fax number for your association/chamber. | |
| This is the email address for your association/chamber. | X | |
| WebAddress | This is the web-site address for your association/chamber. | |
| No | The invoice number. | X |
| POno | Purchase Order Number. | X |
| SelectDate | The invoice date. | X |
| DueDate | The invoice due date. | X |
| PurchasedByName | The name of the Purchasing Organization (if applicable), otherwise name of purchaser will show. | X |
| PurchasedByNamePrimaryBusiness | Purchasing Individual’s Primary Business (if applicable). | |
| BillToName | Billing Contact Name (if applicable). | |
| BillToEmail | Billing Contact Email. | |
| BillToAddress | Billing Address Line 1 and 2 on same line. | X |
| BillToAddress1 | Bill to Address 1. | |
| BillToAddress2 | Bill to Address 2. | |
| BillToCity | Billing City, State, & Zip Code. | X |
| BillToCountry | Billing Country | |
| BillToContact | Billing Contact Name (if applicable). | X |
| Message | Invoice Message, added to the invoice when the invoice was created. | X |
| Subtotal | Subtotal of the goods/services included on the invoice. | X |
| SalesTax | Sales tax calculated on the goods/services included on the invoice. | X |
| Shipping | Shipping costs for the goods/services included on the invoice. | X |
| Total | Total for all charges on the invoice. | X |
| PaymentTotal | Payment made against the invoice | X |
| TotalDue | Total actually due on the invoice, if , for example, a payment has been made against the invoice. | X |
| ARCurrent | Current open balance. | X |
| AR30 | Past Due Open Balance in the last 30-60 days | X |
| AR60 | Past Due Open Balance in the last 60-90 days | X |
| AR90Plus | Past Due Open Balance over 90 days | X |
| ContactBalance | Total Open Invoice Balance | X |
| PaymentHyperlink | Link to payment screen | X |
| UFPurchasedByContactPrefix | Prefix for the contact who made the purchase. This is the ‘’’customer’’’. | |
| UFPurchasedByContactFirstName | First name of the contact who made the purchase. This is the ‘’’customer’’’. | |
| UFPurchasedByContactMiddleName | Middle name of the contact who made the purchase. This is the ‘’’customer’’’. | |
| UFPurchasedByContactLastName | Last name of the contact who made the purchase. This is the ‘’’customer’’’. | |
| UFPurchasedByContactSuffix | Suffix of the contact who made the purchase. This is the ‘’’customer’’’. | |
| UFPurchasedByContactCommonName | Common name of the contact who made the purchase. This is the ‘’’customer’’’. | |
| UFPurchasedFromOrganizationName | The organization from which the purchase was made (your association/chamber). | |
| UFBillingContactPrefix | The prefix for the billing contact selected when the invoice was created. | |
| UFBillingContactFirstName | The first name of the billing contact selected when the invoice was created. | |
| UFBillingContactMiddleName | The middle name of the billing selected when the invoice was created. | |
| UFBillingContactLastName | The last name of the billing contact selected when the invoice was created. | |
| UFBillingContactSuffix | The suffix of the billing contact selected when the invoice was created. | |
| UFBillingContactCommonName | The common name of the billing contact selected when the invoice was created. | |
| UFBillingContactName | The full name of the billing contact selected when the invoice was created. | |
| UFBillingAddress1 | The billing address selected when the invoice was created. | |
| UFBillingAddress1 | The billing address 2 associated to the address selected when the invoice was created. | |
| UFBillingAddressCity | The city associated to the address selected when the invoice was created. | |
| UFBillingAddressStateProvince | The state or province associated to the address selected when the invoice was created. | |
| UFBillingAddressPostalCode | The postal code associated to the address selected when the invoice was created. | |
| UFBillingAddressCountry | The country associated to the address selected when the invoice was created. | |
| UFPurchaseCreatedDate | The date an invoice was created. |
Add Custom Fields to Invoice Templates
For further customization of your invoices, business and individual Custom Fields (those displayed on the More Info tabs) may be added to your documentation templates.
- Fields must be configured as Public. See Custom Fields for information on configuration of fields.
- If the invoice is being created for a business, fields configured of type Business will be available.
- If the invoice is being created for an individual, fields configured of type Individual will be available.
- When adding a custom field to an invoice template, the name of the custom field must be exact. Do NOT use the Display Name.
See Add Merge Fields to a Document Template for further information on editing a template and adding merge fields.
Available Merge Fields for Cover Letters
When using merge fields for cover letters, the system will look to the purchaser (customer) to whom you are sending the invoice to find the appropriate information.
| Merge Field Name | Description |
|---|---|
| UFContactPrefix | Prefix for the contact(s) to whom you are sending the invoice. |
| UFContactFirstName | First name of the purchaser(s) for whom you are printing the cover letter. This is listed as the customer when the invoice is created. |
| UFContactMiddleName | Middle name of the purchaser(s) for whom you are printing the cover letter. This is listed as the customer when the invoice is created. |
| UFContactLastName | Last name of the purchaser(s) for whom you are printing the cover letter. This is listed as the customer when the invoice is created. |
| UFContactSuffix | Suffix of the purchaser(s) for whom you are printing the cover letter. This is listed as the customer when the invoice is created. |
| UFContactCommonName | Common name of the purchaser(s) for whom you are printing the cover letter. This is listed as the customer when the invoice is created. |
| UFContactName | Full contact name of the purchaser(s) for whom you are printing the cover letter. This is listed as the customer when the invoice is created. |
Available Merge Fields for Avery Name tags
Several Attendee Badge document generation templates are available for you to select for your event attendees. The fields listed below are available.
| Merge Field Name | Description |
|---|---|
| Prefix | Prefix of the event attendee. |
| FirstName | First name of the event attendee. |
| MiddleName | Middle name of the event attendee. |
| LastName | Last name of the event attendee. |
| Suffix | Suffix of the the event attendee. |
| CommonName | Common name of the event attendee. |
Continuing Education/Certificates Merge Fields
| Merge Field | Description |
|---|---|
| UFCertificationContactPrefix | Prefix of the contact receiving a certificate, a component certificate, or being displayed on a roster. |
| UFCertificationContactFirstName | First Name of the contact receiving a certificate, a component certificate, or being displayed on a roster. |
| UFCertificationContactMiddleName | Middle Name of the contact receiving a certificate, a component certificate, or being displayed on a roster. |
| UFCertificationContactLastName | Last Name of the contact receiving a certificate, a component certificate, or being displayed on a roster. |
| UFCertificationContactSuffix | Suffix of the contact receiving a certificate, a component certificate, or being displayed on a roster. |
| UFCertificationContactCommonName | Common Name of the contact receiving a certificate, a component certificate, or being displayed on a roster. |
| UFCertificationContactName | Concatenates the First Name, Last Name and Suffix of the contact receiving a certificate, a component certificate or displayed on a roster. |
| UFCertificationContactDisplayName | |
| UFCertificationContactAccountNumber | The Account Number of the contact receiving a certificate, a component certificate or being displayed on a roster. |
| UFCertificationApprovedByContactPrefix | The Prefix of the contact who has approved a certification or component certification. |
| UFCertificationApprovedByContactFirstName | The First Name of the contact who has approved a certification or component certification. |
| UFCertificationApprovedByContactMiddleName | The Middle Name of the contact who has approved a certification or component certification. |
| UFCertificationApprovedByContactLastName | The Last Name of the contact who has approved a certification or component certification. |
| UFCertificationApprovedByContactSuffix | The Suffix of the contact who has approved a certification or component certification. |
| UFCertificationApprovedByContactCommonName | The Common Name of the contact who has approved a certification or component certification. |
| UFCertificationApprovedByContactName | Concatenates the First Name, Last Name and Suffix of the contact who has approved a certification or component certification. |
| UFCertificationComponentCode | The Certification Component Code |
| UFCertificationComponentName | The Certification Component Name. |
| UFCertificationComponentInstructorDisplay | The Instructor of a Certification Component. |
| UFCertificationComponentEventLocation | The location of a Certification Event. |
| UFCertificationComponentEventSessionLocation | The location of a session associated to a certification component |
| UFCertificationContactLicenseNumbers | |
| UFCertificationComponentCompletedDate | The date a certification component was completed. |
| UFCertificationComponentHoursEarned | The number of hours earned by completing the certification component. |
| UFCertificationComponentCreditsEarned | The number of credits earned by completing the certification component. |
| UFCertificationExpirationDate | The expiration date of the certification. |
| UFCertificationComponentEventName | The name of the event to which the certification component was associated. |
| UFCertificationComponentEventStartDate | The start date of the event to which the certification component was associated. |
| UFCertificationComponentEventStartTime | The start time of the event to which the certification component was associated. |
| UFCertificationComponentEventEndDate | The end date of the event to which the certification component was associated. |
| UFCertificationComponentEventEndTime | The end time of the event to which the certification component was associated. |
| “Attendee Email” | The email of the certificate recipient, if the certification was associated to an event. |
| “Primary Business” | The primary business of the certificate recipient. |
In addition to the standard merge fields, component certificates and certification rosters may include Individual custom fields. NOTE: Certification Certificates cannot merge Individual Custom Fields. Individual custom fields are those fields created of type "Individual" and are included on a contact's Additional Info tab.
Individual Custom Fields - Component Certificates
Standard merge fields available for Component Certificates are described in Continuing Education/Certificates Merge Fields. You may also add an individual custom field to a component certificate. To do this, create a merge field in Word that starts with UFCertificationContact and then the name of the custom field.
For Example: If your custom field is called NPN #, your merge field would look like <<UFCertificationContactNPN>> and the code in Word would be { MERGEFIELD UFCertificationContactNPN /* MERGEFORMAT } The custom field should be a single word with no special characters like “#” or “*”. IMPORTANT: The display name should be the same as the merge field name.
| NOTE: Individual Custom Merge fields will display best if the field is set to contain a single value. Some examples of good field types to use as merge fields on these documents are: Integer, Decimal, Money, Text, Dropdown |
Individual Custom Fields - Certification Rosters
Standard merge fields available for Certification Rosters are described in Continuing Education/Certificates Merge Fields.
To add an individual custom field to a Certificate Roster, create a merge field in Word using the name of the custom field. For example, if your custom field is called NPN #, your merge field would look like <<NPN>> and the code in Word would be { MERGEFIELD NPN /* MERGEFORMAT } The custom field should be a single word with no special characters like “#” or “*”. The display name of the field can be set to include these if needed.
| NOTE: Individual Custom Merge fields will display best if the field is set to contain a single value. Some examples of good field types to use as merge fields on these documents are: Integer, Decimal, Money, Text, Dropdown |
Getting Started - Special Topics
Managing Multiple Database with GrowthZone
If you are an organization that manages multiple organizations that use the GrowthZone software, you can easily switch from one database to the next.
Your staff members will need to have access setup in each of the databases, but will be able to use the same credentials for each.
Add Staff Member with Access to Multiple Databases
If your organization manages multiple databases, you can easily setup credentials for staff that will allow them to switch from one database to another.
| NOTE: One staff member must have Administrative access to any/all of the databases to perform these steps. |
- Setup login credentials for all staff in your primary database, as described in Add Staff Member.
- Add all staff members as Individual contacts in each of the additional databases. See Add New Contact - Individual. Enter the staff user first and last names, along with email address. This should be the same as the names and email addresses entered in the primary database.
- Click Setup in the left-hand navigation panel.
- Click Staff Access in the Users section.
- Click the Add button.
- On the Edit Users screen, click the Advanced Options check-box.
- In the Staff login from another tenant text-box, enter the user name that was configured in the primary database.
- Enter the Primary Contact / Password Reset Email. This should be the email address that you entered for the individual contact, as well as the email address associated to this staff member in the primary database. If the contact exists in your database the system will automatically populate the First/Last Name fields. If you have not added the contact - return to step 2 and add the staff member as a contact.
- Select the Access Level that the staff member will have to this database. NOTE: Access level may differ from one database to another.
- Click Done.
- In the list of staff members, click the
 icon in the Actions column.
- Click OK on the Enable Login screen.
This will immediately enable the staff login for this database.
| NOTE: If changes are made to passwords, or staff members are disabled/deleted, these changes impact access to all databases. |
Switch from one Organization Database to Another
If you manage multiple GrowthZone Database accounts, to switch from one to the other:
- Click your name in the top right of the header bar.
- On the Switch Account screen, select the database you wish to switch to from the Default Tenant Key list.
- Click Done. The screen will refresh, and the selected database will be displayed.
| NOTE: The Switch Account option will only be displayed if the staff member has been setup for multiple accounts. |
Assign Back-office Access to a Contact
At times, a member representative may need access to the back office to review information about the other representatives of their member organization. For example, if you have member representative who must review/approve certifications for other representatives of the organization. This would require access to the back office. In setting up access level to the back office in the following manner, the representative would only be able to view/manage information related to the other representatives of their organization.
- Add the representative, who requires access, to your Organization as a contact. See Add Individual Contacts to an Organization/Business for information on adding a contact to a business.
- Setup Access Level with Has Contact Relationship Restriction enabled.
- Add a staff login (Setup > Staff Login) for the member representative, and assign the access level created above to him/her. See Add Staff Member for instructions.
- On the contact's organization Profile tab, assign the individual to the organization as Assigned Staff. See Assign Staff to a Business/Organization for instructions.
Configure Designations
You may assign designations to individual contacts in your database.
| See Adding Designations in Action! |
To configure designations:
- Click Setup in the left-hand navigation panel.
- Click Designations in the Miscellaneous section.
- Click the
 icon.
icon. - Enter the desired designation.
- Repeat steps 3 - 4 above to add additional designations.
- Click Save.
General Data Protection Regulation Basics (GDPR)
The General Data Protection Regulation (GDPR) is a European Union law enacted in 2016 which will take effect with enforcement beginning on May 25th, 2018. This law was enacted with the goal of providing better data and privacy protection and security for European Union (EU) member states’ citizens.
Brexit Impact
In early 2017, UK Prime Minister May outlined several technology related impacts of the impending exit of the UK from the EU (Brexit) which have been reiterated by UK Digital Minister Hancock. According to these reports, the UK plans to keep GDPR provisions by mirroring it via UK regulations. These regulations are not yet in place and will require legislation to be passed in parliament. However, it should be noted that the Brexit process is currently unlikely to terminate prior to the EU GDPR deadline in 2018. Thus, UK customers are recommended to stick with May 25th, 2018 deadline for compliance.
GDPR Responsibilities & Accountability
In dealing with GDPR Compliance, it is important to understand where accountability lies.
For GrowthZone software (including the MIC/Hub), GrowthZone is responsible for complying with the GDPR, communicating compliance to chambers and associations, and reporting issues. Our staff and member apps, as extensions of the back office and MIC/Hubs, fall under this definition as well. SmartCMS and GrowthZoneCMS do not collect member or visitor data. On pages where member or visitor data appears to be collected by these systems, it is in fact due to an integration of the Chambermaster/Memberzone and GrowthZone software and thus these systems do not fall under the GDPR requirements.
Customers that use third party systems for websites or integrations with Chambermaster and GrowthZone software need to be aware GrowthZone is not responsible for the compliance of these systems; GrowthZone is responsible for GDPR compliance of its products only. Chambers and associations are accountable to ensure overall GDPR compliance for the mix of systems they are using to collect and process member and visitor data.
Components
All information regarding the specific regulations can be found on the GDPR site. Requirements of the GDPR are broken down into the following categories or “rights” of individuals:
- The right to be informed
- The right of access
- The right to rectification
- The right to erasure
- The right to restrict processing
- The right to data portability
- The right to object
- Rights in relation to automated decision making and profiling.
These rights when viewed together are meant to provide individual users greater clarity and understanding of what personal data is being stored, how it is being used, and how to access/delete that data. In the end, the goal is to provide greater personal data privacy, access and protection. Here’s a brief summary of obligations for GDPR compliance.
- Right to be informed: Obligation of organization to inform users submitting personal data as to how the data will be kept private and used. Usually issued as part of a privacy notice that must be viewed..
- Right of access: Obligation to confirm a user’s request as to whether their data is being held/processed and the obligation to grant them access to their personal data
- Right of rectification: Obligation to provide access to rectify any personal data deemed incorrect. Obligation to disclose any personal data given to 3rd parties and contact information for rectification
- Right of erasure: Obligation to remove/erase all stored personal data upon request
- Right to restrict processing:Obligation to halt the processing of data that is deemed restricted by the user
- Right to data portability: Obligation to provide a .csv/export of personal data within one month of request
- Right to object: Obligation, if requested, to halt processing of data for marketing, profiling, interest, or research purposes
- Rights in relation: Obligation to provide clarity on types of decisions that are automated and allow for human interaction for those that have a significant legal impact.
A chamber or association may receive a request from an individual regarding these rights or a request from a governmental agency for records and documentation of compliance. Additionally, organizations have specific obligations regarding accountability, data protection, and breach notifications that vary depending on the types of data being collected and processed; these records may also be requested.
GDPR Compliance at GrowthZone
GrowthZone is compliant with current GDPR requirements. To verify, you can go to the Privacy Shield website and search for "GrowthZone".
Express Consent
To ensure users are aware of the types of data being collected and for what purpose it is being used along with the need to opt-in, there will be changes, additions, and privacy notices added to screens that collect information. This can include features like the membership application, event registration, etc. Privacy Settings Areas such as the MIC and Hub will see additions allowing members even more control over their personal data including contact information, profile information and visibility settings.
Reports
One of the key goals of the GDPR is to provide understanding of what data is stored, allow users access to correct it, and delete it if they choose. Reporting regarding GDPR compliance and specific personal data reports will be added so that chambers and associations to easily identify and document the types of data stored and find specific user’s personal data if requested.
Training
GDPR documentation and training will be provided starting in 2018 helping chambers and associations tackle specific GDPR compliance issues. Offerings will include both technical trainings and general communication with topics ranging from help understanding the law, to running reports, to dealing data.
