Difference between revisions of "Event Management"
Cpetterson (talk | contribs) |
|||
| (157 intermediate revisions by 7 users not shown) | |||
| Line 1: | Line 1: | ||
| + | <p style="font-size:30px">NEW!! Find all of your answers in the [https://helpdesk.growthzone.com/kb/article/1573-contents-event-management// GrowthZone Knowledge Base!]</p> | ||
| + | |||
=='''<span style="color:#800080">Events Overview'''</span>== | =='''<span style="color:#800080">Events Overview'''</span>== | ||
---- | ---- | ||
=='''<span style="color:#800080">Events Initial Setup'''</span>== | =='''<span style="color:#800080">Events Initial Setup'''</span>== | ||
---- | ---- | ||
| + | {| class="wikitable" | ||
| + | |- | ||
| + | | | ||
| + | [[File:Video-call-24.jpg|link=https://www.screencast.com/t/1lqvJDKAGw]] | ||
| + | | style="width: 100%"| '''See Events Initial Setup in Action!''' | ||
| + | |} | ||
==='''<span style="color:#800080">Event Settings Defaults'''</span>=== | ==='''<span style="color:#800080">Event Settings Defaults'''</span>=== | ||
---- | ---- | ||
The Event Settings options allow you to configure the defaults to be used for your events. Setting up the defaults will save you time when creating events, and may be over-ridden as needed for individual events. | The Event Settings options allow you to configure the defaults to be used for your events. Setting up the defaults will save you time when creating events, and may be over-ridden as needed for individual events. | ||
| − | |||
| − | |||
#Select '''Setup''' in the Navigation panel. | #Select '''Setup''' in the Navigation panel. | ||
#Click '''Event Settings''' in the '''Event''' section. | #Click '''Event Settings''' in the '''Event''' section. | ||
| + | #:[[File:EventSettings01.png|center]] | ||
#On the '''Event Settings''' screen, you may configure the following to be the default for the events that you will setup: | #On the '''Event Settings''' screen, you may configure the following to be the default for the events that you will setup: | ||
| + | #:*'''Default Registration Version''' - Select which version of the registration form you prefer as your default. (Version 2 is recommended.) | ||
#:*'''Payment Gateway''' - Select the payment gateway you wish to use by default for your events. (Requires Integrated Payment Processing) | #:*'''Payment Gateway''' - Select the payment gateway you wish to use by default for your events. (Requires Integrated Payment Processing) | ||
#:*'''Invoice Line Item Description Option''' - Select what you like to be included in the invoice line items. | #:*'''Invoice Line Item Description Option''' - Select what you like to be included in the invoice line items. | ||
#:*'''Display Registration Descriptions by Default''': Select this option if you wish to display the description of a registration fee on the event registration page, as shown below. If this option is not selected, the description will be displayed when a registrant clicks on the registration type. | #:*'''Display Registration Descriptions by Default''': Select this option if you wish to display the description of a registration fee on the event registration page, as shown below. If this option is not selected, the description will be displayed when a registrant clicks on the registration type. | ||
#:[[File:Reg with Description1.jpg|700px|center]] | #:[[File:Reg with Description1.jpg|700px|center]] | ||
| + | #:*'''Enable Individual Custom Fields on Registration Form''': Select this option if you wish to include individual custom fields on your event registration pages. Data entered into these fields during the registration process will then tie back to the contacts (if they exist) in your database. '''NOTE''': The event must be set to use Version 2 Registration. | ||
#:*'''Confirmation HTML for Event Attendee Registration''' - Enter the confirmation that you would like displayed to registrants after they have completed their registration. This confirmation message is also included in the Registration Confirmation email. | #:*'''Confirmation HTML for Event Attendee Registration''' - Enter the confirmation that you would like displayed to registrants after they have completed their registration. This confirmation message is also included in the Registration Confirmation email. | ||
#:*'''Confirmation HTML for Event Sponsor Registration''' - Enter the confirmation that you would like displayed to a sponsor after they have completed their registration. This confirmation message is also included in the Registration Confirmation email. | #:*'''Confirmation HTML for Event Sponsor Registration''' - Enter the confirmation that you would like displayed to a sponsor after they have completed their registration. This confirmation message is also included in the Registration Confirmation email. | ||
| − | #:*''' | + | #:*'''Default Contact For Event Approval Tasks''' - Select the individual who will be responsible for approving events submitted from the website or the Info Hub. |
| − | #:*'''Default | + | #:*'''Display Associated Individuals Upon Email Match''' - This setting determines whether individuals on an event registration form can view other individuals at their company after confirming their identity via e-mail address only. The setting is off by default. When enabled, anyone could enter the email address for one person at the company and view information for other employees at that company as well. |
| + | #:*'''Default Calendar''' - You can select a default calendar on which you'd prefer your events to appear. This can be changed if needed when setting up new events. | ||
#Click '''Save''' to save your changes. | #Click '''Save''' to save your changes. | ||
| Line 28: | Line 38: | ||
To display your events (whether publicly, member only, or internally) you will need to setup your calendars. | To display your events (whether publicly, member only, or internally) you will need to setup your calendars. | ||
| − | #Click '''Setup''' in the Navigation Panel. | + | #Click '''Setup''' in the Navigation Panel OR go to the Calendars tab in the Events module. |
| − | #Click '''Calendars''' in the '''Event''' section. A list of calendars currently configured in your system will be displayed. | + | #:*If in Setup, Click '''Calendars''' in the '''Event''' section. A list of calendars currently configured in your system will be displayed. |
| + | #:*If in the Events Module, the '''Calendars''' tab will display the same list of calendars. | ||
#:[[File:Calendars.jpg|1200px|center]] | #:[[File:Calendars.jpg|1200px|center]] | ||
#Click the '''Add''' button. | #Click the '''Add''' button. | ||
| − | #:[[File: | + | #:[[File:Addcalendar 12082020.jpg|800px|center]] |
#On the '''Add/Edit Calendar''' screen configure the following: | #On the '''Add/Edit Calendar''' screen configure the following: | ||
#:*'''Name''' - This is the name that will display if you choose to publicize this calendar. | #:*'''Name''' - This is the name that will display if you choose to publicize this calendar. | ||
| Line 38: | Line 49: | ||
#:*'''Is Public Viewable'''- Select this check-box if you wish this calendar to be publishable on your website and viewed by the public. | #:*'''Is Public Viewable'''- Select this check-box if you wish this calendar to be publishable on your website and viewed by the public. | ||
#:*'''Is Member Viewable''' - Select this option if you wish this calendar to be available in the Info Hub. | #:*'''Is Member Viewable''' - Select this option if you wish this calendar to be available in the Info Hub. | ||
| − | #:*'''Group''' - Optional, select a group to associate to this calendar. | + | #:*'''Allow Public Submission''' - If publicly viewable, this option will allow the general public to submit events for approval. |
| + | #:*'''Allow Member Submission''' - If Member viewable, this option will allow members to log in and submit events for approval. '''NOTE:''' Access level for InfoHub Events must be set to "Create" to fully enable member submission. Details on setting up User access levels are available '''[[Getting_Started#View.2FEdit_User_.28Member.29_Access_Levels|here]]'''. | ||
| + | #:*'''Group''' - Optional, select a group to associate to this calendar. Only members of that group (aka list/committee) will be able to view this calendar. | ||
#:*'''Is Active''' - Select this check-box to activate the calendar and make it usable at least by staff members. i.e., in order for events to be added to a calendar the calendar must be active, even if it is not published/viewable on your website or Info Hub. | #:*'''Is Active''' - Select this check-box to activate the calendar and make it usable at least by staff members. i.e., in order for events to be added to a calendar the calendar must be active, even if it is not published/viewable on your website or Info Hub. | ||
#Click '''Done''' to save your new calendar. | #Click '''Done''' to save your new calendar. | ||
| Line 47: | Line 60: | ||
You may modify any of your existing calendars. | You may modify any of your existing calendars. | ||
| − | #Click '''Setup''' in the Navigation Panel. | + | #Click '''Setup''' in the Navigation Panel OR go to the Calendars tab in the Events module. |
| − | #Click '''Calendars''' in the '''Event''' section. A list of calendars currently configured in your system will be displayed. | + | #:*If in Setup, Click '''Calendars''' in the '''Event''' section. A list of calendars currently configured in your system will be displayed. |
| + | #:*If in the Events Module, the '''Calendars''' tab will display the same list of calendars. | ||
#Click the link for the calendar you wish to modify. | #Click the link for the calendar you wish to modify. | ||
#Make your desired modifications and click '''Done'''. | #Make your desired modifications and click '''Done'''. | ||
| Line 55: | Line 69: | ||
---- | ---- | ||
Prior to setting up your event, you will want to setup the appropriate fee items for the event. Refer to '''[[Billing#Setup_Goods.2FServices|Setup Goods and Services]]''' for details. | Prior to setting up your event, you will want to setup the appropriate fee items for the event. Refer to '''[[Billing#Setup_Goods.2FServices|Setup Goods and Services]]''' for details. | ||
| + | |||
| + | ==='''<span style="color:#800080">Set Up "No Show Fees" for your Events'''</span>=== | ||
| + | ---- | ||
| + | You may configure "No Show Fees" for attendees that register for events but do not attend and do not cancel their registration. These fees will be automatically added to any future registration invoices for attendees that registered for an event but did not attend or cancel in advance. | ||
| + | #Configure '''[[Getting_Started#Category_Lists|an event category]]''' for any events instituting a no-show fee. | ||
| + | #Create '''[[Billing#Setup_Goods.2FServices|a good/service item]]''' for your no-show fee. Select the "Event no show fee" type. | ||
| + | #Enable the "Charge No Shows Late Fee" option in your '''[[Event_Management#Event_Settings_Defaults|Event Settings]]'''. | ||
| + | #:[[File:NoShowSettings 09212020.jpg|800px|center|No Show option in the Event Settings window]] | ||
| + | #:*Click the orange "+" icon to add a no show fee | ||
| + | #:*Select the "No Show" event category you added/created | ||
| + | #:*Select the good/service item you just created | ||
| + | #:*Adjust the price if needed | ||
| + | #:*Adjust the "Days To Lookback For Prior No Show" (this will set the number of days previous the system will look for a registration flagged as a no show; 0 is unlimited) | ||
| + | #:*Enter your No Show Policy (this will display at the bottom of the registration page when an event is assigned a category with a No Show Fee configured) | ||
| + | #:[[File:NoShowSettings02 09212020.jpg|800px|center|No Show Settings in the Event Settings Window]] | ||
| + | #Create or edit an event as usual. Make sure to select a category with the No Show fee configured if you wish to charge a no show fee. If an attendee is a no show at an event that includes a category with a no show fee assigned, and if the event they did not attend is within the lookback days range, the next time they attempt to register for an event they will see a notification of the no show fee on their registration. | ||
| + | #: | ||
| + | [[File:NoShowSettings03 09212020.jpg|600px|center|Display of the No Show Fee notice on an event registration]] | ||
| + | '' '''NOTE:''' If a staff user fills out the event registration form on behalf of an attendee that was a no show at a previous event, the no show fee does '''NOT''' get added. The fees will only apply when the attendee fills out the form on their own either by logging in with a username and password or by searching by email address.'' | ||
| + | |||
| + | {| class="wikitable" | ||
| + | |- | ||
| + | | | ||
| + | [[File:One Row.png|25px]] | ||
| + | | style="width: 100%"| '''RECOMMENDATION''': Best Practice is to only have one event category with an assigned no-show fee PER EVENT. If an event is assigned multiple categories that have no-show fees configured, the registration may "stack" multiple no show fees. | ||
| + | |} | ||
=='''<span style="color:#800080">Add a New Event'''</span>== | =='''<span style="color:#800080">Add a New Event'''</span>== | ||
---- | ---- | ||
You may add a new event by clicking the '''Quick Actions''' button in the header bar, or by clicking the '''Add Event''' button on the Events page. | You may add a new event by clicking the '''Quick Actions''' button in the header bar, or by clicking the '''Add Event''' button on the Events page. | ||
| − | [[File: | + | [[File:AddNewEvent01.png|center]] |
#On the '''Add New Event''' screen, configure the following settings: | #On the '''Add New Event''' screen, configure the following settings: | ||
#:*'''Name''' - Enter a name for the event. This is the name that will display on your web-site. | #:*'''Name''' - Enter a name for the event. This is the name that will display on your web-site. | ||
| − | |||
#:*'''Description''' - Provide a description of the event. This description will be displayed on your web-site. | #:*'''Description''' - Provide a description of the event. This description will be displayed on your web-site. | ||
| − | #:*'''Location''' - Enter location information. This information will be displayed on your web-site. | + | #:*'''Location Name''', '''Address ''', '''Address 2''', '''City''', '''State/Province''', '''Postal Code''', '''Country''' - Enter location information. This information will be displayed on your web-site. |
| − | #:*''' | + | #:*'''Start At/End At/All day''' - This is the start time and end time of the event. '''NOTE''': The time zone for the event will default to the time zone configured for your organization. If you wish to change the time zone, you will be able to to this on the event's '''Overview''' tab in the '''Hours''' section. If '''All Day Event''' is selected, no time information will be displayed for the event. |
| − | |||
#:*'''Time/Hours Details''' - This section allows you to enter descriptive information about the time/hours of the event (such as when registration opens, when dinner starts, when auction starts). | #:*'''Time/Hours Details''' - This section allows you to enter descriptive information about the time/hours of the event (such as when registration opens, when dinner starts, when auction starts). | ||
#:*'''Organization''' - The name of your chamber/association will be automatically populated. You may change this to associate this event to a different organization. | #:*'''Organization''' - The name of your chamber/association will be automatically populated. You may change this to associate this event to a different organization. | ||
| + | #:*'''Contact''' - Enter the name of the contact person for this event. | ||
#:*'''Email Address'''- email address you want displayed on the event page | #:*'''Email Address'''- email address you want displayed on the event page | ||
#:*'''Phone'''- phone number you want displayed on the event page | #:*'''Phone'''- phone number you want displayed on the event page | ||
#:*'''Additional Contact Details''' - This text box allows you to enter further contact information, i.e. name, phone number, email, etc. | #:*'''Additional Contact Details''' - This text box allows you to enter further contact information, i.e. name, phone number, email, etc. | ||
#:*'''Category''' - To assist you in filtering, sorting and/or report on this event, you may select a category from the drop-down list. This is optional. '''[[Event_categories#Event_Categories|Click here]]''' for further information on setting up Categories. | #:*'''Category''' - To assist you in filtering, sorting and/or report on this event, you may select a category from the drop-down list. This is optional. '''[[Event_categories#Event_Categories|Click here]]''' for further information on setting up Categories. | ||
| − | #:*'''Calendar''' - Select the calendar(s) on which you want to display this event. The event may be displayed on multiple calendars. | + | #:*'''Calendar''' - Select the calendar(s) on which you want to display this event. The event may be displayed on multiple calendars. If unselected, the default calendar selected in your Event Settings will be used. |
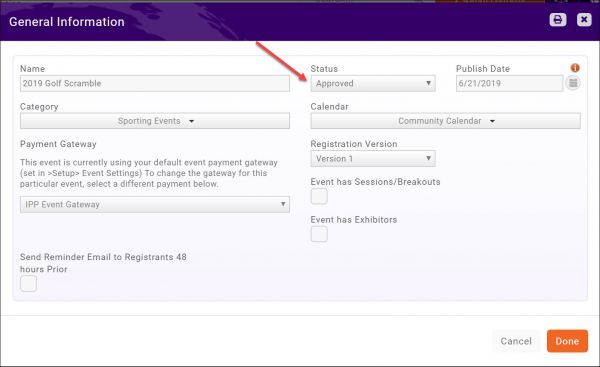
#:*'''Published Status''' - Select the status of this event, only approved events will be displayed on the calendars you have selected. | #:*'''Published Status''' - Select the status of this event, only approved events will be displayed on the calendars you have selected. | ||
| + | #:*'''Publish Date''' - Enter the date that you wish to begin displaying this event on your web-site. | ||
#:*'''Enable Registration''' - Select this check-box to allow registration for this event. If this is not selected, a registration button will not be displayed on your web-site, however, your staff members would be able to register people from the back-office. | #:*'''Enable Registration''' - Select this check-box to allow registration for this event. If this is not selected, a registration button will not be displayed on your web-site, however, your staff members would be able to register people from the back-office. | ||
#:*'''Event has Sessions/Breakouts''' - If you are using the '''Expo''' module, enabling this option will allow you to add sessions to your event. '''[[Event_Management#Adding_Sessions_to_an_Event|Click here]]''' for further information on setting up sessions. | #:*'''Event has Sessions/Breakouts''' - If you are using the '''Expo''' module, enabling this option will allow you to add sessions to your event. '''[[Event_Management#Adding_Sessions_to_an_Event|Click here]]''' for further information on setting up sessions. | ||
| Line 90: | Line 130: | ||
#:[[File:Copy this event.jpg|center]] | #:[[File:Copy this event.jpg|center]] | ||
#Click '''Copy this Event'''. | #Click '''Copy this Event'''. | ||
| − | #:[[File: | + | #:[[File:CopyEvent01new.png|center]] |
#Update the desired event fields. Be sure to review the new event's name, as the name of the copied event will be part of it. This is easily deleted.'''[[Event_Management#Add_a_New_Event|Click Here]]''' for further instruction on available fields. | #Update the desired event fields. Be sure to review the new event's name, as the name of the copied event will be part of it. This is easily deleted.'''[[Event_Management#Add_a_New_Event|Click Here]]''' for further instruction on available fields. | ||
#Select the specific event settings you wish to copy from the original event. | #Select the specific event settings you wish to copy from the original event. | ||
#Click '''Done'''. | #Click '''Done'''. | ||
| + | |||
| + | {| class="wikitable" | ||
| + | |- | ||
| + | | | ||
| + | [[File:Smallest.png|25px]] | ||
| + | | style="width: 100%"| '''NOTE:''' When working with a copied event, if you update the description of the event, this will '''NOT''' update the short description, so be certain to update the short description. | ||
| + | |} | ||
==='''<span style="color:#800080">Setup a Recurring Event Series'''</span>=== | ==='''<span style="color:#800080">Setup a Recurring Event Series'''</span>=== | ||
| Line 117: | Line 164: | ||
[[File:Recurring Event Grey Box.jpg|1000px|center]] | [[File:Recurring Event Grey Box.jpg|1000px|center]] | ||
| − | |||
| − | |||
{| class="wikitable" | {| class="wikitable" | ||
| Line 191: | Line 236: | ||
The '''Overview''' tab of your event allows you to update the information supplied when the event was first created. Click on the pencil icon to the right of the Section name you want to edit | The '''Overview''' tab of your event allows you to update the information supplied when the event was first created. Click on the pencil icon to the right of the Section name you want to edit | ||
| − | A few of the sections have options available from the Overview Tab that aren't available during the initial set up | + | A few of the sections have options available from the Overview Tab that aren't available during the initial set up. |
| + | |||
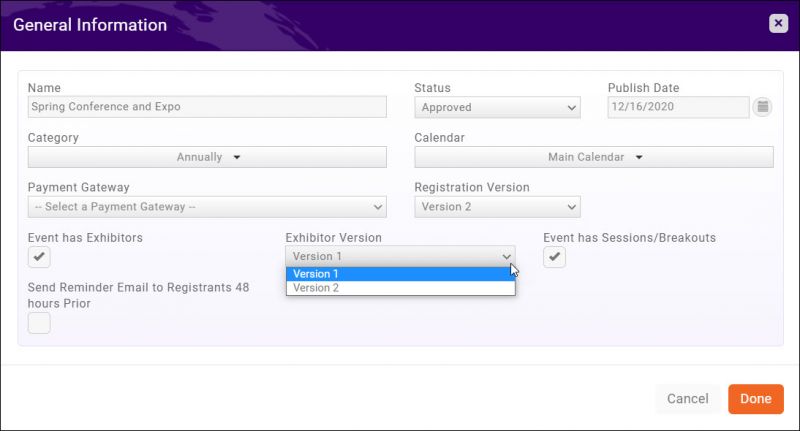
| + | ==='''<span style="color:#800080">Select Event Registration Version'''</span>=== | ||
| + | ---- | ||
| + | Two versions of the event public module are available. To select the version that you wish to use: | ||
| + | |||
| + | '''Overview''' tab. | ||
| + | #Select the event '''Overview''' tab. | ||
| + | #:[[File:Event General Info 2.jpg|600px|center]] | ||
| + | #Click the [[File:Cp orange pencil.jpg]] icon next to '''General Information'''. | ||
| + | #Select the desired version from the '''Registration Version''' list. | ||
| + | #:[[File:Registration version.jpg|600px|center]] | ||
| + | #Click '''Done'''. | ||
==='''<span style="color:#800080">Update Event Payment Gateway'''</span>=== | ==='''<span style="color:#800080">Update Event Payment Gateway'''</span>=== | ||
| Line 216: | Line 273: | ||
When this setting is enabled, the email message you selected for '''Event Reminder''' in '''Automated Messaging''' will be sent to all registrants. See '''[[Communications_Basics#Configure_Automated_Messaging|Configure Automated Messaging]]''' for further information. | When this setting is enabled, the email message you selected for '''Event Reminder''' in '''Automated Messaging''' will be sent to all registrants. See '''[[Communications_Basics#Configure_Automated_Messaging|Configure Automated Messaging]]''' for further information. | ||
| + | |||
| + | ==='''<span style="color:#800080">Sync an Event with GoToWebinar'''</span>=== | ||
| + | ---- | ||
| + | |||
| + | If you have enabled GoToWebinar integration, you can sync your event via the event's '''Overview''' tab. '''NOTE:''' GoToWebinar integration requires Registration Version 2. | ||
| + | |||
| + | #Select the event '''Overview''' tab. | ||
| + | #Click the [[File:Cp orange pencil.jpg]] icon next to '''General Information'''. | ||
| + | #Click the '''Sync with GoToWebinar''' check-box. | ||
| + | #Click '''Done'''. | ||
| + | |||
| + | {| class="wikitable" | ||
| + | |- | ||
| + | | | ||
| + | [[File:One Row.png|25px]] | ||
| + | | style="width: 100%"| '''SYNCING PAID EVENTS''': If you wish to charge for a webinar and sync the event from GrowthZone, your event in GoToWebinar must be set up as a free event, as all payments will be processed through GrowthZone and not GoToWebinar. Setting the GoToWebinar event as a paid event will cause GoToWebinar to reject registrations coming from GrowthZone and will not sync registrants. | ||
| + | |} | ||
| + | |||
| + | ==='''<span style="color:#800080">Adding Event Description and Registration Instructions</span>'''=== | ||
| + | In the Event '''Description''' options, there is a field to enter "Registration Instructions". | ||
| + | [[File:EventDescriptionRegistrationInstructions 11182020.png|600px|center]] | ||
| + | These instructions appear at the top of your event registration page. | ||
| + | [[File:EventDescRegInstrOnEventPg 11182020.png|800px|center]] | ||
| + | You can also add or edit the event description. | ||
| + | [[File:EventDesc 11182020.png|600px|center]] | ||
| + | This appears at the top of the event page and registration page. | ||
| + | |||
| + | Event Page: | ||
| + | [[File:EventPageDesc 11182020.png|800px|center]] | ||
| + | Registration Page: | ||
| + | [[File:RegPageDesc 11182020.png|800px|center]] | ||
| + | |||
| + | If you need to add specific instructions regarding the actual registration types themselves, please see '''[[Event_Management#Specific_Registration_Instructions|Specific Registration Instructions]]'''. | ||
==='''<span style="color:#800080">Add a Map to your Event'''</span>=== | ==='''<span style="color:#800080">Add a Map to your Event'''</span>=== | ||
| Line 225: | Line 315: | ||
===Add a Logo to Your Event=== | ===Add a Logo to Your Event=== | ||
[[File:Add Event Main Image.jpg|frame|center]] | [[File:Add Event Main Image.jpg|frame|center]] | ||
| − | #On the Event page, click the image icon next to the event name. The '''Image Manager''' will be displayed. | + | #On the Event page, click the image icon next to the event name. The '''Image Manager''' will be displayed. '''For an event photo, the 'MINIMUM' size is 150x150 pixels; 'RECOMMENDED' size is 200x200 pixels or larger.''' |
#On the '''Image Manager''' screen, you may either drag & drop the image onto the screen OR click the upload button to browse to your image, and upload. | #On the '''Image Manager''' screen, you may either drag & drop the image onto the screen OR click the upload button to browse to your image, and upload. | ||
#Position selection rectangle around area you would like to use. | #Position selection rectangle around area you would like to use. | ||
#Click '''Crop & Save'''. | #Click '''Crop & Save'''. | ||
This image is the "search logo" for the event and will be displayed next to the event when viewing the events in List View on the website or in the Info Hub | This image is the "search logo" for the event and will be displayed next to the event when viewing the events in List View on the website or in the Info Hub | ||
| − | |||
===Add an Image Gallery to Your Event Page=== | ===Add an Image Gallery to Your Event Page=== | ||
| Line 236: | Line 325: | ||
#In the '''Images''' section click the '''Add''' button | #In the '''Images''' section click the '''Add''' button | ||
#:[[File:ImageManager.png|center]] | #:[[File:ImageManager.png|center]] | ||
| − | #You may drag an image into the image box '''OR''' click the '''Upload''' button to browse to your image. | + | #You may drag an image into the image box '''OR''' click the '''Upload''' button to browse to your image. '''NOTE:''' it is recommended to resize image gallery photos to a consistent width/height prior to uploading. Recommended minimum height is 750 pixels. 16:9, 3:2, and 1:1 ratios are best. |
#Enter a '''Title''' and '''Caption''' for the image if you choose | #Enter a '''Title''' and '''Caption''' for the image if you choose | ||
#Click '''Crop & Save'''. | #Click '''Crop & Save'''. | ||
| Line 257: | Line 346: | ||
<div class='note'>'''NOTE:''' Copying and Pasting the URL is not a requirement; if you know the address you can simply type it in. </div> | <div class='note'>'''NOTE:''' Copying and Pasting the URL is not a requirement; if you know the address you can simply type it in. </div> | ||
| − | ===Update Location of Event=== | + | ==='''<span style="color:#800080">Update Location/Mapping of Event'''</span>=== |
| + | ---- | ||
| + | On the '''Overview''' tab, you will be able to enter address information, which will be used by the system to generate a map of the location. | ||
#In the '''Location''' section of an event, click the [[File:Pencil icon.jpg]] icon. | #In the '''Location''' section of an event, click the [[File:Pencil icon.jpg]] icon. | ||
| − | #:[[File: | + | #:[[File:EventLocation 08032020.jpg|800px|center]] |
#Enter the '''Location Name''': The type ahead searching feature allows you to start typing the Location name, and it searches your organizations, individuals, and past event names. | #Enter the '''Location Name''': The type ahead searching feature allows you to start typing the Location name, and it searches your organizations, individuals, and past event names. | ||
#*If you select a name from the type ahead feature, it will pre-populate the name and address field of the person/org/location you selected. | #*If you select a name from the type ahead feature, it will pre-populate the name and address field of the person/org/location you selected. | ||
#*If you do not select an item from the type ahead, the address fields are left blank and you are able to type in a new location name and address. | #*If you do not select an item from the type ahead, the address fields are left blank and you are able to type in a new location name and address. | ||
#Enter a '''Location Description''': This allows you to add additional information about the location of the event (such as where to park), and will be displayed on your event page. | #Enter a '''Location Description''': This allows you to add additional information about the location of the event (such as where to park), and will be displayed on your event page. | ||
| + | #Click '''Done'''. | ||
| + | |||
| + | ==='''<span style="color:#800080">Update Event Date/Hours/Time Zone'''</span>=== | ||
| + | ---- | ||
| + | |||
| + | {| class="wikitable" | ||
| + | |- | ||
| + | | | ||
| + | [[File:Video-call-24.jpg|25px]] | ||
| + | | style="width: 100%"| '''See it in Action:''' [https://www.screencast.com/t/pb15O3dd Update Event Date/Hours/Time Zone]] | ||
| + | |} | ||
| + | |||
| + | By default, when adding an event, the times defined will be in the time zone configured for your organization. To change the time zone: | ||
| + | |||
| + | #Click the pencil icon, in the '''Hours''' section of the '''Overview''' tab. | ||
| + | #:[[File:Edit Event Hours.jpg|800px|center]] | ||
| + | #Select the desired '''Timezone''' from the list. | ||
| + | #Click '''Done'''. | ||
| + | |||
| + | ==='''<span style="color:#800080">Manage Overall Event Custom Fields'''</span>=== | ||
| + | ---- | ||
| + | These '''Overall Event Custom Fields''' are intended for staff members to track expenses and other internal event information. They can be included in various event reports, such as the '''Events Overview Report''', '''Event Attendee Report''' and the '''Event Activity Report'''. By gathering data in these overall custom fields, you will easily be able to compare event to event, and even year over year. | ||
| + | |||
| + | '''ALL''' custom fields that have been created of type '''Event''' will automatically be displayed on each of your events'''Overview''' tab. You can populate these fields with desired information and/or add additional custom fields, from the '''Overview''' tab. '''NOTE''': These custom fields are not the custom fields that you wish to include on your event registration pages or custom fields used for internal purposes specific to an individual event. See | ||
| + | |||
| + | {| class="wikitable" | ||
| + | |- | ||
| + | | | ||
| + | [[File:One Row.png|25px]] | ||
| + | | style="width: 100%"| '''NOTE''': The Overall Custom Fields are '''NOT''' custom fields that you wish to include on your event registration pages or custom fields used for internal purposes specific to an individual event. See '''[[Event_Management#Add_Custom_Fields_to_Event_and.2For_Event_Registration_Form|Add Custom Fields to Event and/or Event Registration Form]]''' for instructions on setting up custom fields for your event registration page. | ||
| + | |} | ||
| + | |||
| + | ===='''<span style="color:#800080">Populate an Overall Event Custom Field'''</span>==== | ||
| + | ---- | ||
| + | |||
| + | #Select the event's '''Overview''' tab. | ||
| + | #:[[File:Overall fields.jpg|600px|center]] | ||
| + | #Click the [[File:Cp orange pencil.jpg|25px]] icon, in the '''Overall Event Custom Fields''' section. | ||
| + | #:[[File:Edit event fields.jpg|600px|center]] | ||
| + | #Populate the fields as needed. | ||
| + | #Click '''Done'''. | ||
| + | |||
| + | ===='''<span style="color:#800080">Add Overall Event Custom Field'''</span>==== | ||
| + | ---- | ||
| + | '''Overall Event Custom Fields''' can be added "on the fly" from any event's '''Overview''' tab, or under '''Setup > Miscellaneous > Custom Fields'''. | ||
| + | #Select the event's '''Overview''' tab. | ||
| + | #:[[File:Overall fields.jpg|600px|center]] | ||
| + | #Click the [[File:Cp orange pencil.jpg|25px]] icon, in the '''Overall Event Custom Fields''' section. | ||
| + | #:[[File:Edit event fields.jpg|600px|center]] | ||
| + | #Click '''Edit Custom Fields''' | ||
| + | #:[[File:Edit custom fields3.jpg|600px|center]] | ||
| + | #Click the [[File:Orangeplus.jpg|25px]] icon. | ||
| + | #:[[File:Add event custom field.jpg|600px|center]] | ||
| + | #Configure the custom field as needed. See '''[[Getting_Started#Custom_Fields|Custom Fields]]''' for further instructions on custom field types. | ||
#Click '''Done'''. | #Click '''Done'''. | ||
| Line 276: | Line 421: | ||
You can configure: your registration open/end dates, maximum attendees, visibility, and so on under the '''Overall Registration Options'''. | You can configure: your registration open/end dates, maximum attendees, visibility, and so on under the '''Overall Registration Options'''. | ||
| − | # | + | #Select the desired Event. |
| − | #:[[File:Overall | + | #Click the '''Attendee Setup''' tab. |
| + | #Click the pencil icon adjacent to '''Overall Registration Options'''. | ||
| + | #:[[File:Overall Registration Options 2019.jpg|800px|center]] | ||
#Configure the following settings: | #Configure the following settings: | ||
#*'''Registration Start Date''' - This is the date that you wish registration to start; until this date, the '''Register''' button will not be displayed on your web-site. | #*'''Registration Start Date''' - This is the date that you wish registration to start; until this date, the '''Register''' button will not be displayed on your web-site. | ||
| Line 284: | Line 431: | ||
#*'''External Registration Link''' - If you are including an event on your calendar, but registration for this is not managed through your software, enter the URL for the registration site here. | #*'''External Registration Link''' - If you are including an event on your calendar, but registration for this is not managed through your software, enter the URL for the registration site here. | ||
#*'''Options''' | #*'''Options''' | ||
| − | #:*'''Enable Registration''' - Click this option to enable registration (assuming the user is in the time frame indicated above). If the event does not require registration and you want it on your calendar, (a Farmer's Market, for instance), you would not check this box.'''NOTE:''' Staff members would be able to register people for the event from the back-office even if this box is not checked. | + | #:*'''Enable Registration''' - Click this option to enable registration (assuming the user is in the time frame indicated above). If the event does not require registration and you want it on your calendar, (a Farmer's Market, for instance), you would not check this box. If this option is disabled, the register button will not be displayed on your event page, nor will the number of registered guests. '''NOTE:''' Staff members would be able to register people for the event from the back-office even if this box is not checked. |
#:*'''Allow Waiting List''' - Click this option to allow a waiting list. If this option is selected, when your maximum number of attendees has been reached, registrants will be notified that they can be added to a waiting list. | #:*'''Allow Waiting List''' - Click this option to allow a waiting list. If this option is selected, when your maximum number of attendees has been reached, registrants will be notified that they can be added to a waiting list. | ||
| − | #:*'''Show Registered Attendees | + | #:*'''Show Registered Attendees Publicly''' - Click this option if you wish to display the registered attendee list on your public web-site. |
#:*'''Show Registered Attendees To Members''' - Click this option if you wish to display the registered attendees for the event in Info Hub. | #:*'''Show Registered Attendees To Members''' - Click this option if you wish to display the registered attendees for the event in Info Hub. | ||
| − | #:*'''Collect Donations''' | + | #:*'''Collect Donations''': If you are using the '''Fundraising''' module, this check box will allow you to also add a donation collection option to your registration form.'''NOTE:''' If this option is checked, an option will be added to the screen to select the '''Fundraiser Receipt Template'''. |
| − | #:*'''Allow Invoicing''' | + | #:*'''Allow Invoicing''': Click this option if you want to give your registrants to option to be invoiced rather than pay online with a credit card. When this is selected, you will also have the option to select '''Include Invoice in Confirmation Email'''. This will make it easy for the attendee to pay the invoice immediately. |
| − | #:*'''Allow Purchasing of Multiple Registration Types''' - Click this option to allow registrants to register for more than one registration type. '''NOTE:''' Perhaps your event has a pre-event meeting, the event itself, and a banquet. '''Allow Purchasing of Multiple Registration Types''' allows your registrants to register for 1, 2, or all three of these without you having to set up complicated registration scenarios | + | #:*'''Allow Purchasing of Multiple Registration Types''' - Click this option to allow registrants to register for more than one registration type. '''NOTE:''' Perhaps your event has a pre-event meeting, the event itself, and a banquet. '''Allow Purchasing of Multiple Registration Types''' allows your registrants to register for 1, 2, or all three of these without you having to set up complicated registration scenarios. |
| − | #:*''' | + | #:*'''Include Include Invoice Link in Confirmation Email''': This option appears when '''Allow Invoicing''' is selected. This will include a link to the invoice within the confirmation email. '''IF CUSTOMIZING THE "REGISTERED EVENT ATTENDEE" EMAIL TEMPLATE''': Your template '''MUST''' include certain links/code to ensure the registrant receives a link to their invoice when enabling this option. You can copy this code from the default "Registered Event Attendee" template. This is the section of links/code that must be included in your [[Getting_Started#Setup_Your_Document_Templates|customized email template]] |
#*'''Member Validation Options''' - These settings allow you to set how you want your members to prove that they are members so they can receive member pricing. Select one of the following three options: | #*'''Member Validation Options''' - These settings allow you to set how you want your members to prove that they are members so they can receive member pricing. Select one of the following three options: | ||
#:*'''Allow anyone to receive member pricing''': This is the least restrictive option. By leaving it open, with an "on your honor" type approach, members will be able to get member pricing without having to log in and/or remember a password. That would mean that anyone would be able to use the member pricing during registration. In the event (no pun intended) that a non-member then signs up with member-only pricing, a staff member could watch for such instances and even use the opportunity to reach out to that individual with membership benefit information. This is also the option you would use if there is no different between member and non-member pricing. | #:*'''Allow anyone to receive member pricing''': This is the least restrictive option. By leaving it open, with an "on your honor" type approach, members will be able to get member pricing without having to log in and/or remember a password. That would mean that anyone would be able to use the member pricing during registration. In the event (no pun intended) that a non-member then signs up with member-only pricing, a staff member could watch for such instances and even use the opportunity to reach out to that individual with membership benefit information. This is also the option you would use if there is no different between member and non-member pricing. | ||
| Line 298: | Line 445: | ||
#*'''Session Changes Allowed Until''' - If you are using the '''Event Expo''' module and will be setting up Sessions, this check box allows you to set a time limit on when registrants can make changes to the sessions they have signed up for. | #*'''Session Changes Allowed Until''' - If you are using the '''Event Expo''' module and will be setting up Sessions, this check box allows you to set a time limit on when registrants can make changes to the sessions they have signed up for. | ||
#Click '''Done'''. | #Click '''Done'''. | ||
| + | |||
| + | ===='''<span style="color:#800080">Set Registration Cut-off Date'''</span>==== | ||
| + | ---- | ||
| + | The registration cut-off date can be set on the event's '''Attendee Setup''' tab, in the '''Overall Registration Options''' section. See '''[[Event_Management#Setup_Overall_Registration_Options|Setup Overall Registration Options]]''' for instructions. | ||
| + | |||
| + | ===='''<span style="color:#800080">Set a Limit on the Number of Event Attendees'''</span>==== | ||
| + | ---- | ||
| + | You can set a limit on the number of event attendees from the event's ''Attendee Setup''' tab, in the '''Overall Registration Options''' section. See '''[[Event_Management#Setup_Overall_Registration_Options|Setup Overall Registration Options]]''' for instructions. | ||
| + | |||
| + | ===='''<span style="color:#800080">Enable a Waiting List for an Event'''</span>==== | ||
| + | ---- | ||
| + | You can enable a waiting list from the event's ''Attendee Setup''' tab, in the '''Overall Registration Options''' section. See '''[[Event_Management#Setup_Overall_Registration_Options|Setup Overall Registration Options]]''' for instructions. | ||
| + | |||
| + | ===='''<span style="color:#800080">Show Registered Attendees Publicly'''</span>==== | ||
| + | ---- | ||
| + | If you wish to allow the public to view who else is attending your event, you can enable '''Show Registered Attendees Publicly''' on the event's ''Attendee Setup''' tab, in the '''Overall Registration Options''' section. See '''[[Event_Management#Setup_Overall_Registration_Options|Setup Overall Registration Options]]''' for instructions. | ||
| + | [[File:Event Registered Attendees 2019.jpg|600px|center]] | ||
| + | |||
| + | ===='''<span style="color:#800080">Display Number of Registrants on Event Detail Page'''</span>==== | ||
| + | ---- | ||
| + | If you wish to display the number of people registered for your event on your event's page, this is set on the event's '''Attendee Setup''' tab, under the '''Overall Registration Options'''. Deselect this option to remove the count from your page. | ||
| + | |||
| + | {| class="wikitable" | ||
| + | |- | ||
| + | | | ||
| + | [[File:Smallest.png|25px]] | ||
| + | | style="width: 100%"| '''NOTE:''' This setting is only applicable to v2 of the public pages. | ||
| + | |} | ||
| + | |||
| + | [[File:Registered guests 2020.jpg|600px|center]] | ||
| + | |||
| + | ===='''<span style="color:#800080">Show Registered Attendees to Members'''</span>==== | ||
| + | ---- | ||
| + | |||
| + | If you wish to allow your members to be able to see who else is attending your event, you can enable '''Show Registered Attendees to Members''' on the event's ''Attendee Setup''' tab, in the '''Overall Registration Options''' section. See '''[[Event_Management#Setup_Overall_Registration_Options|Setup Overall Registration Options]]''' for instructions. | ||
| + | |||
| + | [[File:MIC Event Attendee List 2019.jpg|800px|center]] | ||
| + | |||
| + | ===='''<span style="color:#800080">Collect Donations for Fundraiser during Event Registration'''</span>==== | ||
| + | ---- | ||
| + | |||
| + | If you are using the GrowthZone Fundraiser module, you can collect donations for your fundraiser(s) during event registration. Enable '''Collect Donations''' on the event's ''Attendee Setup''' tab, in the '''Overall Registration Options''' section. You can select one or more of your fundraisers, and select the donation receipt template you wish sent. | ||
| + | |||
| + | See '''[[Event_Management#Setup_Overall_Registration_Options|Setup Overall Registration Options]]''' for instructions. | ||
| + | |||
| + | ===='''<span style="color:#800080">Allow Invoicing for Event Registration'''</span>==== | ||
| + | ---- | ||
| + | If you wish to allow your registrants to request to be invoiced, you can enable '''Allow Invoicing''' on the event's ''Attendee Setup''' tab, in the '''Overall Registration Options''' section. See '''[[Event_Management#Setup_Overall_Registration_Options|Setup Overall Registration Options]]''' for instructions. | ||
| + | |||
| + | ===='''<span style="color:#800080">Display Number of Registrants on Event Detail Page'''</span>==== | ||
| + | ---- | ||
| + | If you are using Version 2 of the Event Pages, the number of attendees registered for an event is automatically displayed. If you do not wish this number to be displayed, de-select the '''Display Number of Registrants on Event Detail Page''' setting under '''Overall Registration Options''' on the event's '''Attendee Setup''' tab. | ||
| + | |||
| + | [[File:Events reg guests 2020.jpg|600px|center]] | ||
| + | |||
| + | ===='''<span style="color:#800080">Define how the System Authenticates Members for Member Pricing'''</span>==== | ||
| + | ---- | ||
| + | If you offer both member and non-member pricing, you can define how the system will authenticate members on the event's '''Attendee Setup''' tab, in the '''Overall Registration Options''' section. See '''[[Event_Management#Setup_Overall_Registration_Options|Setup Overall Registration Options]]''' for instructions. | ||
===Configure Your Registration Form Settings=== | ===Configure Your Registration Form Settings=== | ||
| Line 321: | Line 526: | ||
#Click '''Done'''. | #Click '''Done'''. | ||
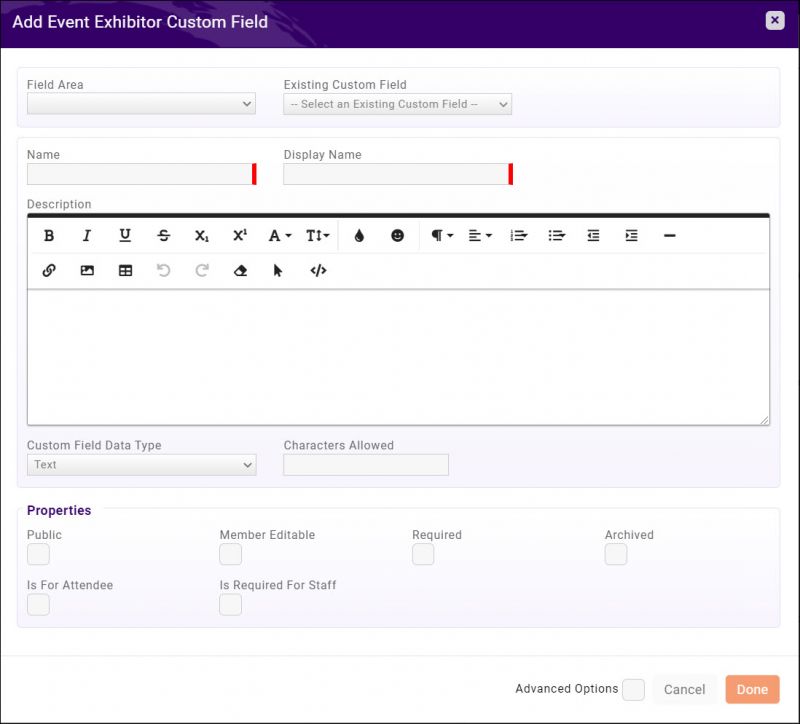
| − | ==='''<span style="color:#800080">Add Custom Fields to | + | ==='''<span style="color:#800080">Add Custom Fields to Event Registration Form'''</span>=== |
---- | ---- | ||
| − | You can easily create custom fields to add to the Event Registration form. For Example, if you are offering meal choices for your annual banquet, you can gather this information from registrants via custom fields. Custom fields may also be created for your internal use, for example, tracking table numbers. | + | You can easily create custom fields to add to the Event Registration form. For Example, if you are offering meal choices for your annual banquet, you can gather this information from registrants via custom fields. Custom fields may also be created for your internal use, for example, tracking table numbers. '''NOTE''': If using Registration Version 2 of the events module, custom fields may be added to specific registration types. |
| − | + | #Click '''Add Custom Field''' in the '''Custom Fields''' section of the '''Attendee Setup''' tab. | |
| − | #Click '''Add Custom Field''' in the | + | #:[[File:Add event custom field cp.jpg|800px|center]] |
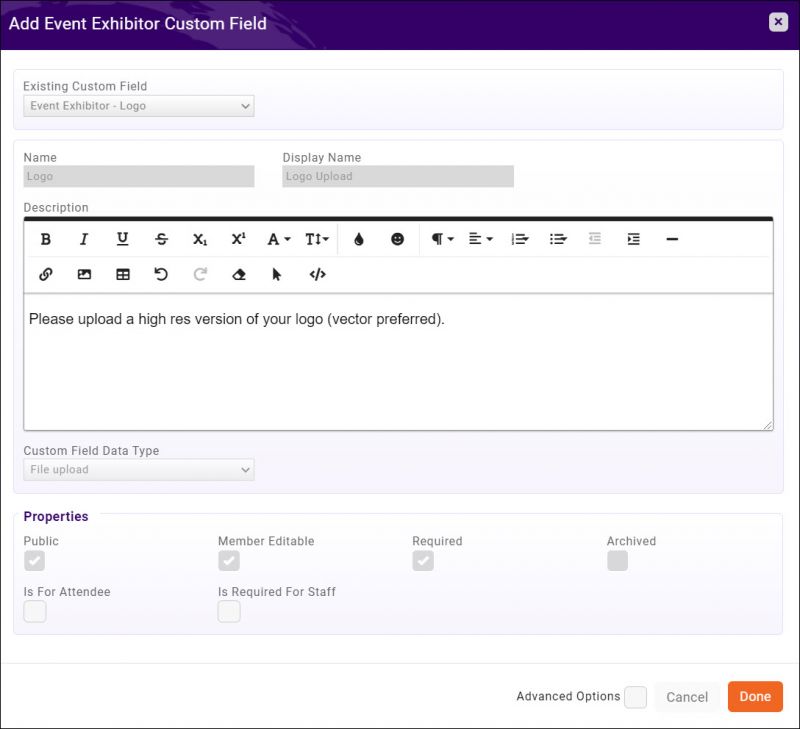
| − | #:[[File: | + | #If you have previously created a custom field for events, simply select it from the '''Use Existing Field''' list and click '''Done'''. If you are selecting a drop-down list, or multi-choice option, you will not have the ability to change the choices. '''NOTE''': You can also select from the '''Individual''' custom fields you have previously set-up for your contacts. See below. |
| − | #If you have previously created a custom field for events, simply select it from the '''Use Existing Field''' list and click '''Done''' | + | #If you are creating a brand new events custom field: |
| + | #*Enter a '''Name''' for the custom field. This is used internally in the database. | ||
| + | #*Enter a '''Display Name'''. This is the name that will be displayed on the registration form. | ||
| + | #*Select the '''Custom Field Data Type'''. This is the type of response that you expect for this custom field. For Example: If you want to know if the attendee has any dietary restrictions, you can select the '''Yes No''' data type. | ||
| + | #*'''Group/Section'''. N/A for Event Registration custom fields. | ||
| + | #*The '''Characters Allowed''' option lets you define the number of characters that may be entered when a '''Text''' or '''Multi line text''' data type are selected. This must be populated. | ||
| + | #Configure the '''Properties''' for this custom field: | ||
| + | #:'''Is for Attendees''': If you wish to include this on your registration form, tick this check-box. | ||
| + | #:'''Public - N/A for Event Fields | ||
| + | #:'''Member Editable''': N/A for Event Fields | ||
| + | #:'''Required''': Enable this option, if registrants must fill out this field. | ||
| + | #:'''Archived''': Enable this option, if you are no longer using this field. | ||
| + | #:'''Is Required for Staff''': Enable this option, if staff is required to complete this field, when registering someone from the back-office. | ||
| + | #Click '''Done''' to save the new custom field. | ||
| − | + | ==='''<span style="color:#800080">Edit an Event Custom Field'''</span>=== | |
| + | ---- | ||
| + | #For the desired event, click the '''Attendee Setup''' tab. | ||
| + | #In the '''Custom Fields''' section, click the [[File:Cp orange pencil.jpg|25px]] icon in the '''Actions''' column for the desired custom field. | ||
| + | #:[[File:Edit custom field.jpg|800px|center]] | ||
| + | #Make the needed changes. | ||
| + | #Click '''Done'''. | ||
| − | + | ==='''<span style="color:#800080">Create Custom Fields specific to an Individual Registration Type'''</span>=== | |
| − | + | ---- | |
| − | + | {| class="wikitable" | |
| − | #''' | + | |- |
| − | # | + | | |
| + | [[File:One Row.png|25px]] | ||
| + | | style="width: 100%"| '''IMPORTANT:''' This option is available for those using Events Registration Version 2. | ||
| + | |} | ||
| + | |||
| + | At times there may be custom fields that are only applicable to specific registration types. For Example, if you are holding a golf tournament which includes registration fees for those actually golfing (and you need to ask for their handicap), but also offer a registration fee to attend just the awards banquet (in which case you would not need to ask for the handicap). By associating the registration type to a custom field, the custom field will only display when that specific registration type is selected. When no selections are made under the Advanced Options, all custom fields created are displayed for all registration types. | ||
| + | |||
| + | #Create the Custom Field as described above. | ||
| + | #Click the '''Advanced Options''' check-box. | ||
| + | #:[[File:Select Reg Type.jpg|600px|center]] | ||
| + | #Select the '''Registration Type''' for which this custom field should be displayed. | ||
| + | #Click '''Done'''. | ||
| − | + | {| class="wikitable" | |
| − | + | |- | |
| − | + | | | |
| − | + | [[File:One Row.png|25px]] | |
| − | + | | style="width: 100%"| '''NOTE:''' A custom field may only be associated to one registration type. If you have multiple registration types that need to use the same custom field, you will need to create multiple custom fields. | |
| − | + | |} | |
| − | + | ||
| + | ==='''<span style="color:#800080">Add Individual Custom Fields to your Event Registration Page'''</span>=== | ||
| + | ---- | ||
| − | + | Over time, you may be collecting the same information from your event registrants. For example, for each of your events, you may ask for dietary restrictions. By creating these custom fields as '''Individual''' custom fields, the responses provided can be stored in your database, associated with the appropriate contact. In future event registrations, this field will automatically populate, so the registrant only need fill in the answer if they wish to change it. | |
| + | {| class="wikitable" | ||
| + | |- | ||
| + | | | ||
| + | [[File:Smallest.png|25px]] | ||
| + | | style="width: 100%"| '''NOTE:''' You must select '''"Enable Individual Custom Fields on Registration Form"''' in '''[[Event_Management#Events_Initial_Setup|Event Settings]]''' to access Individual Custom Fields in the Existing Custom Field dropdown. This option is available for those using Events Registration Version 2. | ||
| + | |} | ||
| − | + | '''Pre-requisite''': Create your Individual Custom Field(s). See '''[[Getting_Started#Custom_Fields|Custom Fields]]''' for instruction. | |
| + | #For the desired event, click the '''Attendee Setup''' tab. | ||
| + | #Click the [[File:orange plus icon.jpg]] in the '''Custom Fields''' section. | ||
| + | #Select the desired custom field from the '''Existing Custom Fields'''. '''NOTE''': Once the existing custom field is selected, there's no edit button like there is for an Event Custom Field. | ||
| + | #:[[File:Ind Cust Fields.jpg|600px|center]] | ||
| + | #To include the field on your registration form, click the '''Is for Attendee''' check-box. | ||
| + | #If staff is required to complete this field when registering someone from the back-office, click the '''Is Required for Staff''' check-box. | ||
| + | #Click '''Done'''. | ||
| + | {| class="wikitable" | ||
| + | |- | ||
| + | | | ||
| + | [[File:One Row.png|25px]] | ||
| + | | style="width: 100%"| '''NOTE:''' We suggest that you carefully think about the information you are collecting through these fields. Any data that's already set on the fields will populate on the registration form if an attendee is matched to a contact. This means that existing data in the field will be visible to anyone who enters that person's email address. Generally, this feature should only be used for information that doesn't change over time (e.g., whether a person uses left or right-handed golf clubs, dietary restrictions, etc...) If the field is used for personal or identifying information (e.g., a birthdate), we suggest having member registrations require a log-in to receive member pricing. If the field is for less personal information, that isn't necessary. | ||
| + | |} | ||
| + | |||
| + | ==='''<span style="color:#800080">Setup your Event Registration Fees'''</span>=== | ||
| + | ---- | ||
A pre-requisite to setting up your registration fees, is setup of the needed Goods & Services. '''[[Billing#Set_Up_Goods.2FServices|Click Here]]''' for further information on setting up goods & services. | A pre-requisite to setting up your registration fees, is setup of the needed Goods & Services. '''[[Billing#Set_Up_Goods.2FServices|Click Here]]''' for further information on setting up goods & services. | ||
| Line 373: | Line 632: | ||
#'''Settings''' options - these settings allow you to define which users can register with this type of registration. This would also display the registration types on your public page. | #'''Settings''' options - these settings allow you to define which users can register with this type of registration. This would also display the registration types on your public page. | ||
#:*Select the '''Allow Members''' check-box if you want this registration type to be available to your members. | #:*Select the '''Allow Members''' check-box if you want this registration type to be available to your members. | ||
| − | #:*Select the '''Allow Non-Members''' check-box if this registration type is also available to non-members. | + | #:*Select the '''Allow Non-Members''' check-box if this registration type is also available to non-members. '''NOTE:''' If this option is selected for a registration fee, the registration fee will '''NOT''' be displayed for members. When selected, '''Is Displayed for Non-Members is automatically selected. |
#:*Select the '''Is Displayed For Non-Members''' check-box if you wish to display this registration type to non-members, even if you have not chosen to allow this registration type for them. | #:*Select the '''Is Displayed For Non-Members''' check-box if you wish to display this registration type to non-members, even if you have not chosen to allow this registration type for them. | ||
#:*Select the '''Allow Staff Only''' check-box if you do not wish to display this registration type publicly. Only your staff users would have access to this option when registering someone from the back-office. '''NOTE:''' If this option is selected, selections for members and non-members are automatically de-selected. | #:*Select the '''Allow Staff Only''' check-box if you do not wish to display this registration type publicly. Only your staff users would have access to this option when registering someone from the back-office. '''NOTE:''' If this option is selected, selections for members and non-members are automatically de-selected. | ||
| Line 384: | Line 643: | ||
#On the event '''Attendee Setup''' tab, click the '''Actions''' button in the '''Registration Types''' section. | #On the event '''Attendee Setup''' tab, click the '''Actions''' button in the '''Registration Types''' section. | ||
#Click '''Add Simple Paid Registration Fee'''. | #Click '''Add Simple Paid Registration Fee'''. | ||
| − | #:[[File: | + | #:[[File:Edit simple paid registration points 2020.jpg|600px|center]] |
#Enter a '''Name''' for the Registration Type. | #Enter a '''Name''' for the Registration Type. | ||
#Enter the '''Registrations Available (0 if unlimited)'''. This option will limit the number of free registrations available, and will not allow registration with this type when the limit has been met. | #Enter the '''Registrations Available (0 if unlimited)'''. This option will limit the number of free registrations available, and will not allow registration with this type when the limit has been met. | ||
| Line 390: | Line 649: | ||
#'''Settings''' options - these settings allow you to define which users can register with this type of registration. This would also display the registration types on your public page. | #'''Settings''' options - these settings allow you to define which users can register with this type of registration. This would also display the registration types on your public page. | ||
#:*Select the '''Allow Members''' check-box if you want this registration type to be available to your members. | #:*Select the '''Allow Members''' check-box if you want this registration type to be available to your members. | ||
| − | #:*Select the '''Allow Non-Members''' check-box if this registration type is also available to non-members. | + | #:*Select the '''Allow Non-Members''' check-box if this registration type is also available to non-members. '''NOTE:''' If this option is selected for a registration fee, the registration fee will '''NOT''' be displayed for members. When selected, '''Is Displayed for Non-Members is automatically selected. |
#:*Select the '''Is Displayed For Non-Members''' check-box if you wish to display this registration type to non-members, even if you have not chosen to allow this registration type for them. | #:*Select the '''Is Displayed For Non-Members''' check-box if you wish to display this registration type to non-members, even if you have not chosen to allow this registration type for them. | ||
#:*Select the '''Allow Staff Only''' check-box if you do not wish to display this registration type publicly. Only your staff users would have access to this option when registering someone from the back-office. '''NOTE:''' If this option is selected, selections for members and non-members are automatically de-selected. | #:*Select the '''Allow Staff Only''' check-box if you do not wish to display this registration type publicly. Only your staff users would have access to this option when registering someone from the back-office. '''NOTE:''' If this option is selected, selections for members and non-members are automatically de-selected. | ||
#Select the '''Goods/Service''' to assign to this registration fee from the drop-down list. [[Billing#Set_Up_Goods.2FServices|Click here]] for information on configuring goods/services. The '''Price''' will automatically be populated if it was populated when the goods/service was configured. You may change the price if needed. | #Select the '''Goods/Service''' to assign to this registration fee from the drop-down list. [[Billing#Set_Up_Goods.2FServices|Click here]] for information on configuring goods/services. The '''Price''' will automatically be populated if it was populated when the goods/service was configured. You may change the price if needed. | ||
| + | #If your members can use points to purchase this registration type, enter the number of points required. | ||
#Click '''Done'''. | #Click '''Done'''. | ||
| − | ====Add a Table/ | + | ====Add a Table/Team Registration Type==== |
This option should be used when the registration fee will register multiple attendees. For example, if you have a golf tournament event for which you are selling foursomes, or a dinner event where you are selling tables of eight. | This option should be used when the registration fee will register multiple attendees. For example, if you have a golf tournament event for which you are selling foursomes, or a dinner event where you are selling tables of eight. | ||
#Click the down arrow on the '''Add Type''' button. | #Click the down arrow on the '''Add Type''' button. | ||
| − | #Click '''Add a Table/ | + | #Click '''Add a Table/Team Registration Type'''. |
| − | #:[[File: | + | #:[[File:AddTableTeamRegType 08262020.jpg|800px|center|A screenshot of the add table/team Registration type window.]] |
#Enter a '''Name''' for the Free Registration Type. | #Enter a '''Name''' for the Free Registration Type. | ||
#Enter the '''Registrations Available (0 if unlimited)'''. This option will limit the number of free registrations available, and will not allow registration with this type when the limit has been met. If you are setting up a registration type based on tables, this would be the number of tables available. | #Enter the '''Registrations Available (0 if unlimited)'''. This option will limit the number of free registrations available, and will not allow registration with this type when the limit has been met. If you are setting up a registration type based on tables, this would be the number of tables available. | ||
| Line 411: | Line 671: | ||
#:*Select the '''Is Displayed For Non-Members''' check-box if you wish to display this registration type to non-members, even if you have not chosen to allow this registration type for them. | #:*Select the '''Is Displayed For Non-Members''' check-box if you wish to display this registration type to non-members, even if you have not chosen to allow this registration type for them. | ||
#:*Select the '''Allow Staff Only''' check-box if you do not wish to display this registration type publicly. Only your staff users would have access to this option when registering someone from the back-office. '''NOTE:''' If this option is selected, selections for members and non-members are automatically de-selected. | #:*Select the '''Allow Staff Only''' check-box if you do not wish to display this registration type publicly. Only your staff users would have access to this option when registering someone from the back-office. '''NOTE:''' If this option is selected, selections for members and non-members are automatically de-selected. | ||
| − | #:*Select the '''Reserve All Attendees''' check-box to reserve all attendees. This setting is enabled by default and ensures that all attendees for this group reservation are reserved even when names are not entered. (The system with use ''Additional Attendee'' if no name is entered. The name of the actual attendee can be added by a staff member when it is known.) | + | #:*Select the '''Reserve All Attendees''' check-box to reserve all attendees. This setting is enabled by default and ensures that all attendees for this group reservation are reserved even when names are not entered. (The system with use ''Additional Attendee'' if no name is entered. The name of the actual attendee can be added by a staff member when it is known.) In the case where a registrant is purchasing more than one group registration, they will be required to have at least one attendee name for each group purchased. |
| − | #Select a fee item from the '''Item''' list. This is the previously setup registration fee for this event. [[Billing#Set_Up_Goods.2FServices|Click here]] for further information on setting up goods/services. The '''Price''' will automatically be populated,if it was populated when the goods/service was configured. You may change the price if needed. | + | #Select a fee item from the '''Item''' list. This is the previously setup registration fee for this event. '''[[Billing#Set_Up_Goods.2FServices|Click here]]''' for further information on setting up goods/services. The '''Price''' will automatically be populated,if it was populated when the goods/service was configured. You may change the price if needed. If you are using Benefit Tracking, you can also assign a '''Point''' value for the registration. |
#Enter the number of attendees per registration in '''Attendees per Table/Group'''. For example, if you are selling tables of eight, you would enter 8. | #Enter the number of attendees per registration in '''Attendees per Table/Group'''. For example, if you are selling tables of eight, you would enter 8. | ||
#Click '''Done'''. | #Click '''Done'''. | ||
| + | |||
| + | =====Table/Team Management===== | ||
| + | See '''[[Event_Management#Table.2FTeam_Management_2|Table/Team Management]]''' for instructions on how to manage your table/team registrants. | ||
====Add Advanced Registration Type==== | ====Add Advanced Registration Type==== | ||
| Line 519: | Line 782: | ||
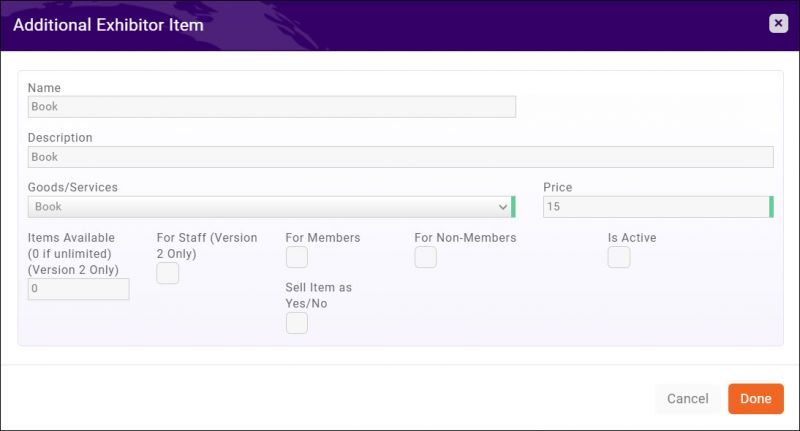
If you wish to sell additional items during the event registration process (for example you may wish to be able to sell mulligans for your golf tournament at the time of registration, or a commemorative hat), these items may be added in the '''Additional Items''' section on the event's '''Attendee Setup''' tab. Additionally, individuals who just wish to purchase an add on item, and not register for the event will be able to do so on the event registration page. | If you wish to sell additional items during the event registration process (for example you may wish to be able to sell mulligans for your golf tournament at the time of registration, or a commemorative hat), these items may be added in the '''Additional Items''' section on the event's '''Attendee Setup''' tab. Additionally, individuals who just wish to purchase an add on item, and not register for the event will be able to do so on the event registration page. | ||
| − | [[File:Additional Items.png| | + | [[File:Additional Items.png|1000px|center]] |
#Click the '''Add Item''' button in the '''Additional Items''' section | #Click the '''Add Item''' button in the '''Additional Items''' section | ||
| − | [[File: | + | #:[[File:New add on item.jpg|600px|center]] |
#Enter a '''Name''' for the additional event item. | #Enter a '''Name''' for the additional event item. | ||
| − | #Select the desired '''Availability''' of the additional item. | + | #Select the desired '''Availability''' of the additional item. |
#:*To allow only those who register for the event to purchase the item, select '''For Attendees'''. | #:*To allow only those who register for the event to purchase the item, select '''For Attendees'''. | ||
| − | #:*To allow individuals to purchase the item without registering for the event, select '''For Overall Registration'''. '''NOTE:''' When '''For Attendees''' is selected, the additional item will only be displayed once a registration option has been selected and will be available for each person on the registration form. | + | #:*To allow individuals to purchase the item without registering for the event, select '''For Overall Registration'''. '''NOTE:''' When '''For Attendees''' is selected, the additional item will only be displayed once a registration option has been selected and will be available for each person on the registration form. |
#Enter a '''Description''' of the item. | #Enter a '''Description''' of the item. | ||
#Select the desired '''Goods/Service''' from the drop-down list. | #Select the desired '''Goods/Service''' from the drop-down list. | ||
| Line 532: | Line 795: | ||
#Select the '''Is For Non Members''' check box to allow non-members to purchase this item. | #Select the '''Is For Non Members''' check box to allow non-members to purchase this item. | ||
#Select the '''Is Active''' check-box to allow the item to be displayed on the event registration form. | #Select the '''Is Active''' check-box to allow the item to be displayed on the event registration form. | ||
| + | #If you wish to limit the number of additional items you have available to be sold, enter the number in the '''Items Available (0 if unlimited - Version 2 Only)'''. Each additional item can have its own specific limit set. Once the limit is reached, the item will be marked with “sold out” on the event registration form. | ||
#Click '''Done'''. | #Click '''Done'''. | ||
| Line 537: | Line 801: | ||
---- | ---- | ||
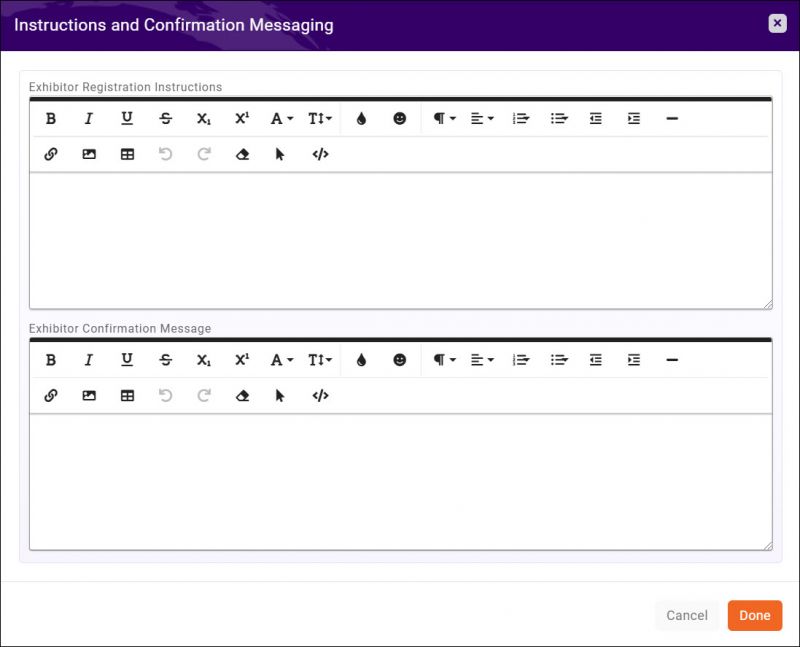
| − | + | You can now provide general registration instructions for your event, plus add additional instructions to the actual registration area. | |
| − | [[File: | + | To add general registration instructions that appear at the top of your event page/registration page, please see '''[[Event_Management#Adding_Event_Description_and_Registration_Instructions|Adding Event Description and Registration Instructions]]'''. |
| + | ===='''<span style="color:#800080">Specific Registration Instructions</span>'''==== | ||
| + | On the Event '''Attendee Setup''' page, you can customize the instructions by editing the '''Instructions and Confirmation Messaging'''. | ||
| + | [[File:InstrAndConfMessaging 11182020.png|800px|center]] | ||
| + | The "Event Registration Instructions" will give specific instructions regarding registration. | ||
| + | [[File:InstrConfMessaging 11182020.png|600px|center]] | ||
| + | These instructions appear directly above your registration options. | ||
| + | [[File:RegTypeInstrcutions 11182020.png|800px|center]] | ||
| − | + | ===='''<span style="color:#800080">Event Confirmation Messaging</span>'''==== | |
| − | + | You can also customize the confirmation displayed after registration is completed by editing the '''Event Confirmation Message'''. | |
| − | + | [[File:ConfMessaging 11182020.png|600px|center]] | |
| − | + | It displays on the registration confirmation page. | |
| − | [[File: | + | [[File:ConfMessaging2 11182020.png|800px|center]] |
| + | The confirmation message is also added to the Confirmation Email registrants receive following their registration. | ||
| + | [[File:ConfEmail 11182020.png|600px|center]] | ||
='''<span style="color:#800080">Event Management-Invitations & Other Communications'''</span>= | ='''<span style="color:#800080">Event Management-Invitations & Other Communications'''</span>= | ||
| Line 568: | Line 841: | ||
If you have previously sent an Event Invite, clicking '''Ignore Recipients that have Registered, Declined, Been Invited,...''' check-box will limit the email to those individuals who have not previously received the invite or responded in someway to a previous invitation. | If you have previously sent an Event Invite, clicking '''Ignore Recipients that have Registered, Declined, Been Invited,...''' check-box will limit the email to those individuals who have not previously received the invite or responded in someway to a previous invitation. | ||
| − | + | ||
| − | + | ==='''<span style="color:#800080">Download list of Invitees'''</span>=== | |
| − | + | ---- | |
| − | + | All invitees are stored and available via a spreadsheet download, found under orange actions button on the Event's '''Attendees''' tab. | |
| − | + | ||
| − | + | #Select the desired event. | |
| + | #Click the '''Attendees''' tab. | ||
| + | #:[[File:Download invitees.jpg|800px|center]] | ||
| + | #Click the orange action button and click '''Download Invitees'''. | ||
=='''<span style="color:#800080">Re-send a Previously Sent Event Invite'''</span>== | =='''<span style="color:#800080">Re-send a Previously Sent Event Invite'''</span>== | ||
| Line 590: | Line 866: | ||
If you want to schedule the email to be sent at a future date, enter a date in the '''Delay Delivery Until''' text box before clicking '''Done'''. | If you want to schedule the email to be sent at a future date, enter a date in the '''Delay Delivery Until''' text box before clicking '''Done'''. | ||
| + | |||
| + | =='''<span style="color:#800080">Re-send a Registration Confirmation'''</span>== | ||
| + | ---- | ||
| + | Go to the Attendees tab of your event. | ||
| + | #Find the attendee that is requesting the confirmation email. | ||
| + | #Click the gray "Actions" button to the far right. | ||
| + | #Select "Resend Confirmation". | ||
| + | [[File:ResendConf 10052020.jpg|800px|center]] | ||
=='''<span style="color:#800080">Send a Manual Event Reminder'''</span>== | =='''<span style="color:#800080">Send a Manual Event Reminder'''</span>== | ||
| Line 608: | Line 892: | ||
A default template has not been created for Event Reminders. You can create the message on the Send Email screen, or, if you have a standard Event Reminder email that you send out, you may create a template. See [[Communications_Basics#Create_and_Manage_Email_Templates|Create and Manage Email Templates]] for instruction on creating email templates. | A default template has not been created for Event Reminders. You can create the message on the Send Email screen, or, if you have a standard Event Reminder email that you send out, you may create a template. See [[Communications_Basics#Create_and_Manage_Email_Templates|Create and Manage Email Templates]] for instruction on creating email templates. | ||
| − | ==Send Email to Event No-Shows== | + | |
| + | =='''<span style="color:#800080">Send Email to Specific Registration Types'''</span>== | ||
| + | ---- | ||
| + | From anywhere in the system you can send an email: | ||
| + | #Begin typing the event name in the TO field; this will pop up a number of dynamic lists to choose from. You will now see the registrants for specific event registration types listed as dynamic lists. | ||
| + | {| class="wikitable" | ||
| + | |- | ||
| + | | | ||
| + | [[File:Smallest.png|25px]] | ||
| + | | style="width: 100%"| '''Note''' If many of your events have the similar names, staff members can start by typing Event Name + SPACE + Registration Type Name to narrow the search. Also, if using specific event merge fields, send your email from within the event itself. | ||
| + | |} | ||
| + | #:[[File:EmailRegType 10052020.jpg|800px|center]] | ||
| + | #Select your desired event + registration type and compose your email (or use a template). | ||
| + | |||
| + | See '''[[Communications_Basics#Sending_an_Email|Sending an Email]]''' for further instructions. | ||
| + | |||
| + | =='''<span style="color:#800080">Send Email to Event No-Shows'''</span>== | ||
| + | ---- | ||
#Select the event '''Communication''' tab. | #Select the event '''Communication''' tab. | ||
#Click the '''Actions''' button. | #Click the '''Actions''' button. | ||
| − | #:[[File:Send Email to No Shows.jpg|center]] | + | #:[[File:Send Email to No Shows.jpg|800px|center]] |
#Click '''Send Email to No Shows'''. The '''Send Email''' screen will be displayed. | #Click '''Send Email to No Shows'''. The '''Send Email''' screen will be displayed. | ||
[[File:CP Send Email.jpg|center]] | [[File:CP Send Email.jpg|center]] | ||
| + | |||
| + | You can also send an email to event no-shows by sending an email from the Communications module or the Quick Actions menu. Once the Send Email window is open, begin typing the name of the event in the To: box. You will see several options available, including a selection for emailing "No Shows". | ||
| + | |||
| + | [[File:EventSendEmailOptions 09292020.jpg|650px|center|Options available for sending email to Event registrants.]] | ||
See '''[[Communications_Basics#Sending_an_Email|Sending an Email]]''' for further instructions. | See '''[[Communications_Basics#Sending_an_Email|Sending an Email]]''' for further instructions. | ||
| Line 648: | Line 953: | ||
The event '''Attendee''' tab will contain important information about the attendee, including the Registration Type and documentation of any Additional Items purchased. Each column in the table is described below. | The event '''Attendee''' tab will contain important information about the attendee, including the Registration Type and documentation of any Additional Items purchased. Each column in the table is described below. | ||
| + | |||
| + | {| class="wikitable" | ||
| + | |- | ||
| + | | | ||
| + | [[File:Smallest.png|25px]] | ||
| + | | style="width: 100%"| '''Did you know...'''Records for event attendees that are not contacts in your database are still stored in the database. Any invoices or payments for these contacts would be located on their Billing tabs. See '''[[Contact_Management#View_Contacts_-_Event_Attendees_Potential_Contacts|View Contacts - Event Attendees Potential Contacts]]''' for further information. | ||
| + | |} | ||
You can use the '''Search''' field, '''Show Only''' drop down, or '''Customize Results''' at the top of the table to find specific registrants or registrants that meet a certain criteria. | You can use the '''Search''' field, '''Show Only''' drop down, or '''Customize Results''' at the top of the table to find specific registrants or registrants that meet a certain criteria. | ||
| Line 720: | Line 1,032: | ||
==='''<span style="color:#800080">Update an Attendee Registration'''</span>=== | ==='''<span style="color:#800080">Update an Attendee Registration'''</span>=== | ||
---- | ---- | ||
| − | The | + | The '''Update Registration''' option allows staff to go to the attendee's registration form, and gives staff members and add additional items or add registrations if needed. |
#For the desired event, click the '''Attendees''' tab. | #For the desired event, click the '''Attendees''' tab. | ||
| Line 787: | Line 1,099: | ||
If you do '''NOT''' want to match this registrant to an existing contact OR create a new contact, simply click '''Cancel''' The registrant will remain registered for the event but will not be added to the database. You can find them within the event, or, if necessary, from the Contacts module (Click '''Customize Results''' and select '''Contacts Not in CRM''') | If you do '''NOT''' want to match this registrant to an existing contact OR create a new contact, simply click '''Cancel''' The registrant will remain registered for the event but will not be added to the database. You can find them within the event, or, if necessary, from the Contacts module (Click '''Customize Results''' and select '''Contacts Not in CRM''') | ||
| − | ===Cancel an Event Registration=== | + | ==='''<span style="color:#800080">Table/Team Management</span>'''=== |
| + | If your event has been set up with a table/team registration type, you can assign attendees to tables or teams. | ||
| + | *On the Attendees tab, click the orange "Actions" button and select "Table/Team Management". This will open a Table/Team Management window. | ||
| + | *If a table or team has registered using the table/team registration type, they will automatically be assigned to a table/team. You can edit the name of this table/team by clicking the pencil icon to the right of the table/team name. | ||
| + | *You can manually create a table/team by clicking the "Add a Table/Team" button. | ||
| + | *If someone has registered using a simple paid registration type, they will display in this window in the "Unassigned Attendees" column. | ||
| + | *To move someone from Unassigned to a table/team, click and drag them to the desired table/team. | ||
| + | *Even if your event does not allow people to register their own table/team, you still need to create a Table/Team Registration Type to enable the Table/Team Management. You can then manually set up your tables/teams and move your attendees into and between the tables/teams as needed. | ||
| + | |||
| + | {| class="wikitable" | ||
| + | |- | ||
| + | | | ||
| + | [[File:Smallest.png|25px]] | ||
| + | | style="width: 100%"| '''Note''' The Table/Team names will be included in the "Download Attendees" file, and are tied to a "Table Name" merge field so can be easily added to name badges. | ||
| + | |} | ||
| + | |||
| + | ==='''<span style="color:#800080">Cancel an Event Registration</span>'''=== | ||
You can cancel a registration from the '''Attendees''' tab. | You can cancel a registration from the '''Attendees''' tab. | ||
#Click on the small gray '''Actions''' drop-down in the right-hand column of the registration you would like to cancel | #Click on the small gray '''Actions''' drop-down in the right-hand column of the registration you would like to cancel | ||
| Line 804: | Line 1,132: | ||
Below are several scenarios to consider once you have cancelled a registration. '''NOTE''': These are only applicable if an invoice and/or a payment have been received for the registration. | Below are several scenarios to consider once you have cancelled a registration. '''NOTE''': These are only applicable if an invoice and/or a payment have been received for the registration. | ||
| − | *'''An invoice has been created for the registration, but not paid''': In this scenario, best practice is to void the invoice | + | *'''An invoice has been created for the registration, but not paid''': In this scenario, best practice is to void the invoice. |
| − | *'''An invoice has been | + | *'''An invoice has been created and paid: |
**If you have a no refund/no credit policy, you need do nothing else. | **If you have a no refund/no credit policy, you need do nothing else. | ||
**If you have a refund policy, create a refund as described in '''[[Billing#Refund_a_Payment|Refund a Payment]]'''. You may create the refund on the '''Attendee Purchases''' tab. | **If you have a refund policy, create a refund as described in '''[[Billing#Refund_a_Payment|Refund a Payment]]'''. You may create the refund on the '''Attendee Purchases''' tab. | ||
**If you have a no refund policy, but are willing to issue a credit, create a credit as described in '''[[Billing#Add_a_Credit_Memo|Add a Credit Memo]]'''. | **If you have a no refund policy, but are willing to issue a credit, create a credit as described in '''[[Billing#Add_a_Credit_Memo|Add a Credit Memo]]'''. | ||
| − | ===Update Attendee Name and Other Information=== | + | ===='''<span style="color:#800080">Registration Cancellation by the Attendee'''</span>==== |
| + | ---- | ||
| + | |||
| + | Attendees have the ability to cancel their own registrations. In this scenario, an email will be sent to those staff members who have subscribed to the '''Unregistered Attendees''' email notification. See '''[[Getting_Started#Subscribe_to_Automated_Staff_Notifications|Subscribe to Automated Staff Notifications]]''' for instructions. When an attendee un-registered, they are not automatically refunded, so you will want to follow your practices for managing payments received for the registration. | ||
| + | |||
| + | ==='''<span style="color:#800080">Update Attendee Name and Other Information'''</span>=== | ||
| + | ---- | ||
You can update names of attendees as well as additional attendee information (for example: custom fields) on the Attendee tab. | You can update names of attendees as well as additional attendee information (for example: custom fields) on the Attendee tab. | ||
| Line 857: | Line 1,191: | ||
==='''<span style="color:#800080">Manage the Event Waiting List'''</span>=== | ==='''<span style="color:#800080">Manage the Event Waiting List'''</span>=== | ||
---- | ---- | ||
| − | If you have | + | If you enable the '''Allow Waiting List''' for an event, visitors to your event page will have the opportunity to be added to the waiting list. When they do so, the '''Event Waiting List Automatic Notice''' automated message will be sent to them. You can customize the email sent, to suit your business needs. See '''[[Communications_Basics#Automated_Messaging|Automated Messages]]''' for further information. |
| + | |||
| + | On the '''Attendee''' tab, you will be able to view who is on the waiting list, register people on the waiting list, and remove people from the waiting list as needed. | ||
If the waiting list is enabled, once you have reached the maximum allowed for the event, registrants will see '''"Maximum attendee limit for the event has been reached. You have to add X attendee(s) to the waiting list, or remove them to continue"''' when trying to register. | If the waiting list is enabled, once you have reached the maximum allowed for the event, registrants will see '''"Maximum attendee limit for the event has been reached. You have to add X attendee(s) to the waiting list, or remove them to continue"''' when trying to register. | ||
| Line 868: | Line 1,204: | ||
[[File:Waiting List.jpg|900px|center]] | [[File:Waiting List.jpg|900px|center]] | ||
| + | |||
| + | ===='''<span style="color:#800080">Register an Attendee from the Waiting List'''</span>==== | ||
| + | ---- | ||
| + | #For the desired event, click the '''Attendees''' tab. | ||
| + | #Click '''Actions''' in the '''Actions''' column for the person you wish to register. To find those on your waiting list, select '''Waiting List''' from the '''Show Only''' drop-down list. | ||
| + | #:[[File:Register from Wait List.jpg|800px|center]] | ||
| + | #Click '''Register'''. '''NOTE''': Do not select '''Update Registration'''. This option should only be used for individuals that are currently of '''Registered''' status. | ||
| + | #:[[File:Register wait.jpg|600px|center]] | ||
| + | #Complete the necessary/required fields on the '''Edit Attendee''' screen. | ||
| + | #Click '''Done'''. | ||
| + | |||
| + | The attendee is now registered for the event, and an invoice has been created. You can send and/or pay the invoice on the event's '''Attendee Purchases''' tab. | ||
===='''<span style="color:#800080">Remove Registrant from Waiting List'''</span>==== | ===='''<span style="color:#800080">Remove Registrant from Waiting List'''</span>==== | ||
| Line 875: | Line 1,223: | ||
#:[[File:Remove from list.jpg|800px|center]] | #:[[File:Remove from list.jpg|800px|center]] | ||
#Click '''Remove From Waiting List'''. This is an immediate action, there is no "undo". | #Click '''Remove From Waiting List'''. This is an immediate action, there is no "undo". | ||
| + | |||
| + | ==='''<span style="color:#800080">Cancel a Registration'''</span>=== | ||
| + | ---- | ||
| + | #For the desired event, click the '''Attendees''' tab. | ||
| + | #Click the '''Actions''' button for the attendee you wish to cancel. | ||
| + | #Select '''Cancel Registration'''. | ||
| + | #Click '''Done'''. | ||
| + | |||
| + | {| class="wikitable" | ||
| + | |- | ||
| + | | | ||
| + | [[File:One Row.png|25px]] | ||
| + | | style="width: 100%"| '''IMPORTANT''': If the registrant has an | ||
| + | |} | ||
| + | |||
===Manage Event Attendance/Check-in=== | ===Manage Event Attendance/Check-in=== | ||
| Line 901: | Line 1,264: | ||
#Click on the appropriate status ('''Attended''', '''No Show''', '''Unknown'''). | #Click on the appropriate status ('''Attended''', '''No Show''', '''Unknown'''). | ||
| − | |||
| − | :On the '''Attendees''' tab, | + | ====='''<span style="color:#800080">Checkin Many Attendees at Once'''</span>===== |
| − | + | ---- | |
| − | :#Click '''Actual Attendance/No Shows'''. | + | |
| − | + | #On the event's '''Attendees''' tab, click on the orange '''Actions''' button in the top right. | |
| − | + | #:[[File:Checkin attendees.jpg|800px|center]] | |
| − | + | #Click '''Actual Attendance/No Shows'''. | |
| + | #:[[File:Set all to attended.jpg|600px|center]] | ||
| + | #You can click the '''Set all to Attended''' button to mark all as attended, then by exception mark those who were '''No Show''' or '''Unknown. Alternately, you can go through the list, and select the appropriate status for each individually. | ||
| + | #Click '''Done'''. | ||
==='''<span style="color:#800080">Download Event Attendees'''</span>=== | ==='''<span style="color:#800080">Download Event Attendees'''</span>=== | ||
| Line 921: | Line 1,286: | ||
#Select the desired '''Attendee Status'''. | #Select the desired '''Attendee Status'''. | ||
#Click '''Download'''. | #Click '''Download'''. | ||
| + | |||
| + | ==='''<span style="color:#800080">Cancel an Event'''</span>=== | ||
| + | ---- | ||
| + | ===='''<span style="color:#800080">Issue a Refund for an Event Registration'''</span>==== | ||
| + | ---- | ||
| + | ===='''<span style="color:#800080">Issue a Credit for an Event Registration'''</span>==== | ||
| + | ---- | ||
=='''<span style="color:#800080">Manage Attendee Purchases'''</span>== | =='''<span style="color:#800080">Manage Attendee Purchases'''</span>== | ||
| Line 986: | Line 1,358: | ||
#Click '''Done'''. | #Click '''Done'''. | ||
| + | |||
| + | =='''<span style="color:#800080">Cancel an Event'''</span>== | ||
| + | ---- | ||
| + | {| class="wikitable" | ||
| + | |- | ||
| + | | | ||
| + | [[File:Video-call-24.jpg|25px]] | ||
| + | | style="width: 100%"| '''See it in Action:''' [https://www.screencast.com/t/d2nQK1EKF Cancel An Event]] | ||
| + | |} | ||
| + | |||
| + | #Select the event's '''Overview''' tab. | ||
| + | #:[[File:Cancel Event 2019.jpg|800px|center]] | ||
| + | #Click the [[File:Cp orange pencil.jpg|25px]] icon in the '''General Information''' section. | ||
| + | #:[[File:Cancel 2019.jpg|600px|center]] | ||
| + | #Select '''Cancelled''' from the '''Status''' list. | ||
| + | #Click '''Done'''. | ||
| + | |||
| + | ===Matching Registrants to Contacts=== | ||
| + | Between the '''Additional Items''' and the '''Actions''' columns there is an unnamed column that ''may'' contain an icon for some registrants. If there is '''NOT''' an icon, it means the system recognizes both the Individual and the Organization as existing contacts. If there '''IS''' an icon, it means something about the registration doesn't match the data in the system. Clicking on the icon allows you to view the information and make a decision about the registrant. | ||
| + | |||
| + | [[File:Icons.png]] | ||
| + | |||
| + | |||
| + | |||
| + | |||
| + | :'''Update Organization''' The Organization the registrant entered on the registration form is different than what the system has for this person. | ||
| + | ::*The system has ''Oak Golf Club'' and the registrant entered ''Oak Gold''; or | ||
| + | ::*The system has the registrant affiliated with ''West Side Auto Sales'' but when registering he entered his side business, ''Robert J Creations'''; or | ||
| + | ::*The registrant entered the name of an Org that is in the system, but she is not connected to it | ||
| + | |||
| + | ::#Click the [[File:Org Change.jpg]] icon. | ||
| + | ::#:[[File:Org Update Screen2.jpg|center]] | ||
| + | ::#Select from the following options: | ||
| + | ::#*'''Use suggested - We've found a possible match''' - If the software is able to find a suggested match, a table of matches from the database it will be displayed. Click the radio button for the desired organization to associate the registrant to that organization. '''NOTE''': If there are no "suggestions" then this option will not be displayed. | ||
| + | ::#*'''Find existing - Search your database''' - if a suggested match is not displayed, or is not accurate, select this radio button to search for the desired organization. A type ahead text box will be displayed. Begin typing the name of the organization you wish to locate. | ||
| + | ::#*'''Create new - Create a new organization record''' - If the registrant's business is brand new to your database, click this option. A new business will be added using the '''Company''' name provided by the registrant. | ||
| + | ::#Click '''Save'''. | ||
| + | |||
| + | ==='''<span style="color:#800080">Match/Add Event Attendees to Your Database'''</span>=== | ||
| + | ---- | ||
| + | As people register for events, the software will attempt to match those registrants to existing contacts in the database. If the system is unable to match, icons will be displayed on the attendee tab to notify you that you have contacts information that may need updating, possible matches to individuals or businesses, or new contacts that need to be created in your database. | ||
| + | |||
| + | When an individual’s contact information (name, primary business, phone, email, etc.) is updated, the system will update any future event registrations linked to this contact with the new information; if an attendee changes companies or moves, their information will be updated on the event so that when the association prints nametags or send out mail, the nametag will be correct and items will go to the correct address. | ||
| + | |||
| + | {| class="wikitable" | ||
| + | |- | ||
| + | | | ||
| + | [[File:One Row.png|25px]] | ||
| + | | style="width: 100%"| '''IMPORTANT''': Contact information updating only works for attendees who are linked to a contact in the system and will only function when members are required to sign in to register, and is a good reason for staff to be diligent about matching attendees to contacts. | ||
| + | |} | ||
| + | |||
| + | [[File:Attendee Tab with Icons.jpg|center]] | ||
| + | |||
| + | On the event '''Attendee''' tab, a different icon will be displayed for each of the following scenarios: | ||
| + | |||
| + | *'''Updating an organization''' - The '''Update Organization''' icon [[File:Org Change.jpg]] will be displayed if someone has changed organization, but everything else (name, email, etc.) matches. For Example: Oaks Golf vs Oak Golf Club. | ||
| + | |||
| + | :Use the following procedure to update the organization: | ||
| + | |||
| + | ::#Click the [[File:Org Change.jpg]] icon. | ||
| + | ::#:[[File:Org Update Screen2.jpg|center]] | ||
| + | ::#Select from the following options: | ||
| + | ::#*'''Use suggested - We've found a possible match''' - If the software is able to find a suggested match, a table of matches from the database it will be displayed. Click the radio button for the desired organization to associate the registrant to that organization. '''NOTE''': If there are no "suggestions" then this option will not be displayed. | ||
| + | ::#*'''Find existing - Search your database''' - if a suggested match is not displayed, or is not accurate, select this radio button to search for the desired organization. A type ahead text box will be displayed. Begin typing the name of the organization you wish to locate. | ||
| + | ::#*'''Create new - Create a new organization record''' - If the registrant's business is brand new to your database, click this option. A new business will be added using the '''Company''' name provided by the registrant. | ||
| + | ::#Click '''Save'''. | ||
| + | |||
| + | *'''Match to Contact''': The '''Match to Contact''' [[File:Match Icon.jpg]] icon will be displayed when there is a potential or no match in your database. | ||
| + | |||
| + | ::#Click the [[File:Match Icon.jpg]] icon. | ||
| + | ::#:[[File:Match Contact3.jpg|center]] | ||
| + | ::#Select from the following options: | ||
| + | ::#*'''Find existing - Search your database''' - if a suggested match is not displayed, or is not accurate, select this radio button to search for the desired organization. A type ahead text box will be displayed. Begin typing the name of the organization you wish to locate. When selected the invoice for this registration will be associated with the selected organization. | ||
| + | ::#*'''Create new - Create a new contact record''' - If the registrant is brand new to your database, click this option. A new individual contact will be added to your database as a non-member. | ||
| + | ::#Click '''Save'''. | ||
| + | |||
| + | *'''Update Contact''': The '''Update Contact''' [[File:Update contact.jpg]] icon will be displayed when a match is found for some of the data submitted during registration (email or name). | ||
| + | |||
| + | ::#Click the [[File:Update contact.jpg]] icon. | ||
| + | ::#:[[File:Update Contact2.jpg|center]] | ||
| + | ::#Select from the following options: | ||
| + | ::#*'''Update contact - Select fields that should be updated in the contact record''' - if this option is available, a table will be displayed from which you may select the fields you wish to update in the database. | ||
| + | ::#*'''Create new - Create a new contact record''' - if this option is selected, a new contact based on the '''Data Submitted from Registration''' will be added to your database. | ||
| + | ::#Click '''Save'''. | ||
| + | ==='''<span style="color:#800080">Download Attendees'''</span>=== | ||
| + | ---- | ||
| + | The '''Download Attendees''' function provides further details, where available, of your attendees. This is also a way by which you can view attendee custom fields. | ||
| + | #For the desired event, click the '''Attendees''' tab. | ||
| + | #Click the orange '''Actions''' button. | ||
| + | #:[[File:Download attendees2020.jpg|800px|center]] | ||
| + | #Click '''Download Attendees'''. | ||
| + | #Select the desired '''Attendee Status'''. | ||
| + | #Click '''Download'''. | ||
| + | |||
| + | ==='''<span style="color:#800080">Table/Team Management</span>'''=== | ||
| + | If your event has been set up with a table/team registration type, you can assign attendees to tables or teams. | ||
| + | *On the Attendees tab, click the orange "Actions" button and select "Table/Team Management". | ||
| + | [[File:TableTeamMgmt 08262020.jpg|250px|center|A screenshot of the Attendee tab Actions button with Table/Team Management selected]] | ||
| + | This will open the Table/Team Management window. | ||
| + | [[File:TableTeamMgmt2 08262020.jpg|800px|center|A screenshot of the Table/Team Management window.]] | ||
| + | *If a table or team has registered using the table/team registration type, they will automatically be assigned to a table/team. You can edit the name of this table/team by clicking the pencil icon to the right of the table/team name. | ||
| + | [[File:TableTeamMgmt3 08262020.jpg|800px|center|A screenshot of the Table/Team Management window, with an arrow to the edit Team Name option.]] | ||
| + | *You can manually create a table/team by clicking the "Add a Table/Team" button. | ||
| + | [[File:TableTeamMgmt4 08262020.jpg|800px|center|A screenshot of the Table/Team Management window, with an arrow to the edit Add a Table/Team button.]] | ||
| + | Type the name of the table/team, select the table/team registration type in the dropdown, and click Done. | ||
| + | [[File:TableTeamMgmt6 08262020.jpg|800px|center|A screenshot of the Add Table/Team window.]] | ||
| + | *If someone has registered using a simple paid registration type, they will display in this window in the "Unassigned Attendees" column. | ||
| + | [[File:TableTeamMgmt5 08262020.jpg|800px|center|A screenshot of the Table/Team Management window, with a box highlighting the Unassigned Attendees column.]] | ||
| + | To move someone from Unassigned to a table/team, click, drag, and drop them to the desired table/team. | ||
| + | [[File:TableTeamMgmt7 08262020.jpg|800px|center|A screenshot of the Table/Team Management window, moving an unassigned attendee to a table/team.]] | ||
| + | You can also click, drag, and drop attendees from a table/team back into the Unassigned column. | ||
| + | [[File:TableTeamMgmt8 08262020.jpg|800px|center|A screenshot of the Table/Team Management window, showing an attendee moved from a table/team to the Unassigned column.]] | ||
| + | *The tables/teams show you how many are allowed in a table/team, and how many are assigned to each table/team. | ||
| + | [[File:TableTeamMgmt9 08262020.jpg|800px|center|A screenshot of the Table/Team Management window, showing the allowed count and assigned count for each team.]] | ||
| + | Even if your event does not allow people to register their own table/team, you still need to create a Table/Team Registration Type to enable the Table/Team Management. You can then manually set up your tables/teams and move your attendees into and between the tables/teams as needed. | ||
| + | |||
| + | {| class="wikitable" | ||
| + | |- | ||
| + | | | ||
| + | [[File:Smallest.png|25px]] | ||
| + | | style="width: 100%"| '''Note''' The Table/Team names will be included in the "Download Attendees" file, and are tied to a "Table Name" merge field so can be easily added to name badges. | ||
| + | |} | ||
| + | |||
| + | ==='''<span style="color:#800080">Cancel an Event Registration'''</span>=== | ||
| + | ---- | ||
| + | #For the desired event, click the '''Attendees''' tab. | ||
| + | #:[[File:Cancel registration 2020.jpg|600px|center]] | ||
| + | #Click the '''Actions''' button for the attendee you wish to cancel. | ||
| + | #Click '''Cancel''' registration. | ||
| + | #Click '''Done'''. | ||
| + | |||
| + | Please note that canceling a registration will have no effect on an invoice that is paid in full; it is up to your organization as to whether you have a no refund policy, '''[[Billing#Manage_Refunds|issue a refund]]''' for any/all monies received, or '''[[Billing#Credit_Memos|create a credit memo]]''' to apply toward a future event. | ||
| + | |||
| + | {| class="wikitable" | ||
| + | |- | ||
| + | | | ||
| + | [[File:One Row.png|40px]] | ||
| + | | style="width: 100%"| '''IMPORTANT:''' If the registrant has an open invoice: | ||
| + | *If there is only a single registrant included on the invoice, the invoice will automatically be written off. | ||
| + | *If multiple registrants are included on the invoice, the invoice will '''NOT''' be written off. Follow your business practices for managing a partial write off. See '''[[Billing#Create_a_Write_Off|Create a Write-off]]''' for instructions. | ||
| + | |} | ||
| + | |||
| + | ='''<span style="color:#800080">Postpone an Event - Automated'''</span>= | ||
| + | ---- | ||
| + | It is unfortunate, but at times, you may find it necessary to postpone an event. The '''Postpone Event''' automated features allow you to easily: | ||
| + | *Update the event title | ||
| + | *Update the event description | ||
| + | *Communicate to event registrants | ||
| + | *Disable on-line registration | ||
| + | *Turn off the reminder email (if applicable) | ||
| + | |||
| + | {| class="wikitable" | ||
| + | |- | ||
| + | | | ||
| + | [[File:Video-call-24.jpg|25px]] | ||
| + | | style="width: 100%"| '''See it in Action:''' [https://www.screencast.com/t/1OpvqZGW3WU7 Postpone an Event - Automated]] | ||
| + | |} | ||
| + | |||
| + | #For the desired event, click the large actions icon. | ||
| + | #:[[File:Postpone 2 2020.jpg|800px|center]] | ||
| + | #Click '''Postpone Event'''. | ||
| + | #:[[File:Postpone this event2 2020.jpg|600px|center]] | ||
| + | #If you wish to update the event title, select '''Update Event Title'''. By default, '''***Postponed***''' is appended to the event title. You can edit this if needed. | ||
| + | #If you wish to update the event description, select '''Update Event Description'''. By default, '''**Postponed**''' is appended to the event description. You can edit this if needed. | ||
| + | #If you wish to send an email to the event registrants, select '''Send email to all registered attendees'''. You can then enter the email text, or, use the '''Event Postponement Notice'''. '''NOTE''': If you select the template, you will still have the opportunity to edit prior to sending to registrants. To edit the template for all future use, see '''[[Communications_Basics#Edit_a_Default_Email_Template|Edit a Default Email Template]]'''. | ||
| + | #Click '''Done'''. | ||
| + | #:[[File:Attn postpne 2020.jpg|500px|center]] | ||
| + | #Review the details on the '''Attention''' screen. Listed are the choices you made when postponing the event. In addition, the status of the event will be updated to postponed, the event reminder (if applicable) will be disabled, and on-line registration will be disabled. | ||
| + | #Click '''Yes''' to confirm, click '''No''' is you wish to make changes. | ||
| + | :If '''Yes''', your choices will be activated, and the status of the event will be updated to postponed, the event reminder (if applicable) will be disabled, and on-line registration will be disabled. | ||
| + | [[File:Postpone status 2020.jpg|500px|center]] | ||
| + | {| class="wikitable" | ||
| + | |- | ||
| + | | | ||
| + | [[File:One Row.png|25px]] | ||
| + | | style="width: 100%"| '''NOTE:''' Registrations are '''NOT''' cancelled, allowing you to retain the registrations if, when, you update the date of the event. | ||
| + | |} | ||
| + | |||
| + | ='''<span style="color:#800080">Cancel an Event - Automated'''</span>= | ||
| + | ---- | ||
| + | It is unfortunate, but at times, you may find it necessary to cancel an event. The '''Cancel this Event''' automated process allows you to: | ||
| + | *Cancel registrations for all registrants | ||
| + | *Credit registrants | ||
| + | *Mass write-off any unpaid invoices | ||
| + | *Send an email to registrants | ||
| + | *Disable online registration | ||
| + | *Disable 48 hour reminder (if applicable) | ||
| + | |||
| + | {| class="wikitable" | ||
| + | |- | ||
| + | | | ||
| + | [[File:Video-call-24.jpg|25px]] | ||
| + | | style="width: 100%"| '''See it in Action:''' [https://www.screencast.com/t/VdA9TvTo1c Cancel an Event - Automated]] | ||
| + | |} | ||
| + | |||
| + | #For the desired event, click the large actions icon. | ||
| + | #:[[File:Cancel event 2020.jpg|800px|center]] | ||
| + | #Click '''Cancel Event'''. | ||
| + | #:[[File:Cancel this event 2020.jpg|600px|center]] | ||
| + | #On the '''Cancel Event''', select desired options: | ||
| + | #*Choose how you wish to manage '''Attendee Purchases'''. Select '''Do Nothing: leave transactions as they are''' or '''Write off open invoices; create credits for paid invoices'''. | ||
| + | #*Click '''Update Event Title''' to update the title of your event. By default '''**Canceled**''' will be appended to the title. You can change this if needed. | ||
| + | #*Click '''Update Event Description''' to update the description of the event. By default '''**Canceled**''' will be appended to the title description. You can change this if needed. | ||
| + | #*Click '''Send email to all registered attendees''' if you wish to notify all registrants. You can then enter the email text, or, use the '''Event Cancellation Notice'''. '''NOTE''': If you select the template, you will still have the opportunity to edit prior to sending to registrants. To edit the template for all future use, see '''[[Communications_Basics#Edit_a_Default_Email_Template|Edit a Default Email Template]]'''. | ||
| + | #Click '''Done'''. | ||
| + | #The '''Attention''' confirmation screen, summarizes your choices and actions that will be performed. Review and click '''Yes''' to proceed with the event cancellation, or click '''No''' if you wish to go back and make changes. | ||
| + | |||
| + | ='''<span style="color:#800080">Cancel an Event - Manual'''</span>= | ||
| + | ---- | ||
| + | |||
| + | {| class="wikitable" | ||
| + | |- | ||
| + | | | ||
| + | [[File:Video-call-24.jpg|25px]] | ||
| + | | style="width: 100%"| '''See it in Action:''' [https://www.screencast.com/t/d2nQK1EKF Cancel an Event]] | ||
| + | |} | ||
| + | It is unfortunate, but at times, you may find it necessary to postpone or cancel an event. Here are some best practices for these situations: | ||
| + | |||
| + | # Update the Event Title/Description: You may simply wish to add "Postponed" or "Cancelled" after the name of the event. It might also be a good idea to add some further information in the description. Perhaps you are planning simply to postpone and want to let the public know this. The title and description can be updated on the event's Overview tab. | ||
| + | # Turn off on-line registration: To ensure that no additional registrations are received for the event, disable registration. Go to the Attendee Setup tab, and click the pencil icon for the Overall Registration Options section; when the edit window opens, de-select the "Enable Registration" option, and click "Done". | ||
| + | # Notify Registrants: Email your registrants as soon as you can, and if feasible, give everyone a call. You may also want to consider using social media and local news outlets to supplement your communications. To send an email to all the event registrants, click the purple Actions button on the far right and select the "Send Email to Registrants" option. Select a template if you've set on up, or type in your message. Include any links or documents pertinent to your message. Your email should be upbeat, and include details about refunds, future event date, etc. When your message is ready, select the "Send" option. | ||
| + | # Turn Off Event Reminder: If you have setup a reminder to automatically be sent to registrants, best practice is to turn off the reminder. The reminder may be turned off on the event's Overview tab, in the General Information section. NOTE: If you have edited the title and the description of the event, these changes would be included in the reminder if you have forgotten to turn off the reminder. | ||
| + | # Cancel the event: if you do decide it's best to completely cancel the event, you can change the status of the event; on the Overview tab in the General Information section, click the pencil icon and change the status of the event to "Cancelled". | ||
| + | |||
| + | Additionally, you may want to set the status of your registrations to "Cancelled". This is optional, and can only be done by selecting "Cancel Registration" for each attendee. | ||
| + | |||
| + | =='''<span style="color:#800080">Issue Refund for a Cancelled Event'''</span>== | ||
| + | ---- | ||
| + | |||
| + | {| class="wikitable" | ||
| + | |- | ||
| + | | | ||
| + | [[File:Video-call-24.jpg|25px]] | ||
| + | | style="width: 100%"| '''See it in Action:''' [https://www.screencast.com/t/5aXserdUOA Issue a Refund for a Cancelled Event]] | ||
| + | |} | ||
| + | |||
| + | If you have paid invoices and you have decided to issue refunds, you can accomplish this directly from the Attendee Purchases tab of the event. Click the Actions button in the Actions column, and select "Create Refund". Add a note to the refund, and if needed, you can modify the amount to refund either a portion of the payment, or the full payment. Credit card refunds will be automatically processed through your GZ payment processor, but if you've already processed a credit card refund outside of GrowthZone directly through your processor, you can select the "Refund Already Issued by Processor" option. This will record the refund in the GrowthZone software, without a refund being issued back to the purchaser on the processor side. | ||
| + | |||
| + | Refunds for check payments will need to be manually managed according to your business processes for cutting checks/returning funds. You may also [http://supportwiki.memberzone.org/index.php?title=Billing#Add_a_Credit_Memo issue a credit toward a future event or invoice]. | ||
| + | |||
| + | More details on issuing refunds can be found [http://supportwiki.memberzone.org/index.php?title=Billing#Refund_a_Payment here]. | ||
| + | |||
| + | =='''<span style="color:#800080">Issue a Credit for a Cancelled Event'''</span>== | ||
| + | ---- | ||
| + | |||
| + | Due to unforeseen circumstances, you’ve had to cancel an event. You’re not sure if you’re going to be able to reschedule, and your organization has chosen to not issue refunds. If your registrants have paid and you wish to give them a credit toward a future event or invoice, you can issue them a credit memo. You can do this either from a contact record via the billing tab, or through the Billing module's Credit Memos tab. | ||
| + | |||
| + | {| class="wikitable" | ||
| + | |- | ||
| + | | | ||
| + | [[File:Video-call-24.jpg|25px]] | ||
| + | | style="width: 100%"| '''See it in Action:''' [https://www.screencast.com/t/KrhcMJcXu Issue a Credit Memo for a Cancelled Event]] | ||
| + | |} | ||
| + | |||
| + | Credit memos can be applied to any open invoice; it is up to your organization to decide if you wish to restrict their use in any way. | ||
| + | |||
| + | {| class="wikitable" | ||
| + | |- | ||
| + | | | ||
| + | [[File:Smallest.png|25px]] | ||
| + | | style="width: 100%"| '''Note''' Credit memos currently cannot be applied by the member; only your organization staff will be able to apply them to a future event or invoice. | ||
| + | |} | ||
| + | |||
| + | More details on issuing credit memos can be found [http://supportwiki.memberzone.org/index.php?title=Billing#Add_a_Credit_Memo here]. | ||
='''<span style="color:#800080">Event Sponsor Management'''</span>= | ='''<span style="color:#800080">Event Sponsor Management'''</span>= | ||
| Line 1,004: | Line 1,640: | ||
Benefits consist of any combination of the Sponsor Name, Logo, and/or URL appearing on the Event Page, Emails, and/or Registration page. For example, perhaps a Bronze sponsor has only their Name on the Event Page, the Event Emails, and the Registration Page; the Silver sponsor has their Name AND Logo on all three, and the Gold sponsor gets their Name, Logo, AND url on all three. You can create any combination; the only caveat is that if you want to display the url you must also display the name and logo. | Benefits consist of any combination of the Sponsor Name, Logo, and/or URL appearing on the Event Page, Emails, and/or Registration page. For example, perhaps a Bronze sponsor has only their Name on the Event Page, the Event Emails, and the Registration Page; the Silver sponsor has their Name AND Logo on all three, and the Gold sponsor gets their Name, Logo, AND url on all three. You can create any combination; the only caveat is that if you want to display the url you must also display the name and logo. | ||
| − | #Click'''Setup''' in the left navigation panel. | + | #Click '''Setup''' in the left navigation panel. |
#Click '''Event Sponsorship Benefits''' in the '''Events''' section. Any existing benefits will be displayed. | #Click '''Event Sponsorship Benefits''' in the '''Events''' section. Any existing benefits will be displayed. | ||
#:[[File:Sponsor Benefits.jpg|900px|center]] | #:[[File:Sponsor Benefits.jpg|900px|center]] | ||
| Line 1,020: | Line 1,656: | ||
#*'''Sponsor Url on Event Emails''' | #*'''Sponsor Url on Event Emails''' | ||
#*'''Sponsor Url on Registration Page''' | #*'''Sponsor Url on Registration Page''' | ||
| − | # | + | #Determine the '''Display Order''' of this Benefit. For example: Assuming Gold sponsors are displayed before Silver, and Silver before Bronze, Gold would have a Display Order of 1, Silver would be 2 and Bronze would be 3. |
| − | # | + | #Click '''Done'''. |
| − | == | + | ==='''<span style="color:#800080">Setup Sponsor Registration Types for an Event'''</span>=== |
| − | # | + | ---- |
| − | # Click on the '''Sponsor Setup Tab'''. Any existing '''Sponsor Registration Types''' will be displayed. | + | #Click '''Events''' in the left-hand navigation panel. |
| + | #Click on the '''Sponsor Setup Tab'''. Any existing '''Sponsor Registration Types''' will be displayed. | ||
#:[[File:SponsorSetupTab2.jpg|center]] | #:[[File:SponsorSetupTab2.jpg|center]] | ||
# Click the Orange Plus button [[File:OrangePlusRound.jpg|30px]] to add a Sponsor Registration Type | # Click the Orange Plus button [[File:OrangePlusRound.jpg|30px]] to add a Sponsor Registration Type | ||
#:[[File:AddSponsorshipType.jpg|center]] | #:[[File:AddSponsorshipType.jpg|center]] | ||
# On the '''Add Sponsorship Type screen, configure the following: | # On the '''Add Sponsorship Type screen, configure the following: | ||
| − | # | + | #*'''Sponsorship Type''': Enter a name for the new sponsorship type. (''Gold'', ''Silver'', ''Bronze''...) |
| − | # | + | #*'''Description''': Description of the Sponsorship Type, this in internal only |
| − | # | + | #*'''Position''': Confirm the Order this sponsorship will be (Should be the same as the Sponsor Benefit it will be associated with in a later step) |
| − | # | + | #*'''Sales Goal Quantity''': Optional and internal. If you have a goal of X number of sponsorships of this type, enter that number here and the system will help keep track for you. |
| − | # | + | #*'''Maximum Quantity''': Optional and internal. If you are limiting the number of this sponsorship type for this event, enter that number here. |
| − | #: | + | #*'''Is Public (Version 2 Only)''': Select this option if you wish to include this sponsorship fee on your event registration page. |
| − | # | + | #*'''Fees''' |
| − | # | + | #:*'''Item''': Select the Goods & Service Item this Sponsorship Type will be using |
| − | # | + | #:*'''Quantity''': Enter the default quantity for this item. |
| − | # | + | #:*'''Price''': Enter the price for this Sponsorship Type. The price set when the goods/service was created will be displayed by default. You can change this as needed. |
| − | # | + | #:*''' Hide on Invoice''': Check this box if the sponsorship is part of a bundle and you do not want it to appear as a separate line item on the invoice. The amount will roll into another invoice item and still be included in the total. |
| − | # | + | #:*(Optional)Click on the orange plus sign [[File:Orange plus icon.jpg]] to add another fee item to this sponsorship type |
| − | #: | + | #*'''Sponsor Benefits''' |
| − | #Click '''Done''' | + | #:*Select the Sponsor Benefits this sponsorship type is related too. If needed click the [[File:Gray plus 2020.jpg|25px]] to create a new Sponsor Benefit package. |
| − | + | #Click '''Done'''. | |
| + | {| class="wikitable" | ||
| + | |- | ||
| + | | | ||
| + | [[File:Smallest.png|25px]] | ||
| + | | style="width: 100%"| '''NOTE:''': It may be helpful to name your Sponsor ''Benefits'' the same as your Sponsor ''Types'', to help match up at this stage. | ||
| + | |} | ||
| − | == | + | ===='''<span style="color:#800080">Manage Event Sponsors'''</span>==== |
| − | + | ---- | |
| + | ===='''<span style="color:#800080">Register Event Sponsors'''</span>==== | ||
| + | ---- | ||
| + | Sponsors can be registered for events through the back-office, or, if you have enabled '''Is Public (Version 2 Only)''' for the sponsor registration, sponsors can register via your event registration page. To register a sponsor from the back-office: | ||
#Go to the '''Sponsors''' tab of the Event. Any sponsors already registered will appear here. | #Go to the '''Sponsors''' tab of the Event. Any sponsors already registered will appear here. | ||
| − | #:[[File: | + | #:[[File:Add sponsor 2020.jpg|800px|center]] |
| − | # | + | #Click the orange action button and select '''Add Sponsor'''. |
| − | |||
#On the '''Add Sponsor''' window, fill in the fields with the relevant information: | #On the '''Add Sponsor''' window, fill in the fields with the relevant information: | ||
| − | #:[[File: | + | #:[[File:Add sponsor complete 2020.jpg|600px|center]] |
| − | #:*'''Sponsor Name''' The name of the sponsor | + | #:*'''Sponsor Name''': The name of the sponsor. This contact must already be in your database. |
| − | #:*Select the '''Address''' and '''Email''' if it does not populate automatically | + | #:*Select the '''Address''' and '''Email''' if it does not populate automatically. |
| − | #:*'''Registration Date''' Optional. Enter the date the sponsor registered. (can be backdated) | + | #:*'''Registration Date''': Optional. Enter the date the sponsor registered. (can be backdated) |
| − | #:*'''Sponsorship Level''' Select the Sponsorship Type they are purchasing | + | #:*'''Sponsorship Level''': Select the Sponsorship Type they are purchasing. The choices available will be those that you have created on the '''Setup Sponsors''' tab. |
| − | #:*'''Description''' This will default to the description you entered when you created the Sponsorship Type. It can be edited | + | #:*'''Description''': This will default to the description you entered when you created the Sponsorship Type. It can be edited |
| − | #:*'''Qty''' This will default to the quantity you entered when you created the Sponsorship Type. It can be edited. | + | #:*'''Qty''': This will default to the quantity you entered when you created the Sponsorship Type. It can be edited. |
#:*'''Price''' and '''Total''' are populated automatically based on the Qty and the Price you entered when you created the Sponsorship Type. They cannot be overridden. | #:*'''Price''' and '''Total''' are populated automatically based on the Qty and the Price you entered when you created the Sponsorship Type. They cannot be overridden. | ||
#:*'''Message''' This message will appear on the invoice | #:*'''Message''' This message will appear on the invoice | ||
#:*'''Internal Memo''' This is a note to yourself or your staff regarding this sponsor. It is not required and is not public. | #:*'''Internal Memo''' This is a note to yourself or your staff regarding this sponsor. It is not required and is not public. | ||
#:*'''Sponsor Url''' The URL of the contact (if populated in the contact record), will automatically populate this field. It can be removed or edited. If it is edited it does not impact the contact record. | #:*'''Sponsor Url''' The URL of the contact (if populated in the contact record), will automatically populate this field. It can be removed or edited. If it is edited it does not impact the contact record. | ||
| − | #:*'''Sponsor Logo''' The logo of the contact (if populated in the contact record), will automatically populate this field | + | #:*'''Sponsor Logo''' The logo of the contact (if populated in the contact record), will automatically populate this field, it can be removed or edited. If the contact does not have a logo, hover over the logo image, and click the [[File:Cp orange pencil.jpg|25px]] to upload an image. The logo size recommendation is 400px wide by 200px high. |
| − | #Click '''Done''' | + | #Click '''Done'''. |
| + | ===='''<span style="color:#800080">Cancel an Event Sponsor'''</span>==== | ||
| + | ---- | ||
| + | #For the desired event, click the '''Sponsors''' tab. | ||
| + | #: | ||
| + | #Click the | ||
='''<span style="color:#800080">Manage your Exhibitors'''</span>= | ='''<span style="color:#800080">Manage your Exhibitors'''</span>= | ||
| Line 1,072: | Line 1,722: | ||
If you are using the '''Expo''' module, you can add and manage exhibitors to your events on the Event page. The Expo module allows you to easily manage every expect, including: | If you are using the '''Expo''' module, you can add and manage exhibitors to your events on the Event page. The Expo module allows you to easily manage every expect, including: | ||
| − | * | + | *Creating your exhibitor registration and booth options |
*Accept on-line exhibitor registrations | *Accept on-line exhibitor registrations | ||
*Manage payments for exhibitors | *Manage payments for exhibitors | ||
| Line 1,078: | Line 1,728: | ||
*Manage communications with exhibitors | *Manage communications with exhibitors | ||
| − | =='''<span style="color:#800080">Exhibitors - Initial Setup'''</span>== | + | [[File:ExhibitorSetupTab 12172020.jpg|800px|center]] |
| + | |||
| + | With the release of Exhibitors '''[[Event_Management#Version_2_Exhibitors|Version 2]]''', we have greatly simplified the process of setting up exhibitors in an event. Be default, any new event will automatically use Exhibitors Version 2. Existing events will have the option to switch from Version 1 to Version 2 as shown below. Switching an event from Version 1 to '''[[Event_Management#Version_2_Exhibitors|Version 2]]''' will integrate exhibitor registrations onto the event registration page, as well as updating the Exhibitor Setup tab to the new version as detailed below. | ||
| + | |||
| + | {| class="wikitable" | ||
| + | |- | ||
| + | | | ||
| + | [[File:One Row.png|25px]] | ||
| + | | style="width: 100%"| '''IMPORTANT''': If you switch an event from Exhibitor Version 1 to Version 2, '''IT CANNOT BE SWITCHED BACK.''' | ||
| + | |} | ||
| + | |||
| + | =='''<span style="color:#800080">Version 1 Exhibitors'''</span>== | ||
| + | ---- | ||
| + | |||
| + | ==='''<span style="color:#800080">Initial Setup'''</span>=== | ||
---- | ---- | ||
| Line 1,103: | Line 1,767: | ||
*Once all configurations have been added, click '''Done'''. | *Once all configurations have been added, click '''Done'''. | ||
| − | =='''<span style="color:#800080">Setup Exhibitor Registration Page'''</span>== | + | ==='''<span style="color:#800080">Setup Exhibitor Registration Page'''</span>=== |
---- | ---- | ||
| Line 1,115: | Line 1,779: | ||
#Configure your '''Exhibitor Registration Options'''by clicking the pencil icon for '''Exhibitor Registration Options'''. | #Configure your '''Exhibitor Registration Options'''by clicking the pencil icon for '''Exhibitor Registration Options'''. | ||
#:[[File:Exhibitor General setup.jpg|800px|center]] | #:[[File:Exhibitor General setup.jpg|800px|center]] | ||
| − | #:*Enter a '''Registration Start Date''' | + | #:*Enter a '''Registration Start Date''': This is the date you wish to open registration for your exhibitors. |
| − | #:*Enter a '''Registration End Date''' | + | #:*Enter a '''Registration End Date''': This is the date that registration will close for exhibitors. |
| − | #:*Select an '''Exhibitor Directory''' to be used for the exhibitors. You can add a new directory by clicking the '''+''' button. | + | #:*Select an '''Exhibitor Directory''' to be used for the exhibitors. You can add a new directory by clicking the '''+''' button. See '''[[Getting_Started#Setup_your_Directories|Setup Your Directories]]''' for instructions on creating a directory of your exhibitors. |
| − | #:*Select your '''Terms/Conditions''' | + | #:*Select your '''Terms/Conditions''': If you exhibitors must accept terms and conditions, select previously created terms/conditions for the list '''OR''' click the [[File:Grayplus.jpg|25px]] and add new terms and conditions. |
| − | #:*'''Enable Registration''' | + | #:*'''Enable Registration''': Click the check-box to enable on-line registration. |
| − | #:*'''Allow Invoicing''' | + | #:*'''Allow Invoicing''': Select this option to allow the exhibitor to request to be invoiced. |
| − | #:*'''Allow Logo''' | + | #:*'''Allow Logo''': Select this option to allow the exhibitor to upload a logo when registering for the event. |
#:*Click '''Done'''. | #:*Click '''Done'''. | ||
#Configure '''Exhibitor Types''': This function allows you to setup your exhibitor packages. | #Configure '''Exhibitor Types''': This function allows you to setup your exhibitor packages. | ||
| − | #:[[File:Exhibitor Types.jpg|center]] | + | #:[[File:Exhibitor Types.jpg|1000px|center]] |
#Click the '''+''' icon to add a new '''Exhibitor Type'''. | #Click the '''+''' icon to add a new '''Exhibitor Type'''. | ||
| − | #:[[File:Add Edit Exhibitor Type.jpg|center]] | + | #:[[File:Add Edit Exhibitor Type.jpg|800px|center]] |
#:*Enter a '''Name''' for the Exhibitor Type - this name will be displayed on your web-page. | #:*Enter a '''Name''' for the Exhibitor Type - this name will be displayed on your web-page. | ||
#:*Enter a '''Description''' of the Exhibitor Type - the description will be displayed on your web-page. | #:*Enter a '''Description''' of the Exhibitor Type - the description will be displayed on your web-page. | ||
| Line 1,143: | Line 1,807: | ||
#:**Edit and/or Enter the '''Price''' of the fee item. | #:**Edit and/or Enter the '''Price''' of the fee item. | ||
#:*'''Booth''' | #:*'''Booth''' | ||
| − | #:**Select a '''Booth Type''' from the drop-down list. | + | #:**Select a '''Booth Type''' from the drop-down list. If needed, click the [[File:orange plus icon.jpg]] to add a new booth type, or click the [[File:Edit_Policies.jpg]] icon to edit an existing booth type. See '''[[Event_Management#Exhibitors_-_Initial_Setup|Exhibitors - Initial Setup]]''' for information on configuring your booths. |
#Setup Exhibitor '''Custom Questions''': This option allows you to add custom fields to the exhibitor registration page. | #Setup Exhibitor '''Custom Questions''': This option allows you to add custom fields to the exhibitor registration page. | ||
#*Click '''Add Item'''. | #*Click '''Add Item'''. | ||
| Line 1,155: | Line 1,819: | ||
#*If your staff must fill in this field, when registering someone from the back office, click the '''Required For Staff''' check-box. | #*If your staff must fill in this field, when registering someone from the back office, click the '''Required For Staff''' check-box. | ||
#*If the custom field should only be displayed for certain registration types, select the registration types from the '''Display Only for this Exhibitor Type''' list. | #*If the custom field should only be displayed for certain registration types, select the registration types from the '''Display Only for this Exhibitor Type''' list. | ||
| − | #If | + | #(Optional) If the custom field Data Type is set to '''Yes/No''' an additional field will be displayed '''Saleable Item'''. This option allows you to collect a fee if the exhibitor answers yes. For Example, if your custom field is internet access, for which you charge an additional fee, select the goods/service from the list. |
| + | #Click '''Done'''. | ||
| + | |||
| + | |||
| + | |||
| + | =='''<span style="color:#800080">Version 2 Exhibitors'''</span>== | ||
| + | ---- | ||
| + | |||
| + | {| class="wikitable" | ||
| + | |- | ||
| + | | | ||
| + | [[File:Video-call-24.jpg|link=https://www.screencast.com/t/Q70SaY2rgeGi]] | ||
| + | | style="width: 100%"| '''See an Overview of Exhibitors Version 2!''' | ||
| + | |} | ||
| + | |||
| + | With the release of Exhibitors Version 2, we have greatly simplified the process of setting up exhibitors in an event. Be default, any new event will automatically use Exhibitors Version 2. Existing events will have the option to switch from Version 1 to Version 2 as shown below. Switching an event from Version 1 to Version 2 will integrate exhibitor registrations onto the event registration page, as well as updating the Exhibitor Setup tab to the new version as detailed below. | ||
| + | |||
| + | ==='''<span style="color:#800080">Switching to Exhibitor Version 2'''</span>=== | ||
| + | ---- | ||
| + | To utilize the new Exhibitor Version 2 functionality in an existing event, you can switch your Exhibitors Version to Version 2. | ||
| + | |||
| + | {| class="wikitable" | ||
| + | |- | ||
| + | | | ||
| + | [[File:One Row.png|25px]] | ||
| + | | style="width: 100%"| '''IMPORTANT''': If you switch an event from Exhibitor Version 1 to Version 2, '''IT CANNOT BE SWITCHED BACK.''' | ||
| + | |} | ||
| + | |||
| + | #To switch from Version 1 to Version 2, go to the event's '''Overview''' tab and click the orange pencil icon [[File:Pencil 12162020.jpg|20px]] for the '''General Information''' section. | ||
| + | #:[[File:ExhibitorV1 12162020.jpg|800px|center]] | ||
| + | |||
| + | {| class="wikitable" | ||
| + | |- | ||
| + | | | ||
| + | [[File:One Row.png|25px]] | ||
| + | | style="width: 100%"| '''NOTE''': The event must be using Registration Form Version 2; you will not see the option to switch Exhibitor Version if Registration Form is set to Version 1. | ||
| + | |} | ||
| + | |||
| + | #In the '''Exhibitor Version''' dropdown, select "Version 2". | ||
| + | #Click "Done". | ||
| + | |||
| + | ==='''<span style="color:#800080">Exhibitors - Registration Options'''</span>=== | ||
| + | ---- | ||
| + | |||
| + | Set up exhibitor-specific registration options. | ||
| + | |||
| + | #Click the '''Exhibitor Setup''' tab | ||
| + | #Click the pencil icon [[File:Pencil 12162020.jpg]] for the '''Exhibitor Registrations Options''' section. These selections are optional; if no options are set, exhibitor registrations will use the Attendee Setup options. | ||
| + | #:[[File:ExhibitorGenSetup 12162020.jpg|800px|center]] | ||
| + | #The following options are available: | ||
| + | #:*'''Registration Start Date''' ''(Optional)'' | ||
| + | #:*'''Registration End Date''' ''(Optional)'' | ||
| + | #:*'''Exhibitor Directory''': You can select an existing directory, or create a new one by clicking the grey plus icon [[File:GreyPlus 12162020.jpg|20px]]. ''(Optional)'' | ||
| + | #:*'''Terms/Conditions''': You can select an existing terms and conditions, or create a new one by clicking the grey plus icon [[File:GreyPlus 12162020.jpg|20px]]. ''(Optional)'' ''(NOTE: if Terms/Conditions are selected, they are required to be accepted by the exhibitor before registration can proceed)'' | ||
| + | #:*'''Enable Online Registration''': this will add your Exhibitor registration types/options to your overall event registration page. ''(Optional)'' Leaving this unselected will only allow exhibitors to be added via the back office by staff. | ||
| + | #:*'''Venue Floor Plan''': You can upload an image file (.jpeg, .jpg, .png, .gif, or .bmp) of your venue layout. Recommended size of 1000 pixels wide and 72dpi minimum. ''(Optional)'' | ||
| + | #Make any adjustments/selections as needed and click '''Done'''. | ||
| + | |||
| + | ==='''<span style="color:#800080">Exhibitor Types'''</span>=== | ||
| + | ---- | ||
| + | Here you set up your exhibitor registration types. Similar to Attendee Registration Type. | ||
| + | #Click the orange plus icon [[File:OrangePlus 12162020.jpg|20px]]. | ||
| + | #In the '''Add Exhibitor Type''' window, complete the following: | ||
| + | #:[[File:AddExhibitorType 12162020.jpg|800px|center]] | ||
| + | #:*'''Name''' '''(Required)''' | ||
| + | #:*'''Total Quantity of this Type''': this allows you to limit the number of booths of this type available. ''(Optional)'' | ||
| + | #:*'''Description''': additional description of the booth/exhibitor type. ''(Optional)'' | ||
| + | #:*'''Staff Registration Type''': Select the registration type used to register booth staff as attendees. Click the grey plus icon [[File:GreyPlus 12162020.jpg|20px]] to create a new registration type if needed. '''(Required)''' | ||
| + | #:*'''Personnel Included in Price''': Specify how many attendees are to be included in the exhibitor registration. '''(Required)''' | ||
| + | #:*'''Base Fees''': Click the orange plus icon [[File:OrangePlus 12162020.jpg|20px]] and select the good/service item(s) for the exhibitor registration. Adjust the pricing if needed. '''(Required)''' | ||
| + | #:*'''Booths''': Click the orange plus icon [[File:OrangePlus 12162020.jpg|20px]] to specify the booth number(s) for the exhibitor registration type here. Single booth numbers can be entered by using the same number for both "Starting Number" and "Ending Number". When registering, exhibitors will have the ability to look at a venue map and select a booth number from the range specified here. When a booth number is taken, it is removed from the available range so no two exhibitors may register for the same booth. | ||
| + | #Complete all required fields and click '''Done'''. | ||
| + | |||
| + | ==='''<span style="color:#800080">Custom Fields'''</span>=== | ||
| + | ---- | ||
| + | If you have additional questions or options for your exhibitors to select, you can set up custom fields to include in their registration. | ||
| + | #Click the orange plus icon [[File:OrangePlus 12162020.jpg|20px]]. | ||
| + | #In the "Add Event Exhibitor Custom Field" window, complete the following: | ||
| + | #:[[File:NewExhibitorCustomField 12162020.jpg|800px|center]] | ||
| + | #:*'''Field Area''': if setting up a new custom field for this event, select "Event Exhibitor". '''(Required)''' | ||
| + | #:*'''Existing Custom Field''': if you are using an existing custom field, make your selection here. ''(NOTE: only custom fields of type '''Event Exhibitor''' are available to select.)'' Selecting an existing field will remove the "Field Area" option from the window and will populate the remainder of the fields with the selected field's properties , greying out any changes to the options as shown below: | ||
| + | #:[[File:ExistingCustomField 12162020.jpg|800px|center]] | ||
| + | #:*'''Name''' '''(Required if adding a new custom field)''' | ||
| + | #:*'''Display Name''': this is what will display out on the exhibitor registration form. '''(Required if adding a new custom field)''' | ||
| + | #:*'''Description''': Any additional information you wish to display about this field on the exhibitor registration form. ''(Optional)'' | ||
| + | #:*'''Custom Field Data Type''': Select the type of data you wish to collect in this field. For more information on custom field data types, see '''[[Getting_Started#Custom_Fields|Custom Fields]]'''. ''NOTE: you cannot change a custom field's data type once the custom field has been saved/after you click "Done". Be sure to select the correct data type!'' '''(Required if adding a new custom field)''' | ||
| + | #:*'''Characters Allowed''': Limit the number of characters input when using a Text or Multi line Text data type. If you select a different data type, this field is no longer displayed. ''(Optional)'' | ||
| + | #:*'''Properties''' - Define the properties for the custom field: | ||
| + | #:**'''Public''': Select this check-box if you wish this field to be displayed for the public. This will allow the field to be displayed in the InfoHub, Directories and for use in membership applications. | ||
| + | #:**'''Member Editable''': Select this check-box to allow users to edit this custom field in their hub profile. If a custom field is to appear in the hub, but is not to be editable, you need only check the property '''Public'''. | ||
| + | #:**'''Required''': Select this check-box to make this field required. | ||
| + | #:**'''Archived''': If you no longer wish to use this custom field, selecting this check-box will hide the field from being used in the back office, but historical data will be maintained. | ||
| + | #:**'''Is for Attendee''': If you wish to include this on your registration form, tick this check-box. | ||
| + | #:**'''Is Required for Staff''': Enable this option if staff is required to complete this field when registering someone from the back-office. | ||
| + | #Click '''Advanced Options''' to display the '''Applies to Exhibitor Type (Version 2 Only)''' option. This allows you to restrict the custom field to a specific exhibitor registration type if needed. ''(Optional)'' | ||
| + | #:[[File:ExhibitorCustomFieldAdvOpt 12162020.jpg|800px|center]] | ||
| + | # Click '''Done'''. | ||
| + | |||
| + | ==='''<span style="color:#800080">Additional Items'''</span>=== | ||
| + | ---- | ||
| + | |||
| + | If you wish to sell additional items during the event registration process (for example you may wish to be able to sell wifi access, or need to charge for hardwired internet drops to a booth), these items may be added in the '''Additional Items''' section on the event's '''Exhibitor Setup''' tab. | ||
| + | #Click the '''Add Item''' button in the '''Additional Items''' section | ||
| + | #:[[File:AddExhibitorItem 12162020.jpg|800px|center]] | ||
| + | #Enter a '''Name''' for the additional exhibitor item. '''(Required)''' | ||
| + | #Enter a '''Description''' of the item. ''(Optional)'' | ||
| + | #Select the desired '''Goods/Service''' from the drop-down list. '''(Required)''' | ||
| + | #Enter, edit, or accept the default '''Price'''. '''(Required)''' | ||
| + | #If you wish to limit the number of additional items you have available to be sold, enter the number in the '''Items Available (0 if unlimited - Version 2 Only)'''. Each additional item can have its own specific limit set. Once the limit is reached, the item will be marked with “sold out” in the exhibitor registration. ''(Optional)'' | ||
| + | #Select the '''For Members''' check box to allow members to purchase this item. | ||
| + | #Select the '''For Non Members''' check box to allow non-members to purchase this item. | ||
| + | #Select the '''Is Active''' check-box to allow the item to be displayed on the event registration form. | ||
| + | #Select '''Sell Item as Yes/No''' option to only allow the ability to select or deselect the additional item on the exhibitor registration (will not allow a quantity selection). | ||
#Click '''Done'''. | #Click '''Done'''. | ||
| + | |||
| + | ==='''<span style="color:#800080">Instructions and Confirmation Messaging'''</span>=== | ||
| + | ---- | ||
| + | If you have exhibitor-specific registration instructions, or wish to customize the confirmation page after exhibitor registration, you can click the orange pencil icon [[File:Pencil 12162020.jpg|20px]] to customize those messages. | ||
| + | [[File:ExhibitorMessaging.jpg|800px|center]] | ||
| + | *'''Exhibitor Registration Instructions''': these instructions will display right above the Exhibitor Registration options on the event registration form. | ||
| + | [[File:ExhibitorInstructions 12162020.jpg|800px|center]] | ||
| + | *'''Exhibitor Confirmation Message''': This is only used for '''Version 1''' exhibitor registrations. If you are using version 2 exhibitor registrations, all attendees and exhibitors will receive the attendee confirmation from the Attendee Setup tab. | ||
=='''<span style="color:#800080">Manage Exhibitor Registrations'''</span>== | =='''<span style="color:#800080">Manage Exhibitor Registrations'''</span>== | ||
| Line 1,166: | Line 1,950: | ||
---- | ---- | ||
| − | ==='''<span style="color:#800080"> | + | #For the desired event, click the '''Exhibitors''' tab. |
| + | #:[[File:Add exhibitor.jpg|800px|center]] | ||
| + | #Click the orange actions button, and select '''Add Exhibitor'''. | ||
| + | #Complete the exhibitor registration form. | ||
| + | #Click '''Submit'''. | ||
| + | |||
| + | ==='''<span style="color:#800080">Assign Exhibitor Booth Number'''</span>=== | ||
---- | ---- | ||
| + | The '''Booth Type''' associated to an exhibitor's registration fee defines the booths available and the number of inventory. Booths are '''NOT''' automatically assigned when an exhibitor registers. | ||
| + | |||
| + | To assign a booth number (and remove it from the inventory): | ||
| + | |||
| + | #For the desired event, click the '''Exhibitor''' tab. | ||
| + | #:[[File:Edit exhibitor.jpg|800px|center]] | ||
| + | #Click the hyper-linked name of the exhibitor in the '''Name''' column. | ||
| + | #Scroll to the '''Booth Preferences''' section. | ||
| + | #:[[File:Booth Preferences.jpg|600px|center]] | ||
| + | #From the '''Booth Configuration''' list, select the desired booth number. | ||
| + | #Click '''Done'''. | ||
==='''<span style="color:#800080">Cancel an Exhibitor Registration'''</span>=== | ==='''<span style="color:#800080">Cancel an Exhibitor Registration'''</span>=== | ||
---- | ---- | ||
| + | |||
| + | In the event an exhibitor cancels: | ||
| + | |||
| + | #For the desired event, click the '''Exhibitor''' tab. | ||
| + | #:[[File:Cancel exhibitor.jpg|800px|center]] | ||
| + | #Click '''Actions''' in the '''Actions''' column for the exhibitor you wish to cancel. | ||
| + | #Click '''Cancel'''. '''NOTE''': There is no confirmation, the action is immediate. | ||
==='''<span style="color:#800080">Send an Email to All Exhibitors'''</span>=== | ==='''<span style="color:#800080">Send an Email to All Exhibitors'''</span>=== | ||
---- | ---- | ||
| + | |||
| + | #For the desired event, click large '''Actions''' button. | ||
| + | #:[[File:Email all exhibitors.jpg|800px|center]] | ||
| + | #Click '''Send Email to Exhibitors'''. | ||
| + | #Complete desired email and send. | ||
==='''<span style="color:#800080">Send an Email to an Individual Exhibitor'''</span>=== | ==='''<span style="color:#800080">Send an Email to an Individual Exhibitor'''</span>=== | ||
---- | ---- | ||
| + | #For the desired event, click the '''Exhibitors''' tab. | ||
| + | #:[[File:Send ind exhibitor email.jpg|800px|center]] | ||
| + | #Click the '''Actions''' button in the '''Actions''' column for the desired exhibitor. | ||
| + | #Click '''Send Email'''. | ||
| + | #Compose and send the desired email. | ||
| − | ==='''<span style="color:#800080">Download Exhibitor | + | ==='''<span style="color:#800080">Email/Download an Exhibitor Invoice'''</span>=== |
---- | ---- | ||
| + | Invoices for your exhibitors may be sent individually from the '''Exhibitor''' tab, or you may send them in bulk from the '''Billing > Pending Delivery'''. See '''[[Billing#Deliver_Invoices|Deliver Invoices]]''' for further information on delivering in bulk. | ||
| − | ==='''<span style="color:#800080">Download Exhibitor | + | The instructions below are to send an individual invoice to an individual exhibitor: |
| + | |||
| + | #For the desired event, click the '''Exhibitors''' tab. | ||
| + | #:[[File:Send exhibitor invoice.jpg|800px|center]] | ||
| + | #Click the '''Actions''' button in the '''Actions''' column for the desired exhibitor. | ||
| + | #Click '''Send Invoice''' if you wish to email the invoice or '''Download Invoice''' to print a copy of the invoice. | ||
| + | |||
| + | ==='''<span style="color:#800080">Download Exhibitor Badges'''</span>=== | ||
---- | ---- | ||
| − | + | #For the desired event, click the '''Attendees''' tab. | |
| − | + | #:[[File:Exhibitor badges.jpg|1000px|center]] | |
| + | #Click the orange '''Actions''' button. | ||
| + | #Click '''Download Badges'''. | ||
| + | #On the '''Attendees Badges Print''' screen: | ||
| + | #*Select the badge template you wish to use from the '''Document Generation Template''' list. | ||
| + | #*Tick '''Show Tenant Logo''' if you wish to include your organization's logo on the badges. | ||
| + | #*Tick '''Print Exhibitors Only''' and ensure that '''Print Non Exhibitors Only''' is de-selected. | ||
| + | #*(Optional) If you wish to include ''Exhibitor'' on the badge, tick '''Show Exhibitors on Exhibitor Badges'''. | ||
| + | #Click '''Done'''. | ||
='''<span style="color:#800080">Manage Event Sessions'''</span>= | ='''<span style="color:#800080">Manage Event Sessions'''</span>= | ||
| Line 1,217: | Line 2,051: | ||
#:[[File:Sessions CP.jpg|800px|center]] | #:[[File:Sessions CP.jpg|800px|center]] | ||
#Click the '''Add Session''' button. | #Click the '''Add Session''' button. | ||
| − | #:[[File: | + | #:[[File:Session with Goods Services.jpg|700px|center]] |
#Configure the following: | #Configure the following: | ||
#*'''Name''': Enter a name for the session. | #*'''Name''': Enter a name for the session. | ||
| Line 1,227: | Line 2,061: | ||
#*'''Main Photo''': Upload a photo for this session. For example, you may wish to upload a photo of the speaker. | #*'''Main Photo''': Upload a photo for this session. For example, you may wish to upload a photo of the speaker. | ||
#*Click the [[File:Orange plus icon.jpg]] icon to enter the name, title and details of the '''Speaker'''. | #*Click the [[File:Orange plus icon.jpg]] icon to enter the name, title and details of the '''Speaker'''. | ||
| − | #*(Optional) If using the ''' | + | #*(Coming Soon) '''Goods/Services''': If your event is setup to use V2 of the events module, you may add a fee to your event. Click the [[File:Orange plus icon.jpg]] to select the desired fee item. See '''[[Event_Management#Select_Event_Public_Module_Version|Select Event Public Module Version]]''' for information on updating your event page to V2. |
| + | #:[[File:Session Fee.jpg|800px|center]] | ||
| + | #*(Optional) If using the '''Continuing Education''' module, click the [[File:Orange plus icon.jpg]] to add a continuing education program/certification for this session. | ||
#*Click '''Done'''. | #*Click '''Done'''. | ||
| Line 1,286: | Line 2,122: | ||
='''<span style="color:#800080">Event Reports'''</span>= | ='''<span style="color:#800080">Event Reports'''</span>= | ||
---- | ---- | ||
| − | + | Several reports are available for management and analysis of your events. See '''[[Reports#Event_Reports|Event Reports]]'''. | |
| − | |||
| − | |||
| − | |||
| − | |||
| − | |||
| − | |||
| − | |||
| − | |||
| − | |||
| − | |||
| − | |||
| − | |||
| − | |||
| − | |||
| − | |||
| − | |||
| − | |||
| − | |||
| − | |||
| − | |||
| − | |||
| − | |||
| − | |||
| − | |||
| − | |||
| − | |||
| − | |||
| − | |||
| − | |||
| − | |||
| − | |||
| − | |||
| − | |||
| − | |||
| − | |||
| − | |||
| − | |||
| − | |||
| − | |||
| − | |||
| − | |||
| − | |||
| − | |||
| − | |||
| − | |||
| − | |||
| − | |||
| − | |||
| − | |||
| − | |||
| − | |||
| − | |||
| − | |||
| − | |||
| − | |||
| − | |||
| − | |||
| − | # | ||
| − | |||
| − | |||
| − | |||
| − | |||
| − | |||
| − | |||
| − | |||
| − | |||
| − | |||
| − | |||
| − | |||
| − | |||
| − | |||
| − | |||
| − | |||
| − | |||
| − | |||
| − | |||
| − | |||
| − | |||
| − | |||
| − | |||
| − | |||
| − | |||
| − | |||
| − | |||
='''<span style="color:#800080">Event Management FAQ's'''</span>= | ='''<span style="color:#800080">Event Management FAQ's'''</span>= | ||
---- | ---- | ||
| − | |||
| − | |||
*'''How can I change the way fees are displayed on invoices?''' [[Event_Management#Event_Settings_Defaults|Click here]]. | *'''How can I change the way fees are displayed on invoices?''' [[Event_Management#Event_Settings_Defaults|Click here]]. | ||
*'''How can I generate a list of all session attendees?''' [[Event_Management#Event_Sessions_Report|Click Here]] | *'''How can I generate a list of all session attendees?''' [[Event_Management#Event_Sessions_Report|Click Here]] | ||
Latest revision as of 12:13, 1 April 2021
NEW!! Find all of your answers in the GrowthZone Knowledge Base!
Contents
- 1 Events Overview
- 2 Events Initial Setup
- 3 Add a New Event
- 4 View/Edit Events
- 5 Edit Event details
- 5.1 Select Event Registration Version
- 5.2 Update Event Payment Gateway
- 5.3 Setup an Automatic Event Reminder
- 5.4 Sync an Event with GoToWebinar
- 5.5 Adding Event Description and Registration Instructions
- 5.6 Add a Map to your Event
- 5.7 Add a Logo to Your Event
- 5.8 Add an Image Gallery to Your Event Page
- 5.9 Add a Video to your Event Page
- 5.10 Update Location/Mapping of Event
- 5.11 Update Event Date/Hours/Time Zone
- 5.12 Manage Overall Event Custom Fields
- 6 Set Up Event Registration and Fee Details
- 6.1 Setup Overall Registration Options
- 6.1.1 Set Registration Cut-off Date
- 6.1.2 Set a Limit on the Number of Event Attendees
- 6.1.3 Enable a Waiting List for an Event
- 6.1.4 Show Registered Attendees Publicly
- 6.1.5 Display Number of Registrants on Event Detail Page
- 6.1.6 Show Registered Attendees to Members
- 6.1.7 Collect Donations for Fundraiser during Event Registration
- 6.1.8 Allow Invoicing for Event Registration
- 6.1.9 Display Number of Registrants on Event Detail Page
- 6.1.10 Define how the System Authenticates Members for Member Pricing
- 6.2 Configure Your Registration Form Settings
- 6.3 Add Custom Fields to Event Registration Form
- 6.4 Edit an Event Custom Field
- 6.5 Create Custom Fields specific to an Individual Registration Type
- 6.6 Add Individual Custom Fields to your Event Registration Page
- 6.7 Setup your Event Registration Fees
- 6.8 Set Up Discounts for your Event
- 6.9 Add Additional Items for Sale during Event Registration
- 6.10 Customize Registration Instructions and Confirmation Messages
- 6.1 Setup Overall Registration Options
- 7 Event Management-Invitations & Other Communications
- 8 Manage Event Registrations
- 9 Postpone an Event - Automated
- 10 Cancel an Event - Automated
- 11 Cancel an Event - Manual
- 12 Event Sponsor Management
- 13 Manage your Exhibitors
- 14 Manage Event Sessions
- 15 Event Reports
- 16 Event Management FAQ's
Events Overview
Events Initial Setup
| See Events Initial Setup in Action! |
Event Settings Defaults
The Event Settings options allow you to configure the defaults to be used for your events. Setting up the defaults will save you time when creating events, and may be over-ridden as needed for individual events.
- Select Setup in the Navigation panel.
- Click Event Settings in the Event section.
- On the Event Settings screen, you may configure the following to be the default for the events that you will setup:
- Default Registration Version - Select which version of the registration form you prefer as your default. (Version 2 is recommended.)
- Payment Gateway - Select the payment gateway you wish to use by default for your events. (Requires Integrated Payment Processing)
- Invoice Line Item Description Option - Select what you like to be included in the invoice line items.
- Display Registration Descriptions by Default: Select this option if you wish to display the description of a registration fee on the event registration page, as shown below. If this option is not selected, the description will be displayed when a registrant clicks on the registration type.
-
- Enable Individual Custom Fields on Registration Form: Select this option if you wish to include individual custom fields on your event registration pages. Data entered into these fields during the registration process will then tie back to the contacts (if they exist) in your database. NOTE: The event must be set to use Version 2 Registration.
- Confirmation HTML for Event Attendee Registration - Enter the confirmation that you would like displayed to registrants after they have completed their registration. This confirmation message is also included in the Registration Confirmation email.
- Confirmation HTML for Event Sponsor Registration - Enter the confirmation that you would like displayed to a sponsor after they have completed their registration. This confirmation message is also included in the Registration Confirmation email.
- Default Contact For Event Approval Tasks - Select the individual who will be responsible for approving events submitted from the website or the Info Hub.
- Display Associated Individuals Upon Email Match - This setting determines whether individuals on an event registration form can view other individuals at their company after confirming their identity via e-mail address only. The setting is off by default. When enabled, anyone could enter the email address for one person at the company and view information for other employees at that company as well.
- Default Calendar - You can select a default calendar on which you'd prefer your events to appear. This can be changed if needed when setting up new events.
- Click Save to save your changes.
Create Calendars
To display your events (whether publicly, member only, or internally) you will need to setup your calendars.
- Click Setup in the Navigation Panel OR go to the Calendars tab in the Events module.
- If in Setup, Click Calendars in the Event section. A list of calendars currently configured in your system will be displayed.
- If in the Events Module, the Calendars tab will display the same list of calendars.
- Click the Add button.
- On the Add/Edit Calendar screen configure the following:
- Name - This is the name that will display if you choose to publicize this calendar.
- Description - This is a description of the calendar (for internal use.)
- Is Public Viewable- Select this check-box if you wish this calendar to be publishable on your website and viewed by the public.
- Is Member Viewable - Select this option if you wish this calendar to be available in the Info Hub.
- Allow Public Submission - If publicly viewable, this option will allow the general public to submit events for approval.
- Allow Member Submission - If Member viewable, this option will allow members to log in and submit events for approval. NOTE: Access level for InfoHub Events must be set to "Create" to fully enable member submission. Details on setting up User access levels are available here.
- Group - Optional, select a group to associate to this calendar. Only members of that group (aka list/committee) will be able to view this calendar.
- Is Active - Select this check-box to activate the calendar and make it usable at least by staff members. i.e., in order for events to be added to a calendar the calendar must be active, even if it is not published/viewable on your website or Info Hub.
- Click Done to save your new calendar.
Modify an Existing Calendar
You may modify any of your existing calendars.
- Click Setup in the Navigation Panel OR go to the Calendars tab in the Events module.
- If in Setup, Click Calendars in the Event section. A list of calendars currently configured in your system will be displayed.
- If in the Events Module, the Calendars tab will display the same list of calendars.
- Click the link for the calendar you wish to modify.
- Make your desired modifications and click Done.
Set Up Goods & Services for Your Event
Prior to setting up your event, you will want to setup the appropriate fee items for the event. Refer to Setup Goods and Services for details.
Set Up "No Show Fees" for your Events
You may configure "No Show Fees" for attendees that register for events but do not attend and do not cancel their registration. These fees will be automatically added to any future registration invoices for attendees that registered for an event but did not attend or cancel in advance.
- Configure an event category for any events instituting a no-show fee.
- Create a good/service item for your no-show fee. Select the "Event no show fee" type.
- Enable the "Charge No Shows Late Fee" option in your Event Settings.
-
- Click the orange "+" icon to add a no show fee
- Select the "No Show" event category you added/created
- Select the good/service item you just created
- Adjust the price if needed
- Adjust the "Days To Lookback For Prior No Show" (this will set the number of days previous the system will look for a registration flagged as a no show; 0 is unlimited)
- Enter your No Show Policy (this will display at the bottom of the registration page when an event is assigned a category with a No Show Fee configured)
-
- Create or edit an event as usual. Make sure to select a category with the No Show fee configured if you wish to charge a no show fee. If an attendee is a no show at an event that includes a category with a no show fee assigned, and if the event they did not attend is within the lookback days range, the next time they attempt to register for an event they will see a notification of the no show fee on their registration.
NOTE: If a staff user fills out the event registration form on behalf of an attendee that was a no show at a previous event, the no show fee does NOT get added. The fees will only apply when the attendee fills out the form on their own either by logging in with a username and password or by searching by email address.
| RECOMMENDATION: Best Practice is to only have one event category with an assigned no-show fee PER EVENT. If an event is assigned multiple categories that have no-show fees configured, the registration may "stack" multiple no show fees. |
Add a New Event
You may add a new event by clicking the Quick Actions button in the header bar, or by clicking the Add Event button on the Events page.
- On the Add New Event screen, configure the following settings:
- Name - Enter a name for the event. This is the name that will display on your web-site.
- Description - Provide a description of the event. This description will be displayed on your web-site.
- Location Name, Address , Address 2, City, State/Province, Postal Code, Country - Enter location information. This information will be displayed on your web-site.
- Start At/End At/All day - This is the start time and end time of the event. NOTE: The time zone for the event will default to the time zone configured for your organization. If you wish to change the time zone, you will be able to to this on the event's Overview tab in the Hours section. If All Day Event is selected, no time information will be displayed for the event.
- Time/Hours Details - This section allows you to enter descriptive information about the time/hours of the event (such as when registration opens, when dinner starts, when auction starts).
- Organization - The name of your chamber/association will be automatically populated. You may change this to associate this event to a different organization.
- Contact - Enter the name of the contact person for this event.
- Email Address- email address you want displayed on the event page
- Phone- phone number you want displayed on the event page
- Additional Contact Details - This text box allows you to enter further contact information, i.e. name, phone number, email, etc.
- Category - To assist you in filtering, sorting and/or report on this event, you may select a category from the drop-down list. This is optional. Click here for further information on setting up Categories.
- Calendar - Select the calendar(s) on which you want to display this event. The event may be displayed on multiple calendars. If unselected, the default calendar selected in your Event Settings will be used.
- Published Status - Select the status of this event, only approved events will be displayed on the calendars you have selected.
- Publish Date - Enter the date that you wish to begin displaying this event on your web-site.
- Enable Registration - Select this check-box to allow registration for this event. If this is not selected, a registration button will not be displayed on your web-site, however, your staff members would be able to register people from the back-office.
- Event has Sessions/Breakouts - If you are using the Expo module, enabling this option will allow you to add sessions to your event. Click here for further information on setting up sessions.
- Event has Exhibitors - If you are using the Expo module, enabling this option will allow you to manage your exhibitors. Click Here for further information.
- Copy From Existing Event - if you wish, you can copy the details from an existing event to this event. Click Here for further details on copying events.
- Click Save to save the new event.
Copy An Existing Event
If you run the same events regularly, you can copy an existing event and save yourself some setup time. You can determine key setup items you would like to copy, such as Attendee Setup, Tasks, Files, etc.
- Click Events in the Navigation Panel.
- Open the event you wish to copy by clicking on its name.
- Click the Action ribbon on the right.
- Click Copy this Event.
- Update the desired event fields. Be sure to review the new event's name, as the name of the copied event will be part of it. This is easily deleted.Click Here for further instruction on available fields.
- Select the specific event settings you wish to copy from the original event.
- Click Done.
| NOTE: When working with a copied event, if you update the description of the event, this will NOT update the short description, so be certain to update the short description. |
Setup a Recurring Event Series
If your association has an event which occurs on a regular basis, save time by setting it up as a recurring event.
- Create your event, as described in Add a New Event.
- On the event's Overview tab, click the
 in the Recurrence section.
- Enter a name for the series.
- Enter a description of the series.
- In the Series Start Date box, enter the date of the first event.
- In the Series End Date box, enter the date of the last event in the series.
- Select from the following Recurrence Pattern options: Daily, Weekly, Monthly, Annually. This allows you to specify how often the event occurs.
- Select the Relative Date check-box if the event is to recur on the same day of a week:
- Specify the On the option, Day of The Week option, and the Every n months option. For example, if you wish to set up an event for the third Thursday of every month, configure your settings as shown below:
- Or if the recurrence is not on a Relative Date, specify the exact Day and Every n months. For example, if you wish to setup an event for the 23 of each month, configure your settings as shown below:
- Click Done.
A gray box will be displayed on the Overview tab indicating that this event is part of a series.
NOTE: If it is necessary to edit the recurrence schedule:
|
Make Changes to an Entire Event Series
Information such as the location of a recurring event, descriptions, contact information, etc. may be updated for an entire event series. NOTE: If there are no registrations or sponsors attached to any future events within the series then you may edit the recurrence settings. When making a change, you are only able to extend the date out, not move it back - unless you change the frequency.
- On the Overview tab for any of the events in the series, click the click here link in the grey box.
- The Edit Event Series dialog box will be displayed, shown partially below.
- Update information as needed. NOTE: If there are no registrations or sponsors attached to any future events within the series then you may edit the recurrence settings. When making a change, you are only able to extend the date out, not move it back - unless you change the frequency.
- Click Done.
Make Changes to an Individual Event in a Series
The following items, on the event's Overview tab may be updated for an individual event.
| NOTE: Once updates have been made on the Overview tab for the individual event, the event is no longer a part of the series. |
- Event Image
- Name
- Description
- Category
- Calendar
- Location Name
- Location Address
- Location Description
- Contact Information
- Pricing Description
- Images
- Videos
| CAUTION: Changes made to the Attendee Setup tab, will effect ALL events. If Overview information changes are not needed from one event to another, but changes to the Attendee Setup are needed, you may wish to use the Copy Event function. If Overview changes are needed for a particular event, make the changes to the Overview tab as described below, then update the Attendee Setup. |
- From the Events module, select the desired event in the series.
- Make the desired changes to the Overview information.
- Click Done.
Your changes will be saved, and the event is no longer associated to the series.
View/Edit Events
You may view your events, by selecting Events in the Navigation Panel OR you may type the event name in the Search box in the header bar. When you select events in the navigation panel all of your events will be displayed. You may view the events in list format or in card format by clicking the icons on the right-hand side of the screen.
Click the name of Event you wish to edit to open the event's page. The Event page is setup with several different tabs that provide the functionality to customize and manage your event.
Edit Event details
The Overview tab of your event allows you to update the information supplied when the event was first created. Click on the pencil icon to the right of the Section name you want to edit
A few of the sections have options available from the Overview Tab that aren't available during the initial set up.
Select Event Registration Version
Two versions of the event public module are available. To select the version that you wish to use:
Overview tab.
- Select the event Overview tab.
- Click the
 icon next to General Information.
 - Select the desired version from the Registration Version list.
- Click Done.
Update Event Payment Gateway
Events will use the default event payment gateway (set in Setup> Event Settings). You can change this in the General Information on the event's Overview tab.
- Select the event Overview tab.
- Click the
 icon next to General Information.
- Select the desired gateway from the Payment Gateway list.
- Click Done.
Setup an Automatic Event Reminder
It can be challenging to remember and find the time to send an email to event attendees just prior the event's start date. To solve this, you can configure an automated reminder to be sent out 48 hours prior to the event.
- Select the event Overview tab.
- Click the
 icon next to General Information.
- Click the Send Reminder Email to Registrants 48 hours Prior check-box.
- Click Done.
When this setting is enabled, the email message you selected for Event Reminder in Automated Messaging will be sent to all registrants. See Configure Automated Messaging for further information.
Sync an Event with GoToWebinar
If you have enabled GoToWebinar integration, you can sync your event via the event's Overview tab. NOTE: GoToWebinar integration requires Registration Version 2.
- Select the event Overview tab.
- Click the
 icon next to General Information.
 - Click the Sync with GoToWebinar check-box.
- Click Done.
| SYNCING PAID EVENTS: If you wish to charge for a webinar and sync the event from GrowthZone, your event in GoToWebinar must be set up as a free event, as all payments will be processed through GrowthZone and not GoToWebinar. Setting the GoToWebinar event as a paid event will cause GoToWebinar to reject registrations coming from GrowthZone and will not sync registrants. |
Adding Event Description and Registration Instructions
In the Event Description options, there is a field to enter "Registration Instructions".
These instructions appear at the top of your event registration page.
You can also add or edit the event description.
This appears at the top of the event page and registration page.
Event Page:
Registration Page:
If you need to add specific instructions regarding the actual registration types themselves, please see Specific Registration Instructions.
Add a Map to your Event
In the Location section, add the actual address in the address fields. Both the address and the description will display on the event page; the completed address fields will also trigger a map to be displayed.
Add a Logo to Your Event
- On the Event page, click the image icon next to the event name. The Image Manager will be displayed. For an event photo, the 'MINIMUM' size is 150x150 pixels; 'RECOMMENDED' size is 200x200 pixels or larger.
- On the Image Manager screen, you may either drag & drop the image onto the screen OR click the upload button to browse to your image, and upload.
- Position selection rectangle around area you would like to use.
- Click Crop & Save.
This image is the "search logo" for the event and will be displayed next to the event when viewing the events in List View on the website or in the Info Hub
Add an Image Gallery to Your Event Page
- In the Images section click the Add button
- You may drag an image into the image box OR click the Upload button to browse to your image. NOTE: it is recommended to resize image gallery photos to a consistent width/height prior to uploading. Recommended minimum height is 750 pixels. 16:9, 3:2, and 1:1 ratios are best.
- Enter a Title and Caption for the image if you choose
- Click Crop & Save.
Follow the steps above to add additional images. You may change the order in which images are displayed by clicking the Reorder button.
Add a Video to your Event Page
- Copy the URL of the video you want to display from where ever it is being hosted, (likely YouTube) [you are simply "pointing to" the video in order to embed it, you are not uploading it]
- In the Videos section click the orange Add button
- Paste the URL to the location of your video.
- Click Done.
Update Location/Mapping of Event
On the Overview tab, you will be able to enter address information, which will be used by the system to generate a map of the location.
- In the Location section of an event, click the
 icon.
icon.
- Enter the Location Name: The type ahead searching feature allows you to start typing the Location name, and it searches your organizations, individuals, and past event names.
- If you select a name from the type ahead feature, it will pre-populate the name and address field of the person/org/location you selected.
- If you do not select an item from the type ahead, the address fields are left blank and you are able to type in a new location name and address.
- Enter a Location Description: This allows you to add additional information about the location of the event (such as where to park), and will be displayed on your event page.
- Click Done.
Update Event Date/Hours/Time Zone
| See it in Action: Update Event Date/Hours/Time Zone] |
By default, when adding an event, the times defined will be in the time zone configured for your organization. To change the time zone:
- Click the pencil icon, in the Hours section of the Overview tab.
- Select the desired Timezone from the list.
- Click Done.
Manage Overall Event Custom Fields
These Overall Event Custom Fields are intended for staff members to track expenses and other internal event information. They can be included in various event reports, such as the Events Overview Report, Event Attendee Report and the Event Activity Report. By gathering data in these overall custom fields, you will easily be able to compare event to event, and even year over year.
ALL custom fields that have been created of type Event will automatically be displayed on each of your eventsOverview tab. You can populate these fields with desired information and/or add additional custom fields, from the Overview tab. NOTE: These custom fields are not the custom fields that you wish to include on your event registration pages or custom fields used for internal purposes specific to an individual event. See
| NOTE: The Overall Custom Fields are NOT custom fields that you wish to include on your event registration pages or custom fields used for internal purposes specific to an individual event. See Add Custom Fields to Event and/or Event Registration Form for instructions on setting up custom fields for your event registration page. |
Populate an Overall Event Custom Field
- Select the event's Overview tab.
- Click the
 icon, in the Overall Event Custom Fields section.
- Populate the fields as needed.
- Click Done.
Add Overall Event Custom Field
Overall Event Custom Fields can be added "on the fly" from any event's Overview tab, or under Setup > Miscellaneous > Custom Fields.
- Select the event's Overview tab.
- Click the
 icon, in the Overall Event Custom Fields section.
- Click Edit Custom Fields
- Click the
 icon.
icon.
- Configure the custom field as needed. See Custom Fields for further instructions on custom field types.
- Click Done.
Set Up Event Registration and Fee Details
Your event registration form, fees, discounts, and so on, are setup on an Event's Attendee Setup tab.
Setup Overall Registration Options
You can configure: your registration open/end dates, maximum attendees, visibility, and so on under the Overall Registration Options.
- Select the desired Event.
- Click the Attendee Setup tab.
- Click the pencil icon adjacent to Overall Registration Options.
- Configure the following settings:
- Registration Start Date - This is the date that you wish registration to start; until this date, the Register button will not be displayed on your web-site.
- Registration End Date - This is the date that you wish to close registration. After this date, the Register button will no longer display on your web-site, and a message indicating that registration is closed will be displayed.
- Max Attendees - This setting allows you to define the maximum number of people who may register for the event. Once the maximum has been reached, the Register button will no longer display on your web-site, and a message will be displayed, (unless you select Allow Waiting List in Options below. If this field is left blank, there is no limit to your attendance.
- External Registration Link - If you are including an event on your calendar, but registration for this is not managed through your software, enter the URL for the registration site here.
- Options
- Enable Registration - Click this option to enable registration (assuming the user is in the time frame indicated above). If the event does not require registration and you want it on your calendar, (a Farmer's Market, for instance), you would not check this box. If this option is disabled, the register button will not be displayed on your event page, nor will the number of registered guests. NOTE: Staff members would be able to register people for the event from the back-office even if this box is not checked.
- Allow Waiting List - Click this option to allow a waiting list. If this option is selected, when your maximum number of attendees has been reached, registrants will be notified that they can be added to a waiting list.
- Show Registered Attendees Publicly - Click this option if you wish to display the registered attendee list on your public web-site.
- Show Registered Attendees To Members - Click this option if you wish to display the registered attendees for the event in Info Hub.
- Collect Donations: If you are using the Fundraising module, this check box will allow you to also add a donation collection option to your registration form.NOTE: If this option is checked, an option will be added to the screen to select the Fundraiser Receipt Template.
- Allow Invoicing: Click this option if you want to give your registrants to option to be invoiced rather than pay online with a credit card. When this is selected, you will also have the option to select Include Invoice in Confirmation Email. This will make it easy for the attendee to pay the invoice immediately.
- Allow Purchasing of Multiple Registration Types - Click this option to allow registrants to register for more than one registration type. NOTE: Perhaps your event has a pre-event meeting, the event itself, and a banquet. Allow Purchasing of Multiple Registration Types allows your registrants to register for 1, 2, or all three of these without you having to set up complicated registration scenarios.
- Include Include Invoice Link in Confirmation Email: This option appears when Allow Invoicing is selected. This will include a link to the invoice within the confirmation email. IF CUSTOMIZING THE "REGISTERED EVENT ATTENDEE" EMAIL TEMPLATE: Your template MUST include certain links/code to ensure the registrant receives a link to their invoice when enabling this option. You can copy this code from the default "Registered Event Attendee" template. This is the section of links/code that must be included in your customized email template
- Member Validation Options - These settings allow you to set how you want your members to prove that they are members so they can receive member pricing. Select one of the following three options:
- Allow anyone to receive member pricing: This is the least restrictive option. By leaving it open, with an "on your honor" type approach, members will be able to get member pricing without having to log in and/or remember a password. That would mean that anyone would be able to use the member pricing during registration. In the event (no pun intended) that a non-member then signs up with member-only pricing, a staff member could watch for such instances and even use the opportunity to reach out to that individual with membership benefit information. This is also the option you would use if there is no different between member and non-member pricing.
- Email address is an exact match to an active member: With this setting, membership validation is based on email addresses. The first step in the event registration process has the user put in their name and email address. If the email address used is an exact match to an active member, it will recognize that and automatically show member pricing.
- Only if the member logs in: This is the most restrictive setting. If members come into an event through the INFO HUB or through a member email invitation, they will already be logged in. If a member comes to the registration page not already authenticated, they will only be able to see member pricing, by clicking "Know your member login? Login Now" and logging in.
- Session Changes Allowed Until - If you are using the Event Expo module and will be setting up Sessions, this check box allows you to set a time limit on when registrants can make changes to the sessions they have signed up for.
- Click Done.
Set Registration Cut-off Date
The registration cut-off date can be set on the event's Attendee Setup tab, in the Overall Registration Options section. See Setup Overall Registration Options for instructions.
Set a Limit on the Number of Event Attendees
You can set a limit on the number of event attendees from the event's Attendee Setup' tab, in the Overall Registration Options section. See Setup Overall Registration Options for instructions.
Enable a Waiting List for an Event
You can enable a waiting list from the event's Attendee Setup' tab, in the Overall Registration Options section. See Setup Overall Registration Options for instructions.
Show Registered Attendees Publicly
If you wish to allow the public to view who else is attending your event, you can enable Show Registered Attendees Publicly' on the event's Attendee Setup tab, in the Overall Registration Options section. See Setup Overall Registration Options for instructions.
Display Number of Registrants on Event Detail Page
If you wish to display the number of people registered for your event on your event's page, this is set on the event's Attendee Setup tab, under the Overall Registration Options. Deselect this option to remove the count from your page.
| NOTE: This setting is only applicable to v2 of the public pages. |
Show Registered Attendees to Members
If you wish to allow your members to be able to see who else is attending your event, you can enable Show Registered Attendees to Members' on the event's Attendee Setup tab, in the Overall Registration Options section. See Setup Overall Registration Options for instructions.
Collect Donations for Fundraiser during Event Registration
If you are using the GrowthZone Fundraiser module, you can collect donations for your fundraiser(s) during event registration. Enable Collect Donations' on the event's Attendee Setup tab, in the Overall Registration Options section. You can select one or more of your fundraisers, and select the donation receipt template you wish sent.
See Setup Overall Registration Options for instructions.
Allow Invoicing for Event Registration
If you wish to allow your registrants to request to be invoiced, you can enable Allow Invoicing' on the event's Attendee Setup tab, in the Overall Registration Options section. See Setup Overall Registration Options for instructions.
Display Number of Registrants on Event Detail Page
If you are using Version 2 of the Event Pages, the number of attendees registered for an event is automatically displayed. If you do not wish this number to be displayed, de-select the Display Number of Registrants on Event Detail Page setting under Overall Registration Options on the event's Attendee Setup tab.
Define how the System Authenticates Members for Member Pricing
If you offer both member and non-member pricing, you can define how the system will authenticate members on the event's Attendee Setup tab, in the Overall Registration Options section. See Setup Overall Registration Options for instructions.
Configure Your Registration Form Settings
By default, the registration form for an event will require name and email address (organization will be included on the form, but is not required). You may configure the fields you wish to require on the registration form and add custom fields in the Registration Form Settings section of the event's Attendee Setup tab.
- Click the
 icon in the Registration Form Settings section.
- Configure the following as desired:
- Display Address
- Require Address
- Display Cell Phone
- Require Cell Phone
- Require Additional Attendees Email
- Allow Registration Without Session Selection (may not appear if you do not have the Event Expo or the Event does not have Sessions)
- Require Company
- Require Title
- Term for Additional Attendees (e.g. Guest)
- Click Done.
Add Custom Fields to Event Registration Form
You can easily create custom fields to add to the Event Registration form. For Example, if you are offering meal choices for your annual banquet, you can gather this information from registrants via custom fields. Custom fields may also be created for your internal use, for example, tracking table numbers. NOTE: If using Registration Version 2 of the events module, custom fields may be added to specific registration types.
- Click Add Custom Field in the Custom Fields section of the Attendee Setup tab.
- If you have previously created a custom field for events, simply select it from the Use Existing Field list and click Done. If you are selecting a drop-down list, or multi-choice option, you will not have the ability to change the choices. NOTE: You can also select from the Individual custom fields you have previously set-up for your contacts. See below.
- If you are creating a brand new events custom field:
- Enter a Name for the custom field. This is used internally in the database.
- Enter a Display Name. This is the name that will be displayed on the registration form.
- Select the Custom Field Data Type. This is the type of response that you expect for this custom field. For Example: If you want to know if the attendee has any dietary restrictions, you can select the Yes No data type.
- Group/Section. N/A for Event Registration custom fields.
- The Characters Allowed option lets you define the number of characters that may be entered when a Text or Multi line text data type are selected. This must be populated.
- Configure the Properties for this custom field:
- Is for Attendees: If you wish to include this on your registration form, tick this check-box.
- Public - N/A for Event Fields
- Member Editable: N/A for Event Fields
- Required: Enable this option, if registrants must fill out this field.
- Archived: Enable this option, if you are no longer using this field.
- Is Required for Staff: Enable this option, if staff is required to complete this field, when registering someone from the back-office.
- Click Done to save the new custom field.
Edit an Event Custom Field
- For the desired event, click the Attendee Setup tab.
- In the Custom Fields section, click the
 icon in the Actions column for the desired custom field.
- Make the needed changes.
- Click Done.
Create Custom Fields specific to an Individual Registration Type
| IMPORTANT: This option is available for those using Events Registration Version 2. |
At times there may be custom fields that are only applicable to specific registration types. For Example, if you are holding a golf tournament which includes registration fees for those actually golfing (and you need to ask for their handicap), but also offer a registration fee to attend just the awards banquet (in which case you would not need to ask for the handicap). By associating the registration type to a custom field, the custom field will only display when that specific registration type is selected. When no selections are made under the Advanced Options, all custom fields created are displayed for all registration types.
- Create the Custom Field as described above.
- Click the Advanced Options check-box.
- Select the Registration Type for which this custom field should be displayed.
- Click Done.
| NOTE: A custom field may only be associated to one registration type. If you have multiple registration types that need to use the same custom field, you will need to create multiple custom fields. |
Add Individual Custom Fields to your Event Registration Page
Over time, you may be collecting the same information from your event registrants. For example, for each of your events, you may ask for dietary restrictions. By creating these custom fields as Individual custom fields, the responses provided can be stored in your database, associated with the appropriate contact. In future event registrations, this field will automatically populate, so the registrant only need fill in the answer if they wish to change it.
| NOTE: You must select "Enable Individual Custom Fields on Registration Form" in Event Settings to access Individual Custom Fields in the Existing Custom Field dropdown. This option is available for those using Events Registration Version 2. |
Pre-requisite: Create your Individual Custom Field(s). See Custom Fields for instruction.
- For the desired event, click the Attendee Setup tab.
- Click the
 in the Custom Fields section.
 - Select the desired custom field from the Existing Custom Fields. NOTE: Once the existing custom field is selected, there's no edit button like there is for an Event Custom Field.
- To include the field on your registration form, click the Is for Attendee check-box.
- If staff is required to complete this field when registering someone from the back-office, click the Is Required for Staff check-box.
- Click Done.
| NOTE: We suggest that you carefully think about the information you are collecting through these fields. Any data that's already set on the fields will populate on the registration form if an attendee is matched to a contact. This means that existing data in the field will be visible to anyone who enters that person's email address. Generally, this feature should only be used for information that doesn't change over time (e.g., whether a person uses left or right-handed golf clubs, dietary restrictions, etc...) If the field is used for personal or identifying information (e.g., a birthdate), we suggest having member registrations require a log-in to receive member pricing. If the field is for less personal information, that isn't necessary. |
Setup your Event Registration Fees
A pre-requisite to setting up your registration fees, is setup of the needed Goods & Services. Click Here for further information on setting up goods & services.
| NOTE: For proper accounting, when creating/selecting Goods & Services for your event, be sure to verify that the appropriate income, accounts receivable and deposit accounts have been selected for the goods & services. These accounts drive where the financial transactions will be reported. Additionally, registrations paid by credit card will use the default gateway set under your finance settings. If you wish to use an alternate gateway for this event, see Update Event Payment Gateway. |
Add a Free Registration Type
For events, where you simply wish people to register, but are not charging a fee, you will select the Free Registration Type.
- On the event Attendee Setup tab, click the Actions button in the Registration Types section.
- Click Add Free Registration Type.
- Enter a Name for the Free Registration Type.
- Enter the Registrations Available (0 if unlimited). This option will limit the number of free registrations available, and will not allow registration with this type when the limit has been met.
- Enter a Description for this registration type. Registrants will be able to view the description of the fee item by clicking on the fee item link on the registration page.
- Settings options - these settings allow you to define which users can register with this type of registration. This would also display the registration types on your public page.
- Select the Allow Members check-box if you want this registration type to be available to your members.
- Select the Allow Non-Members check-box if this registration type is also available to non-members. NOTE: If this option is selected for a registration fee, the registration fee will NOT be displayed for members. When selected, Is Displayed for Non-Members is automatically selected.
- Select the Is Displayed For Non-Members check-box if you wish to display this registration type to non-members, even if you have not chosen to allow this registration type for them.
- Select the Allow Staff Only check-box if you do not wish to display this registration type publicly. Only your staff users would have access to this option when registering someone from the back-office. NOTE: If this option is selected, selections for members and non-members are automatically de-selected.
- Click Done.
Add a Simple Paid Registration Fee
This option will register one person per fee item.
- On the event Attendee Setup tab, click the Actions button in the Registration Types section.
- Click Add Simple Paid Registration Fee.
- Enter a Name for the Registration Type.
- Enter the Registrations Available (0 if unlimited). This option will limit the number of free registrations available, and will not allow registration with this type when the limit has been met.
- Enter a Description for this registration type. Registrants will be able to view the description of the fee item by clicking on the fee item link on the registration page.
- Settings options - these settings allow you to define which users can register with this type of registration. This would also display the registration types on your public page.
- Select the Allow Members check-box if you want this registration type to be available to your members.
- Select the Allow Non-Members check-box if this registration type is also available to non-members. NOTE: If this option is selected for a registration fee, the registration fee will NOT be displayed for members. When selected, Is Displayed for Non-Members is automatically selected.
- Select the Is Displayed For Non-Members check-box if you wish to display this registration type to non-members, even if you have not chosen to allow this registration type for them.
- Select the Allow Staff Only check-box if you do not wish to display this registration type publicly. Only your staff users would have access to this option when registering someone from the back-office. NOTE: If this option is selected, selections for members and non-members are automatically de-selected.
- Select the Goods/Service to assign to this registration fee from the drop-down list. Click here for information on configuring goods/services. The Price will automatically be populated if it was populated when the goods/service was configured. You may change the price if needed.
- If your members can use points to purchase this registration type, enter the number of points required.
- Click Done.
Add a Table/Team Registration Type
This option should be used when the registration fee will register multiple attendees. For example, if you have a golf tournament event for which you are selling foursomes, or a dinner event where you are selling tables of eight.
- Click the down arrow on the Add Type button.
- Click Add a Table/Team Registration Type.
- Enter a Name for the Free Registration Type.
- Enter the Registrations Available (0 if unlimited). This option will limit the number of free registrations available, and will not allow registration with this type when the limit has been met. If you are setting up a registration type based on tables, this would be the number of tables available.
- Enter a Description for this registration type. Registrants will be able to view the description of the fee item by clicking on the fee item link on the registration page. Show Me
- Settings options - these settings allow you to define which users can register with this type of registration. This would also display the registration types on your public page.
- Select the Allow Members check-box if you want this registration type to be available to your members.
- Select the Allow Non-Members check-box if this registration type is also available to non-members.
- Select the Is Displayed For Non-Members check-box if you wish to display this registration type to non-members, even if you have not chosen to allow this registration type for them.
- Select the Allow Staff Only check-box if you do not wish to display this registration type publicly. Only your staff users would have access to this option when registering someone from the back-office. NOTE: If this option is selected, selections for members and non-members are automatically de-selected.
- Select the Reserve All Attendees check-box to reserve all attendees. This setting is enabled by default and ensures that all attendees for this group reservation are reserved even when names are not entered. (The system with use Additional Attendee if no name is entered. The name of the actual attendee can be added by a staff member when it is known.) In the case where a registrant is purchasing more than one group registration, they will be required to have at least one attendee name for each group purchased.
- Select a fee item from the Item list. This is the previously setup registration fee for this event. Click here for further information on setting up goods/services. The Price will automatically be populated,if it was populated when the goods/service was configured. You may change the price if needed. If you are using Benefit Tracking, you can also assign a Point value for the registration.
- Enter the number of attendees per registration in Attendees per Table/Group. For example, if you are selling tables of eight, you would enter 8.
- Click Done.
Table/Team Management
See Table/Team Management for instructions on how to manage your table/team registrants.
Add Advanced Registration Type
The advanced registration type allows you to bundle multiple items together for the registration fee. For example, you may wish to bundle together the event fee along with additional items.
- On the event Attendee Setup tab, click the Actions button in the Registration Types section.
- Click Add Advanced Registration Types.
- Enter a Name for the Registration Type.
- Enter the Registrations Available (0 if unlimited). This option will limit the number of advanced registration types available, and will not allow registration with this type when the limit has been met.
- Enter Attendees per Registration. This option allows you to include more than one attendee for this registration type. For example, if this advanced type is to be used for a golf foursome, you would enter 4.
- Enter a Description for this registration type. Registrants will be able to view the description of the fee item by clicking on the fee item link on the registration page.
- Settings options - these settings allow you to define which users can register with this type of registration. This would also display the registration types on your public page.
- Select the Allow Members check-box if you want this registration type to be available to your members.
- Select the Allow Non-Members check-box if this registration type is also available to non-members.
- Select the Is Displayed For Non-Members check-box if you wish to display this registration type to non-members, even if you have not chosen to allow this registration type for them.
- Select the Allow Staff Only check-box if you do not wish to display this registration type publicly. Only your staff users would have access to this option when registering someone from the back-office. NOTE: If this option is selected, selections for members and non-members are automatically de-selected.
- Select the Reserve All Attendees check-box to reserve all attendees. This setting is enabled by default and ensures that all attendees for this group reservation are reserved even when names are not entered. (The system with use Additional Attendee if no name is entered. The name of the actual attendee can be added by a staff member when it is known.)
- Click the
 to add the Goods/Services associated to this registration type. You will select from all previously created goods/services. Click here for information on setting up good/services. Click the
  to add additional goods/services to the registration type.
 - Click Done.
Change the order in which Registration Types are Displayed on your Event page
The order in which you add your registration types will be the order in which they display on your registration form. You may reorder these by hovering over the registration type, and dragging into the desired position.
View Registration Type Limits and Number Sold
Once registration has begun for your event, you will be able to see, at a glance, the limits you have set for your registration types, and how many, of each registration type, have been sold.
Set Up Discounts for your Event
Any event may have special discounts available and applied to all or selected fees. Discounts based on early registration, promo code, or membership type, or volume may be created for each event and applied when the discount criteria is met. Discounts are setup on the Event Attendee Setup tab.
There are 4 discount types"
- Early Registration
- Promo Code
- Membership Type
- Volume
All of the options for all of the types are the same except for the specific criteria:
- Name
- Available Starting On - Enter the date this discount takes effect.
- Ends On - Enter the date this discount is no longer valid.
- Discount Type Previously created discount types will be included in the list. Click the + button to add a new discount type. This is important for reporting.
- Discount Price Method:
- Reduce Price by Percentage - Enter the percentage by which the standard price will be discounted.
- Reduce Price by Amount - Enter the dollar amount that will be subtracted from the standard price.
- Set Price To - Enter the price that will be used instead of the standard price.
Advanced Options Applies To (Registration Type) - Selecting a registration type allows you to limit the use of this discount to that specific registration type. For example, if you have setup registration types for members and non-members, you could choose to have a discount only apply to members.
| NOTE: You can only select one registration type per discount. If you want a discount to apply to more than one registration type but not all of them, you will need to create a discount type for each one. Selecting no registration type will apply the discount to all of them. |
Total Available - Allows you to limit the number of registrations that can use this discount. Limit Per Purchase - This allows you to limit the number registrants that can use this discount type from the same registration form.
Setting Discount Criteria
Early Registration - provides a discount if a registration comes in between the Starting On date/time and the Ends On date/time
Promo Code - provides a discount if the registrant enters the code on the registration form. If selected, the registration form will automatically add a field for the code.
Membership Type - provides a discount based on the membership type of the registrant. This is a multi-select field, allowing you to use the same Discount for more than one membership type.
Volume - provides a discount if the Minimum Quantity for Discount is reached on a single registration form
Click the drop-down arrow on the Add Discount tab to select the type of discount you wish to setup.
| NOTE: The Event Discount Use Report may be used to analyze how discounts have been used for an event. Click Here for instructions on running the report. |
Add Additional Items for Sale during Event Registration
If you wish to sell additional items during the event registration process (for example you may wish to be able to sell mulligans for your golf tournament at the time of registration, or a commemorative hat), these items may be added in the Additional Items section on the event's Attendee Setup tab. Additionally, individuals who just wish to purchase an add on item, and not register for the event will be able to do so on the event registration page.
- Click the Add Item button in the Additional Items section
- Enter a Name for the additional event item.
- Select the desired Availability of the additional item.
- To allow only those who register for the event to purchase the item, select For Attendees.
- To allow individuals to purchase the item without registering for the event, select For Overall Registration. NOTE: When For Attendees is selected, the additional item will only be displayed once a registration option has been selected and will be available for each person on the registration form.
- Enter a Description of the item.
- Select the desired Goods/Service from the drop-down list.
- Enter, edit, or accept the default Price.
- Select the Is For Members check box to allow members to purchase this item.
- Select the Is For Non Members check box to allow non-members to purchase this item.
- Select the Is Active check-box to allow the item to be displayed on the event registration form.
- If you wish to limit the number of additional items you have available to be sold, enter the number in the Items Available (0 if unlimited - Version 2 Only). Each additional item can have its own specific limit set. Once the limit is reached, the item will be marked with “sold out” on the event registration form.
- Click Done.
Customize Registration Instructions and Confirmation Messages
You can now provide general registration instructions for your event, plus add additional instructions to the actual registration area.
To add general registration instructions that appear at the top of your event page/registration page, please see Adding Event Description and Registration Instructions.
Specific Registration Instructions
On the Event Attendee Setup page, you can customize the instructions by editing the Instructions and Confirmation Messaging.
The "Event Registration Instructions" will give specific instructions regarding registration.
These instructions appear directly above your registration options.
Event Confirmation Messaging
You can also customize the confirmation displayed after registration is completed by editing the Event Confirmation Message.
It displays on the registration confirmation page.
The confirmation message is also added to the Confirmation Email registrants receive following their registration.
Event Management-Invitations & Other Communications
The Events Module provides a variety of ways to manage your event attendees, starting with sending invitations all the way through your post-event reports. Templates have been designed to help you easily communicate new events to your members, resend emails, send reminders, etc.
Send Event Invitations
- Click on the Actions ribbon on the right hand side of any page within the event
- Click Send Event Invite Email.
- This will trigger the Send Email window with the Event Invite template already selected.
The use of merge fields personalizes the invite for each recipient, and provides information specific to the event that you are working with. You may edit the template to meet your specific needs. Refer to Adding Database Fields for information on adding database fields to a template.
If you want to schedule the email to be sent at a future date, enter a date in the Delay Delivery Until text box.
If you have previously sent an Event Invite, clicking Ignore Recipients that have Registered, Declined, Been Invited,... check-box will limit the email to those individuals who have not previously received the invite or responded in someway to a previous invitation.
Download list of Invitees
All invitees are stored and available via a spreadsheet download, found under orange actions button on the Event's Attendees tab.
- Select the desired event.
- Click the Attendees tab.
- Click the orange action button and click Download Invitees.
Re-send a Previously Sent Event Invite
From any tab in the event,
- Click the Actions button.
- Click Re-send Event Invite.
-
- The software will look to your previously sent email, and create a group of those that have "Not Responded Yet", as shown in the image above.
- The Send Email screen will automatically populate the subject line with "Event Invite", you may change this to better describe your event.
- The message will default to the Event Invite template, used when you sent the initial invite.
-
- Edit the template to meet your specific needs.
- Click Done to send the email.
If you want to schedule the email to be sent at a future date, enter a date in the Delay Delivery Until text box before clicking Done.
Re-send a Registration Confirmation
Go to the Attendees tab of your event.
- Find the attendee that is requesting the confirmation email.
- Click the gray "Actions" button to the far right.
- Select "Resend Confirmation".
Send a Manual Event Reminder
| NOTE: You can also setup an event reminder to be sent automatically. See Setup an Automatic Event Reminder. |
From any tab within the event,
- Click the Actions button.
- Click Send Event Reminder.
A default template has not been created for Event Reminders. You can create the message on the Send Email screen, or, if you have a standard Event Reminder email that you send out, you may create a template. See Create and Manage Email Templates for instruction on creating email templates.
Send Email to Specific Registration Types
From anywhere in the system you can send an email:
- Begin typing the event name in the TO field; this will pop up a number of dynamic lists to choose from. You will now see the registrants for specific event registration types listed as dynamic lists.
| Note If many of your events have the similar names, staff members can start by typing Event Name + SPACE + Registration Type Name to narrow the search. Also, if using specific event merge fields, send your email from within the event itself. |
- Select your desired event + registration type and compose your email (or use a template).
See Sending an Email for further instructions.
Send Email to Event No-Shows
- Select the event Communication tab.
- Click the Actions button.
- Click Send Email to No Shows. The Send Email screen will be displayed.
You can also send an email to event no-shows by sending an email from the Communications module or the Quick Actions menu. Once the Send Email window is open, begin typing the name of the event in the To: box. You will see several options available, including a selection for emailing "No Shows".
See Sending an Email for further instructions.
Other Email Options
Note that within the Actions Ribbon of an event there are also options to
- Send Email to Registrants
- Send Email to Actual Attendees
- Send Email to Sponsors (If you have the Sponsors/Ads module), and
- Send Email to Exhibitors (If you have the Event Expo module)
All of these options work the same way as Send Event Reminder in that the system will determine who the recipients will be based on their registration status.
Manage Event Registrations
Technically, an event registration consists of attendee information and financial information related to the registration. While they are tightly entwined, we've separated them on two separate tabs to make it easier to manage. You can see in this image that while each tab has some overlapping content, the majority of the information is unique to either the attendee him/her self or the financial details, depending on the tab:
| NOTE: As with most of the tables within the software, clicking on the column header will sort the table by that column. |
Managing Event Attendees
The event Attendee tab will contain important information about the attendee, including the Registration Type and documentation of any Additional Items purchased. Each column in the table is described below.
| Did you know...Records for event attendees that are not contacts in your database are still stored in the database. Any invoices or payments for these contacts would be located on their Billing tabs. See View Contacts - Event Attendees Potential Contacts for further information. |
You can use the Search field, Show Only drop down, or Customize Results at the top of the table to find specific registrants or registrants that meet a certain criteria.
You can add or remove columns from the displayed list, by clicking the ![]() and selecting the columns you wish to display in your list.
and selecting the columns you wish to display in your list.
The orange Actions button in the top right corner provides a short cut to adding a registration and a variety of reports:
Reg. Id
- Clicking on the Reg. Id of a registrant will give you a snap shot of the registration and an opportunity to add any comments. These comments are for internal-use only.
Change the Name of an Attendee
- Clicking on the Name of a registrant brings up the Edit Attendee window, allowing you to edit contact information of the attendee, (which you may need for billing or other event-related communication), as well as populate any custom fields set up for the event. This function is useful when you are selling tables of 8, and need to update the Additional Attendee(s).
| NOTE: Any edits you make in this window will be reflected in the Contact Record. |
Organization
- Simply a display of the registrant's organization. If the registrant is a non-member and did not enter an organization on the registration form, this will be empty.
Event Status
- The event status column displays the registrants current status related to the event. It is a drop-down so registrants can be marked as Attended, No Show, or Unknown right from the Attendee tab.
Invoice #
- Also available on the Attendee Purchases tab, clicking on the Invoice # brings up the Edit Invoice window. This column is color-coded so you can see at a glance which invoices have been paid (green) and which are unpaid (red). If there is not an Invoice # in this column there is no invoice, indicating the registrant selected the Pay at the Door/Please Invoice Me option and they have not yet been invoiced, or it is a free event.
In the Edit Invoice window you can make various edits to the invoice itself. If a payment has been made you can also view the payment history by clicking on the Reference Number in the Payment History section or Download Payment, Send Email, or Create Refund, all available from the Actions button in the Actions column in the Payment History If no payment has been made, the Payment History section will be empty.
- Select the event's Overview tab.
- Click the
 icon in the General Information section.
- Select Cancelled from the Status list.
- Click Done.
Matching Registrants to Contacts
Between the Additional Items and the Actions columns there is an unnamed column that may contain an icon for some registrants. If there is NOT an icon, it means the system recognizes both the Individual and the Organization as existing contacts. If there IS an icon, it means something about the registration doesn't match the data in the system. Clicking on the icon allows you to view the information and make a decision about the registrant.
- Update Organization The Organization the registrant entered on the registration form is different than what the system has for this person.
- The system has Oak Golf Club and the registrant entered Oak Gold; or
- The system has the registrant affiliated with West Side Auto Sales but when registering he entered his side business, Robert J Creations'; or
- The registrant entered the name of an Org that is in the system, but she is not connected to it
- Click the
 icon.
icon.
- Select from the following options:
- Use suggested - We've found a possible match - If the software is able to find a suggested match, a table of matches from the database it will be displayed. Click the radio button for the desired organization to associate the registrant to that organization. NOTE: If there are no "suggestions" then this option will not be displayed.
- Find existing - Search your database - if a suggested match is not displayed, or is not accurate, select this radio button to search for the desired organization. A type ahead text box will be displayed. Begin typing the name of the organization you wish to locate.
- Create new - Create a new organization record - If the registrant's business is brand new to your database, click this option. A new business will be added using the Company name provided by the registrant.
- Click Save.
- Click the
Match/Add Event Attendees to Your Database
As people register for events, the software will attempt to match those registrants to existing contacts in the database. If the system is unable to match, icons will be displayed on the attendee tab to notify you that you have contacts information that may need updating, possible matches to individuals or businesses, or new contacts that need to be created in your database.
When an individual’s contact information (name, primary business, phone, email, etc.) is updated, the system will update any future event registrations linked to this contact with the new information; if an attendee changes companies or moves, their information will be updated on the event so that when the association prints nametags or send out mail, the nametag will be correct and items will go to the correct address.
| IMPORTANT: Contact information updating only works for attendees who are linked to a contact in the system and will only function when members are required to sign in to register, and is a good reason for staff to be diligent about matching attendees to contacts. |
On the event Attendee tab, a different icon will be displayed for each of the following scenarios:
- Updating an organization - The Update Organization icon
 will be displayed if someone has changed organization, but everything else (name, email, etc.) matches. For Example: Oaks Golf vs Oak Golf Club.
- Use the following procedure to update the organization:
- Click the
 icon.
icon.
- Select from the following options:
- Use suggested - We've found a possible match - If the software is able to find a suggested match, a table of matches from the database it will be displayed. Click the radio button for the desired organization to associate the registrant to that organization. NOTE: If there are no "suggestions" then this option will not be displayed.
- Find existing - Search your database - if a suggested match is not displayed, or is not accurate, select this radio button to search for the desired organization. A type ahead text box will be displayed. Begin typing the name of the organization you wish to locate.
- Create new - Create a new organization record - If the registrant's business is brand new to your database, click this option. A new business will be added using the Company name provided by the registrant.
- Click Save.
- Click the
- Match to Contact: The Match to Contact
 icon will be displayed when there is a potential or no match in your database.
- Click the
 icon.
icon.
- Select from the following options:
- Find existing - Search your database - if a suggested match is not displayed, or is not accurate, select this radio button to search for the desired organization. A type ahead text box will be displayed. Begin typing the name of the organization you wish to locate. When selected the invoice for this registration will be associated with the selected organization.
- Create new - Create a new contact record - If the registrant is brand new to your database, click this option. A new individual contact will be added to your database as a non-member.
- Click Save.
- Click the
- Update Contact: The Update Contact
 icon will be displayed when a match is found for some of the data submitted during registration (email or name).
- Click the
 icon.
icon.
- Select from the following options:
- Update contact - Select fields that should be updated in the contact record - if this option is available, a table will be displayed from which you may select the fields you wish to update in the database.
- Create new - Create a new contact record - if this option is selected, a new contact based on the Data Submitted from Registration will be added to your database.
- Click Save.
- Click the
Download Attendees
The Download Attendees function provides further details, where available, of your attendees. This is also a way by which you can view attendee custom fields.
- For the desired event, click the Attendees tab.
- Click the orange Actions button.
- Click Download Attendees.
- Select the desired Attendee Status.
- Click Download.
Table/Team Management
If your event has been set up with a table/team registration type, you can assign attendees to tables or teams.
- On the Attendees tab, click the orange "Actions" button and select "Table/Team Management".
This will open the Table/Team Management window.
- If a table or team has registered using the table/team registration type, they will automatically be assigned to a table/team. You can edit the name of this table/team by clicking the pencil icon to the right of the table/team name.
- You can manually create a table/team by clicking the "Add a Table/Team" button.
Type the name of the table/team, select the table/team registration type in the dropdown, and click Done.
- If someone has registered using a simple paid registration type, they will display in this window in the "Unassigned Attendees" column.
To move someone from Unassigned to a table/team, click, drag, and drop them to the desired table/team.
You can also click, drag, and drop attendees from a table/team back into the Unassigned column.
- The tables/teams show you how many are allowed in a table/team, and how many are assigned to each table/team.
Even if your event does not allow people to register their own table/team, you still need to create a Table/Team Registration Type to enable the Table/Team Management. You can then manually set up your tables/teams and move your attendees into and between the tables/teams as needed.
| Note The Table/Team names will be included in the "Download Attendees" file, and are tied to a "Table Name" merge field so can be easily added to name badges. |
Cancel an Event Registration
- For the desired event, click the Attendees tab.
- Click the Actions button for the attendee you wish to cancel.
- Click Cancel registration.
- Click Done.
Please note that canceling a registration will have no effect on an invoice that is paid in full; it is up to your organization as to whether you have a no refund policy, issue a refund for any/all monies received, or create a credit memo to apply toward a future event.
IMPORTANT: If the registrant has an open invoice:
|
Postpone an Event - Automated
It is unfortunate, but at times, you may find it necessary to postpone an event. The Postpone Event automated features allow you to easily:
- Update the event title
- Update the event description
- Communicate to event registrants
- Disable on-line registration
- Turn off the reminder email (if applicable)
| See it in Action: Postpone an Event - Automated] |
- For the desired event, click the large actions icon.
- Click Postpone Event.
- If you wish to update the event title, select Update Event Title. By default, ***Postponed*** is appended to the event title. You can edit this if needed.
- If you wish to update the event description, select Update Event Description. By default, **Postponed** is appended to the event description. You can edit this if needed.
- If you wish to send an email to the event registrants, select Send email to all registered attendees. You can then enter the email text, or, use the Event Postponement Notice. NOTE: If you select the template, you will still have the opportunity to edit prior to sending to registrants. To edit the template for all future use, see Edit a Default Email Template.
- Click Done.
- Review the details on the Attention screen. Listed are the choices you made when postponing the event. In addition, the status of the event will be updated to postponed, the event reminder (if applicable) will be disabled, and on-line registration will be disabled.
- Click Yes to confirm, click No is you wish to make changes.
- If Yes, your choices will be activated, and the status of the event will be updated to postponed, the event reminder (if applicable) will be disabled, and on-line registration will be disabled.
| NOTE: Registrations are NOT cancelled, allowing you to retain the registrations if, when, you update the date of the event. |
Cancel an Event - Automated
It is unfortunate, but at times, you may find it necessary to cancel an event. The Cancel this Event automated process allows you to:
- Cancel registrations for all registrants
- Credit registrants
- Mass write-off any unpaid invoices
- Send an email to registrants
- Disable online registration
- Disable 48 hour reminder (if applicable)
| See it in Action: Cancel an Event - Automated] |
- For the desired event, click the large actions icon.
- Click Cancel Event.
- On the Cancel Event, select desired options:
- Choose how you wish to manage Attendee Purchases. Select Do Nothing: leave transactions as they are or Write off open invoices; create credits for paid invoices.
- Click Update Event Title to update the title of your event. By default **Canceled** will be appended to the title. You can change this if needed.
- Click Update Event Description to update the description of the event. By default **Canceled** will be appended to the title description. You can change this if needed.
- Click Send email to all registered attendees if you wish to notify all registrants. You can then enter the email text, or, use the Event Cancellation Notice. NOTE: If you select the template, you will still have the opportunity to edit prior to sending to registrants. To edit the template for all future use, see Edit a Default Email Template.
- Click Done.
- The Attention confirmation screen, summarizes your choices and actions that will be performed. Review and click Yes to proceed with the event cancellation, or click No if you wish to go back and make changes.
Cancel an Event - Manual
| See it in Action: Cancel an Event] |
It is unfortunate, but at times, you may find it necessary to postpone or cancel an event. Here are some best practices for these situations:
- Update the Event Title/Description: You may simply wish to add "Postponed" or "Cancelled" after the name of the event. It might also be a good idea to add some further information in the description. Perhaps you are planning simply to postpone and want to let the public know this. The title and description can be updated on the event's Overview tab.
- Turn off on-line registration: To ensure that no additional registrations are received for the event, disable registration. Go to the Attendee Setup tab, and click the pencil icon for the Overall Registration Options section; when the edit window opens, de-select the "Enable Registration" option, and click "Done".
- Notify Registrants: Email your registrants as soon as you can, and if feasible, give everyone a call. You may also want to consider using social media and local news outlets to supplement your communications. To send an email to all the event registrants, click the purple Actions button on the far right and select the "Send Email to Registrants" option. Select a template if you've set on up, or type in your message. Include any links or documents pertinent to your message. Your email should be upbeat, and include details about refunds, future event date, etc. When your message is ready, select the "Send" option.
- Turn Off Event Reminder: If you have setup a reminder to automatically be sent to registrants, best practice is to turn off the reminder. The reminder may be turned off on the event's Overview tab, in the General Information section. NOTE: If you have edited the title and the description of the event, these changes would be included in the reminder if you have forgotten to turn off the reminder.
- Cancel the event: if you do decide it's best to completely cancel the event, you can change the status of the event; on the Overview tab in the General Information section, click the pencil icon and change the status of the event to "Cancelled".
Additionally, you may want to set the status of your registrations to "Cancelled". This is optional, and can only be done by selecting "Cancel Registration" for each attendee.
Issue Refund for a Cancelled Event
| See it in Action: Issue a Refund for a Cancelled Event] |
If you have paid invoices and you have decided to issue refunds, you can accomplish this directly from the Attendee Purchases tab of the event. Click the Actions button in the Actions column, and select "Create Refund". Add a note to the refund, and if needed, you can modify the amount to refund either a portion of the payment, or the full payment. Credit card refunds will be automatically processed through your GZ payment processor, but if you've already processed a credit card refund outside of GrowthZone directly through your processor, you can select the "Refund Already Issued by Processor" option. This will record the refund in the GrowthZone software, without a refund being issued back to the purchaser on the processor side.
Refunds for check payments will need to be manually managed according to your business processes for cutting checks/returning funds. You may also issue a credit toward a future event or invoice.
More details on issuing refunds can be found here.
Issue a Credit for a Cancelled Event
Due to unforeseen circumstances, you’ve had to cancel an event. You’re not sure if you’re going to be able to reschedule, and your organization has chosen to not issue refunds. If your registrants have paid and you wish to give them a credit toward a future event or invoice, you can issue them a credit memo. You can do this either from a contact record via the billing tab, or through the Billing module's Credit Memos tab.
| See it in Action: Issue a Credit Memo for a Cancelled Event] |
Credit memos can be applied to any open invoice; it is up to your organization to decide if you wish to restrict their use in any way.
| Note Credit memos currently cannot be applied by the member; only your organization staff will be able to apply them to a future event or invoice. |
More details on issuing credit memos can be found here.
Event Sponsor Management
Using the Sponsors/Ads module in conjunction with your events allows you to generate additional revenue and have GrowthZone do a lot of the work for you—-win win! To get started, you will setup Sponsorship Benefits. Once created, you will be able to use the benefits through all of your events.
| NOTE: The Sponsors/Ads module is required to use this functionality. |
Set up Sponsorship Benefits
Benefits consist of any combination of the Sponsor Name, Logo, and/or URL appearing on the Event Page, Emails, and/or Registration page. For example, perhaps a Bronze sponsor has only their Name on the Event Page, the Event Emails, and the Registration Page; the Silver sponsor has their Name AND Logo on all three, and the Gold sponsor gets their Name, Logo, AND url on all three. You can create any combination; the only caveat is that if you want to display the url you must also display the name and logo.
- Click Setup in the left navigation panel.
- Click Event Sponsorship Benefits in the Events section. Any existing benefits will be displayed.
- Click the Add button
 to add a benefit
- Enter a Name for the the new sponsor benefit.
- Configure desired benefits:
- Name on Event Page
- Name on Event Emails
- Name on Registration Page
- Logo on Event Page
- Logo on Event Emails
- Logo on Registration Page
- Sponsor Url on Event Page
- Sponsor Url on Event Emails
- Sponsor Url on Registration Page
- Determine the Display Order of this Benefit. For example: Assuming Gold sponsors are displayed before Silver, and Silver before Bronze, Gold would have a Display Order of 1, Silver would be 2 and Bronze would be 3.
- Click Done.
Setup Sponsor Registration Types for an Event
- Click Events in the left-hand navigation panel.
- Click on the Sponsor Setup Tab. Any existing Sponsor Registration Types will be displayed.
- Click the Orange Plus button
 to add a Sponsor Registration Type
- On the Add Sponsorship Type screen, configure the following:
- Sponsorship Type: Enter a name for the new sponsorship type. (Gold, Silver, Bronze...)
- Description: Description of the Sponsorship Type, this in internal only
- Position: Confirm the Order this sponsorship will be (Should be the same as the Sponsor Benefit it will be associated with in a later step)
- Sales Goal Quantity: Optional and internal. If you have a goal of X number of sponsorships of this type, enter that number here and the system will help keep track for you.
- Maximum Quantity: Optional and internal. If you are limiting the number of this sponsorship type for this event, enter that number here.
- Is Public (Version 2 Only): Select this option if you wish to include this sponsorship fee on your event registration page.
- Fees
- Item: Select the Goods & Service Item this Sponsorship Type will be using
- Quantity: Enter the default quantity for this item.
- Price: Enter the price for this Sponsorship Type. The price set when the goods/service was created will be displayed by default. You can change this as needed.
- Hide on Invoice: Check this box if the sponsorship is part of a bundle and you do not want it to appear as a separate line item on the invoice. The amount will roll into another invoice item and still be included in the total.
- (Optional)Click on the orange plus sign
 to add another fee item to this sponsorship type
- Sponsor Benefits
- Click Done.
| NOTE:: It may be helpful to name your Sponsor Benefits the same as your Sponsor Types, to help match up at this stage. |
Manage Event Sponsors
Register Event Sponsors
Sponsors can be registered for events through the back-office, or, if you have enabled Is Public (Version 2 Only) for the sponsor registration, sponsors can register via your event registration page. To register a sponsor from the back-office:
- Go to the Sponsors tab of the Event. Any sponsors already registered will appear here.
- Click the orange action button and select Add Sponsor.
- On the Add Sponsor window, fill in the fields with the relevant information:
-
- Sponsor Name: The name of the sponsor. This contact must already be in your database.
- Select the Address and Email if it does not populate automatically.
- Registration Date: Optional. Enter the date the sponsor registered. (can be backdated)
- Sponsorship Level: Select the Sponsorship Type they are purchasing. The choices available will be those that you have created on the Setup Sponsors tab.
- Description: This will default to the description you entered when you created the Sponsorship Type. It can be edited
- Qty: This will default to the quantity you entered when you created the Sponsorship Type. It can be edited.
- Price and Total are populated automatically based on the Qty and the Price you entered when you created the Sponsorship Type. They cannot be overridden.
- Message This message will appear on the invoice
- Internal Memo This is a note to yourself or your staff regarding this sponsor. It is not required and is not public.
- Sponsor Url The URL of the contact (if populated in the contact record), will automatically populate this field. It can be removed or edited. If it is edited it does not impact the contact record.
- Sponsor Logo The logo of the contact (if populated in the contact record), will automatically populate this field, it can be removed or edited. If the contact does not have a logo, hover over the logo image, and click the
 to upload an image. The logo size recommendation is 400px wide by 200px high.
-
- Click Done.
Cancel an Event Sponsor
- For the desired event, click the Sponsors tab.
- Click the
Manage your Exhibitors
If you are using the Expo module, you can add and manage exhibitors to your events on the Event page. The Expo module allows you to easily manage every expect, including:
- Creating your exhibitor registration and booth options
- Accept on-line exhibitor registrations
- Manage payments for exhibitors
- Assign booths, and other exhibitor needs
- Manage communications with exhibitors
With the release of Exhibitors Version 2, we have greatly simplified the process of setting up exhibitors in an event. Be default, any new event will automatically use Exhibitors Version 2. Existing events will have the option to switch from Version 1 to Version 2 as shown below. Switching an event from Version 1 to Version 2 will integrate exhibitor registrations onto the event registration page, as well as updating the Exhibitor Setup tab to the new version as detailed below.
| IMPORTANT: If you switch an event from Exhibitor Version 1 to Version 2, IT CANNOT BE SWITCHED BACK. |
Version 1 Exhibitors
Initial Setup
If you consistently offer the same booth types for your exhibitors, you can configure these ahead. This allows you to define booth configuration types, sizing and style of booth, as well as define your booth numbers. NOTE: The booth configurations, once setup, will be available any time you are setting up exhibitors. The booth types will then be available for selection when setting up your event registration page. Alternately, you can create the booth types on the fly setting up the event.
- Click Setup in the left-hand navigation panel.
- Click Booth Configurations in the Events section. A list of booth configurations you have previously setup for your organization will be displayed.
- Click the Add button to add a new configuration.
- Enter a Name for the booth type. The name will be included on the exhibitor registration form. A name may be something indicating the size and other characteristics of the booth.
- Enter a Description of the booth type. This can also be included on your exhibitor registration form.
- Select a Venue for the booth type. This indicates the location of the booth. If you have previously created venues, you may select one from the drop-down OR click the + button to add a new venue.
- Booth Styles/Inventory: click the orange plus icon to add new booth styles and the number of each available.
- Enter the Starting Number. This is the first booth number of this configuration type.
- Enter the Ending Number. This is the last booth number of this configuration type.
- Enter the Width and Height of this configuration type.
- Enter the Style of this configuration type.
- Minimum Quantity per Exhibitor - Enter the minimum number of this configuration type that an exhibitor may register for.
- Maximum Quantity per Exhibitor - Enter the maximum number of this configuration type that an exhibitor may register for.
- Click Done.
- Repeat steps above to add additional configurations.
- Once all configurations have been added, click Done.
Setup Exhibitor Registration Page
| NOTE: The Exhibitors options will only be displayed if you have selected "Event has Exhibitors" when the event is first setup. |
- On the Event page, click the Exhibitor Setup tab. NOTE: The Exhibitors Setup tab will only be displayed if you have selected "Event has Exhibitors" when the event is first setup.
- Configure your Exhibitor Registration Optionsby clicking the pencil icon for Exhibitor Registration Options.
-
- Enter a Registration Start Date: This is the date you wish to open registration for your exhibitors.
- Enter a Registration End Date: This is the date that registration will close for exhibitors.
- Select an Exhibitor Directory to be used for the exhibitors. You can add a new directory by clicking the + button. See Setup Your Directories for instructions on creating a directory of your exhibitors.
- Select your Terms/Conditions: If you exhibitors must accept terms and conditions, select previously created terms/conditions for the list OR click the
 and add new terms and conditions.
 - Enable Registration: Click the check-box to enable on-line registration.
- Allow Invoicing: Select this option to allow the exhibitor to request to be invoiced.
- Allow Logo: Select this option to allow the exhibitor to upload a logo when registering for the event.
- Click Done.
-
- Configure Exhibitor Types: This function allows you to setup your exhibitor packages.
- Click the + icon to add a new Exhibitor Type.
-
- Enter a Name for the Exhibitor Type - this name will be displayed on your web-page.
- Enter a Description of the Exhibitor Type - the description will be displayed on your web-page.
- Enter the Total Quantity of this Type - this is the total number of this type of booth. The software will track the number available/sold, and close sale of this type when total quantity is reached.
- Included Staff Personnel: This section allows you to define the number of attendees allowed with the exhibitor registration, as well as the number of extra personnel that can be included. The Staff Registration Type is the cost of additional personnel.
-
- Select a Staff Registration Type from the drop-down list. This allows you to assign the fee item, and the price to be added to the base price of the exhibitor registration. NOTE: Registration fees may be added on the Attendee Setup tab for exhibitor type configuration, or you may click the
 to add a new registration type. Refer to Setup Your Event Fees for further instruction on setting up fees.
 - Enter Staff Personnel Included with Exhibitor Registration (0 if unlimited): This setting allows you to limit the number of personnel the exhibitor can include as attendees. If set to 0 there is no limitation. If you wish, you will be able to offer the option to charge for additional attendees.
- Extra Allowed with Purchase: This setting allows you to limit the extra staff that may be added to an exhibitor registration.
- Select a Staff Registration Type from the drop-down list. This allows you to assign the fee item, and the price to be added to the base price of the exhibitor registration. NOTE: Registration fees may be added on the Attendee Setup tab for exhibitor type configuration, or you may click the
- Base Fees: This section allows you to define the base fee for the exhibitor registration.
-
- Select a previously configured fee item from the Item drop-down list.
- Enter a Description of the fee item (Optional)
- Edit and/or Enter the Price of the fee item.
- Booth
- Select a Booth Type from the drop-down list. If needed, click the
 to add a new booth type, or click the
  icon to edit an existing booth type. See Exhibitors - Initial Setup for information on configuring your booths.
- Select a Booth Type from the drop-down list. If needed, click the
-
- Setup Exhibitor Custom Questions: This option allows you to add custom fields to the exhibitor registration page.
- Click Add Item.
- Enter a Name for the field. This is the name that will be displayed in the back-office.
- Enter a Display Name for the field. This is the name that will be displayed on the exhibitor registration form.
- Select the Data Type. See Custom Fields for further information on data types.
- Enter a Description: This will be displayed on the Exhibitor registration page, and provides a way to clarify the question you are asking.
- Enter Characters Allowed: This option is only displayed if Text or Multi-text is selected, and allows you to limit the number of characters entered. This field MUST be populated.
- If the registrant must fill in this field, click the Required check-box.
- If your staff must fill in this field, when registering someone from the back office, click the Required For Staff check-box.
- If the custom field should only be displayed for certain registration types, select the registration types from the Display Only for this Exhibitor Type list.
- (Optional) If the custom field Data Type is set to Yes/No an additional field will be displayed Saleable Item. This option allows you to collect a fee if the exhibitor answers yes. For Example, if your custom field is internet access, for which you charge an additional fee, select the goods/service from the list.
- Click Done.
Version 2 Exhibitors
| See an Overview of Exhibitors Version 2! |
With the release of Exhibitors Version 2, we have greatly simplified the process of setting up exhibitors in an event. Be default, any new event will automatically use Exhibitors Version 2. Existing events will have the option to switch from Version 1 to Version 2 as shown below. Switching an event from Version 1 to Version 2 will integrate exhibitor registrations onto the event registration page, as well as updating the Exhibitor Setup tab to the new version as detailed below.
Switching to Exhibitor Version 2
To utilize the new Exhibitor Version 2 functionality in an existing event, you can switch your Exhibitors Version to Version 2.
| IMPORTANT: If you switch an event from Exhibitor Version 1 to Version 2, IT CANNOT BE SWITCHED BACK. |
- To switch from Version 1 to Version 2, go to the event's Overview tab and click the orange pencil icon
 for the General Information section.
| NOTE: The event must be using Registration Form Version 2; you will not see the option to switch Exhibitor Version if Registration Form is set to Version 1. |
- In the Exhibitor Version dropdown, select "Version 2".
- Click "Done".
Exhibitors - Registration Options
Set up exhibitor-specific registration options.
- Click the Exhibitor Setup tab
- Click the pencil icon
 for the Exhibitor Registrations Options section. These selections are optional; if no options are set, exhibitor registrations will use the Attendee Setup options.
- The following options are available:
- Registration Start Date (Optional)
- Registration End Date (Optional)
- Exhibitor Directory: You can select an existing directory, or create a new one by clicking the grey plus icon
 . (Optional)
 - Terms/Conditions: You can select an existing terms and conditions, or create a new one by clicking the grey plus icon
 . (Optional) (NOTE: if Terms/Conditions are selected, they are required to be accepted by the exhibitor before registration can proceed)
 - Enable Online Registration: this will add your Exhibitor registration types/options to your overall event registration page. (Optional) Leaving this unselected will only allow exhibitors to be added via the back office by staff.
- Venue Floor Plan: You can upload an image file (.jpeg, .jpg, .png, .gif, or .bmp) of your venue layout. Recommended size of 1000 pixels wide and 72dpi minimum. (Optional)
- Make any adjustments/selections as needed and click Done.
Exhibitor Types
Here you set up your exhibitor registration types. Similar to Attendee Registration Type.
- Click the orange plus icon
 .
. - In the Add Exhibitor Type window, complete the following:
-
- Name (Required)
- Total Quantity of this Type: this allows you to limit the number of booths of this type available. (Optional)
- Description: additional description of the booth/exhibitor type. (Optional)
- Staff Registration Type: Select the registration type used to register booth staff as attendees. Click the grey plus icon
 to create a new registration type if needed. (Required)
 - Personnel Included in Price: Specify how many attendees are to be included in the exhibitor registration. (Required)
- Base Fees: Click the orange plus icon
 and select the good/service item(s) for the exhibitor registration. Adjust the pricing if needed. (Required)
 - Booths: Click the orange plus icon
 to specify the booth number(s) for the exhibitor registration type here. Single booth numbers can be entered by using the same number for both "Starting Number" and "Ending Number". When registering, exhibitors will have the ability to look at a venue map and select a booth number from the range specified here. When a booth number is taken, it is removed from the available range so no two exhibitors may register for the same booth.
-
- Complete all required fields and click Done.
Custom Fields
If you have additional questions or options for your exhibitors to select, you can set up custom fields to include in their registration.
- Click the orange plus icon
 .
. - In the "Add Event Exhibitor Custom Field" window, complete the following:
-
- Field Area: if setting up a new custom field for this event, select "Event Exhibitor". (Required)
- Existing Custom Field: if you are using an existing custom field, make your selection here. (NOTE: only custom fields of type Event Exhibitor are available to select.) Selecting an existing field will remove the "Field Area" option from the window and will populate the remainder of the fields with the selected field's properties , greying out any changes to the options as shown below:
-
- Name (Required if adding a new custom field)
- Display Name: this is what will display out on the exhibitor registration form. (Required if adding a new custom field)
- Description: Any additional information you wish to display about this field on the exhibitor registration form. (Optional)
- Custom Field Data Type: Select the type of data you wish to collect in this field. For more information on custom field data types, see Custom Fields. NOTE: you cannot change a custom field's data type once the custom field has been saved/after you click "Done". Be sure to select the correct data type! (Required if adding a new custom field)
- Characters Allowed: Limit the number of characters input when using a Text or Multi line Text data type. If you select a different data type, this field is no longer displayed. (Optional)
- Properties - Define the properties for the custom field:
- Public: Select this check-box if you wish this field to be displayed for the public. This will allow the field to be displayed in the InfoHub, Directories and for use in membership applications.
- Member Editable: Select this check-box to allow users to edit this custom field in their hub profile. If a custom field is to appear in the hub, but is not to be editable, you need only check the property Public.
- Required: Select this check-box to make this field required.
- Archived: If you no longer wish to use this custom field, selecting this check-box will hide the field from being used in the back office, but historical data will be maintained.
- Is for Attendee: If you wish to include this on your registration form, tick this check-box.
- Is Required for Staff: Enable this option if staff is required to complete this field when registering someone from the back-office.
-
- Click Advanced Options to display the Applies to Exhibitor Type (Version 2 Only) option. This allows you to restrict the custom field to a specific exhibitor registration type if needed. (Optional)
- Click Done.
Additional Items
If you wish to sell additional items during the event registration process (for example you may wish to be able to sell wifi access, or need to charge for hardwired internet drops to a booth), these items may be added in the Additional Items section on the event's Exhibitor Setup tab.
- Click the Add Item button in the Additional Items section
- Enter a Name for the additional exhibitor item. (Required)
- Enter a Description of the item. (Optional)
- Select the desired Goods/Service from the drop-down list. (Required)
- Enter, edit, or accept the default Price. (Required)
- If you wish to limit the number of additional items you have available to be sold, enter the number in the Items Available (0 if unlimited - Version 2 Only). Each additional item can have its own specific limit set. Once the limit is reached, the item will be marked with “sold out” in the exhibitor registration. (Optional)
- Select the For Members check box to allow members to purchase this item.
- Select the For Non Members check box to allow non-members to purchase this item.
- Select the Is Active check-box to allow the item to be displayed on the event registration form.
- Select Sell Item as Yes/No option to only allow the ability to select or deselect the additional item on the exhibitor registration (will not allow a quantity selection).
- Click Done.
Instructions and Confirmation Messaging
If you have exhibitor-specific registration instructions, or wish to customize the confirmation page after exhibitor registration, you can click the orange pencil icon ![]() to customize those messages.
to customize those messages.
- Exhibitor Registration Instructions: these instructions will display right above the Exhibitor Registration options on the event registration form.
- Exhibitor Confirmation Message: This is only used for Version 1 exhibitor registrations. If you are using version 2 exhibitor registrations, all attendees and exhibitors will receive the attendee confirmation from the Attendee Setup tab.
Manage Exhibitor Registrations
The Exhibitors (Beta) will display a list of registered exhibitors.
Add an Exhibitor from the back-office
- For the desired event, click the Exhibitors tab.
- Click the orange actions button, and select Add Exhibitor.
- Complete the exhibitor registration form.
- Click Submit.
Assign Exhibitor Booth Number
The Booth Type associated to an exhibitor's registration fee defines the booths available and the number of inventory. Booths are NOT automatically assigned when an exhibitor registers.
To assign a booth number (and remove it from the inventory):
- For the desired event, click the Exhibitor tab.
- Click the hyper-linked name of the exhibitor in the Name column.
- Scroll to the Booth Preferences section.
- From the Booth Configuration list, select the desired booth number.
- Click Done.
Cancel an Exhibitor Registration
In the event an exhibitor cancels:
- For the desired event, click the Exhibitor tab.
- Click Actions in the Actions column for the exhibitor you wish to cancel.
- Click Cancel. NOTE: There is no confirmation, the action is immediate.
Send an Email to All Exhibitors
- For the desired event, click large Actions button.
- Click Send Email to Exhibitors.
- Complete desired email and send.
Send an Email to an Individual Exhibitor
- For the desired event, click the Exhibitors tab.
- Click the Actions button in the Actions column for the desired exhibitor.
- Click Send Email.
- Compose and send the desired email.
Email/Download an Exhibitor Invoice
Invoices for your exhibitors may be sent individually from the Exhibitor tab, or you may send them in bulk from the Billing > Pending Delivery. See Deliver Invoices for further information on delivering in bulk.
The instructions below are to send an individual invoice to an individual exhibitor:
- For the desired event, click the Exhibitors tab.
- Click the Actions button in the Actions column for the desired exhibitor.
- Click Send Invoice if you wish to email the invoice or Download Invoice to print a copy of the invoice.
Download Exhibitor Badges
- For the desired event, click the Attendees tab.
- Click the orange Actions button.
- Click Download Badges.
- On the Attendees Badges Print screen:
- Select the badge template you wish to use from the Document Generation Template list.
- Tick Show Tenant Logo if you wish to include your organization's logo on the badges.
- Tick Print Exhibitors Only and ensure that Print Non Exhibitors Only is de-selected.
- (Optional) If you wish to include Exhibitor on the badge, tick Show Exhibitors on Exhibitor Badges.
- Click Done.
Manage Event Sessions
If using the Expo Module, you can setup and manage sessions for an event.
Add Session Timeslots
The first step in setting up sessions for an event is to define timeslots. Once timeslots have been created you will setup your sessions, and assign sessions to the timeslots.
- On the desired event, click the Sessions/Breakouts tab.
- Click the Timeslots button.
- Click the
 icon to add your timeslots.
- Enter the Name of the timeslot. NOTE: This is not to be the name of a session, as you may assign multiple sessions to the same session. By default, the name of the timeslot is the date and time. This is displayed as the Date on your event page.M
- Enter the Start Time of the session. Click the calendar icon if needed.
- Enter the End Time of the session. Click the Calendar icon if needed.
- Click Done.
- Repeat steps 2 - 6 to add additional timeslots.
- Click Close.
Create Sessions
Once timeslots have been created, you will create your sessions and assign to timeslots. See Add Session Timeslots for instructions on setting up your timelots. NOTE: In addition to having setup your timeslots, you must also have registration fees setup. When creating a session, you will select the registration fee that a registrant must select in order to be eligible for the session. See Setup Your Event Fees.
- For the desired event, click the Sessions/Breakouts tab.
- Click the Add Session button.
- Configure the following:
- Name: Enter a name for the session.
- Description: Enter a description for the session.
- Timeslot: Select the desired timeslot. See Add Session Timeslots for instructions on setting up your timelots.
- Location: Select the location of the session from the drop-down list. If needed, click the
 icon to add a new location.
 - Attendee Limit (0 if unlimited): Enter the maximum number of attendees allowed for this session. Set to zero if there is no limit.
- Event Registration Type: Select the event registration type eligible for attendance in this session.
- Main Photo: Upload a photo for this session. For example, you may wish to upload a photo of the speaker.
- Click the
 icon to enter the name, title and details of the Speaker.
 - (Coming Soon) Goods/Services: If your event is setup to use V2 of the events module, you may add a fee to your event. Click the
 to select the desired fee item. See Select Event Public Module Version for information on updating your event page to V2.
Manage Session Attendees
When you event is setup with Sessions an Event Sessions button is displayed on your event page.
Clicking the Event Sessions button, will open up a page which displays a list of all available sessions.
Registrants may click the Register for Event button, to select a registration type, and the sessions that they wish to attend.
View an Individual Registrant's Sessions
- For the desired event, click the Attendees tab.
- For the attendee, click Actions.
- Click View Sessions.
Resend Event Itinerary
When a registrant selects sessions for an event, the confirmation received will include a list of the sessions they have selected. If needed, you can resend the confirmation. NOTE: This option is only available when an event has sessions.
- For the desired event, click the Attendees tab.
- For the attendee, click Actions.
- Click Resend/Send Itinerary.
An email is sent to the registrant.
View All Session Attendees
- For the desired event, click the Sessions/Breakouts tab.
- For the desired session, click the numbered link in the Registeredcolumn.
You may print this list by clicking the printer icon. You can also use the Event Sessions Report to view a list of all registered attendees.
Check-in Session Attendees
- For the desired event, click the Sessions/Breakouts tab.
- For the desired session, click the numbered link in the Registeredcolumn.
- In the Status column, you may choose Attended, Unknown or No Show from the drop-down list.
- Click Done.
Event Reports
Several reports are available for management and analysis of your events. See Event Reports.
Event Management FAQ's
- How can I change the way fees are displayed on invoices? Click here.
- How can I generate a list of all session attendees? Click Here
- How can I setup my fees so that I can defer revenue revenue recognition to the date the event starts?
- Select Setup.
- Click Goods/Services in the Services, Products and Commerce section.
- Click New.
- Setup your goods/services for the event as you normally would (Click Here for full details of setting up Goods/Services) , with specific configuration of:
- Revenue Recognition Type: This setting allows you to configure when the revenue will be recognized. Select Fully on Event Start Date to defer revenue recognition until the start date of the event.
- Deferred Income Account: Select the deferred income account for this good/service. The drop-down list will be populated with the deferred income accounts configured in you Chart of Accounts. If you have chosen to defer the revenue for this event to a specific point in time, the revenue will be held in the deferred income account until that point in time.
With this goods/service, as registration fees are processed, the revenue will be placed in the deferred income account selected for the goods/service. On the day of the event, the revenue will be moved to the income account you selected for the goods/service. Income in the deferred revenue account can be monitored by running the Accounting Transaction Report or the Sales by Account Report. Click Here to view reports.
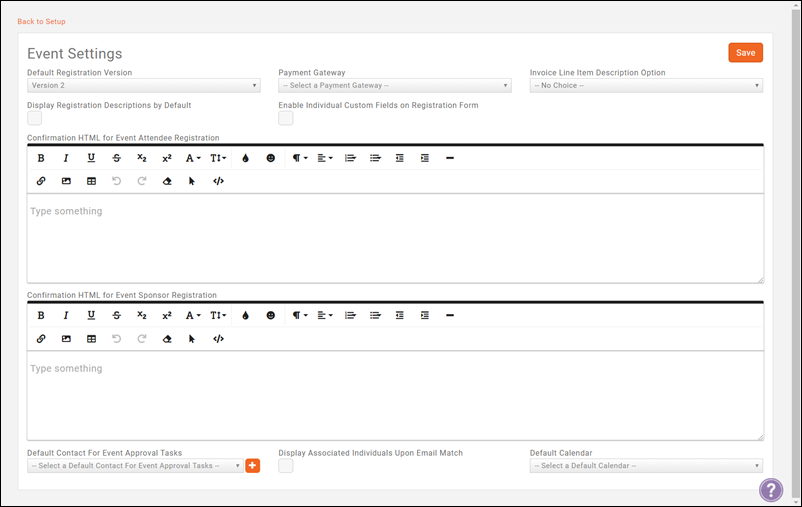


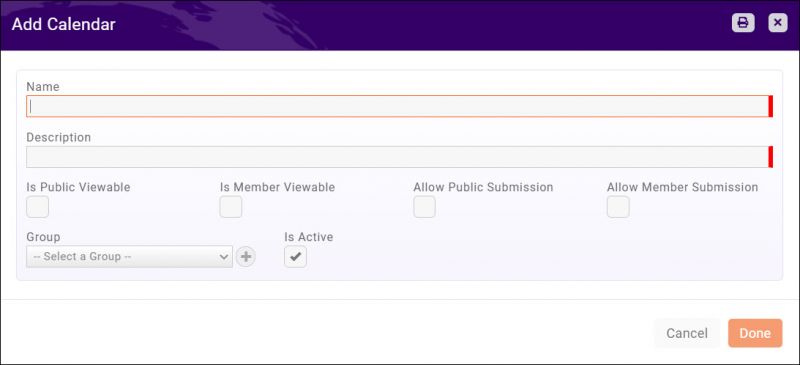
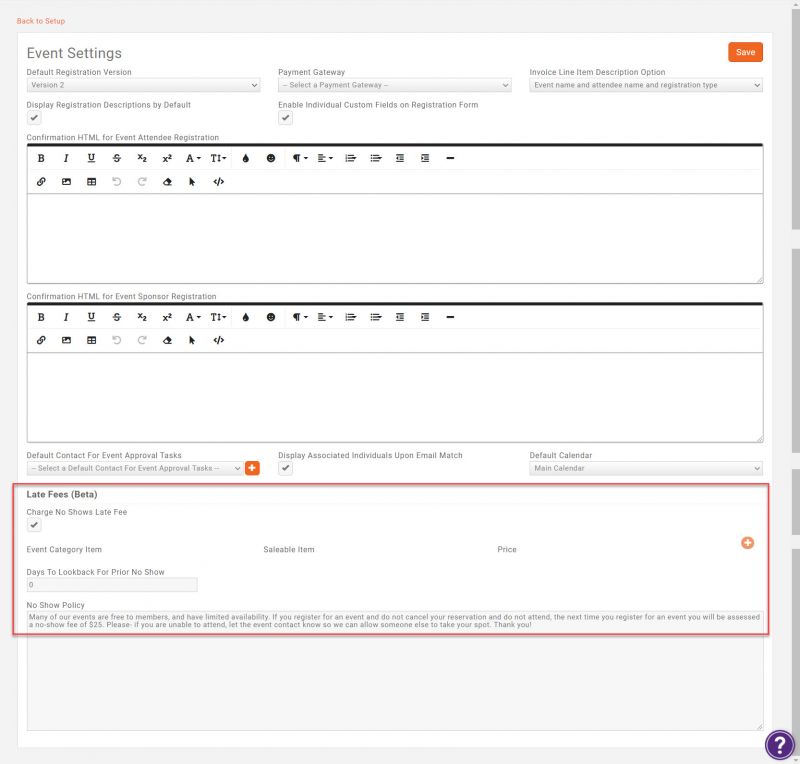

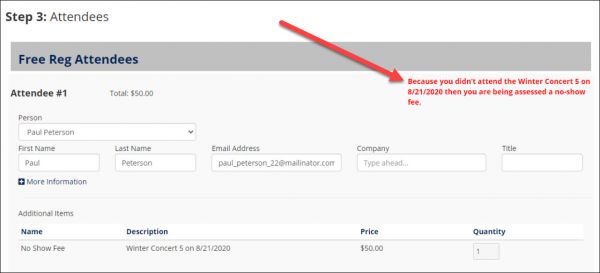
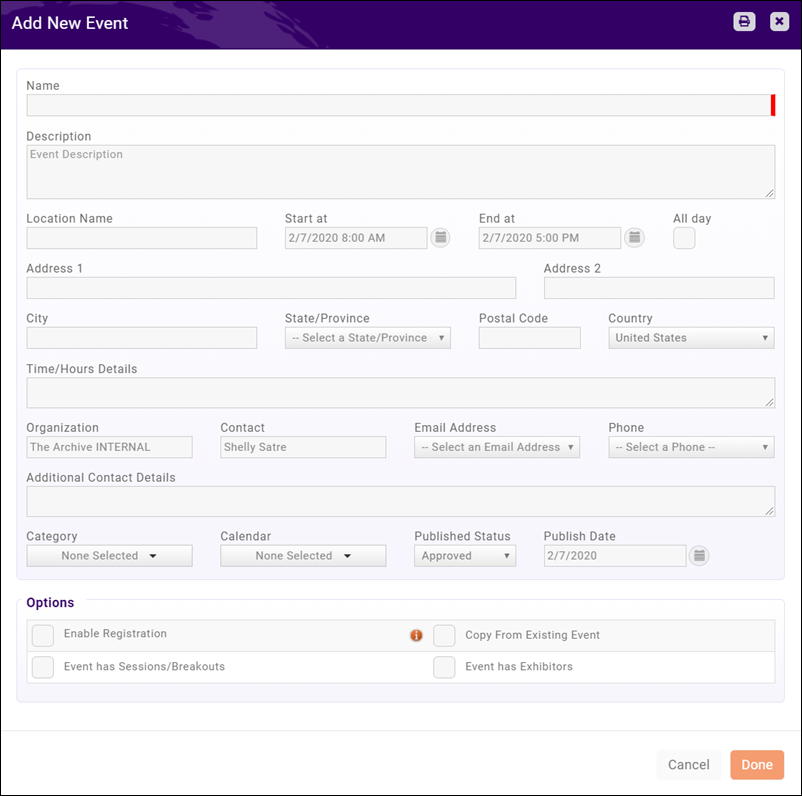
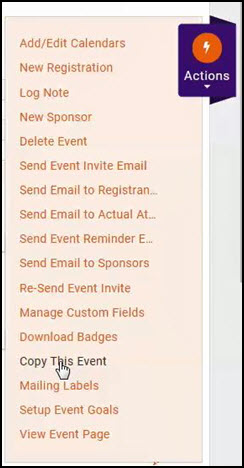
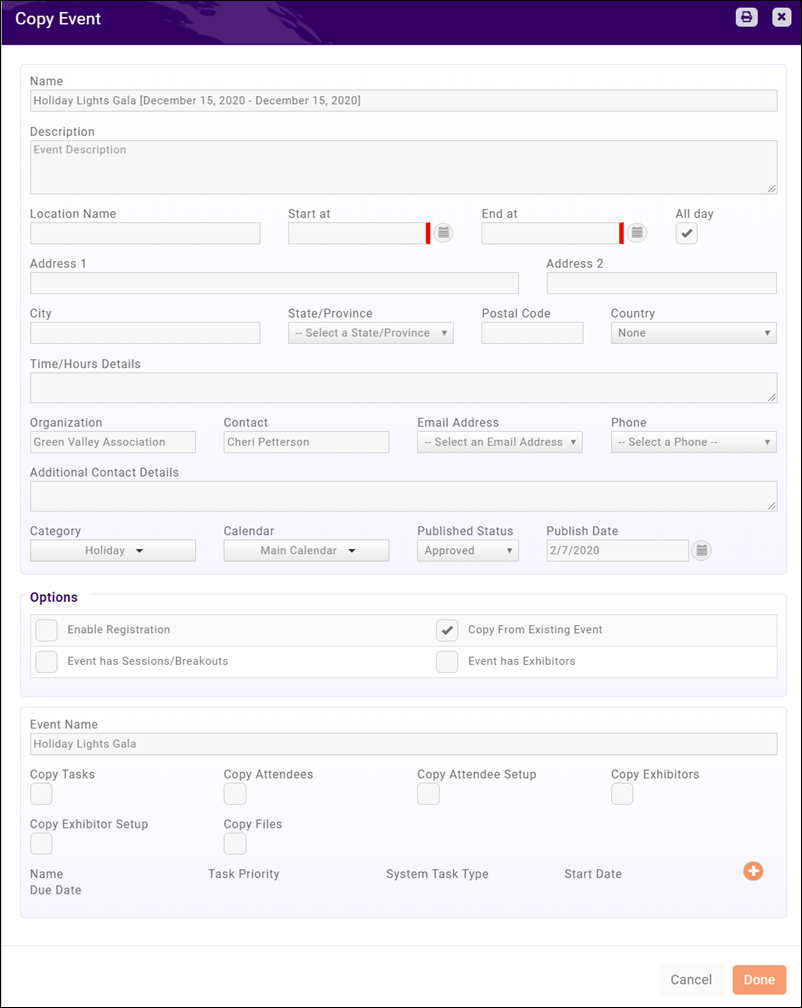
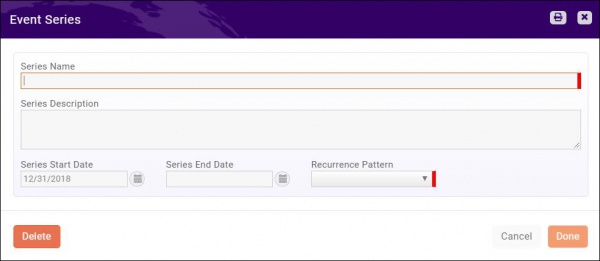


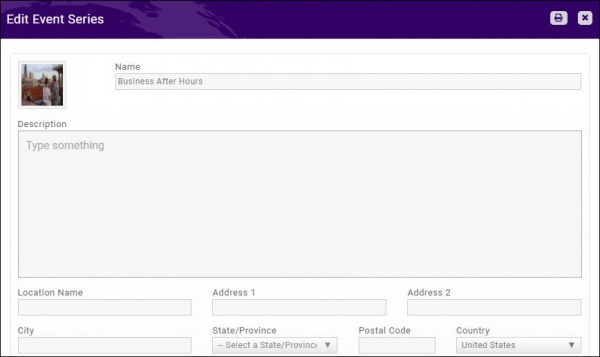

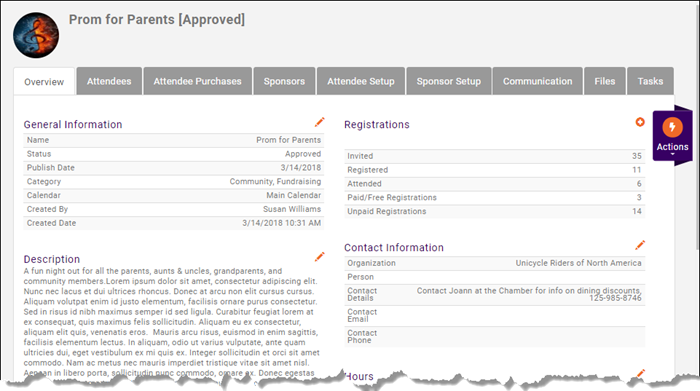

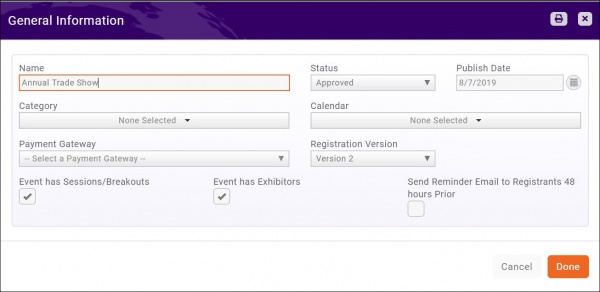
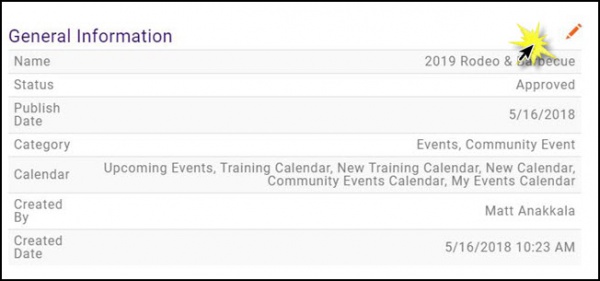
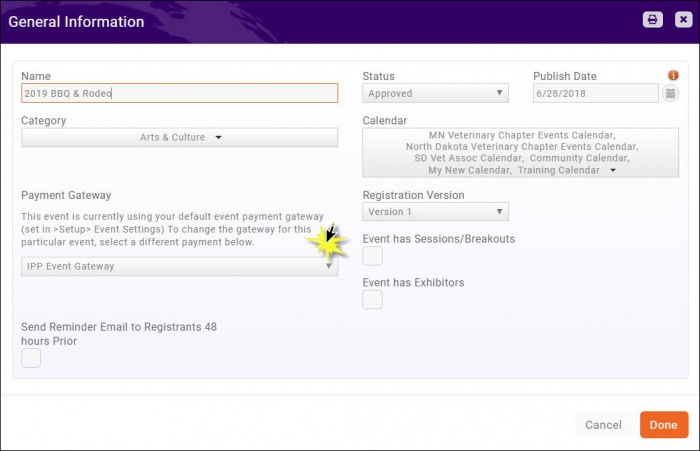
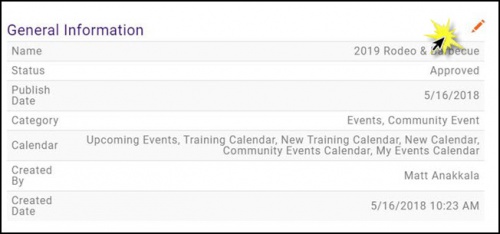
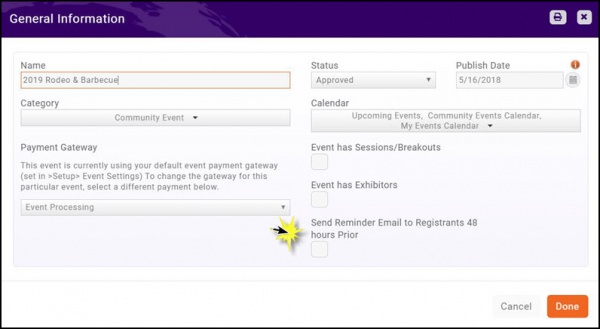
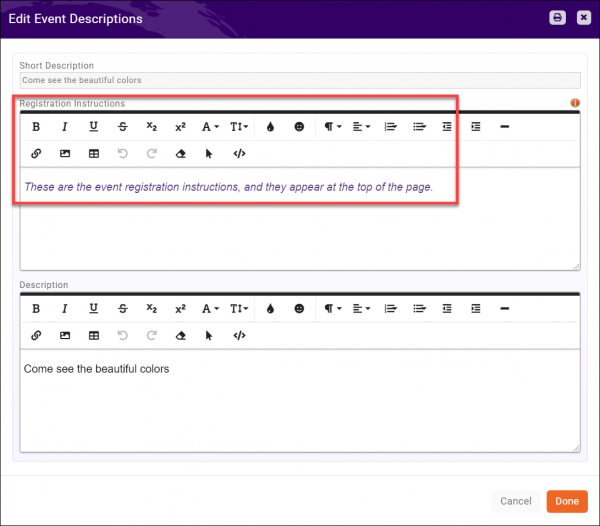
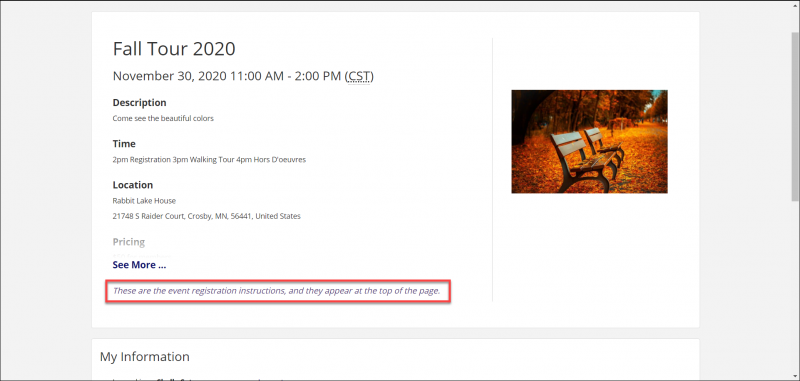
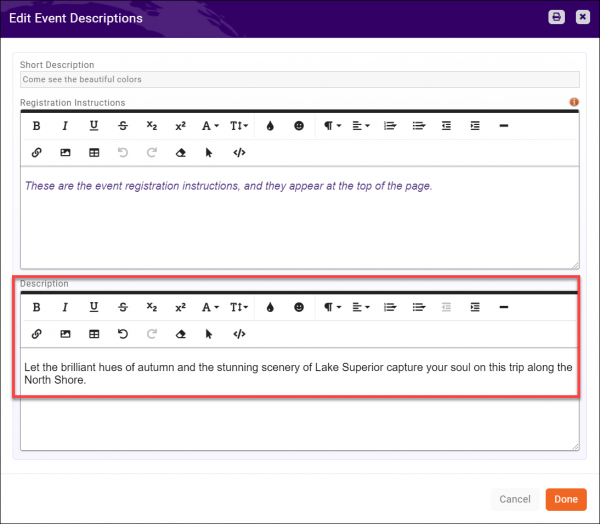


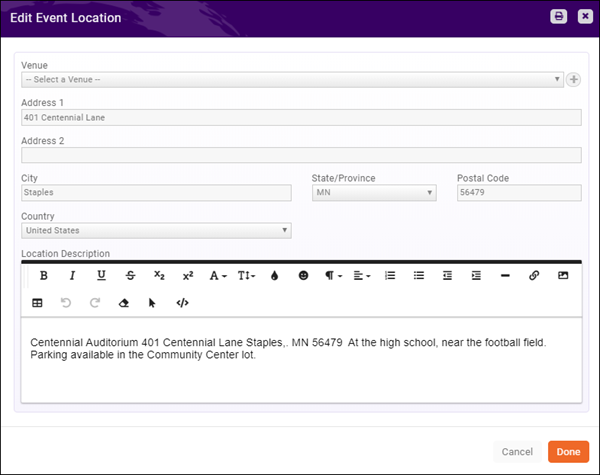

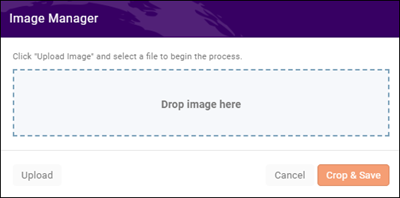

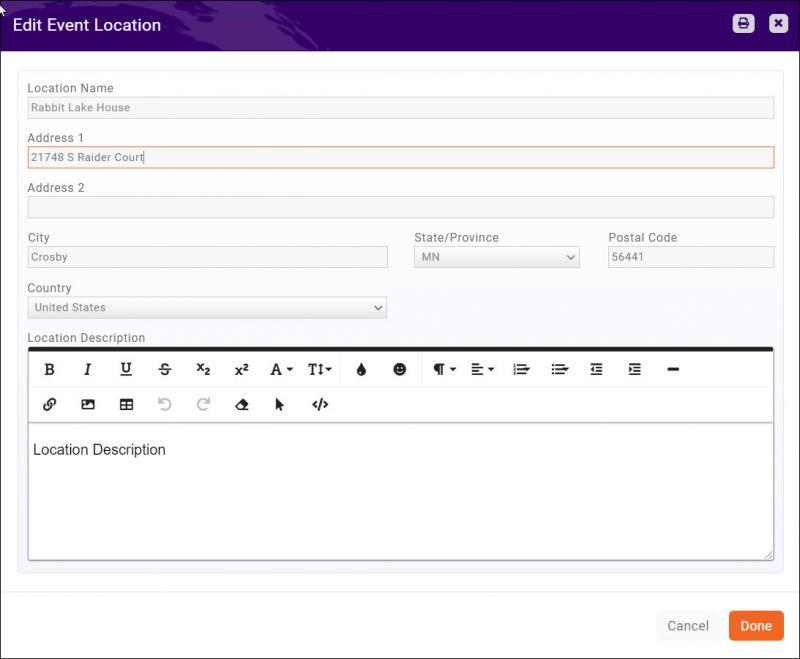
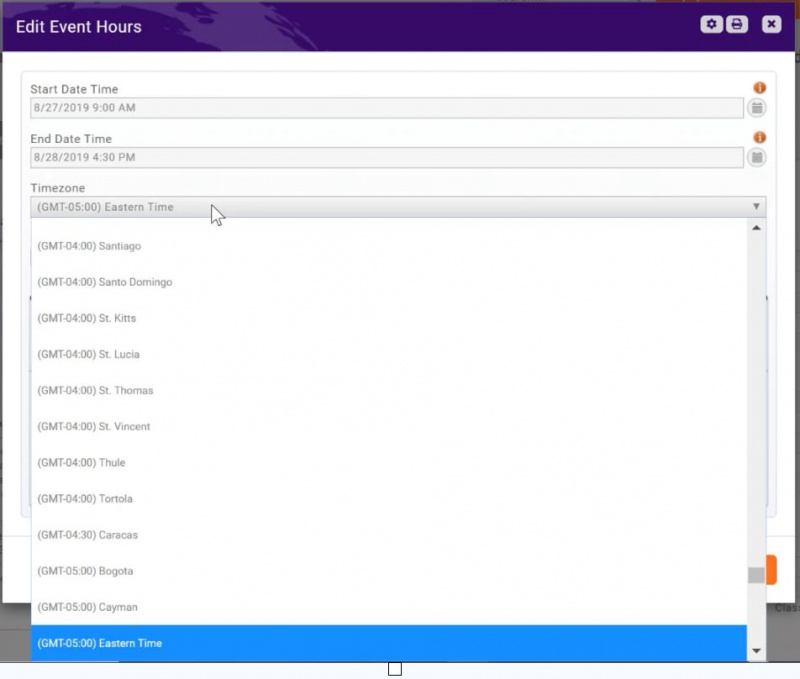

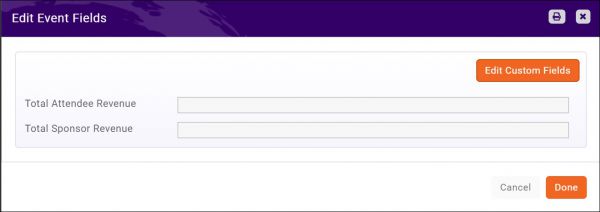
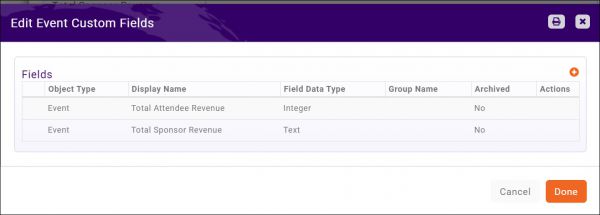
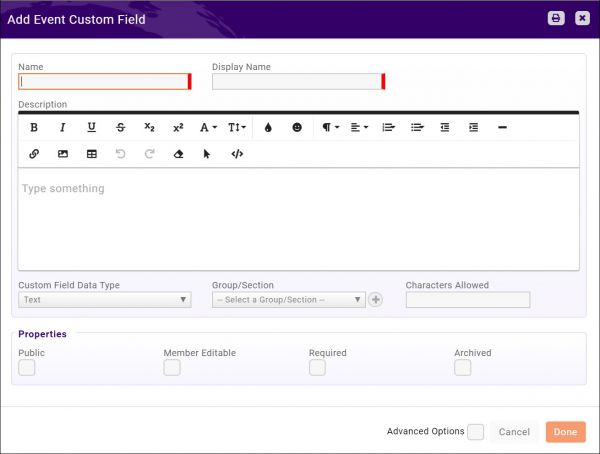
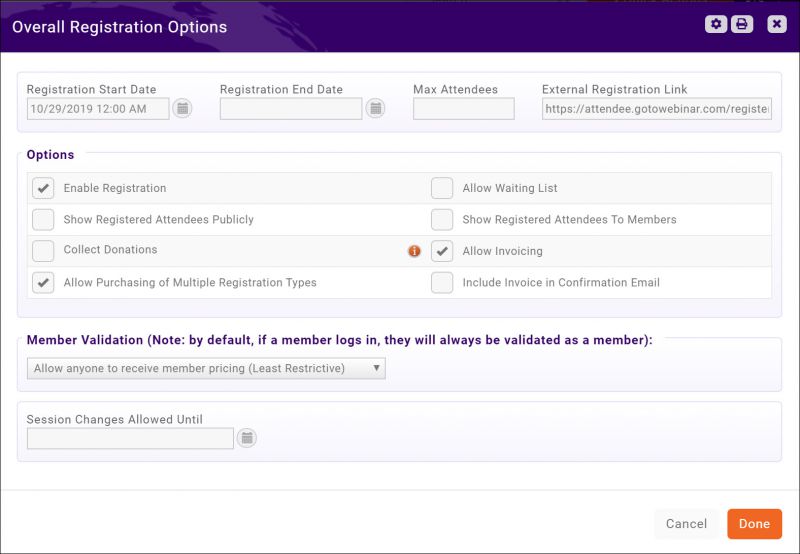
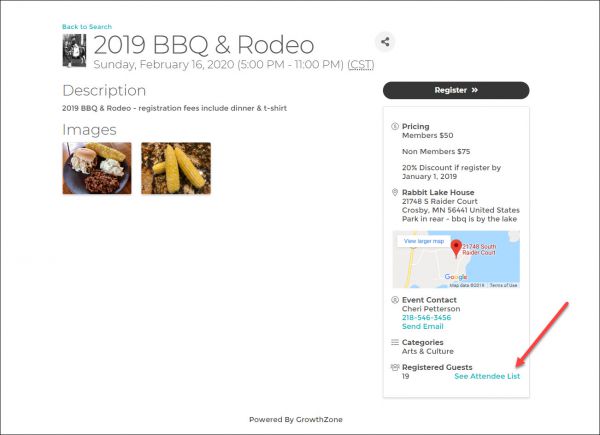
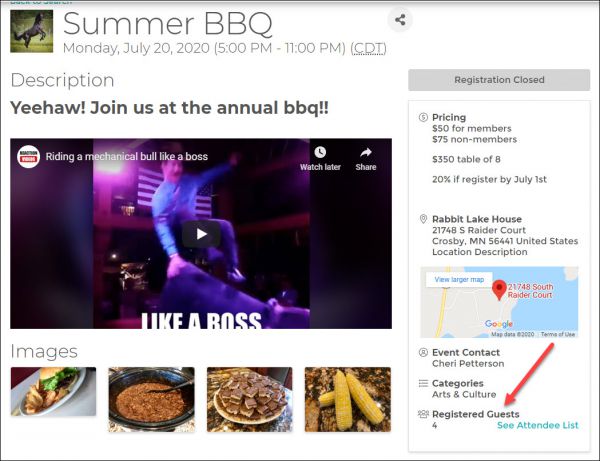
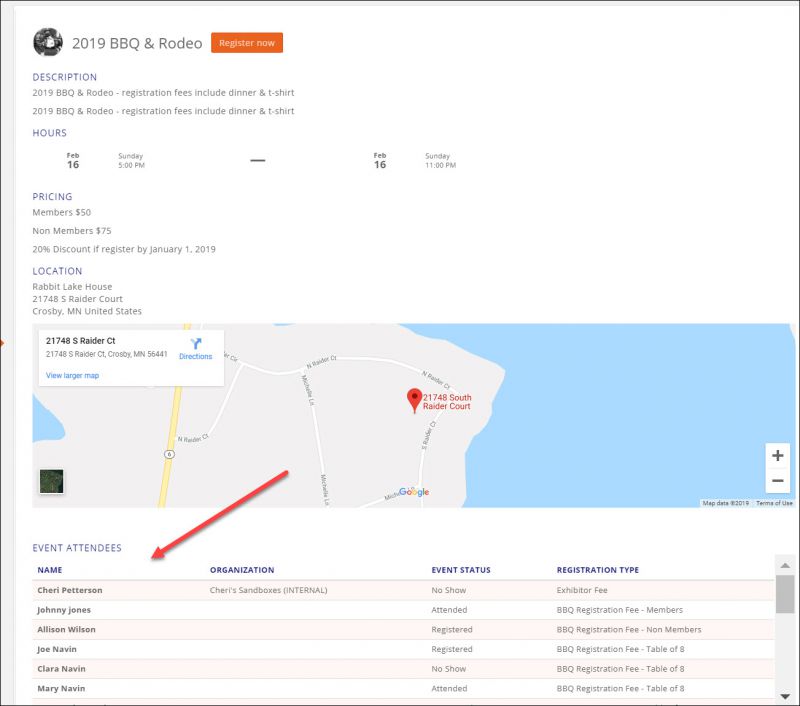
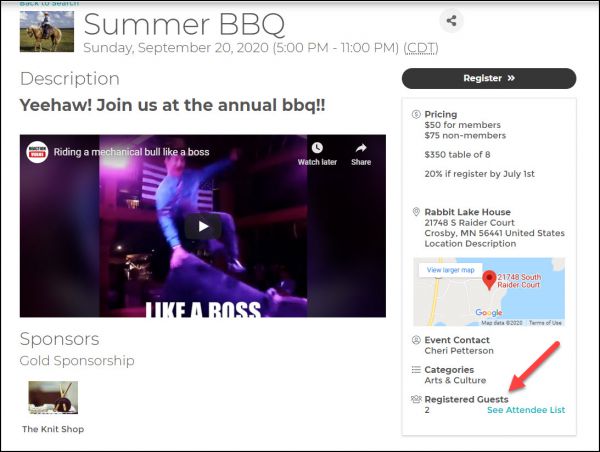

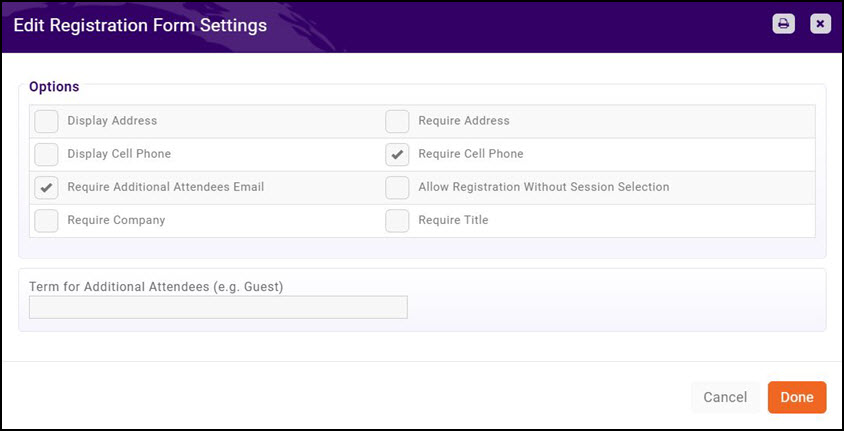
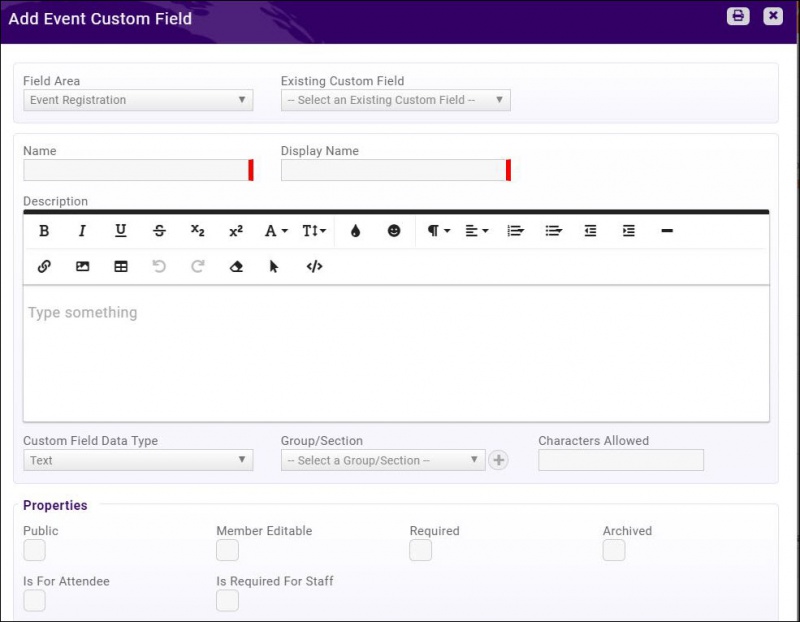


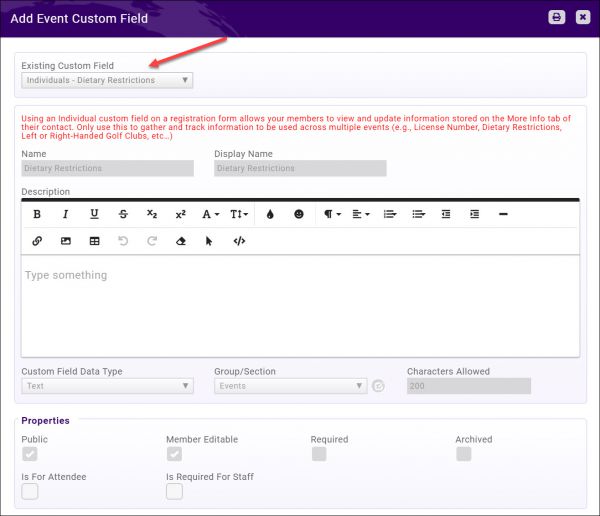
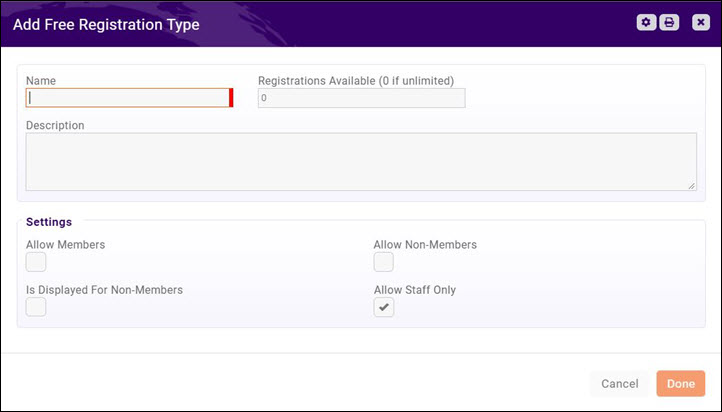
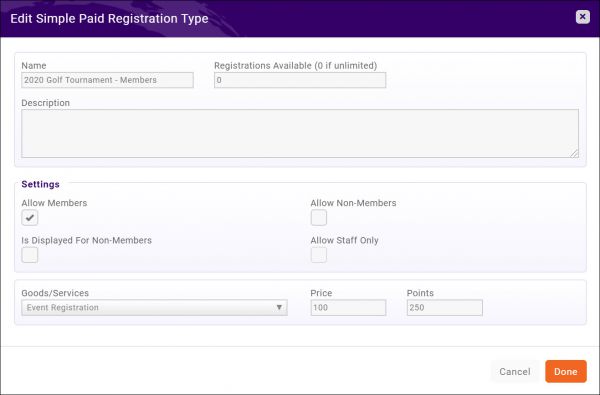
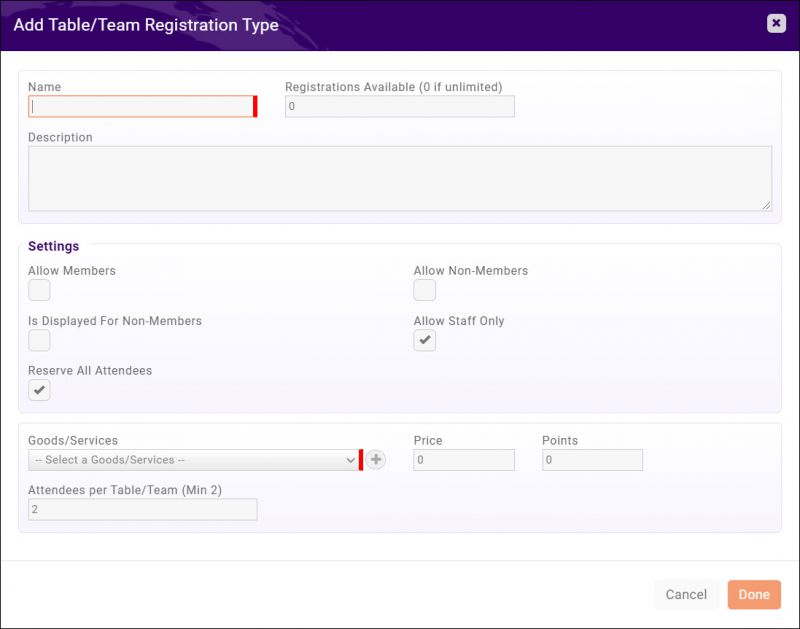
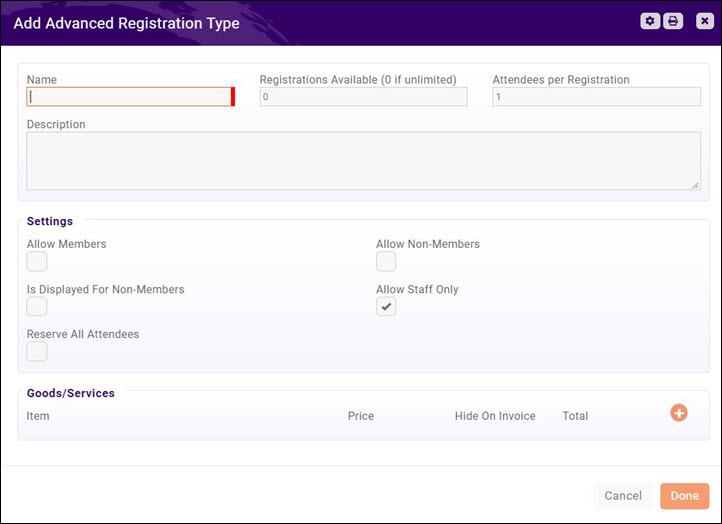


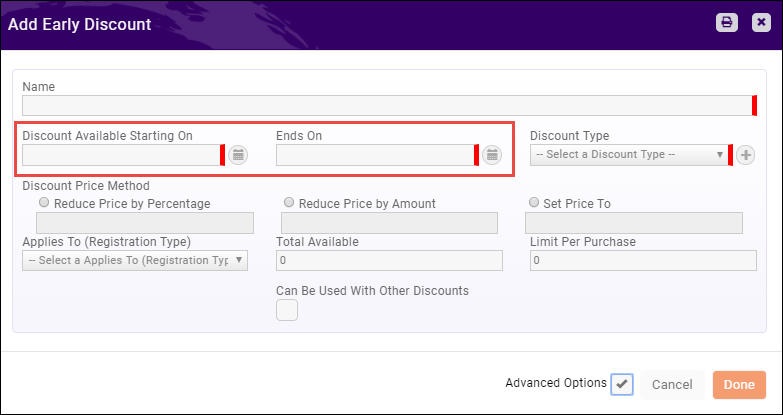
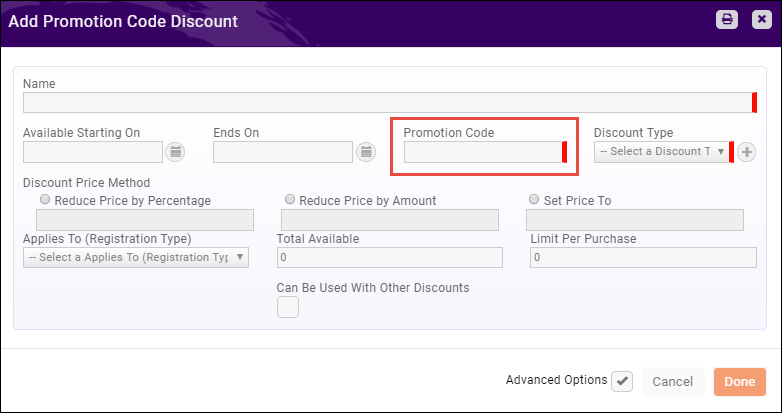
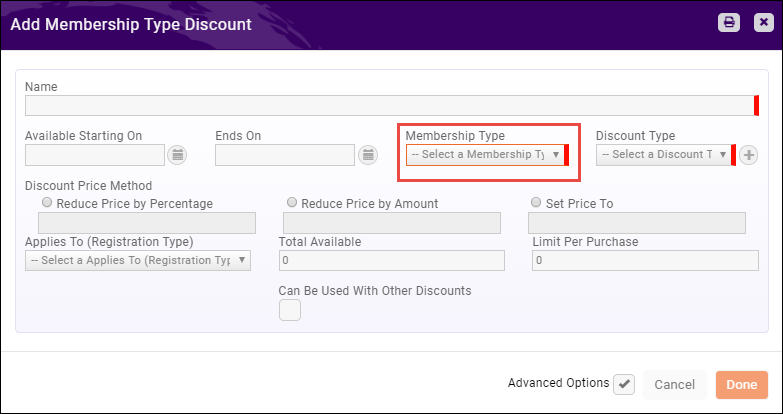
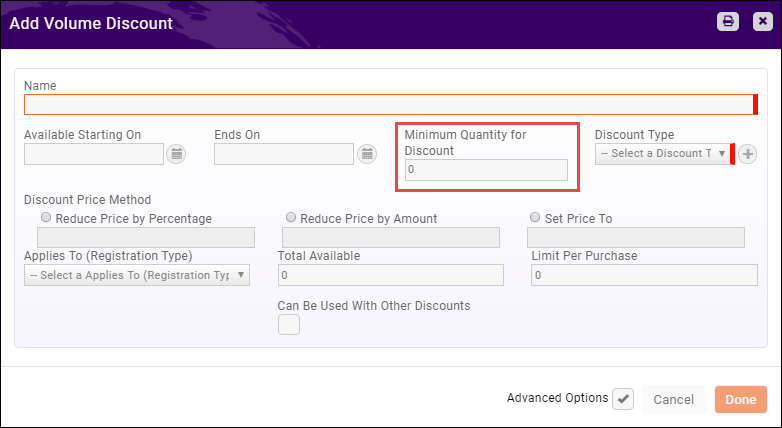
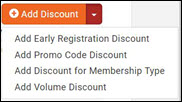

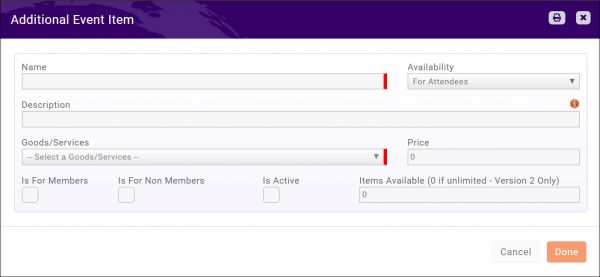
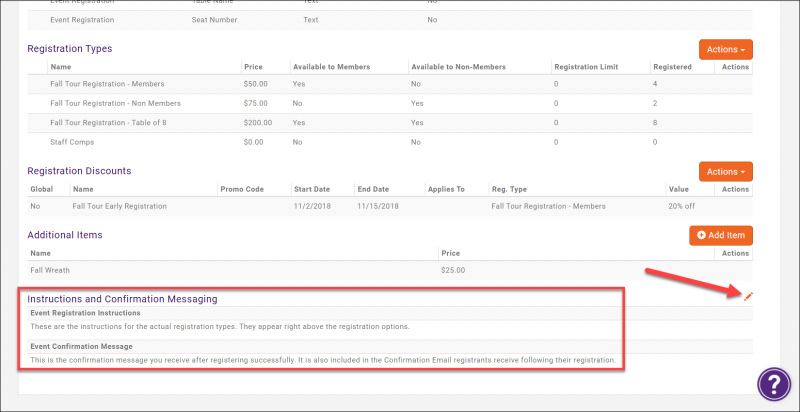
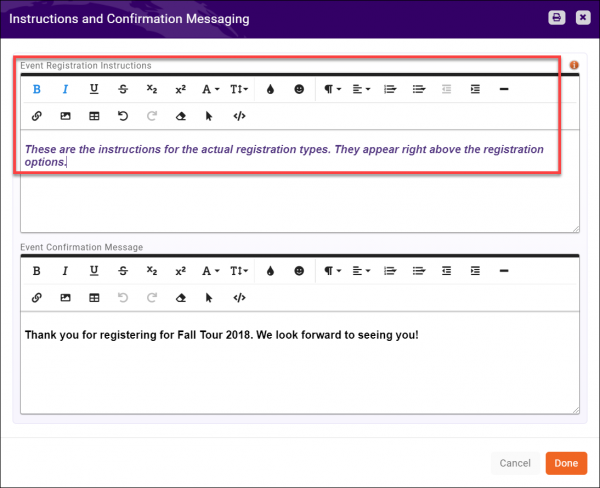
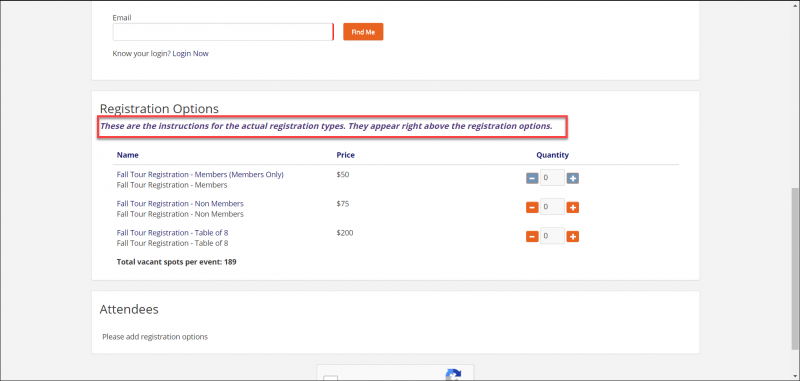
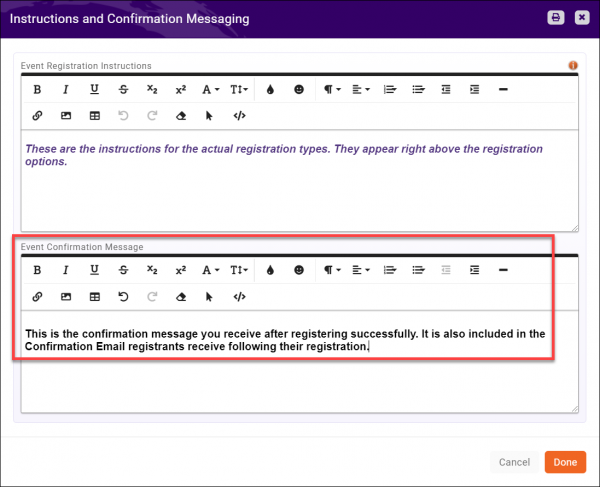
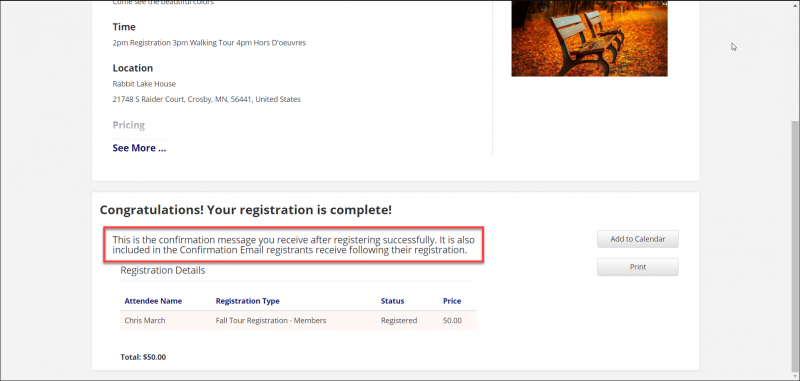
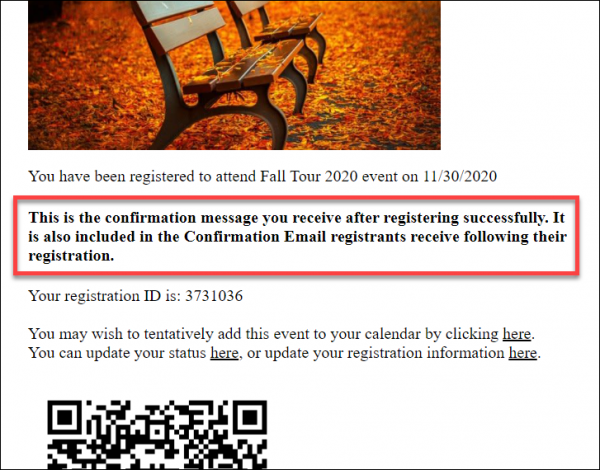
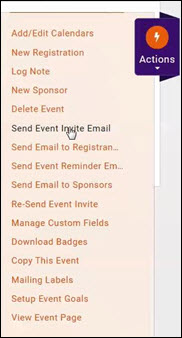
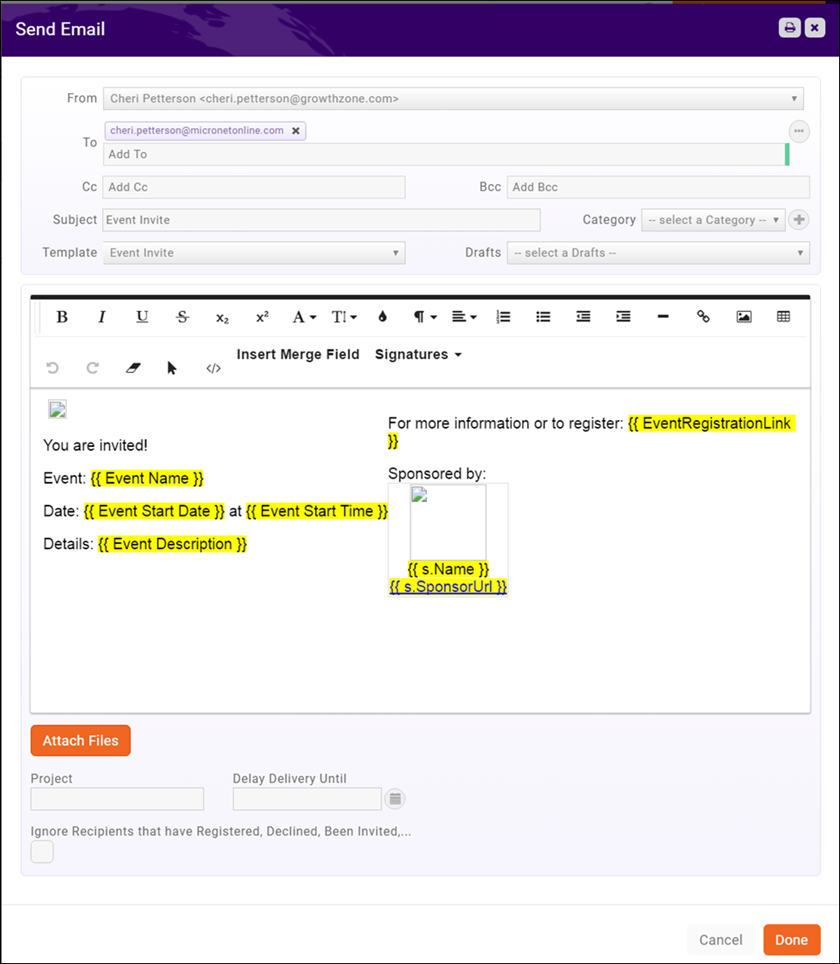
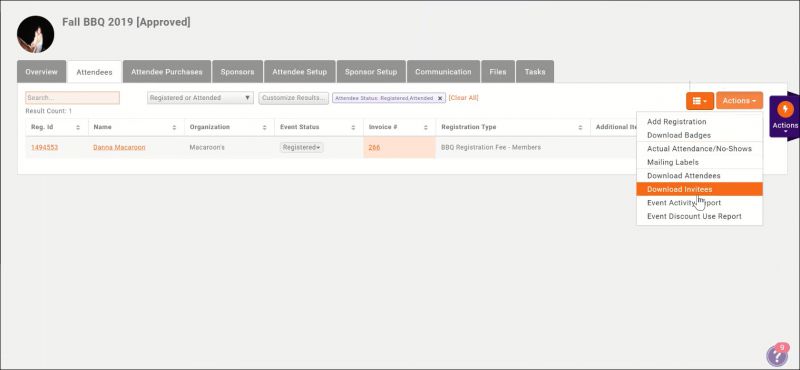
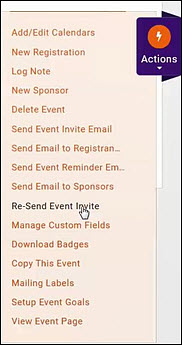


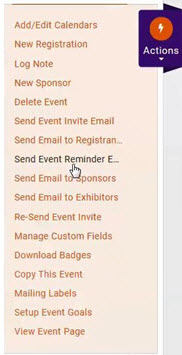
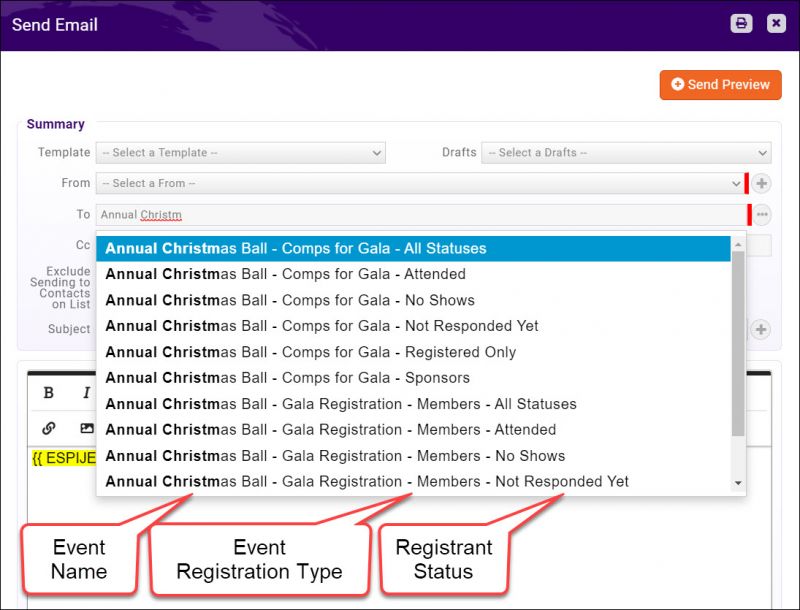

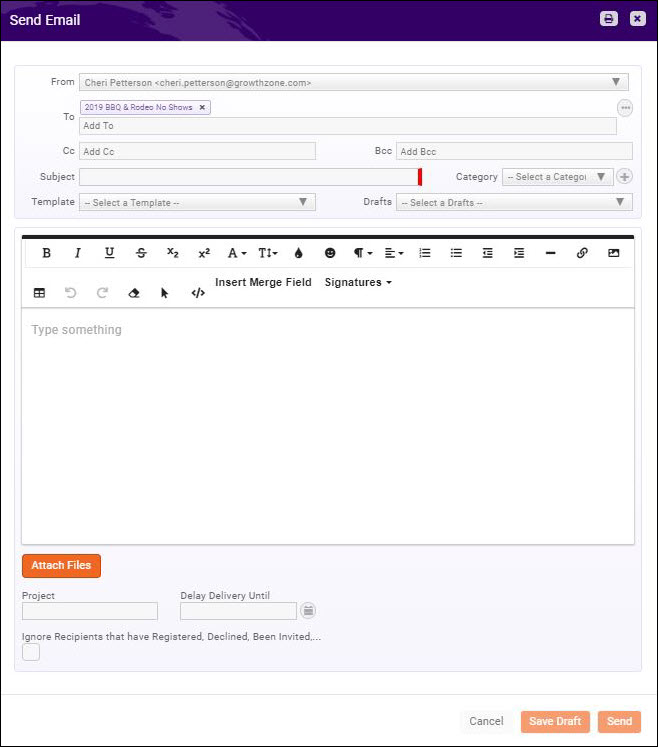
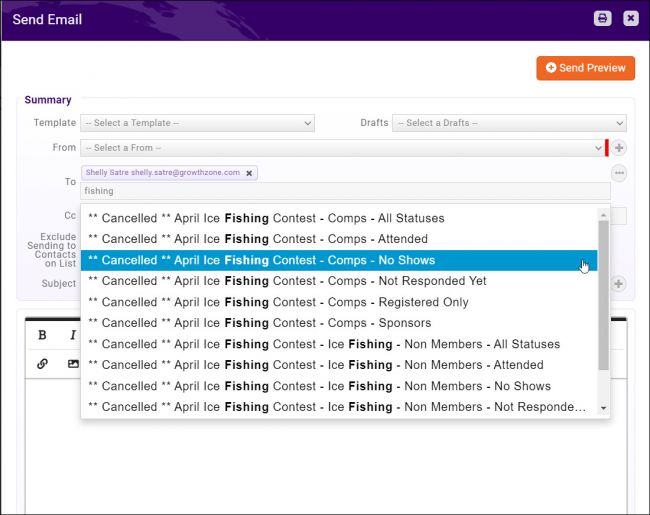
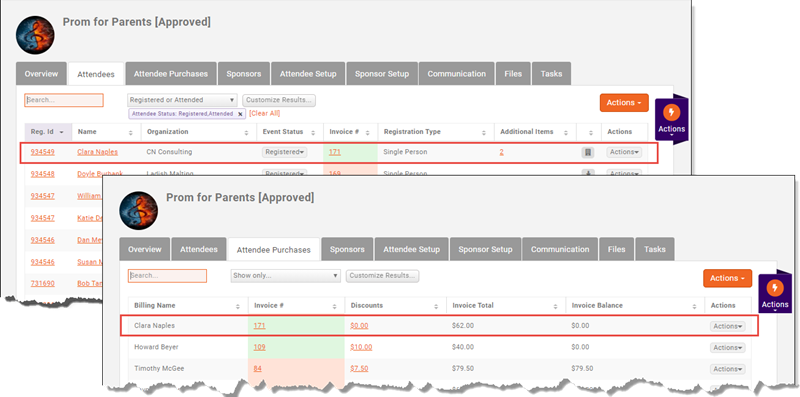


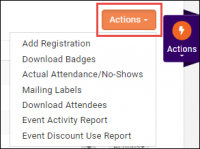
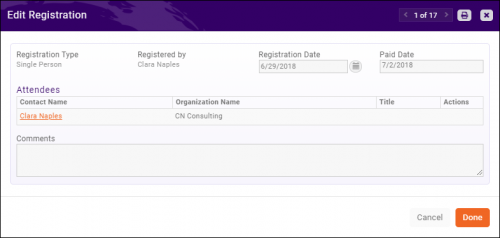
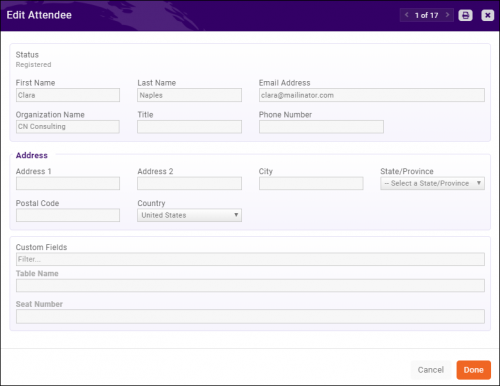
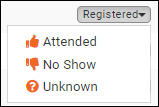
![] NOTE: Any edits you make to the invoice line items here will only impact the invoice, not the actual event. In other words, if you add a line item for an event registration, you are only adding those dollars to the invoice, you are not actually registering them for the event. Registration Type :Simply a display of the registration type. Sorting by this column will put all like-registration types together. Additional Items :If there are additional items available for purchase during event registration and a registrant purchases 1 or more, the number purchased will appear in this column. Clicking on the number will display the quantity of each item purchased by that registrant, organized by Attendee Items and Registration Items Refer to Additional Items for information on the difference between these types. Actions :From the Actions drop-down on the far-right side you can cancel the registration, edit the attendee (same as clicking on the Name), and print a name badge for this attendee. (You can print bulk badges from the orange Actions button at the top of the screen). If the invoice has not yet been paid, you can also enter a check or credit card payment. Register an Attendee from the Back Office #For the desired event, click the Attendees tab. #Click the orange Actions button. #: #Click Add Registration. #Complete the event registration form and payment information as needed. #Send Event Confirmation Email to Registrant: This option is enabled by default. Deselect the check-box if you do not wish to send a confirmation to the registrant. The system will record, for future reference, that the confirmation was not sent. #Click Submit. Update an Attendee Registration The Update Registration option allows staff to go to the attendee's registration form, and gives staff members and add additional items or add registrations if needed. #For the desired event, click the Attendees tab. #: #For the desired attendee, click the Actions button in the Actions column. #Click the Update Registration button. #Make the desired updates to the registration. #Select payment options. #Send Event Confirmation Email to Registrant: This option is enabled by default. Deselect the check-box if you do not wish to send a confirmation to the registrant. The system will record, for future reference, that the confirmation was not sent. #Click Submit. NOTE: If you add additional attendees, and you select the Invoice option, the fees will be added to an existing invoice, if applicable. Match Event Registrants to Contacts Between the Additional Items and the Actions columns there is an unnamed column that may contain an icon for some registrants. If there is NOT an icon, it means the system recognizes both the Individual and the Organization as existing contacts. If there IS an icon, it means something about the registration doesn't match the data in the system. Clicking on the icon allows you to view the information and make a decision about the registrant. :Update Organization This icon will appear if the Organization the registrant entered on the registration form is different than what the system has for this person. ::*The system has Oak Golf Club and the registrant entered Oak Gold; or ::*The system has the registrant affiliated with West Side Auto Sales but when registering he entered his side business, Robert J Creations; or ::*The registrant entered the name of an Org that is in the system, but she is not connected to it :::#Click the icon. :::#: :::#Select from the following options: :::#*Use suggested - We've found a possible match - If the software is able to find a suggested match, a table of matches from the database it will be displayed. Click the radio button for the desired organization to associate the registrant to that organization. NOTE: If there are no "suggestions" then this option will not be displayed. :::#*Find existing - Search your database - if a suggested match is not displayed, or is not accurate, select this radio button to search for the desired organization. A type ahead text box will be displayed. Begin typing the name of the organization you wish to locate. :::#*Create new - Create a new organization record - If the registrant's business is brand new to your database, click this option. A new business will be added using the Company name provided by the registrant. :::#Click Save. :Update Contact This icon will appear if the system thinks the registrant is probably a match to a contact in the system but something about the information provided is not the same :: The system has Robert Smith with an email rsmith@mailinator.com; The registration is for Bob Smith with the same email as Robert ::#Click the icon. ::#: ::#Select from the following options: ::#*Update contact - Select fields that should be updated in the contact record - if this option is available, a table will be displayed from which you may select the fields you wish to update in the database. This will change Robert Smith's contact record to Bob Smith ::#*Create new - Create a new contact record - if this option is selected, a new contact based on the Data Submitted from Registration will be added to your database. This will add Bob Smith to the database, so there will be a contact record for Robert Smith and a contact record for Bob Smith, both with the same email address. The event registration and invoice will go to Bob Smith ::#*Do not update contact - this option will leave Bob Smith as the registrant within the event, (Bob Smith will be printed on the name tag and check-in roster), but the registration action and invoice will still go to Robert Smith since the email is a direct match. ::#Click Save. :Match to Contact: This icon will appear when the system does not recognize the name, email, or organization of the registrant. :: a registrant who is not in the database :: a registrant who is in the database and related to Company ABC but enters company abc or Company XYZ as her organization ::#Click the icon. ::#: NOTE: If the registrant did not enter anything for their Organization when they registered, this section will not appear in the edit window. ::#Select from the following options: ::#*Find existing - Search your database - if a suggested match is not displayed, or is not accurate, select this radio button to search for the desired individual or organization. A type ahead text box will be displayed. Begin typing the name of the contact you wish to locate and select it when it appears in the list. ::#*Create new - Create a new contact record - If the registrant is brand new to your database, click this option. A new individual contact will be added to your database as a non-member. ::#Click Save. If you do NOT want to match this registrant to an existing contact OR create a new contact, simply click Cancel The registrant will remain registered for the event but will not be added to the database. You can find them within the event, or, if necessary, from the Contacts module (Click Customize Results and select Contacts Not in CRM) Table/Team Management If your event has been set up with a table/team registration type, you can assign attendees to tables or teams. *On the Attendees tab, click the orange "Actions" button and select "Table/Team Management". This will open a Table/Team Management window. *If a table or team has registered using the table/team registration type, they will automatically be assigned to a table/team. You can edit the name of this table/team by clicking the pencil icon to the right of the table/team name. *You can manually create a table/team by clicking the "Add a Table/Team" button. *If someone has registered using a simple paid registration type, they will display in this window in the "Unassigned Attendees" column. *To move someone from Unassigned to a table/team, click and drag them to the desired table/team. *Even if your event does not allow people to register their own table/team, you still need to create a Table/Team Registration Type to enable the Table/Team Management. You can then manually set up your tables/teams and move your attendees into and between the tables/teams as needed. Note The Table/Team names will be included in the "Download Attendees" file, and are tied to a "Table Name" merge field so can be easily added to name badges. Cancel an Event Registration You can cancel a registration from the Attendees tab. #Click on the small gray Actions drop-down in the right-hand column of the registration you would like to cancel #: #Click on Cancel Registration at the top of the drop-down. #:The Edit Cancel Attendance window will appear with registration information for your review #: #Click Done. #:An Information window will appear, instructing you to tend to the financial aspect of a cancellation if appropriate: #: Billing considerations when cancelling registrations Below are several scenarios to consider once you have cancelled a registration. NOTE: These are only applicable if an invoice and/or a payment have been received for the registration. *An invoice has been created for the registration, but not paid: In this scenario, best practice is to void the invoice. *An invoice has been created and paid: **If you have a no refund/no credit policy, you need do nothing else. **If you have a refund policy, create a refund as described in Refund a Payment. You may create the refund on the Attendee Purchases tab. **If you have a no refund policy, but are willing to issue a credit, create a credit as described in Add a Credit Memo. Registration Cancellation by the Attendee Attendees have the ability to cancel their own registrations. In this scenario, an email will be sent to those staff members who have subscribed to the Unregistered Attendees email notification. See Subscribe to Automated Staff Notifications for instructions. When an attendee un-registered, they are not automatically refunded, so you will want to follow your practices for managing payments received for the registration. Update Attendee Name and Other Information You can update names of attendees as well as additional attendee information (for example: custom fields) on the Attendee tab. #In the desired event, click the Attendee tab. #: #Click the name of the attendee for which you would like to update information. #: #Make the desired changes. #Click Done. Download Name Badges You can easily download badges for your event, and a variety of Avery Style templates are available. Name Badges for All Attendees On the Attendees tab, #Click on the orange Actions button in the top right corner. #: #Click on Download Badges. #In the Edit Event Attendee Badges Print window that appears select the options you want #: #:*File Format select either Pdf or Word document #:*Document Generation Template select from one of 4 template options, Avery 5392, Avery 74558, Attendee Badge, or Avery 5395, or create your own. Refer to Setting Up Document Templates #:*Show Tenant Logo this will print your logo on every name badge #:*Print Non Exhibitors Only checking this box will print badges for only non-exhibitors. Not a factor if you do not have the Event Expo Module #:*Print Exhibitors Only checking this box will print badges for exhibitors only. Not a factor if you do not have the Event Expo Module #:*Show "Exhibitors" on Exhibitor Badges checking this box will print the word Exhibitor on exhibitor badges #:*Sort Order This is the order in which the badges will be printed. #Click Done The PDF or Word document will download. Open and Print. Name Badge for A Single Attendee On the Attendees tab, #Click on the small gray Actionsdrop down in the far right column of the registrant for whom you want to print the badge #: #Click on Print Badge. #In the Edit Event Attendee Badges Print window that appears select the options you want #: #:*Document Generation Template select SingleAttendeeBadge or create your own. Refer to Setting Up Document Templates #:*Show Tenant Logo this will print your logo on every name badge #:*File Format select either Pdf or Word document #Click Done The PDF or Word document will download. Open and Print. Manage the Event Waiting List If you enable the Allow Waiting List for an event, visitors to your event page will have the opportunity to be added to the waiting list. When they do so, the Event Waiting List Automatic Notice automated message will be sent to them. You can customize the email sent, to suit your business needs. See Automated Messages for further information. On the Attendee tab, you will be able to view who is on the waiting list, register people on the waiting list, and remove people from the waiting list as needed. If the waiting list is enabled, once you have reached the maximum allowed for the event, registrants will see "Maximum attendee limit for the event has been reached. You have to add X attendee(s) to the waiting list, or remove them to continue" when trying to register. If the registrant chooses to continue, they must select the "Add to Waiting List" check-box. You can view registrants on your attendee tab by filtering to Waiting List in the Show Only drop-down. Should registrations open up, you may register from the Attendee tab, or remove them from the waiting list. Register an Attendee from the Waiting List #For the desired event, click the Attendees tab. #Click Actions in the Actions column for the person you wish to register. To find those on your waiting list, select Waiting List from the Show Only drop-down list. #: #Click Register. NOTE: Do not select Update Registration. This option should only be used for individuals that are currently of Registered status. #: #Complete the necessary/required fields on the Edit Attendee screen. #Click Done. The attendee is now registered for the event, and an invoice has been created. You can send and/or pay the invoice on the event's Attendee Purchases tab. Remove Registrant from Waiting List #For the desired event, click the Attendees tab. #Click Actions in the Actions column for the person you wish to remove from the waiting list. #: #Click Remove From Waiting List. This is an immediate action, there is no "undo". Cancel a Registration #For the desired event, click the Attendees tab. #Click the Actions button for the attendee you wish to cancel. #Select Cancel Registration. #Click Done. IMPORTANT: If the registrant has an Manage Event Attendance/Check-in Check-in Roster While there is no established Check-in Roster document, you can achieve the same result by selecting Download Attendees from the orange Actions button in the top right corner of the Attendees tab. This will download an Excel file while you can edit to suit your needs and print to take to the event. #For the desired event, click the Attendees tab. #Click the orange action button. #: #Click Download Attendees. #: #Select the desired Attendee status from the drop-down list. #Click Download. An Excel file will be available for you to use as a check-in roster. Manually Recording Actual Attendance/No Shows Check-in One Attendee at a time #On the desired event, click the Attendees tab, #Click on the Event Status drop down of the registrant you are working with. #: #Click on the appropriate status ('Attended, No Show, Unknown). Checkin Many Attendees at Once #On the event's Attendees tab, click on the orange Actions button in the top right. #: #Click Actual Attendance/No Shows. #: #You can click the Set all to Attended button to mark all as attended, then by exception mark those who were No Show or Unknown. Alternately, you can go through the list, and select the appropriate status for each individually. #Click Done. Download Event Attendees You can download a list of all of your event registrants to have a complete lists of all registration information. For example, if a meal choice was a custom field, you can use the download function to a create a list for the caterer. #On the event's click the Attendee tab. #: #Click the orange Actions button. #Select Download Attendees. #: #Select the desired Attendee Status. #Click Download. Cancel an Event Issue a Refund for an Event Registration Issue a Credit for an Event Registration Manage Attendee Purchases The Attendee Purchases tab will contain important information about the event-related purchases made by the attendee, including the Invoice # and and Discounts. Each column in the table is described below. Billing Name :Name of the Billing contact for the purchase. Depending on your Billing Setup, this may not be the person who registered Invoice # :Also available on the Attendee tab, clicking on the invoice # brings up the Edit Invoice window. This column is color-coded so you can see at a glance which invoices have been paid (green) and which are unpaid (red). If there is not an invoice # in this column there is no invoice, indicating the registrant selected the Pay at the Door/Please Invoice Me option and they have not yet been invoiced, or it is a free event. NOTE: If an invoice has been written off, the invoice number is marked with a strikethrough This helps staff members see at a glance that those invoices have been manipulated. :In the Edit Invoice window you can make various edits to the invoice itself. If a payment has been made you can also view the payment history by clicking on the Reference Number in the Payment History section or Download Payment, Send Email, or Create Refund, all available from the Actions button in the Actions column in the Payment History. If no payment has been made, the Payment History section will be empty. Discounts :The value of any discounts used on a purchase will be displayed here. Clicking the discount will display the Sales Discounts window for your review: Invoice Total :For viewing only (not clickable), this displays the total of the invoice for the event registration, including actual registrations and additional items. Invoice Balance :This column represents what remains to be paid on the invoice. If the invoice column is green this amount should be $0.00 Actions :From the Actions drop-down on the far-right side you can send the invoice via email, download the invoice, enter check/cash payment, or enter credit card payment. Event Management-Payments Enter a Payment #On the Attendee Purchases Tab., click the Actions drop-down of the registration for which you are entering payment. #: #Select the payment type you are enter, Check or Credit Card. Refer to Billing: Accept Payments for the final steps. Send a Single Event Registration Invoice From the Attendees Purchases tab, :#Click the Actions drop-down of the registration for which you are sending the invoice :#The Send Email screen will be displayed, with the Billing Name in the To: field and the invoice automatically attached. :#Enter a Subject (required) and a message (optional) [or use a template] :#Click Send Approve Events submitted by Members NOTE: Members with Create or Full Control access to Events in the Info Hub may add events, but the events must be approved by staff. If you wish to auto-approve events, enable Auto Approve Events Submitted From Hub under Setup > Info Hub Settings. #When an event is submitted via the Info Hub, staff who have subscribed to the Event Submitted For Approval will receive a notification that an event has been submitted. See Configure User Notifications for details. #: #Click the Approve Event link in the email. If you are currently authenticated in the software (logged in), you will be taken to the event's Overview tab. If you are not currently authenticated in the software (not logged in), you will need to log-in and navigate to the event's Overview tab. #: #Click the in the General Information section. #: #Select Approved or Declined from the Status list. #Click Done. Cancel an Event See it in Action: [https://www.screencast.com/t/d2nQK1EKF Cancel An Event](/images/thumb/b/bf/EditInvoice.png/600px-EditInvoice.png)

