Difference between revisions of "Fundraising"
Cpetterson (talk | contribs) |
|||
| (71 intermediate revisions by 3 users not shown) | |||
| Line 1: | Line 1: | ||
| − | = | + | <p style="font-size:30px">NEW!! Find all of your answers in the [https://helpdesk.growthzone.com/kb/article/1814-contents-fundraising// GrowthZone Knowledge Base!]</p> |
| − | The | + | =='''<span style="color:#800080">Create a New Fundraising Campaign'''</span>== |
| + | ---- | ||
| + | #Click '''Fundraising''' in the Navigation Panel. The Fundraising module will display a list of all of your fundraising campaigns. | ||
| + | #:[[File:Fundraisers home 2020.jpg|1000px|center]] | ||
| + | #Click the '''Add New''' button. | ||
| + | #:[[File:Add campaign 2020.jpg|600px|center]] | ||
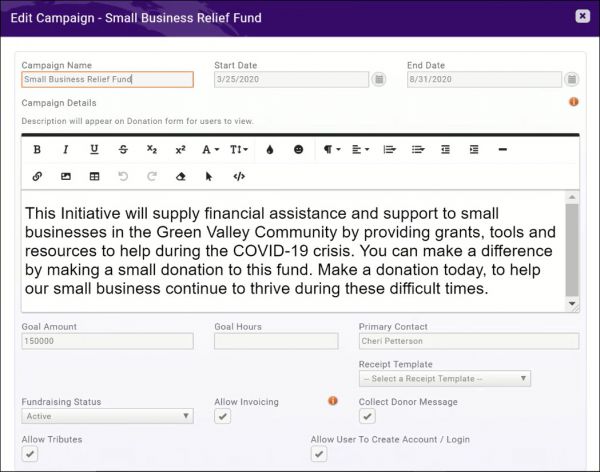
| + | #Configure the following settings: | ||
| + | #*'''Campaign Name''': Enter a name for this new campaign. This will be the display name for the campaign. | ||
| + | #*'''Start Date''' and '''End Date''': Enter the start and end dates. Donations may be accepted from start date to end date. | ||
| + | #*'''Description''' - Enter a description of the new campaign. | ||
| + | #*'''Goal Amount''': Enter your financial goals for this campaign. | ||
| + | #*'''Primary Contact''': Enter the name of the primary contact for the campaign. The contact must exist in your database. | ||
| + | #*'''Receipt Template''': Select the receipt template you wish to use for this campaign. [[Communications_Basics#Create_and_Manage_Email_Templates|Click here]] for details on managing and editing your templates. This will be the email sent in response to a donation. | ||
| + | #* '''Fundraising Status''': Select the status of this campaign from the drop-down list. | ||
| + | #*'''Allow Invoicing''': Select this option if you wish to allow a donors to choose to be billed for their donation. | ||
| + | #*'''Collect Donor Message''': Select this check-box if you wish to allow a donor to enter a message. | ||
| + | #*'''Allow Tributes''': Select this option if you wish to allow tributes. The donor can honor a specific donation in someone's name. | ||
| + | #*'''Allow User To Create Account / Login''': Select this option if you wish to allow the donor to create log-in credentials to the Info Hub. This is best practice to allow the donor to store their credit card information and be able to pay bills on-line. | ||
| + | #Click '''Done'''. | ||
| − | = | + | {| class="wikitable" |
| + | |- | ||
| + | | | ||
| + | [[File:Smallest.png|30px]] | ||
| + | | style="width: 100%;" | '''NOTE:''' Once the new fundraiser is saved, a '''Donation Link''' will be available on the '''Donations Setup''' tab. This link may be added to your web-page or distributed via email. | ||
| + | |} | ||
| + | Additional setup/configuration options for your fundraisers are described below. | ||
| − | + | =='''<span style="color:#800080">Customize Fundraiser Settings'''</span>== | |
| − | + | ---- | |
| − | + | ==='''<span style="color:#800080">Assign a Payment Gateway to your Fundraiser'''</span>=== | |
| − | + | ---- | |
| − | # | + | By default, the gateway that you have set in your '''Finance > General Settings''' will be used for processing credit card payments. If you wish to use a different gateway, you will need to set this up first. If you are using GrowthZone Pay, see '''[[Billing#Setup_GrowthZone_Pay|Setup GrowthZone Pay]]''' for instructions. If you are using an alternate processor, contact our support team for assistance. |
| − | + | To assign a different gateway to your fundraiser: | |
| − | + | #For the desired fundraiser, click the '''Donation Setup''' tab. | |
| − | + | #:[[File:Donation Setup 2020.jpg|1000px|center]] | |
| − | + | #Select the desired gateway from the '''Payment Gateway''' drop-down list. | |
| − | + | #Click '''Save'''. | |
| − | |||
| − | |||
| − | |||
| − | |||
| − | # | ||
| − | # | ||
| − | #Click ''' | ||
| − | < | + | ==='''<span style="color:#800080">Enable/Disable Organization Donation Option'''</span>=== |
| + | ---- | ||
| + | In cases where you would like donations to be submitted on behalf of organizations, rather than individuals, you will turn on '''Enable Organization Donation Option'''. In other cases, perhaps PAC contributions, where it is against federal regulations to collect PAC donations from companies or businesses, you may need to disable this option. | ||
| + | #For the desired fundraiser, click the '''Donation Setup''' tab. | ||
| + | #:[[File:Enable org donation 2020.jpg|1000px|center]] | ||
| + | #Check or un-check the '''Enable Organization Donation Option''' as needed. '''NOTE:''' This box is checked by default. | ||
| + | #Click '''Save'''. | ||
| − | After completing the initial setup | + | ==='''<span style="color:#800080">Associate Donation Terms to a Fundraiser'''</span>=== |
| + | ---- | ||
| + | After completing the initial setup, you can add terms/conditions to the Fundraiser: | ||
| + | #For the desired fundraiser, click the '''Donation Setup''' tab. | ||
| + | #:[[File:Donation terms 2020.jpg|1000px|center]] | ||
| + | #Enter your '''Donation Terms'''. | ||
| + | #Click '''Save'''. | ||
| − | # | + | ==='''<span style="color:#800080">Customize your Fundraiser Confirmation Message'''</span>=== |
| − | #Select a previously created good/service in the '''Item''' drop-down list '''OR''' click the [[File:Orange plus icon.jpg]] to add a new goods/service. [[Billing#Set_Up_Goods.2FServices|Click here]] for details on setting up good/services. | + | ---- |
| + | Provide a thank you message to donors, in the browser, after a donation is submitted. We have provided a default message, that you can use as designed or | ||
| + | customize to meet your needs. | ||
| + | #For the desired fundraiser, click the '''Donation Setup''' tab. | ||
| + | #:[[File:Donation confirmation 2020.jpg|1000px|center]] | ||
| + | #Enter your confirmation message in the '''Confirmation HTML for Fundraiser Donation''' text box. You can use the rich text editor options to customize your message. | ||
| + | #Click '''Save'''. | ||
| + | |||
| + | =='''<span style="color:#800080">Manage Goods/Services assigned to a Fundraiser'''</span>== | ||
| + | ---- | ||
| + | ==='''<span style="color:#800080">Add Goods/Services to a Fundraiser'''</span>=== | ||
| + | ---- | ||
| + | After completing the initial setup of the campaign, you will associate goods/services to the campaign on the '''Donation Setup''' tab. | ||
| + | #For the desired Fundraiser, click the '''Donation Setup''' tab. | ||
| + | #:[[File:fee items donation 2020.jpg|1000px|center]] | ||
| + | #On the '''Donation Setup''' tab, click the [[File:Orange plus icon.jpg]] icon in the '''Donation/Pledge Items''' section. | ||
| + | #:[[File:Add Donation Item 2020.jpg|600px|center]] | ||
| + | #Select a previously created good/service in the '''Item''' drop-down list '''OR''' click the [[File:Orange plus icon.jpg]] to add a new goods/service. [[Billing#Set_Up_Goods.2FServices|Click here]] for details on setting up good/services. '''NOTE''': Only those goods/services of type '''Donation''' will be available for selection. | ||
#If this fee item is a pledge, click the '''Is a Pledge''' check-box. | #If this fee item is a pledge, click the '''Is a Pledge''' check-box. | ||
| − | #To | + | #'''Default To Suggested Amount''': Select this check-box if you wish your donation form to default the donation amount to the suggested amount. Donors would be able to over-ride this amount if they wish. |
| − | |||
#On the '''Edit Amounts''' screen, configure the following: | #On the '''Edit Amounts''' screen, configure the following: | ||
| − | #*'''Minimum Amount''' | + | #*'''Minimum Amount''': This setting allows you to define the minimum donation accepted. If '''Show Minimum Amount''' is then enabled, this will display on your fundraiser page. |
| − | #*'''Suggested Amount''' | + | #*'''Show Minimum Amount''': If you wish to display the minimum amount on your donation page, enable this option. |
| − | #*''' | + | #*'''Suggested Amount''': This setting allows you to define the suggested dollar value of a donation. If you enable '''Default to Suggested Amount''', this value will automatically be populated on the fundraiser page. |
| − | # | + | #*Add additional '''Suggested Amounts''': Click the [[File:orange plus icon.jpg]] adjacent to '''Suggested Amounts''' to add additional options. When this is set, your fundraiser page will include a drop-down list of these amounts for selection. |
| − | # | + | #*'''Allow donor to select donation start date''': If the donor selects a frequency other than '''One Time''', he/she will have the option to choose the start date for their recurring donation. If this option is not selected, the start date begins on the current date. |
| + | #*'''Allow Custom Amount''': Select this check box to allow donors to enter any donation amount they wish. | ||
| + | #Click '''Done'''. | ||
| + | #Click '''Save''' on the '''Donation Setup''' page. | ||
| + | Repeat the steps above to add additional donation items. | ||
| + | ==='''<span style="color:#800080">Edit an Existing Goods/Services assigned to a Fundraiser'''</span>=== | ||
| + | ---- | ||
| + | #For the desired Fundraiser, click the '''Donation Setup''' tab. | ||
| + | #:[[File:Edit donation item 2020.jpg|800px|center]] | ||
| + | #In the '''Donation/Pledge Items''' section, click the [[File:Cp orange pencil.jpg|25px]] icon for the item you wish to change. | ||
| + | #:[[File:Edit existing donation item 2020.jpg|600px|center]] | ||
| + | #Make desired changes. | ||
#Click '''Done'''. | #Click '''Done'''. | ||
| − | #Click ''' | + | ==='''<span style="color:#800080">Remove a Goods/Services assigned to a Fundraiser'''</span>=== |
| + | ---- | ||
| + | #For the desired Fundraiser, click the '''Donation Setup''' tab. | ||
| + | #:[[File:Delete donation item 2020.jpg|800px|center]] | ||
| + | #Click the [[File:Orange x.jpg|15px]] in the '''Actions''' column for the item you wish to delete. | ||
| + | #:[[File:Delete donation confirm 2020.jpg|400px|center]] | ||
| + | #Click '''OK''' to delete the item. This action cannot be undone, and the item will no longer be available on your fundraiser page for selection. | ||
| + | |||
| + | =='''<span style="color:#800080">Sharing the Fundraiser Link'''</span>== | ||
| + | ---- | ||
| + | Once you have added a fundraiser, a link is automatically created on the '''Donation Setup''' tab. | ||
| − | + | [[File:Share fundraiser link 2020.jpg|1000px|center]] | |
| − | + | This link may be shared in many ways: | |
| − | + | *On your public web-site: Embed this link on your web-site. | |
| + | *Email/Newsletters: Send the link via email or include in your newsletters. | ||
| + | *Membership Application Form: You may choose to enable '''Collect Donations''' on your membership application form. See '''[[Membership_Management#View.2FCreate_your_Membership_Application_Form|View/Create your Membership Application Form]]''' for further instructions. | ||
| + | *Event Registrations: You may choose to enable '''Collect Donations''' on your event registration forms. See '''[[Event_Management#Collect_Donations_for_Fundraiser_during_Event_Registration|Collect Donations for Fundraiser during Event Registration]]''' for further instructions. | ||
| + | =='''<span style="color:#800080">Update Fundraiser Campaign Details'''</span>== | ||
| + | ---- | ||
| + | The details set when you initially setup your Fundraiser can be updated in the following manner: | ||
| + | #Click '''Fundraising''' in the Navigation Panel. The Fundraising module will display all of your fundraising campaigns. | ||
| + | #Click the hyper-link for the desired fundraiser. | ||
| + | #:[[File:Edit campaign 2020.jpg|800px|center]] | ||
| + | #Click the '''Actions''' common tasks button. | ||
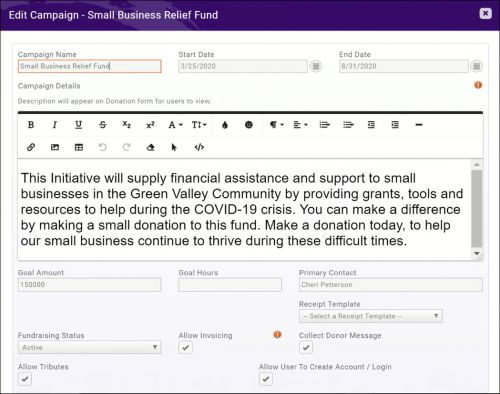
| + | #Click '''Edit Campaign'''. | ||
| + | #:[[File:Edit campaign screen 2020.jpg|600px|center]] | ||
| + | ==='''<span style="color:#800080">Update Fundraiser Title'''</span>=== | ||
| + | ---- | ||
#Click '''Fundraising''' in the Navigation Panel. The Fundraising module will display all of your fundraising campaigns. | #Click '''Fundraising''' in the Navigation Panel. The Fundraising module will display all of your fundraising campaigns. | ||
| − | |||
#Click the hyper-link for the desired fundraiser. | #Click the hyper-link for the desired fundraiser. | ||
| + | #:[[File:Edit campaign 2020.jpg|800px|center]] | ||
#Click the '''Actions''' common tasks button. | #Click the '''Actions''' common tasks button. | ||
| − | |||
#Click '''Edit Campaign'''. | #Click '''Edit Campaign'''. | ||
| − | #:[[File: | + | #:[[File:Edit campaign screen 2020.jpg|500px|center]] |
| + | #Make desired changes to the '''Title''' of the fundraiser. | ||
| + | #Click '''Done'''. | ||
| + | ==='''<span style="color:#800080">Update Fundraiser Description'''</span>=== | ||
| + | ---- | ||
| + | #Click '''Fundraising''' in the Navigation Panel. The Fundraising module will display all of your fundraising campaigns. | ||
| + | #Click the hyper-link for the desired fundraiser. | ||
| + | #:[[File:Edit campaign 2020.jpg|800px|center]] | ||
| + | #Click the '''Actions''' common tasks button. | ||
| − | + | ==='''<span style="color:#800080">Update Fundraiser Goals'''</span>=== | |
| − | [[ | + | ---- |
| + | #Click '''Fundraising''' in the Navigation Panel. The Fundraising module will display all of your fundraising campaigns. | ||
| + | #Click the hyper-link for the desired fundraiser. | ||
| + | #:[[File:Edit campaign 2020.jpg|800px|center]] | ||
| + | #Click the '''Actions''' common tasks button. | ||
| + | #Click '''Edit Campaign'''. | ||
| + | #:[[File:Edit campaign screen 2020.jpg|500px|center]] | ||
| + | #Make desired changes to the '''Goals'''of the fundraiser. | ||
| + | #Click '''Done'''. | ||
| + | ==='''<span style="color:#800080">Update Fundraiser Start/End Date'''</span>=== | ||
| + | ---- | ||
| + | #Click '''Fundraising''' in the Navigation Panel. The Fundraising module will display all of your fundraising campaigns. | ||
| + | #Click the hyper-link for the desired fundraiser. | ||
| + | #:[[File:Edit campaign 2020.jpg|800px|center]] | ||
| + | #Click the '''Actions''' common tasks button. | ||
| + | #Click '''Edit Campaign'''. | ||
| + | #:[[File:Edit campaign screen 2020.jpg|500px|center]] | ||
| + | #Make desired changes to the '''Start/End Dates'''of the fundraiser. | ||
| + | #Click '''Done'''. | ||
| + | ==='''<span style="color:#800080">Change Email sent to Donors'''</span>=== | ||
| + | ---- | ||
| + | #Click '''Fundraising''' in the Navigation Panel. The Fundraising module will display all of your fundraising campaigns. | ||
| + | #Click the hyper-link for the desired fundraiser. | ||
| + | #:[[File:Edit campaign 2020.jpg|800px|center]] | ||
| + | #Click the '''Actions''' common tasks button. | ||
| + | #Click '''Edit Campaign'''. | ||
| + | #:[[File:Edit campaign screen 2020.jpg|500px|center]] | ||
| + | #Select the desired '''Receipt Template'''of the fundraiser. | ||
| + | #Click '''Done'''. | ||
| + | ==='''<span style="color:#800080">Complete/Cancel a Fundraiser'''</span>=== | ||
| + | ---- | ||
| + | #Click '''Fundraising''' in the Navigation Panel. The Fundraising module will display all of your fundraising campaigns. | ||
| + | #Click the hyper-link for the desired fundraiser. | ||
| + | #:[[File:Edit campaign 2020.jpg|800px|center]] | ||
| + | #Click the '''Actions''' common tasks button. | ||
| + | #Click '''Edit Campaign'''. | ||
| + | #:[[File:Edit campaign screen 2020.jpg|500px|center]] | ||
| + | #Select the desired option from the '''Fundraising Status''' list. | ||
| + | #Click '''Done'''. | ||
| − | == | + | =='''<span style="color:#800080">Managing Donors/Donations'''</span>== |
| + | ---- | ||
| + | ==='''<span style="color:#800080">Donation Process Flow'''</span>=== | ||
| + | ---- | ||
| + | Whether a donation is entered via your donation form, or from the back-office, the following will occur: | ||
| + | #A thank you email is sent to the donor. | ||
| + | #A notification is sent to your staff members who have subscribed to the '''On-line Donation Notice'''. | ||
| + | #If the donation was paid by credit card: | ||
| + | #*An invoice and payment record are created, and displayed on the contact's '''Billing''' tab. | ||
| + | #*If they have chosen to make a recurring donation, this will be setup in the '''Scheduled Billing''' section of the '''Billing''' tab. | ||
| + | #If you allow invoicing and the donor requests to be invoiced: | ||
| + | #*The invoice will automatically be created. You will need to send the invoice out. | ||
| + | #*If the donor has chosen to make a recurring donation, a schedule will be setup on the contact's '''Billing''' tab. | ||
| + | {| class="wikitable" | ||
| + | |- | ||
| + | | | ||
| + | [[File:One Row.png|25px]] | ||
| + | | style="width: 100%"| '''NOTE:''' If the donor is not a contact in your database, a contact record will automatically be created. | ||
| + | |} | ||
| + | ==='''<span style="color:#800080">Manually Add Donations from the Back-Office'''</span>=== | ||
| + | ---- | ||
| + | When contacted by a donor, you can easily add their donation from the back-office. | ||
| + | #Click '''Fundraising''' in the left-hand navigation panel. The Fundraising module will display all of your fundraising campaigns. | ||
| + | #Click the hyper-link for the desired fundraiser. | ||
| + | #:[[File:Add donation bo 2020.jpg|800px|center]] | ||
| + | #Click the large purple '''Actions''' common tasks button. | ||
| + | #Click '''Add Donations'''. Your donations form will be displayed allowing you to enter the donation. | ||
| + | ==='''<span style="color:#800080">Add a Donor & Check Payment Simultaneously'''</span>=== | ||
| + | ---- | ||
| + | If you have received checks from individual who wish to make a one time donation, and who have not filled in your donation form, you can easily add the donation information and the payment at the same time. | ||
| + | {| class="wikitable" | ||
| + | |- | ||
| + | | | ||
| + | [[File:One Row.png|25px]] | ||
| + | | style="width: 100%"| '''NOTE:''' This option is '''NOT''' used to pay for existing invoices, only to enter a donor and a check received when a donation has not already been setup. Additionally, when a donation/payment is entered in this manner, the thank you email is not sent. | ||
| + | |} | ||
#Click '''Fundraising''' in the Navigation Panel. The Fundraising module will display all of your fundraising campaigns. | #Click '''Fundraising''' in the Navigation Panel. The Fundraising module will display all of your fundraising campaigns. | ||
| − | |||
#Click the hyper-link for the desired fundraiser. | #Click the hyper-link for the desired fundraiser. | ||
| − | #Click the '''Donation | + | #:[[File:Enter cash donation 2020.jpg|800px|center]] |
| + | #Click the purple '''Actions''' common tasks icon. | ||
| + | #Click '''Enter Cash Donation'''. | ||
| + | #:[[File:Add enter cash donation 2020.jpg|500px|center]] | ||
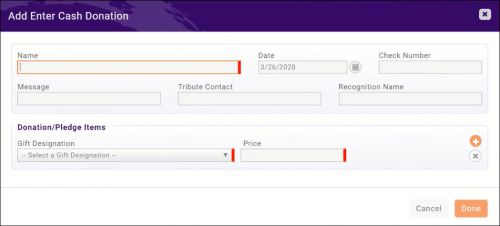
| + | #Enter the following: | ||
| + | #*'''Name''': Enter the name of the donor. '''NOTE:''' If the donor does not exist in your database as a contact, a new non-member contact will be created. | ||
| + | #*'''Date''': The current date will be displayed by default, and may be changed. | ||
| + | #*'''Check Number''': Enter the check number as a reference. | ||
| + | #*'''Message''': Enter the message the donor wishes displayed. | ||
| + | #*'''Tribute Contact''': Enter the person the donor is making this donation in tribute to. | ||
| + | #*'''Recognition Name''': The recognition name is the name of the person who will get recognized for the donation. | ||
| + | #*'''Donation Pledge Items''': Select the appropriate item from the drop-down list. | ||
| + | #*'''Price''': Enter the amount of the donation. | ||
| + | #Click '''Done'''. | ||
| − | + | After the donation and payment is entered, an invoice and payment will be displayed on the contact's '''Billing''' tab. A confirmation email is not automatically sent, so you may wish to do this manually. | |
| − | + | ==='''<span style="color:#800080">Send Out Invoices for Donations'''</span>=== | |
| − | + | ---- | |
| − | [[File: | + | Invoices are automatically created when a donor requests to be invoices. These invoices will be placed on the '''Pending Delivery''' tab of the '''Billing''' module. See '''[[Billing#Deliver_Invoices|Deliver Invoices]]''' for instructions. |
| − | + | ==='''<span style="color:#800080">Manage Recurring Donations'''</span>=== | |
| − | + | ---- | |
| + | ===='''<span style="color:#800080">View Details of a Recurring Donation'''</span>==== | ||
| + | ---- | ||
| + | #For the desired fundraiser, click the '''Recurring''' tab. | ||
| + | #:[[File:Recurring tab 2020.jpg|800px|center]] | ||
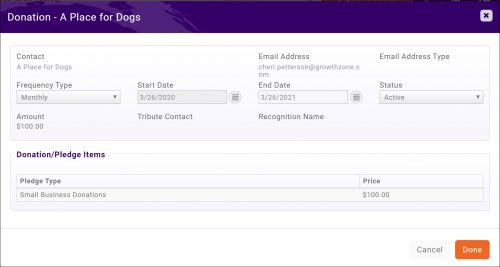
| + | #For the desired donor, click the [[File:Gray pencil 2020.jpg|25px]] in the '''Actions''' column. | ||
| + | #:[[File:Recurring donation details 2020.jpg|500px|center]] | ||
| + | ===='''<span style="color:#800080">Update End Date of a Recurring Donation'''</span>==== | ||
| + | ---- | ||
| + | #For the desired fundraiser, click the '''Recurring''' tab. | ||
| + | #:[[File:Recurring tab 2020.jpg|800px|center]] | ||
| + | #For the desired donor, click the [[File:Gray pencil 2020.jpg|25px]] in the '''Actions''' column. | ||
| + | #:[[File:Recurring donation details 2020.jpg|500px|center]] | ||
| + | #Enter the desired end date. | ||
| + | #Click '''Done'''. | ||
| + | Updating the end date will also update the end date on the contact's '''Scheduled Billing'''. | ||
| + | ===='''<span style="color:#800080">Update Frequency of a Recurring Donation'''</span>==== | ||
| + | ---- | ||
| + | #For the desired fundraiser, click the '''Recurring''' tab. | ||
| + | #:[[File:Recurring tab 2020.jpg|800px|center]] | ||
| + | #For the desired donor, click the [[File:Gray pencil 2020.jpg|25px]] in the '''Actions''' column. | ||
| + | #:[[File:Recurring donation details 2020.jpg|500px|center]] | ||
| + | #Select the desired frequency from the '''Frequency Type''' list. | ||
| + | #Click '''Done'''. | ||
| + | Updating the frequency will also update the frequency for the contact's '''Scheduled Billing''' on the '''Billing''' tab. | ||
| + | ===='''<span style="color:#800080">De-activate of a Recurring Donation'''</span>==== | ||
| + | ---- | ||
| + | #For the desired fundraiser, click the '''Recurring''' tab. | ||
| + | #:[[File:Recurring tab 2020.jpg|800px|center]] | ||
| + | #For the desired donor, click the [[File:Gray pencil 2020.jpg|25px]] in the '''Actions''' column. | ||
| + | #:[[File:Recurring donation details 2020.jpg|500px|center]] | ||
| + | #Select '''Inactive''' from the '''Status''' list. | ||
| + | #Click '''Done'''. | ||
| + | Deactivating the recurring donation will inactivate the scheduled billing for this item on the contact's '''Billing''' tab. | ||
| + | [[File:Scheduled billing inactive 2020.jpg|800px|center]] | ||
| − | ==View | + | =='''<span style="color:#800080">View All Donation Activity'''</span>== |
| + | ---- | ||
#Click '''Fundraising''' in the Navigation Panel. The Fundraising module will display all of your fundraising campaigns. | #Click '''Fundraising''' in the Navigation Panel. The Fundraising module will display all of your fundraising campaigns. | ||
#:[[File:Fundraising.jpg|center]] | #:[[File:Fundraising.jpg|center]] | ||
#Click the hyper-link for the desired fundraiser. | #Click the hyper-link for the desired fundraiser. | ||
| − | #Click the ''' | + | #Click the '''Donation Activity''' tab. The '''Donation Activity''' tab will display both one time and recurring donations. |
| − | [[File: | + | [[File:Dontation Activity.jpg|center]] |
| − | Click the [[File: | + | Click the [[File:View Donation Details.jpg]] to view the details of the donation. |
| − | + | [[File:Fundraising Donation Details.jpg|center]] | |
| − | + | On the '''Fundraising Donation Details''' screen you can edit the donation details, as well as add notes. | |
| − | ==View List of Donors== | + | =='''<span style="color:#800080">View List of Donors'''</span>== |
| + | ---- | ||
#Click '''Fundraising''' in the Navigation Panel. The Fundraising module will display all of your fundraising campaigns. | #Click '''Fundraising''' in the Navigation Panel. The Fundraising module will display all of your fundraising campaigns. | ||
| Line 98: | Line 306: | ||
[[File:Donors.jpg|center]] | [[File:Donors.jpg|center]] | ||
| − | == | + | =='''<span style="color:#800080">Send an E-mail all Donors'''</span>== |
| + | ---- | ||
| + | Communicating with your members, whether sending follow-up thank you emails or keeping them abreast of how the funds are being used, is critical to the success of your campaign. | ||
| − | #Click '''Fundraising''' in the | + | #Click '''Fundraising''' in the left-hand navigation panel. A list of your fundraising campaigns will be displayed. |
| − | |||
#Click the hyper-link for the desired fundraiser. | #Click the hyper-link for the desired fundraiser. | ||
| + | #:[[File:Donation send email 2020.jpg|800px|center]] | ||
#Click the '''Actions''' common tasks icon. | #Click the '''Actions''' common tasks icon. | ||
| − | #:[[File: | + | #Click '''Send Email to Donors'''. |
| − | # | + | #:[[File:Send donor email 2020.jpg|600px|center]] |
| + | #Compose your email and send. | ||
| + | |||
| + | For further information on working with emails see '''[[Communications_Basics#Send_an_Email|Send an Email]]'''. | ||
| + | |||
| + | ='''<span style="color:#800080">Fundraiser Reports'''</span>= | ||
| + | ---- | ||
| + | Several reports are available for managing and analyzing your Fundraisers. See '''[[Reports#Fundraiser_Reports|Fundraiser Reports]]'''. | ||
| − | =Fundraiser FAQ's= | + | ='''<span style="color:#800080">Fundraiser FAQ's'''</span>= |
| + | ---- | ||
| + | Click the links below for answers to frequently asked questions: | ||
| − | How do I edit and/or end a recurring donation? [[Fundraising# | + | *[[Fundraising#View_Recurring_Donations|How do I edit and/or end a recurring donation?]] |
| + | *[[Fundraising#Edit_Fundraiser_Campaign_details|How can I view and modify the default Fundraiser receipt template]]? | ||
| + | *[[Fundraising#Edit_Fundraiser_Campaign_details|How can I view and modify the default Fundraiser thank you template?]] | ||
| + | *[[Fundraising#Add_Donor_and_Check_Payment_Simultaneously|I have received multiple donation checks in the mail, how can I enter the donors and payments?]] | ||
| + | *[[Fundraising#Configure_a_Gateway_for_your_Fundraiser|How can I change the gateway used for a fundraising campaign?]] | ||
Latest revision as of 12:31, 1 April 2021
NEW!! Find all of your answers in the GrowthZone Knowledge Base!
Contents
- 1 Create a New Fundraising Campaign
- 2 Customize Fundraiser Settings
- 3 Manage Goods/Services assigned to a Fundraiser
- 4 Sharing the Fundraiser Link
- 5 Update Fundraiser Campaign Details
- 6 Managing Donors/Donations
- 7 View All Donation Activity
- 8 View List of Donors
- 9 Send an E-mail all Donors
- 10 Fundraiser Reports
- 11 Fundraiser FAQ's
Create a New Fundraising Campaign
- Click Fundraising in the Navigation Panel. The Fundraising module will display a list of all of your fundraising campaigns.
- Click the Add New button.
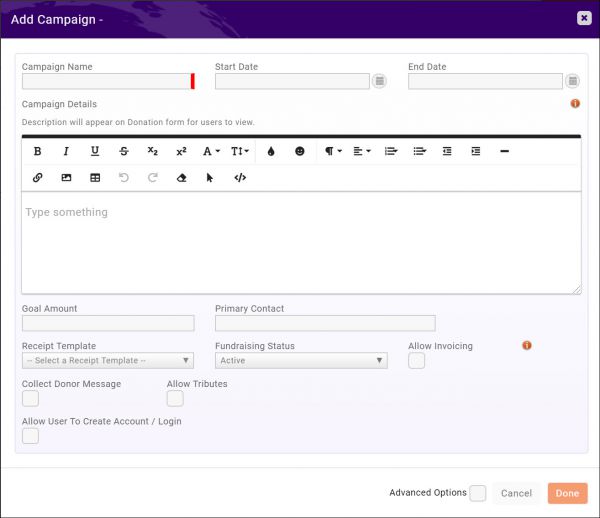
- Configure the following settings:
- Campaign Name: Enter a name for this new campaign. This will be the display name for the campaign.
- Start Date and End Date: Enter the start and end dates. Donations may be accepted from start date to end date.
- Description - Enter a description of the new campaign.
- Goal Amount: Enter your financial goals for this campaign.
- Primary Contact: Enter the name of the primary contact for the campaign. The contact must exist in your database.
- Receipt Template: Select the receipt template you wish to use for this campaign. Click here for details on managing and editing your templates. This will be the email sent in response to a donation.
- Fundraising Status: Select the status of this campaign from the drop-down list.
- Allow Invoicing: Select this option if you wish to allow a donors to choose to be billed for their donation.
- Collect Donor Message: Select this check-box if you wish to allow a donor to enter a message.
- Allow Tributes: Select this option if you wish to allow tributes. The donor can honor a specific donation in someone's name.
- Allow User To Create Account / Login: Select this option if you wish to allow the donor to create log-in credentials to the Info Hub. This is best practice to allow the donor to store their credit card information and be able to pay bills on-line.
- Click Done.
| NOTE: Once the new fundraiser is saved, a Donation Link will be available on the Donations Setup tab. This link may be added to your web-page or distributed via email. |
Additional setup/configuration options for your fundraisers are described below.
Customize Fundraiser Settings
Assign a Payment Gateway to your Fundraiser
By default, the gateway that you have set in your Finance > General Settings will be used for processing credit card payments. If you wish to use a different gateway, you will need to set this up first. If you are using GrowthZone Pay, see Setup GrowthZone Pay for instructions. If you are using an alternate processor, contact our support team for assistance. To assign a different gateway to your fundraiser:
- For the desired fundraiser, click the Donation Setup tab.
- Select the desired gateway from the Payment Gateway drop-down list.
- Click Save.
Enable/Disable Organization Donation Option
In cases where you would like donations to be submitted on behalf of organizations, rather than individuals, you will turn on Enable Organization Donation Option. In other cases, perhaps PAC contributions, where it is against federal regulations to collect PAC donations from companies or businesses, you may need to disable this option.
- For the desired fundraiser, click the Donation Setup tab.
- Check or un-check the Enable Organization Donation Option as needed. NOTE: This box is checked by default.
- Click Save.
Associate Donation Terms to a Fundraiser
After completing the initial setup, you can add terms/conditions to the Fundraiser:
- For the desired fundraiser, click the Donation Setup tab.
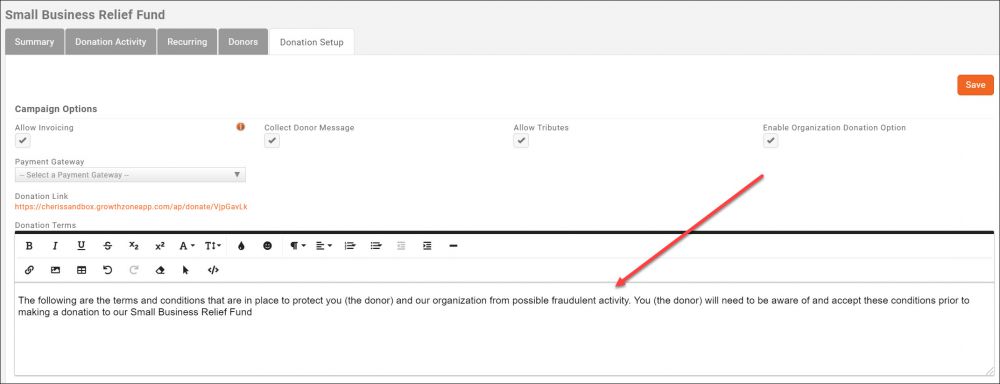
- Enter your Donation Terms.
- Click Save.
Customize your Fundraiser Confirmation Message
Provide a thank you message to donors, in the browser, after a donation is submitted. We have provided a default message, that you can use as designed or customize to meet your needs.
- For the desired fundraiser, click the Donation Setup tab.
- Enter your confirmation message in the Confirmation HTML for Fundraiser Donation text box. You can use the rich text editor options to customize your message.
- Click Save.
Manage Goods/Services assigned to a Fundraiser
Add Goods/Services to a Fundraiser
After completing the initial setup of the campaign, you will associate goods/services to the campaign on the Donation Setup tab.
- For the desired Fundraiser, click the Donation Setup tab.
- On the Donation Setup tab, click the
 icon in the Donation/Pledge Items section.
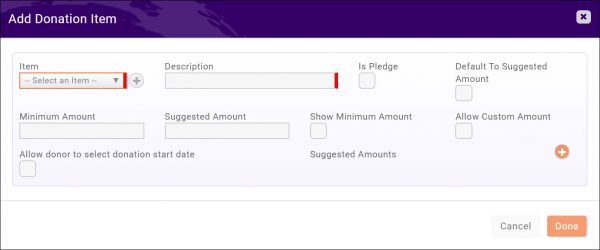
- Select a previously created good/service in the Item drop-down list OR click the
 to add a new goods/service. Click here for details on setting up good/services. NOTE: Only those goods/services of type Donation will be available for selection.
 - If this fee item is a pledge, click the Is a Pledge check-box.
- Default To Suggested Amount: Select this check-box if you wish your donation form to default the donation amount to the suggested amount. Donors would be able to over-ride this amount if they wish.
- On the Edit Amounts screen, configure the following:
- Minimum Amount: This setting allows you to define the minimum donation accepted. If Show Minimum Amount is then enabled, this will display on your fundraiser page.
- Show Minimum Amount: If you wish to display the minimum amount on your donation page, enable this option.
- Suggested Amount: This setting allows you to define the suggested dollar value of a donation. If you enable Default to Suggested Amount, this value will automatically be populated on the fundraiser page.
- Add additional Suggested Amounts: Click the
 adjacent to Suggested Amounts to add additional options. When this is set, your fundraiser page will include a drop-down list of these amounts for selection.
 - Allow donor to select donation start date: If the donor selects a frequency other than One Time, he/she will have the option to choose the start date for their recurring donation. If this option is not selected, the start date begins on the current date.
- Allow Custom Amount: Select this check box to allow donors to enter any donation amount they wish.
- Click Done.
- Click Save on the Donation Setup page.
Repeat the steps above to add additional donation items.
Edit an Existing Goods/Services assigned to a Fundraiser
- For the desired Fundraiser, click the Donation Setup tab.
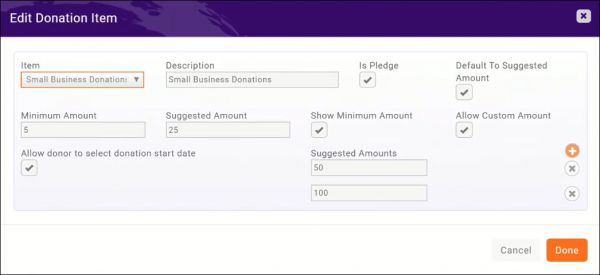
- In the Donation/Pledge Items section, click the
 icon for the item you wish to change.
- Make desired changes.
- Click Done.
Remove a Goods/Services assigned to a Fundraiser
- For the desired Fundraiser, click the Donation Setup tab.
- Click the
 in the Actions column for the item you wish to delete.
- Click OK to delete the item. This action cannot be undone, and the item will no longer be available on your fundraiser page for selection.
Sharing the Fundraiser Link
Once you have added a fundraiser, a link is automatically created on the Donation Setup tab.
This link may be shared in many ways:
- On your public web-site: Embed this link on your web-site.
- Email/Newsletters: Send the link via email or include in your newsletters.
- Membership Application Form: You may choose to enable Collect Donations on your membership application form. See View/Create your Membership Application Form for further instructions.
- Event Registrations: You may choose to enable Collect Donations on your event registration forms. See Collect Donations for Fundraiser during Event Registration for further instructions.
Update Fundraiser Campaign Details
The details set when you initially setup your Fundraiser can be updated in the following manner:
- Click Fundraising in the Navigation Panel. The Fundraising module will display all of your fundraising campaigns.
- Click the hyper-link for the desired fundraiser.
- Click the Actions common tasks button.
- Click Edit Campaign.
Update Fundraiser Title
- Click Fundraising in the Navigation Panel. The Fundraising module will display all of your fundraising campaigns.
- Click the hyper-link for the desired fundraiser.
- Click the Actions common tasks button.
- Click Edit Campaign.
- Make desired changes to the Title of the fundraiser.
- Click Done.
Update Fundraiser Description
- Click Fundraising in the Navigation Panel. The Fundraising module will display all of your fundraising campaigns.
- Click the hyper-link for the desired fundraiser.
- Click the Actions common tasks button.
Update Fundraiser Goals
- Click Fundraising in the Navigation Panel. The Fundraising module will display all of your fundraising campaigns.
- Click the hyper-link for the desired fundraiser.
- Click the Actions common tasks button.
- Click Edit Campaign.
- Make desired changes to the Goalsof the fundraiser.
- Click Done.
Update Fundraiser Start/End Date
- Click Fundraising in the Navigation Panel. The Fundraising module will display all of your fundraising campaigns.
- Click the hyper-link for the desired fundraiser.
- Click the Actions common tasks button.
- Click Edit Campaign.
- Make desired changes to the Start/End Datesof the fundraiser.
- Click Done.
Change Email sent to Donors
- Click Fundraising in the Navigation Panel. The Fundraising module will display all of your fundraising campaigns.
- Click the hyper-link for the desired fundraiser.
- Click the Actions common tasks button.
- Click Edit Campaign.
- Select the desired Receipt Templateof the fundraiser.
- Click Done.
Complete/Cancel a Fundraiser
- Click Fundraising in the Navigation Panel. The Fundraising module will display all of your fundraising campaigns.
- Click the hyper-link for the desired fundraiser.
- Click the Actions common tasks button.
- Click Edit Campaign.
- Select the desired option from the Fundraising Status list.
- Click Done.
Managing Donors/Donations
Donation Process Flow
Whether a donation is entered via your donation form, or from the back-office, the following will occur:
- A thank you email is sent to the donor.
- A notification is sent to your staff members who have subscribed to the On-line Donation Notice.
- If the donation was paid by credit card:
- An invoice and payment record are created, and displayed on the contact's Billing tab.
- If they have chosen to make a recurring donation, this will be setup in the Scheduled Billing section of the Billing tab.
- If you allow invoicing and the donor requests to be invoiced:
- The invoice will automatically be created. You will need to send the invoice out.
- If the donor has chosen to make a recurring donation, a schedule will be setup on the contact's Billing tab.
| NOTE: If the donor is not a contact in your database, a contact record will automatically be created. |
Manually Add Donations from the Back-Office
When contacted by a donor, you can easily add their donation from the back-office.
- Click Fundraising in the left-hand navigation panel. The Fundraising module will display all of your fundraising campaigns.
- Click the hyper-link for the desired fundraiser.
- Click the large purple Actions common tasks button.
- Click Add Donations. Your donations form will be displayed allowing you to enter the donation.
Add a Donor & Check Payment Simultaneously
If you have received checks from individual who wish to make a one time donation, and who have not filled in your donation form, you can easily add the donation information and the payment at the same time.
| NOTE: This option is NOT used to pay for existing invoices, only to enter a donor and a check received when a donation has not already been setup. Additionally, when a donation/payment is entered in this manner, the thank you email is not sent. |
- Click Fundraising in the Navigation Panel. The Fundraising module will display all of your fundraising campaigns.
- Click the hyper-link for the desired fundraiser.
- Click the purple Actions common tasks icon.
- Click Enter Cash Donation.
- Enter the following:
- Name: Enter the name of the donor. NOTE: If the donor does not exist in your database as a contact, a new non-member contact will be created.
- Date: The current date will be displayed by default, and may be changed.
- Check Number: Enter the check number as a reference.
- Message: Enter the message the donor wishes displayed.
- Tribute Contact: Enter the person the donor is making this donation in tribute to.
- Recognition Name: The recognition name is the name of the person who will get recognized for the donation.
- Donation Pledge Items: Select the appropriate item from the drop-down list.
- Price: Enter the amount of the donation.
- Click Done.
After the donation and payment is entered, an invoice and payment will be displayed on the contact's Billing tab. A confirmation email is not automatically sent, so you may wish to do this manually.
Send Out Invoices for Donations
Invoices are automatically created when a donor requests to be invoices. These invoices will be placed on the Pending Delivery tab of the Billing module. See Deliver Invoices for instructions.
Manage Recurring Donations
View Details of a Recurring Donation
- For the desired fundraiser, click the Recurring tab.
- For the desired donor, click the
 in the Actions column.
Update End Date of a Recurring Donation
- For the desired fundraiser, click the Recurring tab.
- For the desired donor, click the
 in the Actions column.
- Enter the desired end date.
- Click Done.
Updating the end date will also update the end date on the contact's Scheduled Billing.
Update Frequency of a Recurring Donation
- For the desired fundraiser, click the Recurring tab.
- For the desired donor, click the
 in the Actions column.
- Select the desired frequency from the Frequency Type list.
- Click Done.
Updating the frequency will also update the frequency for the contact's Scheduled Billing on the Billing tab.
De-activate of a Recurring Donation
- For the desired fundraiser, click the Recurring tab.
- For the desired donor, click the
 in the Actions column.
- Select Inactive from the Status list.
- Click Done.
Deactivating the recurring donation will inactivate the scheduled billing for this item on the contact's Billing tab.
View All Donation Activity
- Click Fundraising in the Navigation Panel. The Fundraising module will display all of your fundraising campaigns.
- Click the hyper-link for the desired fundraiser.
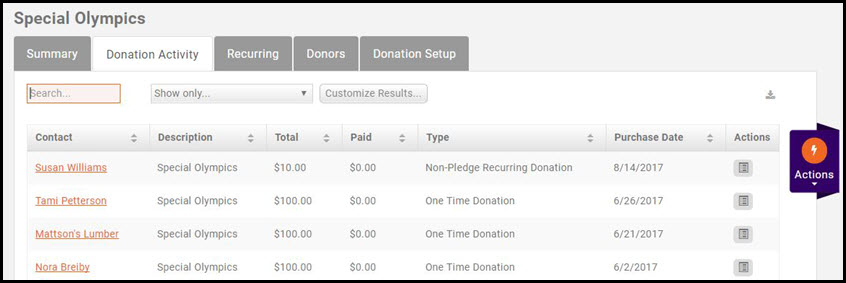
- Click the Donation Activity tab. The Donation Activity tab will display both one time and recurring donations.
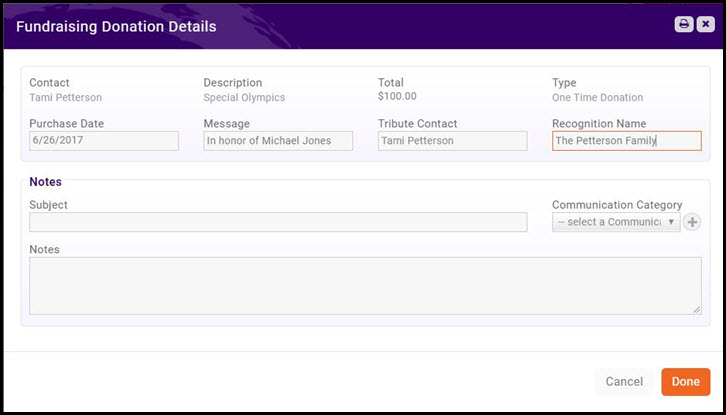
Click the ![]() to view the details of the donation.
to view the details of the donation.
On the Fundraising Donation Details screen you can edit the donation details, as well as add notes.
View List of Donors
- Click Fundraising in the Navigation Panel. The Fundraising module will display all of your fundraising campaigns.
- Click the hyper-link for the desired fundraiser.
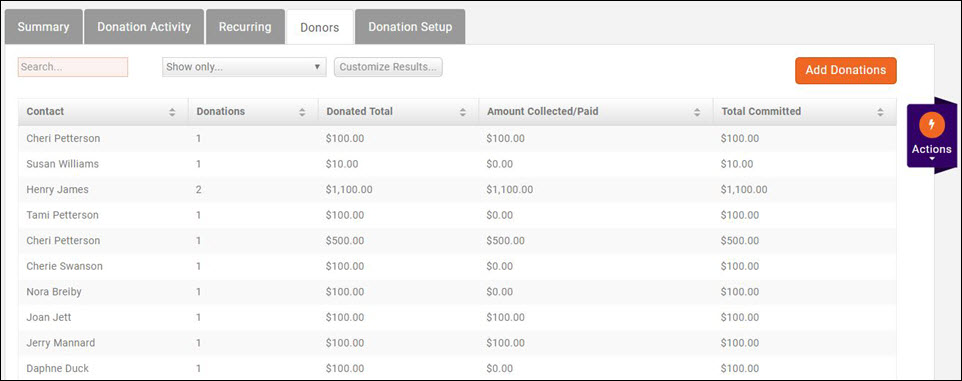
- Click the Donors tab to display the list of all donors to this campaign.
Send an E-mail all Donors
Communicating with your members, whether sending follow-up thank you emails or keeping them abreast of how the funds are being used, is critical to the success of your campaign.
- Click Fundraising in the left-hand navigation panel. A list of your fundraising campaigns will be displayed.
- Click the hyper-link for the desired fundraiser.
- Click the Actions common tasks icon.
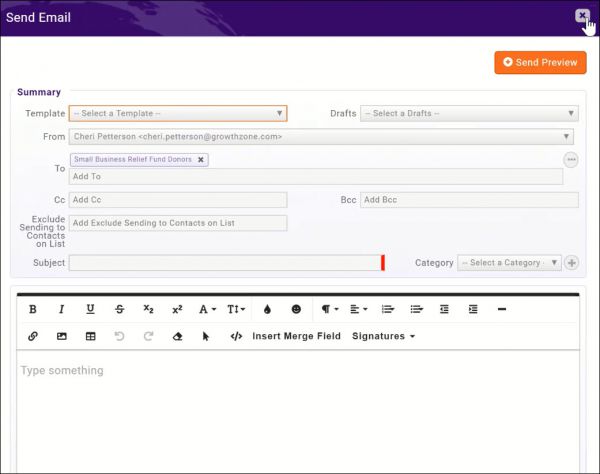
- Click Send Email to Donors.
- Compose your email and send.
For further information on working with emails see Send an Email.
Fundraiser Reports
Several reports are available for managing and analyzing your Fundraisers. See Fundraiser Reports.
Fundraiser FAQ's
Click the links below for answers to frequently asked questions:
- How do I edit and/or end a recurring donation?
- How can I view and modify the default Fundraiser receipt template?
- How can I view and modify the default Fundraiser thank you template?
- I have received multiple donation checks in the mail, how can I enter the donors and payments?
- How can I change the gateway used for a fundraising campaign?

