Difference between revisions of "Fundraising"
Jump to navigation
Jump to search
Cpetterson (talk | contribs) (Created page with "=Overview= The GrowthZone Fundraising module provides the functionality to manage fundraising campaigns for both pledge-based and non-pledge donations. =Add a New Fundraisin...") |
Cpetterson (talk | contribs) |
||
| Line 7: | Line 7: | ||
#Click '''Fundraising''' in the Navigation Panel. The Fundraising module will display all of your fundraising campaigns. | #Click '''Fundraising''' in the Navigation Panel. The Fundraising module will display all of your fundraising campaigns. | ||
#:[[File:Fundraising.jpg|center]] | #:[[File:Fundraising.jpg|center]] | ||
| − | #Click the '''Add New'' button. | + | #Click the '''Add New''' button. |
#:[[File:Add Edit Campaign.jpg|center]] | #:[[File:Add Edit Campaign.jpg|center]] | ||
#Enter a '''Campaign Name''' for the new campaign. | #Enter a '''Campaign Name''' for the new campaign. | ||
| Line 14: | Line 14: | ||
#Enter the '''Goal Amount''' for the new campaign. This is a dollar value goal. | #Enter the '''Goal Amount''' for the new campaign. This is a dollar value goal. | ||
#Enter the '''Primary Contact''' for this campaign. | #Enter the '''Primary Contact''' for this campaign. | ||
| − | #Select the '''Receipt Template''' you wish to use for this campaign. | + | #Select the '''Receipt Template''' you wish to use for this campaign. [[Communications_Basics#Create_and_Manage_Email_Templates|Click here]] for details on managing and editing your templates. |
| − | #Select the '''Thank You Template''' you wish to use for this campaign. | + | #Select the '''Thank You Template''' you wish to use for this campaign. [[Communications_Basics#Create_and_Manage_Email_Templates|Click here]] for details on managing and editing your templates. |
#Select the '''Fundraising Status''' for this campaign from the drop-down list. | #Select the '''Fundraising Status''' for this campaign from the drop-down list. | ||
#If you wish to allow a donor to be billed, click the '''Allow Invoicing''' check-box. | #If you wish to allow a donor to be billed, click the '''Allow Invoicing''' check-box. | ||
| Line 23: | Line 23: | ||
#Click '''Done'''. | #Click '''Done'''. | ||
| − | After completing the initial setup of the campaign, you will associate fee items to the campaign on the '''Donation Setup''' tab | + | After completing the initial setup of the campaign, you will associate fee items to the campaign on the '''Donation Setup''' tab. |
| − | # | + | #On the '''Donation Setup''' tab, click the '''+''' in the '''Donation/Pledge Items''' section. |
| + | #Select a previously created good/service in the '''Item''' drop-down list '''OR''' click the [[File:Orange plus icon.jpg]] to add a new goods/service. [[Billing#Set_Up_Goods.2FServices|Click here]] for details on setting up good/services. | ||
| + | #If this fee item is a pledge, click the '''Is a Pledge''' check-box. | ||
| + | #To edit the amounts associated with this good/service click the pencil icon. | ||
| + | #:[[File:Edit Amounts.jpg|center]] | ||
| + | #On the '''Edit Amounts''' screen, configure the following: | ||
| + | #*'''Minimum Amount''' - this setting allows you to define the minimum donation dollar value'''Suggested Amount. | ||
| + | #*'''Suggested Amount''' - this setting allows you to define the suggested dollar value of a donation. | ||
| + | #*'''Show Minimum Amount''' - select this check-box if you wish to display the minimum amount on the donation form. | ||
| + | #:'''Allow donor to select donation start date''' - click this check box to allow a donor who is contributing on a recurring basis to define their own start date. | ||
| + | #:'''Allow Custom Amount''' - select this check box to allow donors to enter any donation amount. | ||
| + | #Click '''Done'''. | ||
| + | #Click '''Save'''. | ||
Revision as of 14:52, 10 July 2017
Overview
The GrowthZone Fundraising module provides the functionality to manage fundraising campaigns for both pledge-based and non-pledge donations.
Add a New Fundraising Campaign
- Click Fundraising in the Navigation Panel. The Fundraising module will display all of your fundraising campaigns.
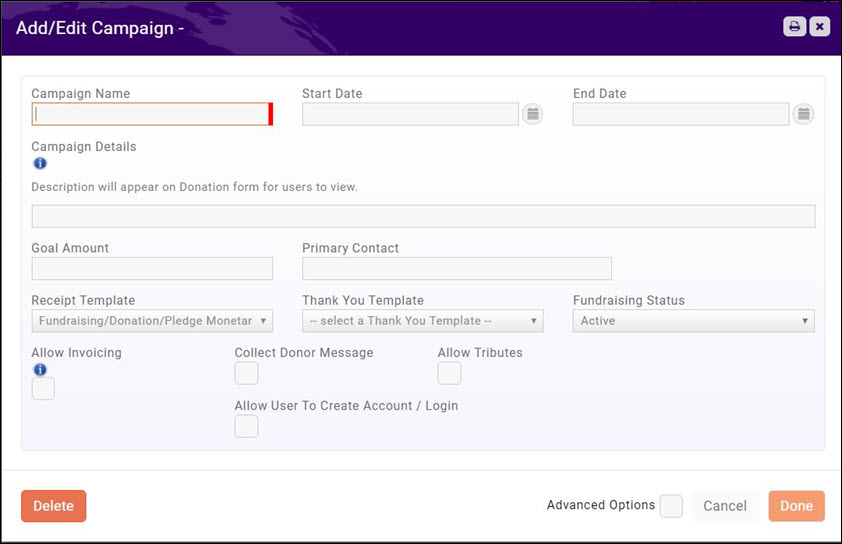
- Click the Add New button.
- Enter a Campaign Name for the new campaign.
- Enter the Start Date and End Date for this campaign.
- Enter a Description of the new campaign.
- Enter the Goal Amount for the new campaign. This is a dollar value goal.
- Enter the Primary Contact for this campaign.
- Select the Receipt Template you wish to use for this campaign. Click here for details on managing and editing your templates.
- Select the Thank You Template you wish to use for this campaign. Click here for details on managing and editing your templates.
- Select the Fundraising Status for this campaign from the drop-down list.
- If you wish to allow a donor to be billed, click the Allow Invoicing check-box.
- If you wish to allow a donor to enter a message, click the Collect Donor Message check-box.
- If you wish to allow tributes, click the Allow Tributes check-box.
- If you wish to allow the donor to create log-in credentials to the Info Hub, click the Allow User To Create Account / Login. This is best practice to allow the donor to store their credit card information.
- Click Done.
After completing the initial setup of the campaign, you will associate fee items to the campaign on the Donation Setup tab.
- On the Donation Setup tab, click the + in the Donation/Pledge Items section.
- Select a previously created good/service in the Item drop-down list OR click the
 to add a new goods/service. Click here for details on setting up good/services.
 - If this fee item is a pledge, click the Is a Pledge check-box.
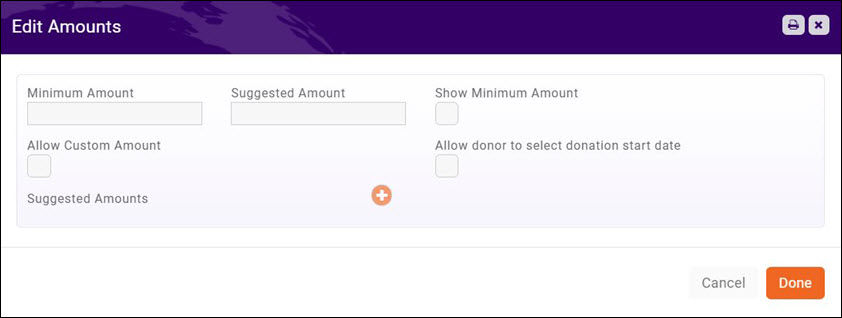
- To edit the amounts associated with this good/service click the pencil icon.
- On the Edit Amounts screen, configure the following:
- Minimum Amount - this setting allows you to define the minimum donation dollar valueSuggested Amount.
- Suggested Amount - this setting allows you to define the suggested dollar value of a donation.
- Show Minimum Amount - select this check-box if you wish to display the minimum amount on the donation form.
- Allow donor to select donation start date - click this check box to allow a donor who is contributing on a recurring basis to define their own start date.
- Allow Custom Amount - select this check box to allow donors to enter any donation amount.
- Click Done.
- Click Save.


