Difference between revisions of "Web Content"
| (79 intermediate revisions by 7 users not shown) | |||
| Line 1: | Line 1: | ||
| − | =Overview= | + | <p style="font-size:30px">NEW!! Find all of your answers in the [https://helpdesk.growthzone.com/kb/article/854-contents-web-content// GrowthZone Knowledge Base!]</p> |
| + | |||
| + | =='''<span style="color:#800080">Web Content Overview'''</span>== | ||
| + | ---- | ||
Web Content provides you with the ability to create pages on your website with templates for Blog, Coupon/Deals, Job Postings, News and other ideas you create. You may add additional content types as needed to your database, then include them on your web-site, or the Info Hub or both. | Web Content provides you with the ability to create pages on your website with templates for Blog, Coupon/Deals, Job Postings, News and other ideas you create. You may add additional content types as needed to your database, then include them on your web-site, or the Info Hub or both. | ||
| Line 8: | Line 11: | ||
*'''Coupons/Deals''' – list of specials or online coupons. You may have one type for members only and another page listing deals available to any website viewer. | *'''Coupons/Deals''' – list of specials or online coupons. You may have one type for members only and another page listing deals available to any website viewer. | ||
*'''News''' – list of announcements, articles, newsletters or any other type of post. Create a news type for your association newsletters and create another for membership announcements. | *'''News''' – list of announcements, articles, newsletters or any other type of post. Create a news type for your association newsletters and create another for membership announcements. | ||
| − | *'''Blog''' – a simple posting feature for creating blog posts. | + | *'''Blog''' – a simple posting feature for creating blog posts. '''Note:''' Blog does not currently contain ability to comment. |
| − | |||
*'''Testimonials''' – share your membership stories. Include their logo/photo. Or use as a member of the month posting. | *'''Testimonials''' – share your membership stories. Include their logo/photo. Or use as a member of the month posting. | ||
| − | =Content | + | {| class="wikitable" |
| + | |- | ||
| + | | | ||
| + | [[File:Smallest.png|25px]] | ||
| + | | style="width: 100%"| '''Did you know...''' A default email template, '''Encourage Posting of Deals, Jobs, News, Events''', has been provided in your database to be used to encourage contacts to submit deals, jobs, events, etc. See '''[[Communications_Basics#View_a_Default_Email_Template|View Default Email Templates]]''' for further information on working with templates. | ||
| + | |} | ||
| + | |||
| + | =='''<span style="color:#800080">Web Content Initial Setup'''</span>== | ||
| + | ---- | ||
On installation of the software, standard content types (Job Postings, Coupons/Deals, News, Blog and Testimonial) are in your database. Content Types are used to organize your content on the web, as well as report and filter within the software. To begin using these, you will need to enable their use. | On installation of the software, standard content types (Job Postings, Coupons/Deals, News, Blog and Testimonial) are in your database. Content Types are used to organize your content on the web, as well as report and filter within the software. To begin using these, you will need to enable their use. | ||
| − | == | + | ==='''<span style="color:#800080">Setup Web Content Category Lists'''</span>=== |
| + | ---- | ||
| + | When posting job, hot deals, etc. you will assign these to categories to make it easy for people to find what they are looking for. When setting up the category lists, they must be configured as "Can be Used Publicly'''. | ||
| + | |||
| + | To setup your categories: | ||
| + | #Click '''Setup''' in the left-hand navigation panel. | ||
| + | #Click '''Category Lists''' in the '''Categories''' section. | ||
| + | #:[[File:Category lists 2020.jpg|800px|center]] | ||
| + | #Click the '''Add''' button. | ||
| + | #Select the desired content type from the '''Category Type''' list. For your web-content modules, select '''Job''', '''Hot Deals''', or '''Content'''. | ||
| + | #Enter a '''Name''' for the category list. | ||
| + | #*'''IMPORTANT''': Select the text box for '''Can be Used Publicly'''. | ||
| + | #*Select the '''Is Active''' check-box to enable use of this list. If you no longer wish to use a category list, best practice is to de-activate the list. | ||
| + | #*Enter a '''Description''', this is optional. | ||
| + | #Click '''Done'''. Your new category list is now displayed. | ||
| + | #Populate your Category list with the desired categories: | ||
| + | #Click the hyper-link for the new category list. | ||
| + | #:[[File:Cat List News.jpg|800px|center]] | ||
| + | #:The '''Category Items''' dialog box will be displayed. | ||
| + | #:[[File:Cat Items CP.jpg|600px|center]] | ||
| + | #*Click '''Add''' to add an individual category '''OR''' click '''Add Multiple''' to add a list of items (shown below). | ||
| + | #:[[File:Add Multiple.jpg|400px|center]] | ||
| + | #Enter the names of your category items (one per line). If you have selected to add an individual item, you will only enter one item. | ||
| + | #Click '''Done'''. | ||
| + | ==='''<span style="color:#800080">Enable Web Content Types'''</span>=== | ||
| + | ---- | ||
| + | GrowthZone has provided you with a variety of web content options. To use these, you must first enable the types that you wish to use. | ||
#Click '''Web Content''' in the Navigation Panel. | #Click '''Web Content''' in the Navigation Panel. | ||
#Click the '''Add Common Lists''' button. | #Click the '''Add Common Lists''' button. | ||
| − | #Select the content types that you wish to enable on the '''Setup Common Content''' screen. | + | #Select the content types that you wish to enable on the '''Setup Common Content''' screen. '''NOTE:''' You may rename the lists to meet your business process. For Example: if you prefer you may change "Job Postings" to be listed as "Careers" instead of "Jobs". |
| − | |||
#: [[File:Setup Common Content.jpg|frame|center]] | #: [[File:Setup Common Content.jpg|frame|center]] | ||
#Click '''Done'''. | #Click '''Done'''. | ||
| − | Once you refresh/reload the Web Content page, you will see that a new tab is created for each content type you add. | + | Once you refresh/reload the Web Content page, you will see that a new tab is created for each content type you add. If you have changed the name of the content lists, for example you have renamed '''Jobs''' to '''Careers''', the tabs will reflect your customization. Once you have enabled web content list types, you can further configure those as described below. |
| − | < | + | |
| + | ==='''<span style="color:#800080">Configure your Web Content Types'''</span>=== | ||
| + | ---- | ||
| + | Additional configuration may be done on your web content types. You will be able to define where the web content is displayed, whether the public and/or members can submit, whether subscription to notifications is allowed, etc. | ||
| + | |||
| + | #Click '''Web Content''' in the Navigation Panel. | ||
| + | #Click the '''Setup''' tab. | ||
| + | #Click the hyper-link for the web content type you wish to configure. | ||
| + | #:*'''Subscription Notification Frequency''': For those subscribed to this list, select when they will be notified of additions to the list. '''As It Happens''' provides an instant alert to the subscriber. '''Note:''' The database is seeded with three lists ('''Public Subscriptions for Hot Deals''', '''Public Subscriptions for Job Postings''', '''Public Subscriptions for Blog Posts''') to which you may allow members and the public to subscribe. When new web content is approved, the automated email message '''Web Content Published''' will be sent to those who have subscribed. | ||
| + | #:*'''Category List''': Select the category to which this list belongs. The category will be used for display on your web-page (For example, you could create a category for restaurants for Hot Deals; or a category called full-time for Job Postings), reporting and filtering. A new category may be created dynamically by clicking the '''+''' button. | ||
| + | #:*'''Options''': These options allow you to define whether members, public or both may view/add to this list. | ||
| + | #:**'''Allow Public to Subscribe''': Select this option if you wish to allow the general public to subscribe to this list. When selected, the public will be able to subscribe, and will become member of the public subscription lists ('''Public Subscriptions for Hot Deals''', '''Public Subscriptions for Job Postings''', '''Public Subscriptions for Blog Posts''') dependent on the type of content list you are creating. When you display the content list on your public web-site the link '''Subscribe to receive Hot Deals notifications!''' will be included on the page. See '''[[Web_Content#Public_Subscription_to_Web_Content|Public Subscription to Web Content]]''' for further details. | ||
| + | #:**'''Visible in Info Hub''': Select this option if you wish to display this list on Info Hub. If you are setting up Member to Member content, you would select this option and not selecting '''Allow Public Access''' option. When this option is selected the '''Optional Hub Icon''' field will be displayed. You may enter a a '''Font Awesome''' icon (Version 5) to be displayed on the navigation panel for this item in the Info Hub. For Example: Entering '''fa-shopping-basket''' will display a shopping basket in the Info Hub menu, as shown below. Visit the '''[https://fontawesome.com/icons?d=gallery&m=free Font Awesome]''' website for a complete list of icons. The icons you choose must be for supported '''FREE''' icons Version 5. '''Did you know'''...if you have enabled '''Show Public Web Content''' in your directory listing(s), this icon will be displayed on the member's directory listing. See '''[[Membership_Management#Understanding_Directory_Display_Settings|Understanding Directory Display Settings]]''' for further information. | ||
| + | #:**'''Allow Info Hub Users to Submit''': Select this option if you wish to allow your members to submit content for this list. If selected, a button will be displayed on Info Hub to allow them to do so. Dependent on the access level granted to the member, the content may be automatically approved or require approval from the back office. | ||
| + | #:*'''Custom Fields''': Default custom field will be displayed. These will vary dependent on the web content type you are working with. You can remove these fields and add additional custom fields as needed. | ||
| + | #Once you have completed all of the configuration for your web content type, click '''Done'''. | ||
| + | |||
| + | ==='''<span style="color:#800080">Set Pricing for Web Content'''</span>=== | ||
| + | ---- | ||
| + | To generate non-dues revenue, you may choose to charge for certain web content types, for example, job postings. To setup pricing: | ||
| + | #Configure your web content list as described above. | ||
| + | #:[[File:Published packages 2020.jpg|600px|center]] | ||
| + | #In the '''Publishing Packages''' section, click the [[File:orange plus icon.jpg]] icon. | ||
| + | #:[[File:Add publishing package 2020.jpg|400px|center]] | ||
| + | #*'''Name''': Enter the name of this publish option. This will display publicly where web content items are submitted. | ||
| + | #*'''Published Duration (Days)''': Enter the number of days a web content item will be published if this pricing option is selected. '''NOTE:''' This will pre-pend the name of the publish option. | ||
| + | #:::*'''Goods/Service''': Select a previously created Goods/Service to assign to this item. The price will automatically be populated with the default. This can be over-written as needed. '''IMPORTANT''': Goods/Services must be setup of type '''Non-dues''' or '''Miscellaneous'''. | ||
| + | #*Click '''Done'''. Repeat the steps above to add additional submission options. | ||
| + | |||
| + | {| class="wikitable" | ||
| + | |- | ||
| + | | | ||
| + | [[File:Smallest.png|25px]] | ||
| + | | style="width: 100%"| '''Did you know...'''If you do not wish to charge your members, you can still use the '''Publishing Packages''' option to limit the length of time an item is published. Simply setup a '''Publishing Package''' with no pricing. | ||
| + | |} | ||
| − | ==Add A New Content Type List== | + | ==='''<span style="color:#800080">Add A New Content Type List'''</span>=== |
| + | ---- | ||
You may associate a new content type to existing content lists. For example, you may wish to have multiple '''News''' content lists, perhaps one for members and one for the public. | You may associate a new content type to existing content lists. For example, you may wish to have multiple '''News''' content lists, perhaps one for members and one for the public. | ||
| Line 35: | Line 105: | ||
#Select the '''Setup''' tab. | #Select the '''Setup''' tab. | ||
#Click the '''Add''' button. | #Click the '''Add''' button. | ||
| − | #:[[File:Add | + | #:[[File:Add content list 2021.jpg|600px|center]] |
#Configure the following settings: | #Configure the following settings: | ||
| − | #:*'''Content Type''' | + | #:*'''Content Type''': Select the common content type to which you want to associate this list. |
| − | #:*'''Name''' | + | #:*'''Name''': Enter a name for this list. This name will be displayed on the web-site and Info Hub. |
| − | #:*'''Plural Name''' | + | #:*'''Plural Name''': Enter the name for this list that will be used when it is to be plural. |
| − | #:*'''Description''' | + | #:*'''Description''': Enter a description of this list. This may be displayed on your web-site. |
| − | # | + | #See '''[[Web_Content#Configure_your_Web_Content_Types|Configure your Web Content Types]]''' for information on all additional settings. |
| − | # | ||
| − | |||
| − | |||
| − | |||
| − | |||
| − | |||
| − | |||
| − | |||
#Click '''Done''' to save the new content list type. | #Click '''Done''' to save the new content list type. | ||
| − | == | + | ==='''<span style="color:#800080">Add Custom Fields to your Content Lists'''</span>=== |
| + | ---- | ||
When you have created a content list type, default custom fields are included based on the type of content list you have created. For Example, the '''News''' content list type includes fields for '''Media Contact''', '''Related Links''', and '''Source'''. You may add additional custom field to meet your business needs. | When you have created a content list type, default custom fields are included based on the type of content list you have created. For Example, the '''News''' content list type includes fields for '''Media Contact''', '''Related Links''', and '''Source'''. You may add additional custom field to meet your business needs. | ||
| Line 70: | Line 133: | ||
#:*'''Custom Field Data Type''' - Select the type of data this field will hold. | #:*'''Custom Field Data Type''' - Select the type of data this field will hold. | ||
#:*'''Description''' - Optional, provide a description of this field. This is for informational purposes. | #:*'''Description''' - Optional, provide a description of this field. This is for informational purposes. | ||
| − | #:*'''Group/Section''' - | + | #:*'''Group/Section''' - N/A |
| − | #:*'''Characters Allowed''' - This option will be displayed if you have selected '''Text''' or '''Multi-line Text''' as the '''Custom Field Data Type''' and allows you to set the number of characters that may be entered. | + | #:*'''Characters Allowed''' - This option will be displayed if you have selected '''Text''' or '''Multi-line Text''' as the '''Custom Field Data Type''' and allows you to set the number of characters that may be entered. You must enter a value in this field. |
#:*'''Properties''' - Click the '''Required''' check-box if this custom field must be filled in. | #:*'''Properties''' - Click the '''Required''' check-box if this custom field must be filled in. | ||
#:*'''Advanced Options''' - Additional settings for this custom field may be configured by clicking the Advanced Options check-box. | #:*'''Advanced Options''' - Additional settings for this custom field may be configured by clicking the Advanced Options check-box. | ||
| Line 81: | Line 144: | ||
You may add additional custom fields as needed by repeating the steps above. | You may add additional custom fields as needed by repeating the steps above. | ||
| − | =Add Web Content from the Back Office= | + | ='''<span style="color:#800080">Add Web Content from the Back Office'''</span>= |
| + | ---- | ||
New web content may be added from the back-office, as well as in Info Hub. The following section describes how to add content from the back-office. | New web content may be added from the back-office, as well as in Info Hub. The following section describes how to add content from the back-office. | ||
| − | ==Add a News Item== | + | =='''<span style="color:#800080">Add a News Item'''</span>== |
| + | ---- | ||
News Items allow you to keep your members and the public up to date on the latest news and information about your members, community and association. News may be a list of announcements, articles, newsletters or any other type of post. | News Items allow you to keep your members and the public up to date on the latest news and information about your members, community and association. News may be a list of announcements, articles, newsletters or any other type of post. | ||
#Click '''Web Content''' in the Navigation Panel. | #Click '''Web Content''' in the Navigation Panel. | ||
| − | #Click the '''News Items''' tab. | + | #Click the '''News Items''' tab. If you have provided a custom name for News when creating your content types, your custom name will be displayed on the tab. In the image below, '''News''' has been renamed '''What's New'''. Additionally, if the '''News''' tab is not displayed, you will need to enable it as a content type. Refer to: '''[[Web_Content#Enabling_Common_Content_Types|Enabling Common Content Types]]'''. |
| − | + | #:[[File:Whats New.jpg|center]] | |
| − | #Click '''Add'''. | + | #Click the '''Add''' button. |
#On the '''General Tab''', configure the following: | #On the '''General Tab''', configure the following: | ||
| − | #: | + | #:'''Contact''' - Enter a Contact's name. The software's type ahead functionality will display options as you type. |
| − | #: | + | #:'''Content Status''' - Select status of this content. The content will not display on your web-sites until status is marked as '''Approved'''. |
| − | #: | + | #:'''Title'''/'''Subtitle''' - Enter a title and subtitle. Both of these will be displayed on your website. |
| − | #: | + | #:'''Tags''' - Add tags to enable filtering and searching. |
| − | #: | + | #:'''Description''' - Provide a description. This is the content of your news item. |
| − | #: | + | #:'''Search Description / Teaser Text''' - this is the description that will appear when the list of news items is initially displayed. |
| − | #: | + | #:'''Content Date''' - Enter the date the content was created. |
| − | #:'''Publish Start''' - Enter the date the content should | + | #:'''Publish Start''' - Enter the date the content should start being published to your web-site. |
| − | #:'''Publish End''' - Enter the end date for the publication of this content. | + | #:'''Publish End''' - Enter the end date for the publication of this content. '''Note:''' the '''Web Content Pre Expiration Notice''' automated email will be sent to the contact three days prior to the Publish End. Within the email will be a link, that will take them to the Info Hub where they could update the news item end date. |
#:'''Require Approval After Edit''' - if your designated staff must approve the content prior to publication, click this check-box. | #:'''Require Approval After Edit''' - if your designated staff must approve the content prior to publication, click this check-box. | ||
| − | #:'''Category''' - Select a category(s) from the list. | + | #:'''Category''' - Select a category(s) from the list. Categories provide a way for the public to search your news content, and also allow you to easily report and analyze on web content submissions. '''[[Web_Content#Setting_up_Content_Categories|Click Here]]''' for details on setting up categories. |
| − | #:'''Media Contact''' - This is | + | #:Custom Fields - default custom fields have been included for each content type. You may remove these fields when setting up your content types and add additional fields as desired. Refer to [[Web_Content#Customizing_Content_List_Types|Customizing Content List Types]] for details on adding custom fields. |
| − | #:'''Related Links''' - This is | + | #:*'''Media Contact''' - This is a default optional custom field. |
| − | #:'''Source''' - This is | + | #:*'''Related Links''' - This is a default optional custom field. |
| + | #:*'''Source''' - This is a default optional custom field. | ||
| + | #:*Additional Custom fields - any custom fields you have added to the content type will be displayed for configuration. | ||
#Click the '''Images''' tab to add images to your news item. | #Click the '''Images''' tab to add images to your news item. | ||
| − | #Click ''' | + | #:[[File:Add image CP.jpg|center]] |
| − | + | #*Click the [[File:Orange pencil Icon.jpg]] to drag & drop or upload an image. | |
| + | #:[[File:Image Manager 3 CP.jpg|center]] | ||
| + | #:*'''Crop & Save''' the image. | ||
| + | #Click '''Done''' when you have completed configuration of the news item. | ||
| − | ==Add a Blog== | + | =='''<span style="color:#800080">Add a Blog'''</span>== |
| + | ---- | ||
Blogs are a great way of engaging your members, and allowing them to have a voice. Additionally, blogs allow for immediate delivery of information. | Blogs are a great way of engaging your members, and allowing them to have a voice. Additionally, blogs allow for immediate delivery of information. | ||
| Line 129: | Line 200: | ||
#:*'''Content Date''' - Enter the date the blog was created. | #:*'''Content Date''' - Enter the date the blog was created. | ||
#:'''Publish Start''' - Enter the date the blog should start to be published to your sites. | #:'''Publish Start''' - Enter the date the blog should start to be published to your sites. | ||
| − | #:'''Publish End''' - Enter the end date for the publication of this content. | + | #:'''Publish End''' - Enter the end date for the publication of this content. '''Note''': the '''Web Content Pre Expiration Notice''' automated email will be sent to the contact three days prior to the Publish End. Within the email will be a link, that will take them to the Info Hub where they could update the blog end date. |
#:'''Require Approval After Edit''' - if your designated staff must approve the content prior to publication, click this check-box. | #:'''Require Approval After Edit''' - if your designated staff must approve the content prior to publication, click this check-box. | ||
| − | #:'''Category''' - Select a category(s) from the list. | + | #:'''Category''' - Select a category(s) from the list. Categories provide a way to report, search and filter blogs. '''[[Web_Content#Setting_up_Content_Categories|Click Here]]''' for details on setting up categories. |
#Click the '''Images''' tab to add images to your blog | #Click the '''Images''' tab to add images to your blog | ||
#Click '''Done''' when you have completed configuration. | #Click '''Done''' when you have completed configuration. | ||
| Line 137: | Line 208: | ||
<div class='note'>'''NOTE:''' If you have added custom fields to your content lists, these will also be displayed for you to configure. Refer to [[Web_Content&action=edit#Customizing_Content_List_Types|Customizing Content List Types]] for details on adding custom fields. </div> | <div class='note'>'''NOTE:''' If you have added custom fields to your content lists, these will also be displayed for you to configure. Refer to [[Web_Content&action=edit#Customizing_Content_List_Types|Customizing Content List Types]] for details on adding custom fields. </div> | ||
| − | ==Add a | + | =='''<span style="color:#800080">Add a Coupon'''</span>== |
| − | + | ---- | |
#Click '''Web Content''' in the Navigation Panel. | #Click '''Web Content''' in the Navigation Panel. | ||
| − | #Click the '''Coupons''' tab. | + | #Click the '''Coupons''' tab. '''NOTE:''' If you have renamed '''Coupons''' when setting up your content types, your custom name for coupons will be displayed on the tab. Additionally, if the '''Coupons''' tab is not displayed, you will need to enable it as a content type. Refer to: [[Web_Content#Enabling_Common_Content_Types|Enabling Common Content Types]]. |
| − | + | #:[[File:Add Coupon.jpg|center]] | |
#Click the '''Add''' button. | #Click the '''Add''' button. | ||
| + | #:[[File:Deal CP.jpg|center]] | ||
#On the '''General Tab''', configure the following: | #On the '''General Tab''', configure the following: | ||
#:*'''Contact''' - Enter a Contact's name. The software's type ahead functionality will display options as you type. | #:*'''Contact''' - Enter a Contact's name. The software's type ahead functionality will display options as you type. | ||
#:*'''Content Status''' - Select status of this deal. The content will not display on your web-sites until status is marked as '''Approved'''. | #:*'''Content Status''' - Select status of this deal. The content will not display on your web-sites until status is marked as '''Approved'''. | ||
#:*'''Title'''/'''Subtitle''' - Enter a title and subtitle. Both of these will be displayed on your website. | #:*'''Title'''/'''Subtitle''' - Enter a title and subtitle. Both of these will be displayed on your website. | ||
| − | #:*''' | + | #:*'''Short Description/Teaser Text''' - Add a short description of the coupon. The short description is displayed under the title on the search page, and is searched when the user enters search criteria on the coupons page. |
#:*'''Description''' - Provide a description. This will be published to your site. | #:*'''Description''' - Provide a description. This will be published to your site. | ||
| − | #:*'''Search Description / Teaser Text''' | + | #:*'''Search Description / Teaser Text''' - Enter the text that you wish to display when the coupon is shown in search. |
| − | #:*'''Content Date''' - Enter the date the | + | #:*'''Content Date''' - Enter the date the coupon was created. |
| − | #:*'''Publish Start''' - Enter the date the | + | #:*'''Publish Start''' - Enter the date the coupon is published to your web-site. |
| − | #:*'''Publish End''' - Enter the end date | + | #:*'''Publish End''' - Enter the end date the coupon will no longer be published to your web-site. '''Note''': the '''Web Content Pre Expiration Notice''' automated email will be sent to the contact three days prior to the Publish End. Within the email will be a link, that will take them to the Info Hub where they could update the coupon publication end date. |
#:*'''Require Approval After Edit''' - if your designated staff must approve the content prior to publication, click this check-box. | #:*'''Require Approval After Edit''' - if your designated staff must approve the content prior to publication, click this check-box. | ||
| − | #:*'''Category''' - Select a category(s) from the list. | + | #:*'''Category''' - Select a category(s) from the list. Categories will allow users and the public to easily search the coupons list. '''[[Web_Content#Setting_up_Content_Categories|Click Here]]''' for details on setting up categories. |
#:*'''Expire Date''' - This is an optional custom field. If you have removed the field from your '''Content List''' custom fields, it will not display for configuration. | #:*'''Expire Date''' - This is an optional custom field. If you have removed the field from your '''Content List''' custom fields, it will not display for configuration. | ||
#:*'''Promo Code''' - This is an optional custom field. If you have removed the field from your '''Content List''' custom fields, it will not display for configuration. | #:*'''Promo Code''' - This is an optional custom field. If you have removed the field from your '''Content List''' custom fields, it will not display for configuration. | ||
| − | #Click the '''Images''' tab to add images to your | + | #Click the '''Images''' tab to add images to your coupon. |
#Click '''Done''' when you have completed configuration. | #Click '''Done''' when you have completed configuration. | ||
| − | <div class='note'>'''NOTE:''' If you have added custom fields to your content lists, these will also be displayed for you to configure. Refer to [[Web_Content&action=edit#Customizing_Content_List_Types|Customizing Content List Types]] for details on adding custom fields. </div> | + | <div class='note'>'''NOTE:''' If you have added custom fields to your content lists, these will also be displayed for you to configure. Refer to '''[[Web_Content&action=edit#Customizing_Content_List_Types|Customizing Content List Types]]''' for details on adding custom fields. </div> |
| − | ==Add a Testimonial== | + | =='''<span style="color:#800080">Add a Testimonial'''</span>== |
| + | ---- | ||
Testimonials are a great way to attract new members, and retain existing members. | Testimonials are a great way to attract new members, and retain existing members. | ||
| Line 179: | Line 252: | ||
#:*'''Content Date''' - Enter the date the testimonial was created. | #:*'''Content Date''' - Enter the date the testimonial was created. | ||
#:'''Publish Start''' - Enter the date the testimonial should start to be published to your sites. | #:'''Publish Start''' - Enter the date the testimonial should start to be published to your sites. | ||
| − | #:'''Publish End''' - Enter the end date for the testimonial to be published. | + | #:'''Publish End''' - Enter the end date for the testimonial to be published. '''Note''': the '''Web Content Pre Expiration Notice''' automated email will be sent to the contact three days prior to the Publish End. Within the email will be a link, that will take them to the Info Hub where they could update the testimonial publication end date. |
#:'''Require Approval After Edit''' - if your designated staff must approve the content prior to publication, click this check-box. | #:'''Require Approval After Edit''' - if your designated staff must approve the content prior to publication, click this check-box. | ||
| − | #:'''Category''' - Select a category(s) from the list. | + | #:'''Category''' - Select a category(s) from the list. Categories provide a way to report, search and filter testimonials. '''[[Web_Content#Setting_up_Content_Categories|Click Here]]''' for details on setting up categories. |
#Click the '''Images''' tab to add images to your testimonial. | #Click the '''Images''' tab to add images to your testimonial. | ||
#Click '''Done''' when you have completed configuration. | #Click '''Done''' when you have completed configuration. | ||
| − | = | + | =='''<span style="color:#800080">Add a Job Posting'''</span>== |
| + | ---- | ||
| − | + | #Click '''Web Content''' in the Navigation Panel. | |
| + | #Click the '''Job Postings''' tab. '''NOTE:''' If you have renamed '''Job Postings''' when setting up your content lists, the name of the tab will reflect the your customized names for job postings. | ||
| + | #:[[File:Job Postings tab.jpg|1200px|center]] | ||
| + | #Click '''Add'''. | ||
| + | #:[[File:Add Job CP.jpg|center]] | ||
| + | #Configure the following: | ||
| + | #*'''Contact''':Enter the contact name. Type ahead functionality will search the database for you. This may be an individual or an organization. | ||
| + | #*'''Content Status''': Select the desired status. | ||
| + | #*'''Description''': Enter the job description. | ||
| + | #*'''Title''': Enter the job title. This will be displayed in the job postings search results. | ||
| + | #*'''Subtitle''': (Optional) Enter a subtitle. | ||
| + | #*'''Short Description / Teaser Text''': (Optional) Enter a short description of the job. The short description is displayed in the search results. The short description is also used when your job postings are searched. | ||
| + | #*'''Description''': Enter the description of the job. | ||
| + | #*'''Viewable Published Date''': This date is displayed with the job posting to notify the user of when the content was published. This is visible in the search results within the Info Hub. | ||
| + | #*'''Publish Start''': Enter the first day this job posting will be published. | ||
| + | #*'''Publish End''': Enter the last day this job posting will be published. '''Note''': the '''Web Content Pre Expiration Notice''' automated email will be sent to the contact three days prior to the Publish End. Within the email will be a link, that will take them to the Info Hub where they could update the job posting publication end date. | ||
| + | #*'''Require Approval After Edit''': If the user modifies content after it has been approved, select this check-box to require your approval of the change. | ||
| + | #*'''Categories''': (Optional) Select the desired category for this job posting. Categories provide a way to report, search and filter job postings. '''[[Web_Content#Setting_up_Content_Categories|Click Here]]''' for details on setting up categories. | ||
| + | #*'''Featured''': This option is available with v2 of the public modules. Enable this option if you would like to display "Featured" for this job on your web-site. If '''Featured''' is select, enter the '''Featured End Date'''. This will be the date the Featured tag will be removed. | ||
| + | #*'''Custom Fields''': If you have included custom fields, enter or choose the appropriate information. | ||
| + | #(Optional) Click the '''Images''' tab to upload an image for the job posting. | ||
| + | #Click '''Done'''. | ||
| − | # | + | =='''<span style="color:#800080">Encourage your Members to Submit Web-content'''</span>== |
| − | # | + | ---- |
| + | Members may enter web content via the Info Hub. Members who are given '''Full Control''' overall to the Info Hub, or '''Full Control''' to '''Info Hub Web Content''' may submit web content without requiring approval from your association. A member with '''Create''' access to '''Info Hub Web Content''' may enter web content, but your approval is required before the content will be made public. See '''[[Info_Hub#Setup_Info_Hub_Access|Setup Info Hub Access]]''' for further information on assigning permissions to your members. | ||
| − | ''' | + | A default email template, '''Encourage Posting of Deals, Jobs, News, Events''', has been provided in your database to be used to invite and encourage members to submit deals, jobs, events, etc. See '''[[Communications_Basics#View_a_Default_Email_Template|View Default Email Templates]]''' for further information on working with templates. |
| − | #Click '''Setup''' in the | + | ==='''<span style="color:#800080">Approve Web Content Submissions'''</span>=== |
| − | #Click ''' | + | ---- |
| + | |||
| + | Members may enter web content via the Info Hub. Members who are given '''Full Control''' overall to the Info Hub, or '''Full Control''' to '''Info Hub Web Content''' may submit web content without requiring approval from your association. A member with '''Create''' access to '''Info Hub Web Content''' may enter web content, but your approval is required before the content will be made public. See '''[[Info_Hub#Setup_Info_Hub_Access|Setup Info Hub Access]]''' for further information on assigning permissions to your members. | ||
| + | |||
| + | Association staff responsible for approving web-content should subscribe to the '''User Created or Modified Web Content''' email notification. As soon as a member submits web content a notification will be sent to the staff who can then go to the Web Content module to approve the content submission. For Example: The email below is sent when a new hot deal is added via the Info Hub. | ||
| + | |||
| + | [[File:Web Content Email Notification.jpg|center]] | ||
| + | |||
| + | To approve web-content: | ||
| + | |||
| + | #Click '''Web Content''' in the left hand navigation panel. | ||
| + | #Click the tab for the appropriate web content. For Example: click '''Hot Deals'''. '''NOTE:''' '''Hot Deals''' in this example is the customization for '''Coupon Deals''' content type. The tab is your software will display the name that you have entered for coupon deals content type. | ||
| + | #:[[File:Hot Deals for Approval.jpg|center]] | ||
| + | #:The '''Hot Deals''' tab will display all of your hot deals, the '''Content Status''' column displays the current state of the hot deal. | ||
| + | #Click the title of the hot deal you wish to approve. | ||
| + | #:[[File:Edit Hot Deal.jpg|center]] | ||
| + | #:On the edit screen, you can review the submission, make edits, and approve the submission. | ||
| + | #To approve the status of the submission, click the '''Content Status''' drop-down. | ||
| + | #Click '''Approved'''. | ||
| + | #Click '''Save'''. | ||
| + | |||
| + | {| class="wikitable" | ||
| + | |- | ||
| + | | | ||
| + | [[File:Smallest.png|25px]] | ||
| + | | style="width: 100%"| '''NOTE''': After staff approved web content, the '''Web Content Approved''' automated message will be sent to the user who submitted the content. | ||
| + | |} | ||
| + | |||
| + | ='''<span style="color:#800080">Create Web Content URL for your Web Page'''</span>= | ||
| + | ---- | ||
| + | |||
| + | |||
| + | #Click '''Setup''' in the left hand navigation panel. | ||
| + | #Click '''GrowthZone Pages''' in the '''Website''' section. | ||
#Click the '''Actions''' button for your CMS and select '''Module/Pages'''. | #Click the '''Actions''' button for your CMS and select '''Module/Pages'''. | ||
#Click '''Add Module'''. | #Click '''Add Module'''. | ||
| − | #:[[File:Add Module.jpg| | + | #:[[File:Add Site Module V2.jpg|800px|center]] |
#Configure the following: | #Configure the following: | ||
| − | # | + | #*'''Site Module Type''' - Select '''Content''' from the list. |
| − | #:*'''Content List''' - Select the desired content list. | + | #*'''Module Version''': Select the version (V1 or V2) that you wish to use for your web content pages. If V2 is selected, you can also select the '''Default Public Layout''' for your web-content (Small List, Medium List or Grid). |
| − | # | + | #*'''Content List''' - Select the desired content list. |
| − | # | + | #*'''Title''' - Enter a title for the new content. This title will be displayed on the web-site. |
| − | # | + | #*'''Relative Path''' - Enter a name for this content. This will be used to build the path for the content, recommendation is that this relative path be a shortened version of the title. For Example: If you have named this content "My Association Blog", you may simply enter "Blog" as your relative path. |
| + | #*'''Template''' - Select a design template from the list. The list will be populated with templates you have previously created. | ||
| + | #*'''Advertising''' - If using the Sponsorship Module, you may configure the Advertising Type that will be displayed at the '''Top of the Page''', and at the advertisement type to be displayed at the '''Bottom of the Page'''. | ||
#Click '''Done'''. Your new page will display on the list of '''Site Modules'''. | #Click '''Done'''. Your new page will display on the list of '''Site Modules'''. | ||
| + | #Click the hyper-link for your new page, to copy the url for the content. | ||
| + | |||
| + | ='''<span style="color:#800080">Public Subscription to Web Content'''</span>= | ||
| + | ---- | ||
| + | |||
| + | When you configure your Web Content for '''Allow Public Subscribers''', and include the content list on your web-page, a subscription link will automatically be displayed on the content page. See '''[[Web_Content#Add_A_New_Content_Type_List|Add a New Content Type List]]''' for information on configuring content for public subscription. | ||
| + | |||
| + | [[File:Content subscribe 2020.png|800px|center]] | ||
| + | |||
| + | Once subscribers click the subscribe link, they are prompted to enter their email and submit. An email is sent to the subscribers, within which is a link for to confirm the subscription. | ||
| + | |||
| + | [[File:Confirm subscription 2020.png|600px|center]] | ||
| + | |||
| + | In addition to the new email subscription list, any other lists to which the user has subscribed will be displayed. The user may choose to opt out of subscriptions as desired. '''NOTE:''' Each email notifying the subscriber of new content will also include your public disclaimer and opt-out option. See '''[[Communications_Basics#Configure_your_Unsubscribe_Message|Configure your Unsubscribe Message]]''' for information on the public disclaimer. | ||
| − | ''' | + | A list of category '''Content List Subscriptions''' will be dynamically created in your database the first time someone subscribes. The name of the list be '''Public Subscription for <name of content type>. |
| + | [[File:Public lists.jpg|center]] | ||
| − | + | ='''<span style="color:#800080">Web Content Report'''</span>= | |
| + | ---- | ||
| + | The Web Content Activity Report can be used to manage and analyze web content. See '''[[Reports#Web_Content_Activity_Report|Web Content Activity Report]]'''. | ||
Latest revision as of 12:18, 1 April 2021
NEW!! Find all of your answers in the GrowthZone Knowledge Base!
Contents
Web Content Overview
Web Content provides you with the ability to create pages on your website with templates for Blog, Coupon/Deals, Job Postings, News and other ideas you create. You may add additional content types as needed to your database, then include them on your web-site, or the Info Hub or both.
Ideas for Web Content Types:
- Job Postings – list of employment opportunities in your area. You may create separate content types, for instance, you may wish to showcase just your association postings on one page and have a separate type for your member postings.
- Coupons/Deals – list of specials or online coupons. You may have one type for members only and another page listing deals available to any website viewer.
- News – list of announcements, articles, newsletters or any other type of post. Create a news type for your association newsletters and create another for membership announcements.
- Blog – a simple posting feature for creating blog posts. Note: Blog does not currently contain ability to comment.
- Testimonials – share your membership stories. Include their logo/photo. Or use as a member of the month posting.
| Did you know... A default email template, Encourage Posting of Deals, Jobs, News, Events, has been provided in your database to be used to encourage contacts to submit deals, jobs, events, etc. See View Default Email Templates for further information on working with templates. |
Web Content Initial Setup
On installation of the software, standard content types (Job Postings, Coupons/Deals, News, Blog and Testimonial) are in your database. Content Types are used to organize your content on the web, as well as report and filter within the software. To begin using these, you will need to enable their use.
Setup Web Content Category Lists
When posting job, hot deals, etc. you will assign these to categories to make it easy for people to find what they are looking for. When setting up the category lists, they must be configured as "Can be Used Publicly.
To setup your categories:
- Click Setup in the left-hand navigation panel.
- Click Category Lists in the Categories section.
- Click the Add button.
- Select the desired content type from the Category Type list. For your web-content modules, select Job, Hot Deals, or Content.
- Enter a Name for the category list.
- IMPORTANT: Select the text box for Can be Used Publicly.
- Select the Is Active check-box to enable use of this list. If you no longer wish to use a category list, best practice is to de-activate the list.
- Enter a Description, this is optional.
- Click Done. Your new category list is now displayed.
- Populate your Category list with the desired categories:
- Click the hyper-link for the new category list.
- The Category Items dialog box will be displayed.
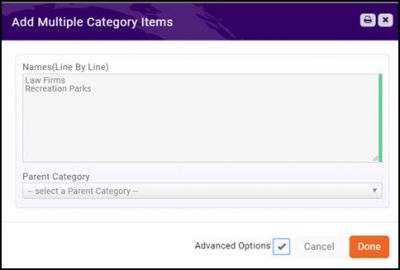
- Click Add to add an individual category OR click Add Multiple to add a list of items (shown below).
- Enter the names of your category items (one per line). If you have selected to add an individual item, you will only enter one item.
- Click Done.
Enable Web Content Types
GrowthZone has provided you with a variety of web content options. To use these, you must first enable the types that you wish to use.
- Click Web Content in the Navigation Panel.
- Click the Add Common Lists button.
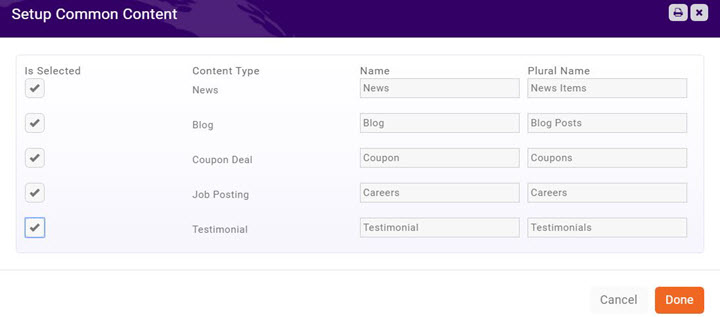
- Select the content types that you wish to enable on the Setup Common Content screen. NOTE: You may rename the lists to meet your business process. For Example: if you prefer you may change "Job Postings" to be listed as "Careers" instead of "Jobs".
- Click Done.
Once you refresh/reload the Web Content page, you will see that a new tab is created for each content type you add. If you have changed the name of the content lists, for example you have renamed Jobs to Careers, the tabs will reflect your customization. Once you have enabled web content list types, you can further configure those as described below.
Configure your Web Content Types
Additional configuration may be done on your web content types. You will be able to define where the web content is displayed, whether the public and/or members can submit, whether subscription to notifications is allowed, etc.
- Click Web Content in the Navigation Panel.
- Click the Setup tab.
- Click the hyper-link for the web content type you wish to configure.
- Subscription Notification Frequency: For those subscribed to this list, select when they will be notified of additions to the list. As It Happens provides an instant alert to the subscriber. Note: The database is seeded with three lists (Public Subscriptions for Hot Deals, Public Subscriptions for Job Postings, Public Subscriptions for Blog Posts) to which you may allow members and the public to subscribe. When new web content is approved, the automated email message Web Content Published will be sent to those who have subscribed.
- Category List: Select the category to which this list belongs. The category will be used for display on your web-page (For example, you could create a category for restaurants for Hot Deals; or a category called full-time for Job Postings), reporting and filtering. A new category may be created dynamically by clicking the + button.
- Options: These options allow you to define whether members, public or both may view/add to this list.
- Allow Public to Subscribe: Select this option if you wish to allow the general public to subscribe to this list. When selected, the public will be able to subscribe, and will become member of the public subscription lists (Public Subscriptions for Hot Deals, Public Subscriptions for Job Postings, Public Subscriptions for Blog Posts) dependent on the type of content list you are creating. When you display the content list on your public web-site the link Subscribe to receive Hot Deals notifications! will be included on the page. See Public Subscription to Web Content for further details.
- Visible in Info Hub: Select this option if you wish to display this list on Info Hub. If you are setting up Member to Member content, you would select this option and not selecting Allow Public Access option. When this option is selected the Optional Hub Icon field will be displayed. You may enter a a Font Awesome icon (Version 5) to be displayed on the navigation panel for this item in the Info Hub. For Example: Entering fa-shopping-basket will display a shopping basket in the Info Hub menu, as shown below. Visit the Font Awesome website for a complete list of icons. The icons you choose must be for supported FREE icons Version 5. Did you know...if you have enabled Show Public Web Content in your directory listing(s), this icon will be displayed on the member's directory listing. See Understanding Directory Display Settings for further information.
- Allow Info Hub Users to Submit: Select this option if you wish to allow your members to submit content for this list. If selected, a button will be displayed on Info Hub to allow them to do so. Dependent on the access level granted to the member, the content may be automatically approved or require approval from the back office.
- Custom Fields: Default custom field will be displayed. These will vary dependent on the web content type you are working with. You can remove these fields and add additional custom fields as needed.
- Once you have completed all of the configuration for your web content type, click Done.
Set Pricing for Web Content
To generate non-dues revenue, you may choose to charge for certain web content types, for example, job postings. To setup pricing:
- Configure your web content list as described above.
- In the Publishing Packages section, click the
 icon.
icon.
- Name: Enter the name of this publish option. This will display publicly where web content items are submitted.
- Published Duration (Days): Enter the number of days a web content item will be published if this pricing option is selected. NOTE: This will pre-pend the name of the publish option.
- Goods/Service: Select a previously created Goods/Service to assign to this item. The price will automatically be populated with the default. This can be over-written as needed. IMPORTANT: Goods/Services must be setup of type Non-dues or Miscellaneous.
- Click Done. Repeat the steps above to add additional submission options.
| Did you know...If you do not wish to charge your members, you can still use the Publishing Packages option to limit the length of time an item is published. Simply setup a Publishing Package with no pricing. |
Add A New Content Type List
You may associate a new content type to existing content lists. For example, you may wish to have multiple News content lists, perhaps one for members and one for the public.
- Click Web Content in the Navigation Panel.
- Select the Setup tab.
- Click the Add button.
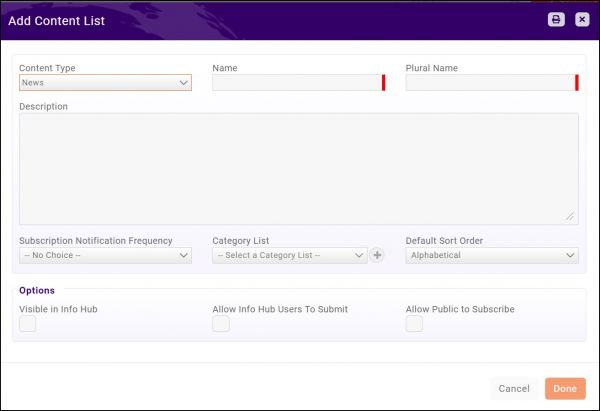
- Configure the following settings:
- Content Type: Select the common content type to which you want to associate this list.
- Name: Enter a name for this list. This name will be displayed on the web-site and Info Hub.
- Plural Name: Enter the name for this list that will be used when it is to be plural.
- Description: Enter a description of this list. This may be displayed on your web-site.
- See Configure your Web Content Types for information on all additional settings.
- Click Done to save the new content list type.
Add Custom Fields to your Content Lists
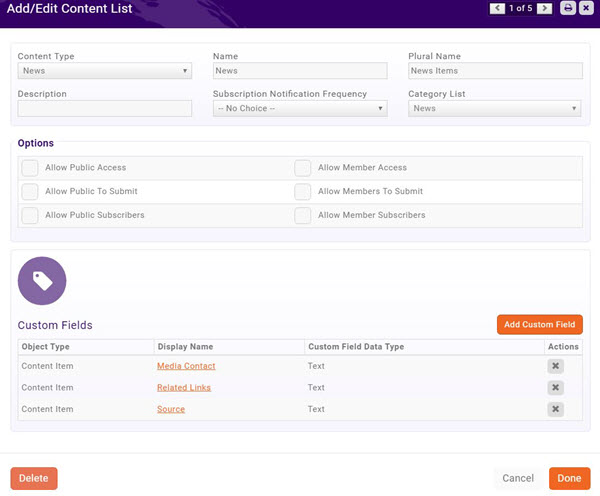
When you have created a content list type, default custom fields are included based on the type of content list you have created. For Example, the News content list type includes fields for Media Contact, Related Links, and Source. You may add additional custom field to meet your business needs.
- Click Web Content in the Navigation Panel.
- Click the Setup tab.
- Click the hyper-link for the list you wish to customize. The Add/Edit Content List screen will display.
-
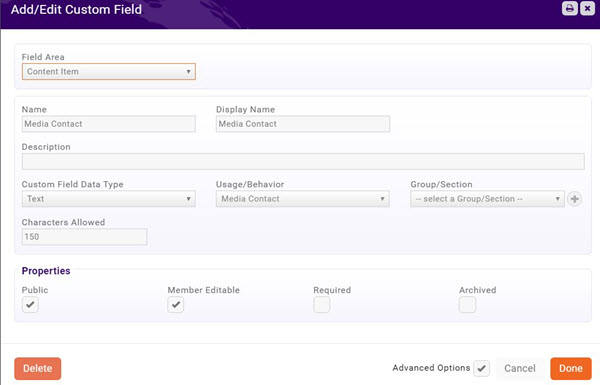
- A list of the custom fields that have already been included by default is displayed. If you will not be using the default custom fields, you can click the X button adjacent to the field to delete it. Alternately, if you would like to see how a default custom field is configured, click its hyper-link. And example of the Media Contact custom field is shown below.
-
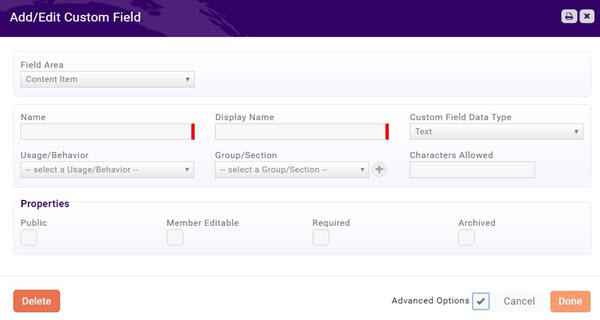
- Add additional custom fields by clicking the Add Custom Field button. The Add/Edit Custom Fields screen will display.
- Configure the following as needed:
- Field Area - Field Area will default to Content Item. Do not change this as your goal is to display this field in your content list.
- Name - Enter a name for this field. This is the database name.
- Display Name - This is the name that will display on the web-site/Info Hub.
- Custom Field Data Type - Select the type of data this field will hold.
- Description - Optional, provide a description of this field. This is for informational purposes.
- Group/Section - N/A
- Characters Allowed - This option will be displayed if you have selected Text or Multi-line Text as the Custom Field Data Type and allows you to set the number of characters that may be entered. You must enter a value in this field.
- Properties - Click the Required check-box if this custom field must be filled in.
- Advanced Options - Additional settings for this custom field may be configured by clicking the Advanced Options check-box.
- Member Editable - If you wish to allow members to edit the custom field in Info Hub, select this check-box.
- Public - Select this check-box if this field is to be displayed publicly.
- Archived - If you no longer wish to use this field, you may archive the field. This should be the option if you have previously used the field, and wish to maintain the historical data, rather than simply deleting the field.
- Click Done once you have completed the custom field.
You may add additional custom fields as needed by repeating the steps above.
Add Web Content from the Back Office
New web content may be added from the back-office, as well as in Info Hub. The following section describes how to add content from the back-office.
Add a News Item
News Items allow you to keep your members and the public up to date on the latest news and information about your members, community and association. News may be a list of announcements, articles, newsletters or any other type of post.
- Click Web Content in the Navigation Panel.
- Click the News Items tab. If you have provided a custom name for News when creating your content types, your custom name will be displayed on the tab. In the image below, News has been renamed What's New. Additionally, if the News tab is not displayed, you will need to enable it as a content type. Refer to: Enabling Common Content Types.
- Click the Add button.
- On the General Tab, configure the following:
- Contact - Enter a Contact's name. The software's type ahead functionality will display options as you type.
- Content Status - Select status of this content. The content will not display on your web-sites until status is marked as Approved.
- Title/Subtitle - Enter a title and subtitle. Both of these will be displayed on your website.
- Tags - Add tags to enable filtering and searching.
- Description - Provide a description. This is the content of your news item.
- Search Description / Teaser Text - this is the description that will appear when the list of news items is initially displayed.
- Content Date - Enter the date the content was created.
- Publish Start - Enter the date the content should start being published to your web-site.
- Publish End - Enter the end date for the publication of this content. Note: the Web Content Pre Expiration Notice automated email will be sent to the contact three days prior to the Publish End. Within the email will be a link, that will take them to the Info Hub where they could update the news item end date.
- Require Approval After Edit - if your designated staff must approve the content prior to publication, click this check-box.
- Category - Select a category(s) from the list. Categories provide a way for the public to search your news content, and also allow you to easily report and analyze on web content submissions. Click Here for details on setting up categories.
- Custom Fields - default custom fields have been included for each content type. You may remove these fields when setting up your content types and add additional fields as desired. Refer to Customizing Content List Types for details on adding custom fields.
- Media Contact - This is a default optional custom field.
- Related Links - This is a default optional custom field.
- Source - This is a default optional custom field.
- Additional Custom fields - any custom fields you have added to the content type will be displayed for configuration.
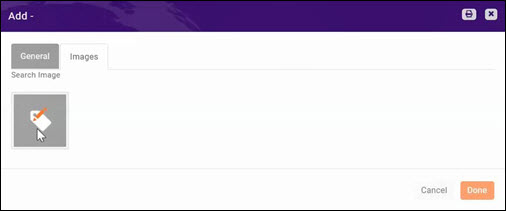
- Click the Images tab to add images to your news item.
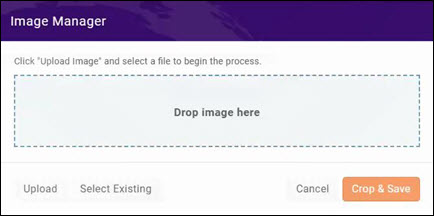
-
- Crop & Save the image.
- Click Done when you have completed configuration of the news item.
Add a Blog
Blogs are a great way of engaging your members, and allowing them to have a voice. Additionally, blogs allow for immediate delivery of information.
- Click Web Content in the Navigation Panel.
- Click the Blog tab.
- NOTE: If the Blog tab is not displayed, you will need to enable it as a content type. Refer to: Enabling Common Content Types.
- Click the Add button.
- On the General Tab, configure the following:
- Contact - Enter a Contact's name. The software's type ahead functionality will display options as you type.
- Content Status - Select status of this blog. The content will not display on your web-sites until status is marked as Approved.
- Title/Subtitle - Enter a title and subtitle. Both of these will be displayed on your website.
- Tags - Add tags to enable filtering and searching.
- Description - Provide a description. This describes the purpose of the blog and will be published to your site.
- Search Description / Teaser Text
- Content Date - Enter the date the blog was created.
- Publish Start - Enter the date the blog should start to be published to your sites.
- Publish End - Enter the end date for the publication of this content. Note: the Web Content Pre Expiration Notice automated email will be sent to the contact three days prior to the Publish End. Within the email will be a link, that will take them to the Info Hub where they could update the blog end date.
- Require Approval After Edit - if your designated staff must approve the content prior to publication, click this check-box.
- Category - Select a category(s) from the list. Categories provide a way to report, search and filter blogs. Click Here for details on setting up categories.
- Click the Images tab to add images to your blog
- Click Done when you have completed configuration.
Add a Coupon
- Click Web Content in the Navigation Panel.
- Click the Coupons tab. NOTE: If you have renamed Coupons when setting up your content types, your custom name for coupons will be displayed on the tab. Additionally, if the Coupons tab is not displayed, you will need to enable it as a content type. Refer to: Enabling Common Content Types.
- Click the Add button.
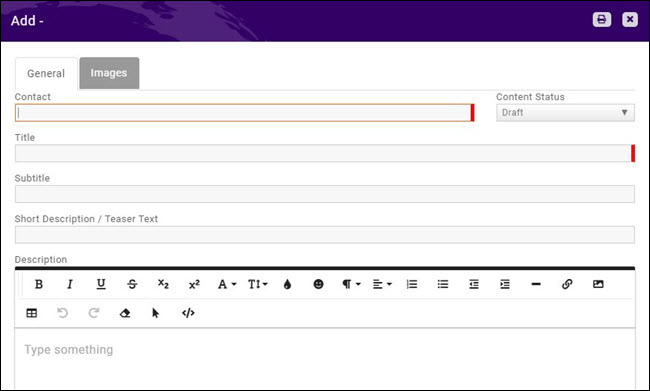
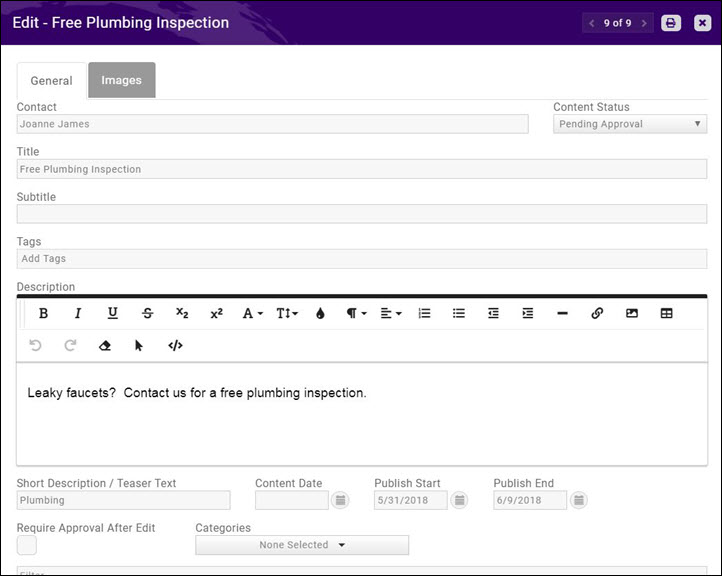
- On the General Tab, configure the following:
- Contact - Enter a Contact's name. The software's type ahead functionality will display options as you type.
- Content Status - Select status of this deal. The content will not display on your web-sites until status is marked as Approved.
- Title/Subtitle - Enter a title and subtitle. Both of these will be displayed on your website.
- Short Description/Teaser Text - Add a short description of the coupon. The short description is displayed under the title on the search page, and is searched when the user enters search criteria on the coupons page.
- Description - Provide a description. This will be published to your site.
- Search Description / Teaser Text - Enter the text that you wish to display when the coupon is shown in search.
- Content Date - Enter the date the coupon was created.
- Publish Start - Enter the date the coupon is published to your web-site.
- Publish End - Enter the end date the coupon will no longer be published to your web-site. Note: the Web Content Pre Expiration Notice automated email will be sent to the contact three days prior to the Publish End. Within the email will be a link, that will take them to the Info Hub where they could update the coupon publication end date.
- Require Approval After Edit - if your designated staff must approve the content prior to publication, click this check-box.
- Category - Select a category(s) from the list. Categories will allow users and the public to easily search the coupons list. Click Here for details on setting up categories.
- Expire Date - This is an optional custom field. If you have removed the field from your Content List custom fields, it will not display for configuration.
- Promo Code - This is an optional custom field. If you have removed the field from your Content List custom fields, it will not display for configuration.
- Click the Images tab to add images to your coupon.
- Click Done when you have completed configuration.
Add a Testimonial
Testimonials are a great way to attract new members, and retain existing members.
- Click Web Content in the Navigation Panel.
- Click the Testimonials tab.
- NOTE: If the Testimonials tab is not displayed, you will need to enable it as a content type. Refer to: Enabling Common Content Types.
- Click the Add button.
- On the General Tab, configure the following:
- Contact - Enter a Contact's name. The software's type ahead functionality will display options as you type.
- Content Status - Select status of this testimonial. The content will not display on your web-sites until status is marked as Approved.
- Title/Subtitle - Enter a title and subtitle. Both of these will be displayed on your website.
- Tags - Add tags to enable filtering and searching.
- Description - Provide a description. This is the testimonial, and will display on your web-site.
- Search Description / Teaser Text
- Content Date - Enter the date the testimonial was created.
- Publish Start - Enter the date the testimonial should start to be published to your sites.
- Publish End - Enter the end date for the testimonial to be published. Note: the Web Content Pre Expiration Notice automated email will be sent to the contact three days prior to the Publish End. Within the email will be a link, that will take them to the Info Hub where they could update the testimonial publication end date.
- Require Approval After Edit - if your designated staff must approve the content prior to publication, click this check-box.
- Category - Select a category(s) from the list. Categories provide a way to report, search and filter testimonials. Click Here for details on setting up categories.
- Click the Images tab to add images to your testimonial.
- Click Done when you have completed configuration.
Add a Job Posting
- Click Web Content in the Navigation Panel.
- Click the Job Postings tab. NOTE: If you have renamed Job Postings when setting up your content lists, the name of the tab will reflect the your customized names for job postings.
- Click Add.
- Configure the following:
- Contact:Enter the contact name. Type ahead functionality will search the database for you. This may be an individual or an organization.
- Content Status: Select the desired status.
- Description: Enter the job description.
- Title: Enter the job title. This will be displayed in the job postings search results.
- Subtitle: (Optional) Enter a subtitle.
- Short Description / Teaser Text: (Optional) Enter a short description of the job. The short description is displayed in the search results. The short description is also used when your job postings are searched.
- Description: Enter the description of the job.
- Viewable Published Date: This date is displayed with the job posting to notify the user of when the content was published. This is visible in the search results within the Info Hub.
- Publish Start: Enter the first day this job posting will be published.
- Publish End: Enter the last day this job posting will be published. Note: the Web Content Pre Expiration Notice automated email will be sent to the contact three days prior to the Publish End. Within the email will be a link, that will take them to the Info Hub where they could update the job posting publication end date.
- Require Approval After Edit: If the user modifies content after it has been approved, select this check-box to require your approval of the change.
- Categories: (Optional) Select the desired category for this job posting. Categories provide a way to report, search and filter job postings. Click Here for details on setting up categories.
- Featured: This option is available with v2 of the public modules. Enable this option if you would like to display "Featured" for this job on your web-site. If Featured is select, enter the Featured End Date. This will be the date the Featured tag will be removed.
- Custom Fields: If you have included custom fields, enter or choose the appropriate information.
- (Optional) Click the Images tab to upload an image for the job posting.
- Click Done.
Encourage your Members to Submit Web-content
Members may enter web content via the Info Hub. Members who are given Full Control overall to the Info Hub, or Full Control to Info Hub Web Content may submit web content without requiring approval from your association. A member with Create access to Info Hub Web Content may enter web content, but your approval is required before the content will be made public. See Setup Info Hub Access for further information on assigning permissions to your members.
A default email template, Encourage Posting of Deals, Jobs, News, Events, has been provided in your database to be used to invite and encourage members to submit deals, jobs, events, etc. See View Default Email Templates for further information on working with templates.
Approve Web Content Submissions
Members may enter web content via the Info Hub. Members who are given Full Control overall to the Info Hub, or Full Control to Info Hub Web Content may submit web content without requiring approval from your association. A member with Create access to Info Hub Web Content may enter web content, but your approval is required before the content will be made public. See Setup Info Hub Access for further information on assigning permissions to your members.
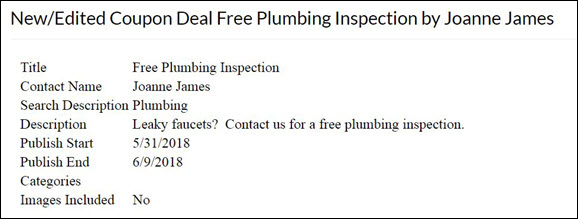
Association staff responsible for approving web-content should subscribe to the User Created or Modified Web Content email notification. As soon as a member submits web content a notification will be sent to the staff who can then go to the Web Content module to approve the content submission. For Example: The email below is sent when a new hot deal is added via the Info Hub.
To approve web-content:
- Click Web Content in the left hand navigation panel.
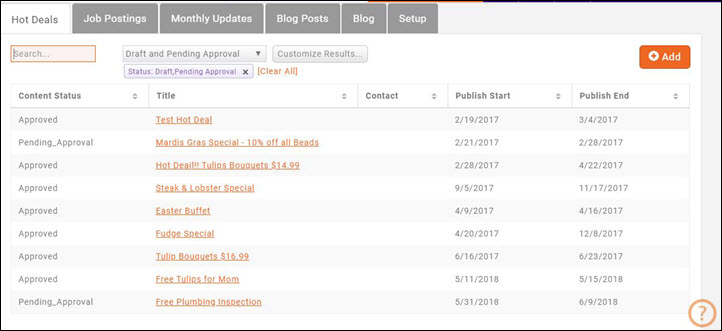
- Click the tab for the appropriate web content. For Example: click Hot Deals. NOTE: Hot Deals in this example is the customization for Coupon Deals content type. The tab is your software will display the name that you have entered for coupon deals content type.
- The Hot Deals tab will display all of your hot deals, the Content Status column displays the current state of the hot deal.
- Click the title of the hot deal you wish to approve.
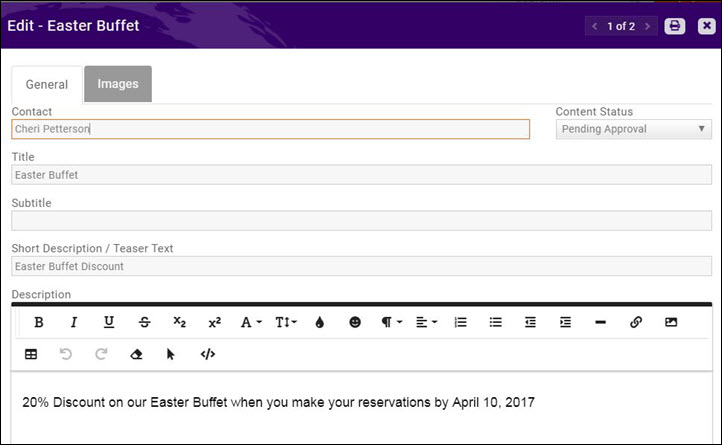
- On the edit screen, you can review the submission, make edits, and approve the submission.
- To approve the status of the submission, click the Content Status drop-down.
- Click Approved.
- Click Save.
| NOTE: After staff approved web content, the Web Content Approved automated message will be sent to the user who submitted the content. |
Create Web Content URL for your Web Page
- Click Setup in the left hand navigation panel.
- Click GrowthZone Pages in the Website section.
- Click the Actions button for your CMS and select Module/Pages.
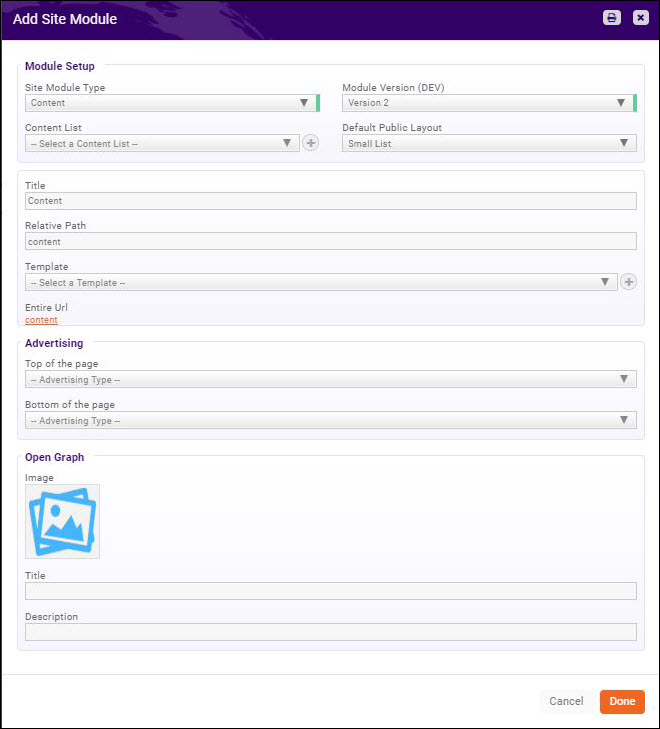
- Click Add Module.
- Configure the following:
- Site Module Type - Select Content from the list.
- Module Version: Select the version (V1 or V2) that you wish to use for your web content pages. If V2 is selected, you can also select the Default Public Layout for your web-content (Small List, Medium List or Grid).
- Content List - Select the desired content list.
- Title - Enter a title for the new content. This title will be displayed on the web-site.
- Relative Path - Enter a name for this content. This will be used to build the path for the content, recommendation is that this relative path be a shortened version of the title. For Example: If you have named this content "My Association Blog", you may simply enter "Blog" as your relative path.
- Template - Select a design template from the list. The list will be populated with templates you have previously created.
- Advertising - If using the Sponsorship Module, you may configure the Advertising Type that will be displayed at the Top of the Page, and at the advertisement type to be displayed at the Bottom of the Page.
- Click Done. Your new page will display on the list of Site Modules.
- Click the hyper-link for your new page, to copy the url for the content.
Public Subscription to Web Content
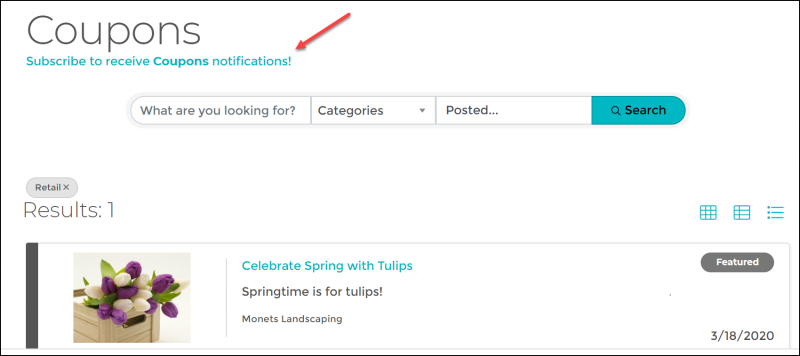
When you configure your Web Content for Allow Public Subscribers, and include the content list on your web-page, a subscription link will automatically be displayed on the content page. See Add a New Content Type List for information on configuring content for public subscription.
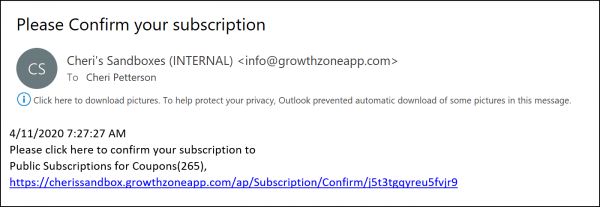
Once subscribers click the subscribe link, they are prompted to enter their email and submit. An email is sent to the subscribers, within which is a link for to confirm the subscription.
In addition to the new email subscription list, any other lists to which the user has subscribed will be displayed. The user may choose to opt out of subscriptions as desired. NOTE: Each email notifying the subscriber of new content will also include your public disclaimer and opt-out option. See Configure your Unsubscribe Message for information on the public disclaimer.
A list of category Content List Subscriptions will be dynamically created in your database the first time someone subscribes. The name of the list be Public Subscription for <name of content type>.
Web Content Report
The Web Content Activity Report can be used to manage and analyze web content. See Web Content Activity Report.


